Integrated Windows Authentication (IWA)
Introduction
If you select Windows as the authentication type for a user, they have to enter their Windows credentials when signing in. You can use Integrated Windows Authentication (IWA) to enable users to sign in automatically when their machine is already connected to the Windows domain. For this authentication type, additional configuration is required, which is described in this chapter.
-
Microsoft is phasing out NTLM in Windows. In environments that rely on NTLM for IWA, users may no longer be able to sign in once NTLM is disabled by default.
- Check the authentication protocol to find out which protocol you use.
- If you currently use IWA with NTLM, we recommend switching to OpenID Connect. If you need to keep IWA, consider switching to Kerberos to ensure continued automatic sign-in for users.
-
Browser policies are becoming stricter, which may affect how IWA is handled in modern browsers. See Configure the browser policy for more information.
We recommend using external authentication with OpenID Connect instead of IWA, as it is more secure and provides a better user experience. For more information about authentication types and how to select one, see Authentication.
Check authentication protocol
To check which authentication protocol is being used for IWA, follow these steps:
- On the client, run
klistto see whether a service ticket was issued for your service principal name (SPN). This confirms Kerberos. - On the server, check the Windows Security Log (Windows 10) or Event Viewer (Windows 11). In Event 4624, the field Authentication Package shows whether the logon used NTLM or Kerberos. See also Event 4624.
Set up IWA
Enable IWA
The option Windows Authentication is not installed by default in IIS. You can install it in the IIS Manager or through the Windows Features dialog.
To install Windows authentication through the Windows Features dialog:
-
In Windows, search Turn Windows features on or off.
-
In the Windows Features pop-up, go to Internet Information Services > World Wide Web Services > Security.
-
Select the checkbox Windows Authentication.
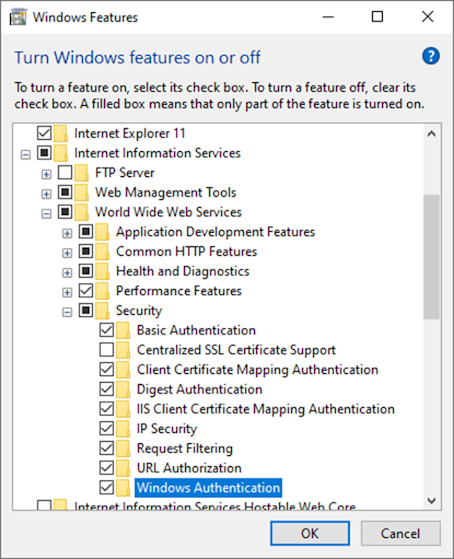 Enable Windows Authentication in Windows Features
 -
Select Ok. Wait for the installation to complete and close the pop-up.
-
Restart the server.
-
Open the IIS Manager. Go to Windows Authentication > Providers. Ensure Negotiate is listed as a provider at the top of the list. This allows Kerberos to be used for authentication instead of falling back to NTLM.
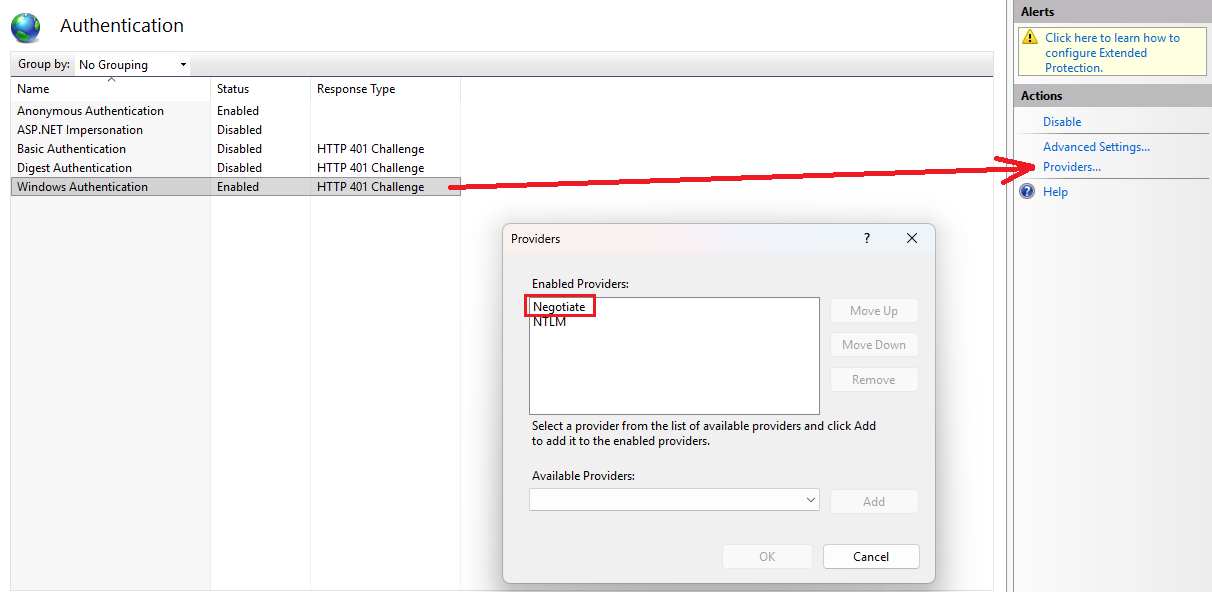 Check that 'Negotiate' is listed as a provider
Configure IWA in IIS
After installing Windows Authentication, configure it in the IIS Manager:
-
Open the IIS Manager, go to the Indicium web application, and double-click the Authentication section.
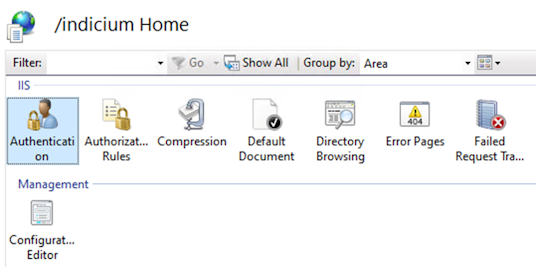 Select the Authentication section in IIS
In the Authentication section, you should see all supported authentication methods, including Windows Authentication. If you just enabled Windows Authentication, you may need to restart the server before it appears here.
-
Disable the Anonymous Authentication method and enable the Windows Authentication method.
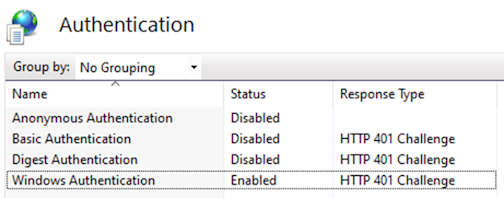 Enable Windows Authentication in IIS
 -
Go back to the overview of the Indicium web application in the IIS Manager and double-click the Configuration Editor.
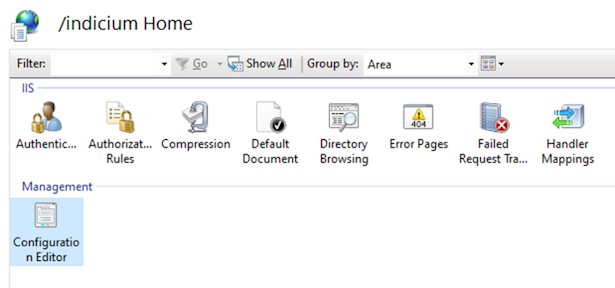 Open the Configuration Editor in IIS
 -
In the Configuration Editor, use the dropdown menu on the top left side to go to the section system.webServer/aspNetCore.
-
Set the configuration option forwardWindowsAuthToken to True.
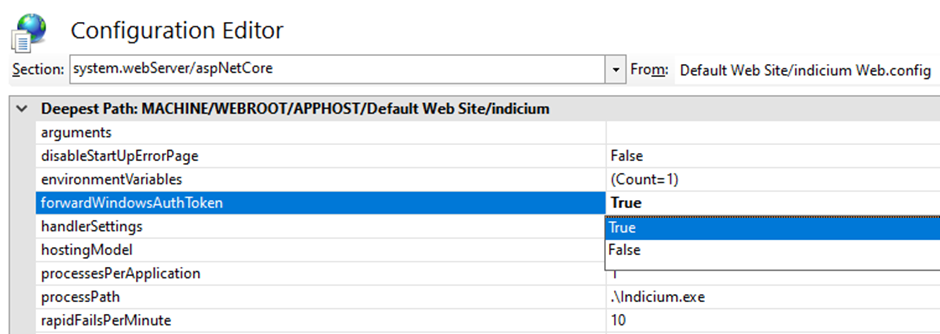 Set the configuration option forwardWindowsAuthToken to True
Configure the browser policy
Browsers only facilitate IWA for trusted websites. Configure the browser policy to allow the hostname of your Thinkwise application. For another way to trust a hostname, see No 'Sign in with Windows' button.
To configure this for Microsoft Edge or Chrome:
- Make the Administrative Templates available in Active Directory:
- For Microsoft Edge, use
msedge.admxandmsedge.adml. - For Chrome, use
chrome.admxandchrome.adml.
- For Microsoft Edge, use
- Configure a Group Policy Object (GPO) for AuthServerAllowlist.
- Allow the hostname of the Thinkwise application in this policy.
To configure this for Firefox:
- Make the Firefox Administrative Templates (
firefox.admxandfirefox.adml) available in Active Directory. - Configure a Group Policy Object (GPO) for Authentication.
- Add the hostname of the Thinkwise application to SPNEGO for Kerberos, or to NTLM for NTLM.
Grant user permissions
All users that are required to log in using IWA must have Read permissions on the web application folder of Indicium. To grant these permissions:
-
In the IIS Manager, right-click the Indicium web application and select Edit Permissions.
 Select Edit Permissions in IIS
 -
In the Properties dialog, go to the Security tab.
-
Select Edit.
-
Select the user or group of users that need to log in using Windows Authentication.
-
Select Add.
-
Select the checkbox Allow for the Read permission.
-
Select OK.
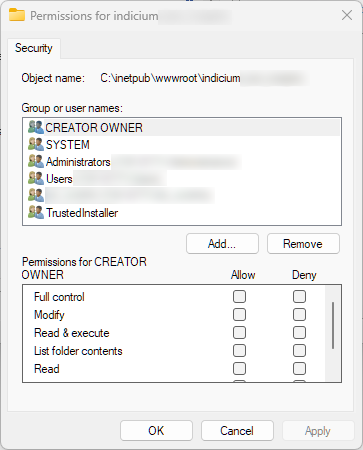 Edit user permissions in IIS
Check the login screen
After following the previous steps successfully, your Indicium web application has been configured to support Windows authentication. The login page should show the button Sign in with Windows.
If you do not see this login page right away, but instead get the standard browser login prompt, additional configuration is required. See No Sign in with Windows button.
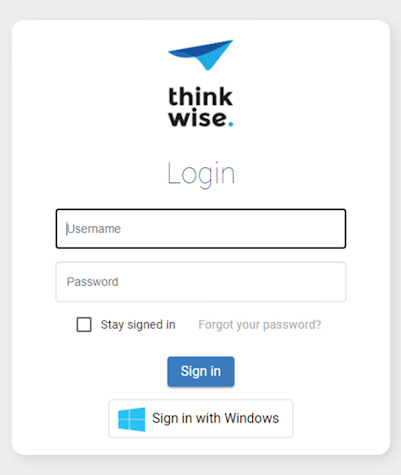 Login page with Windows authentication
Troubleshooting IWA
No 'Sign in with Windows' button
If you do not see the Sign in with Windows button on the login page, but instead get the default browser login prompt, you need to whitelist the hostname in your browser settings.
The reason is that, for security reasons, browsers only facilitate Windows authentication for trusted websites.
Chrome and Microsoft Edge by default consider all hostnames without a period (.) to be local (intranet) and will trust these addresses.
If your hostname is something like https://mysite.mycompany.com, you must whitelist this address first.
Firefox supports a similar whitelist.
A system administrator can whitelist the site in a group policy to apply it to all computers in the domain. This works for Microsoft Edge, Chrome, and Firefox. See Configure the browser policy.
To whitelist a hostname:
-
Open the Windows Internet Options.
-
Go to the Security tab.
-
Select Local intranet.
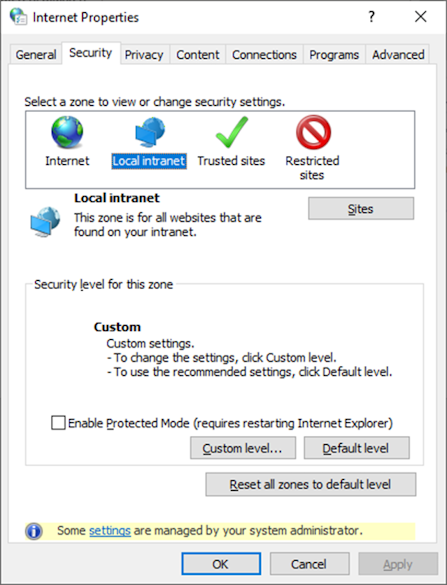 Open the Local intranet settings in Internet Options
 -
Select Sites.
-
Select Advanced.
-
Add the website (up to and including the hostname).
-
Clear your browser’s cookies and login information and try again. You should now see the Sign in with Windows button without being asked for credentials.