User preferences in the Windows user interface
Introduction to user preferences
The availability of and the features within the User preferences toolbar depend on the initial user settings, as applied by the administrator in IAM.
You can adapt your screen to your own needs in different ways:
- Self-learning user interface - The software recommends improvements, by analyzing your way of working. You can choose to accept or reject the recommendations.
- Start your favorite screens automatically - No more need to open your favorite screens manually every time you start your application.
- Select another language
- Adjust your active screen:
- Drag & drop - Many screen elements can be adjusted by dragging and dropping them.
- Select another screen type - Another layout might suit your needs better.
- Change the columns - Add relevant data columns, remove irrelevant data columns, or change the column order.
- Change the tab pages - By adding and removing tabs, it is possible to add relevant or to remove irrelevant detailed data.
- Start with an empty table - When you always start with filtering your data, it can save time to start with an empty table and the filter screen already opened.
- Adjust the search view in the Software Factory - This can help to improve search results.
- Adjust the filter - This can help to only show the data you need.
- Create or edit a prefilter - Create your own prefilters which you can turn on or off at will.
- Cube view settings - It's possible to set another default predefined cube view (pivot tables and graphs).
 User preferences toolbar
Self-learning user interface
By analyzing your way of working, the software can recommend improvements to your user interface which you can choose to accept or not.
Toolbar User preferences
- Press the Generate button to generate recommendations for improving your user interface.
- Next, press the Show button to show and, if desired, select and apply the recommendations.
Examples of suggestions are:
- Open frequently used screens automatically at the application start up.
- Open screens without data, if they are usually filtered immediately.
- Customize the filter and search pop-ups based on which fields are used or are not used.
- Save frequently used filters as standard (user defined pre-filters).
Example
If you frequently open the customer screen and then filter on a customer, a recommendation would be to (1) open the customer screen automatically, directly after the application has started. Furthermore, it would be recommended that (2) this screen will not immediately retrieve the customer details from the database, but directly display the filter screen. This is a combination of two recommendations that will lead to fewer manual actions.
In the chapters below, the manual settings for achieving this example will be explained (Start your favorite screens automatically and Start with an empty table).
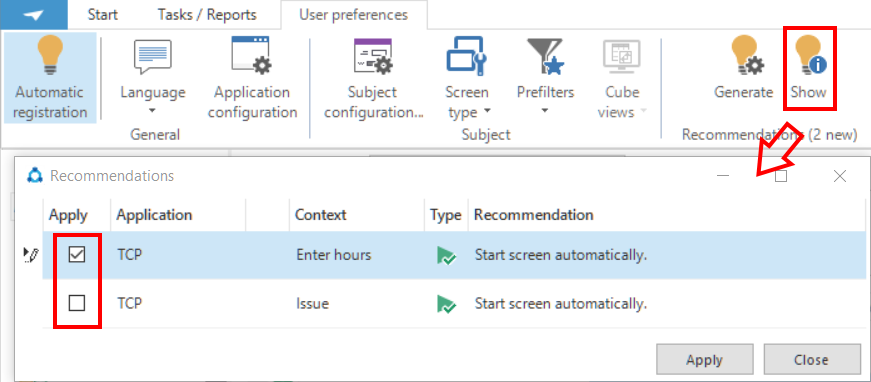 Show recommendations
Start your favorite screens automatically
Instead of opening your screens every morning manually, you can open screens and even extra applications automatically at the start of your application.
Toolbar User preferences
-
Press the Application configuration button.
The Application configuration screen pops up.
-
In the Load on start up column, check the boxes for the applications you wish to start automatically.
-
At the bottom of the pop-up, browse to a screen you wish to open automatically.
-
Drag it to the Start objects column.
-
If necessary, repeat this for more screens.
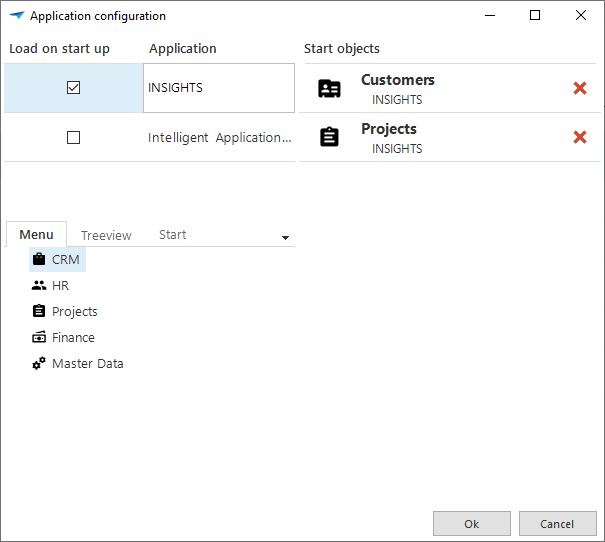 Application configuration via the toolbar
Start with an empty table
Loading a screen with a large table containing a lot of data, can take some time. If you always start with filtering the data, it is possible to start by default with an empty table and an open filter screen.
Toolbar User preferences > tab General
- Check the box for Open the table empty and show the filter screen.
By removing prefilters in an empty table all or part of the data will be shown again, depending on the prefilter.
Select another language
If your application is set up for several languages, you can change the language.
Toolbar User preferences
- Press the Language button.
- Select another language.
Your application will immediately switch to the selected language.
Language preferences drop down
Select another screen type
If another screen type suits your needs better, you can change it in two ways: via the toolbar and via the toolbar menu.
For each screen type, you can configure its availability. See Allow users to select a different screen type.
Select another screen type via the toolbar
Toolbar User preferences
- Press the Screen type button.
- Select another screen type.
If necessary, you can always return to the 'Original screen type' here.
Select another screen type via the toolbar menu
Toolbar User preferences > tab General
- In field Screen type, select another screen type.
If necessary, you can always return to the 'Original screen type' here.
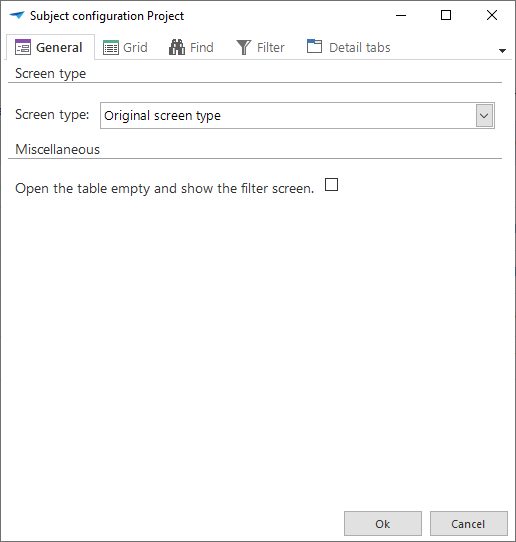 Subject configuration
Drag & drop elements in your screen
Many screen elements can be adjusted by dragging and dropping, to better suit your needs. To make sure that your application remembers these settings for the next session, take the following steps:
Toolbar User preferences
- Press the Automatic registration button.
- Now adjust your screens, such as the height or width of a form or grid, the column width or the status of the quick launch bar and the ribbon.
Change the columns
It is not only possible to drag and drop columns manually in the screen, but the column layout can also be adjusted via the menu. This offers more possibilities:
- Hide columns from view, if they contain irrelevant data to you.
- Change the column order, by putting what's most important first.
- Lock columns: locked columns will always be displayed in your screen, also when side-scrolling is used. This can be useful in a grid with a large number of columns.
Toolbar User preferences > tab Grid
- In the Visible column, only check the columns you wish to display.
- Drag and drop the columns up or down to change the order in which they must be displayed.
- In field Number of grid columns locked, select the number of columns you wish to lock.
Padlock
icons will appear from top to bottom, depending on the number you selected.
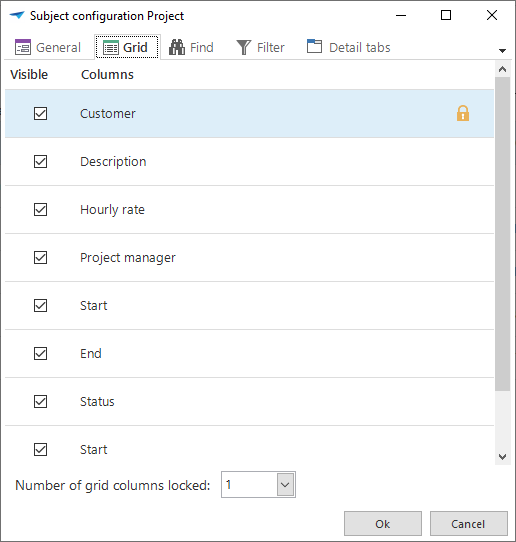
Change the tab pages
The detail tab pages can be adjusted in two ways:
- Hide tabs from view, if they contain irrelevant data to you.
- Change the tab order, by putting what's most important first.
Toolbar User preferences > tab Detail tabs
- In the Visible column, only check the tabs you wish to display.
- Drag and drop the tabs up or down to change the order in which they must be displayed.
Cube view settings
In a cube view, predefined cubes and graphs are available to be selected at will. The view will always start with the set default, though. This default can be changed. Furthermore, it's possible to save your own personal cube view.
Change the default cube view
Toolbar User preferences
-
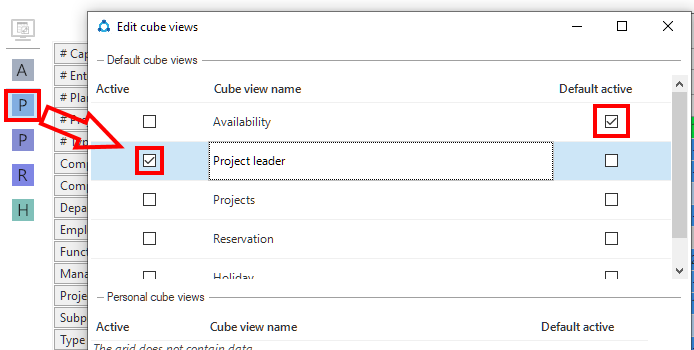
Press the Cube views button.
-
Select Edit cube views.
In the Active column, the currently active cube view is checked.
-
In the Default active column, select the cube view that should be active by default on opening your screen. Personal cube views can also be selected as default.
Create a personal cube view
Toolbar User preferences
- Press the Cube views button.
- Select Save cube views.
- In the Save cube view pop-up, check the Override existing checkbox only if this cube view should replace the existing one.
- If you don't want to lose the existing cube view, enter a new Cube view name and Description.
- Select the Default view type.
- If this view should be active on opening the screen, check the Default active box. Only one view can be default active.
Save cube view