Sort, search, and filter
In accordance with our Lifecycle policy, the Windows GUI is no longer supported from Thinkwise Platform version 2026.1 and higher. This means some features on this page are no longer supported. See Transition to the Universal UI for more information.
Introduction
This guide explains which features and components you can use for adding sort, search, and filter functionality to your end application that uses the the Windows user interface.
Sort
In a column, users can change the sort order by clicking the column header.
In addition, to sort data in a table, they can select Sort in the toolbar or from the context menu. In the pop-up, they can:
- Add or remove a field from the sort with the left
<<and right>>arrows. - Remove the sort order by selecting Clear.
- Re-apply the default sort by selecting Default.
- Change the sequence of the fields on which is sorted by selecting Up or Down.
- Set the sorting order (ascending or descending) by selecting Direction.
For its configuration, see:
 Pop-up for sorting
Search in a grid
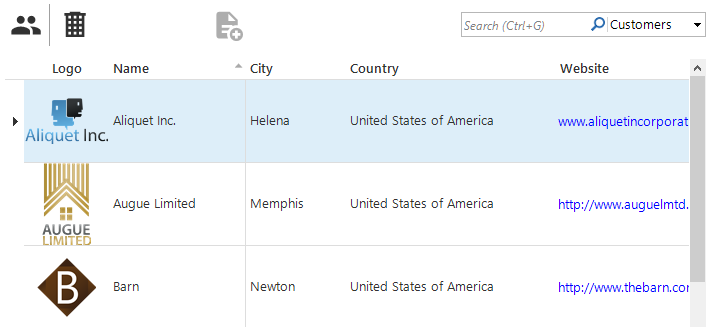
To find a specific word in a grid, users can enter the item they are looking for in the Search field. This field is permanently visible on a screen. It filters several columns at the same time. Hovering over the field shows the columns that are filtered. Only the rows that contain the requested word are shown.
- To remove the search term and its results, users can select Clear
 .
. - If not enough space is available to display the Search field, users can select
 .
.
To configure the Search configuration for your end application, see Search.
 Search field
Search in the menu
To find a specific menu item, users can enter the item they are looking for in the Menu search field. Only the menu items that contain the searched item are shown.
Filter (pop-up)
In the filter pop-up, users can set the operators and values for filtering the available fields.
The filter can be opened by users in two ways:
- Select Start > Filter > Filter in the ribbon
- Right-click in the grid and select Filter from the context menu.
In the pop-up, users can:
- Make the filter case sensitive, by selecting the checkbox Case sensitive.
- Prevent prefilters from interacting with the filter, by selecting the checkbox Clear prefilters. By default, one prefilter remains active, which can lead to certain data not being available.
- 3-tier Save the filter as a prefilter. The prefilter is added to the ribbon/context menu automatically and can be managed as such. Saving advanced filters is not possible.
To configure the filter for your end application, see:
 Filter pop-up
Filter expression
If the filter pop-up proves insufficient, the filter expression pop-up provides more options. Users can open the filter expression pop-up by selecting Start > Filter > Filter expression in the ribbon.
Then, they can can check a field value against corresponding values. By using filter expression, several values can be checked at once.
- A filter condition can be a single condition or a group of conditions.
- Relationships are created between (groups of) conditions. These relationships can be AND, OR, NOT AND or NOT OR.
Filter expressions cannot be created for the Web user interface.
The example below contains a filter for all projects with customers containing retail and descriptions containing support.
The results contain only projects with either an hourly rate greater than 100 or a status in progress or planned.
The tab Visual shows a tree structure with all filter conditions:
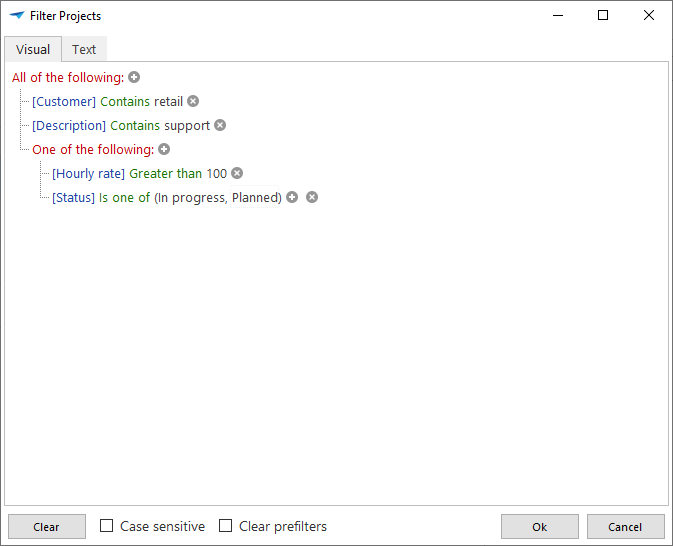 Filter expression visually
The same expression can also be created textually, in the tab Text.
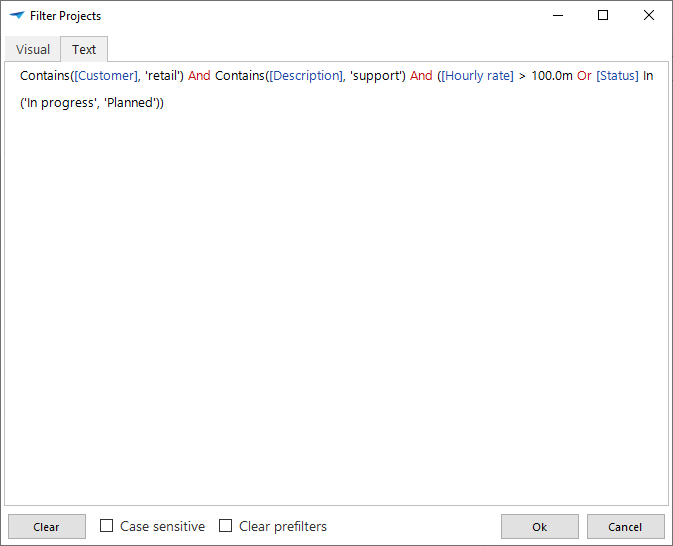 Filter expression textually
User-defined filter
Users can select which columns must be visible or not, and what the default filter conditions should be in a filter pop-up. The available columns and conditions are always in accordance with the open screen. They can find these options in the ribbon, under User preferences > Subject configuration > tab Filter.
- In the column Visible, users can select Always, Never or Extended. Extended means that the column is not displayed by default, but that the filter pop-up can be further extended to also display this column.
- In the column Default condition, users can select the default condition that should be displayed in the filter pop-up. If necessary, they can add another condition later to the filter pop-up.
Filter form
A Filter form is a screen component that you can add to a screen in your end application. For its configuration, see Screen types.
To users, a filter form is always visible in their screen, they can use it to filter data in the grid. The following conditions can be applied during filtering:
- Begins with (Text) - The data begins with the entered text.
- Does not begin with (Text) - The data does not begin with the entered text.
- Contains (Text) - The data contains the entered text, independent of whether this entered text is at the beginning or the end.
- Does not contain (Text) - The data does not contain the entered text, independent of whether this entered text is at the beginning or the end.
- Equal to (Text or Number) - The data is exactly the same as the entered text or numbers.
- Greater than (Text or Number) - The data needs to be greater than the entered number or text. Comparisons of text are performed alphabetically. Greater than B will exclude all words with an A. Greater than Be will exclude everything with Be and lower.
- Greater than or equal to (Text or Number) - The data needs to be greater than or equal to the entered number or text.
- Is empty - No data has been entered.
- Is not empty - Data has been entered.
- Less than or equal to (Text or Number) - The data must be less than or equal to the entered number or text.
- Less than (Text or Number) - The data must be less than the entered number or text.
- Not equal to (Text or Number) - The data is not the same as the entered text or numbers.
- Not between (Number) - The data does not lie inclusively between the entered starting and ending numbers.
- Between (Number) - The data lies inclusively between the entered starting and ending numbers.
Prefilter
To find a data set that meets specific criteria, users can toggle between predefined filters, called prefilters. Prefilters are similar to regular Filters, but do not allow user input. They only show rows that meet the criteria.
For example, for a screen with project details, you can define prefilters for the project status. You have defined prefilter In progress as active by default. If a user opens the screen, only the projects with status In progress are shown. They can disable this prefilter and select the prefilter Planned to see all the planned projects. Disabling all prefilters would show all the projects.
Users can activate a prefilter in three ways:
-
By selecting a prefilter button in the prefilter bar. The colored prefilter button indicates which prefilter is active.
 A filter and prefilter bar in the Windows GUI
 -
By selecting the Prefilters button in the toolbar, and then selecting a prefilter from the list.
-
By right-clicking in the grid and selecting a prefilter from the context menu.
To configure prefilters for your end application, see Prefilters.
 Prefilter in the toolbar
User preferences for prefilters
The Windows user interface can remember and apply a user's default prefilter state preference. For example, if a user deactivates a prefilter that was initially activated, and returns to the same screen, the prefilter will remain deactivated by default.
To configure the prefilter status, see User preferences availability.
User-defined prefilter
Users can create their own prefilters for their active screen in the ribbon under User preferences > Prefilters > Create prefilter. They can enable and disable this prefilter in the screen.
In the Create a prefilter pop-up, users can:
- Enter a Prefilter name.
- Select the checkbox whether the filter should be Active by default in their active screen.
- Create a Shortcut for this prefilter by selecting a keyboard combination.
- Create the filter by selecting conditions and values for every column they wish to include. Depending on the filter condition, a begin and end value can be entered.
The Clear button resets all the filter conditions and values to their original settings.
3-tier It is also possible to save a filter as a prefilter. Create an active filter, then add it as a prefilter via manage prefilters.
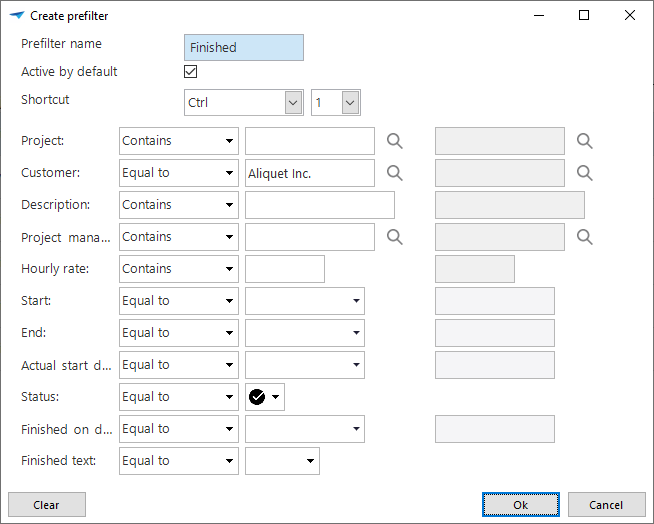 Create a prefilter
Manage prefilters
Users can edit a prefilter in their active screen.
Toolbar User preferences > Prefilters > Edit prefilter
In the Edit prefilters popup, users can:
- Select or clear the checkbox whether the filter should be Active. This means it is enabled or disabled in their screen.
- Select or clear the checkbox whether a prefilter should be Active by default.
- Select Edit
 to change the selected prefilter.
 - Select Delete
 to remove the selected prefilter.
 - Select Add
 to add a new prefilter.
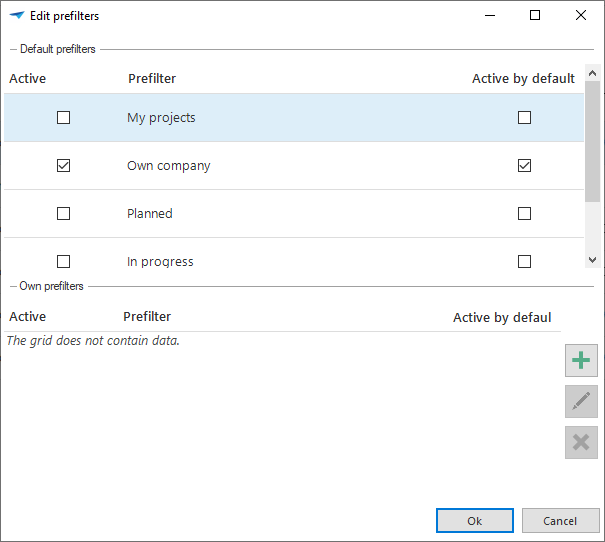 Edit prefilters
Quick filter
To filter for a specific value, users can right-click a cell to open the context menu and select Quick filter. The column of the selected cell is filtered against the value of the selected cell with the condition 'is equal to'. This is a fast way of filtering one a specific criterion.
The quick filter can be used successively several times on different columns. Additional filter conditions can be found in the filter pop-up.
When the quick filter is applied to a column for which a filter already has been defined, the first filter is cleared from that column.
The keyboard shortcut for the quick filter is Ctrl + Alt + R.
Filter in a column header
If a column contains a domain or lookup column with elements, users can filter the values from the grid header. For example, for column 'Invoices' with a COMBO control, users can filter in the header on 'Paid', 'Unpaid' and 'Overdue'.
See:
Remove all filters
To remove all filters, users can right-clicks in the screen and select Remove filter. This shows all the data again.
Quick search
With Quick search, users can select a cell in a grid and start typing the first letters of the word they are looking for. The selection jumps directly to the first occurence of the word.
It is also possible to do a quick search on whole words, by typing these one after another.
With a quick search it is easier to work with a sorted set. When a user searches, for example, for a name, it is useful to first sort the column alphabetically.
Only the current work screen is searched. For very large data sets, you can decide to not display all the data in the work area but, for example, only the first thousand records. A user can recognize this by the icon in the shape of two pages on the top left of the grid. In that case, they should first apply a filter to ensure that all the required data for the search is available in the screen.
Find
To find a word or value in the data visible on the screen, users can right-click a cell to open the context menu and select Find![]() .
In the pop-up, they can select for each column its condition and value.
.
In the pop-up, they can select for each column its condition and value.
- To make the search case sensitive, users can select the checkbox Case sensitive.
- If, after closing the Find pop-up, several records satisfy the criteria, users can select Find next or Find previous in the context menu.
For the Find configuration, see:
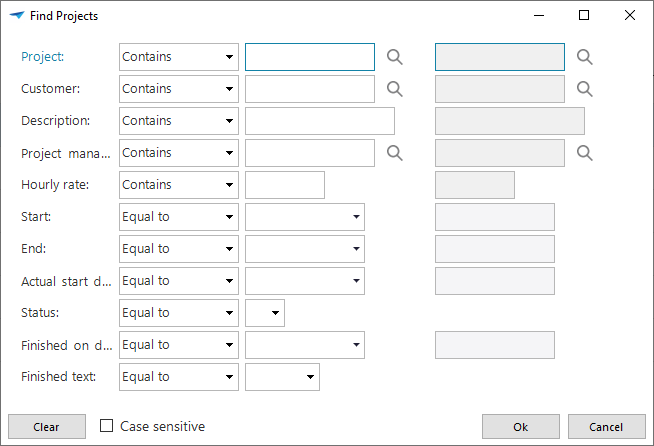 Search pop-up
User-defined Find
Users can define which columns must or must not be visible in the Find pop-up in the ribbon under User preferences > Subject configuration > tab Find. They can also indicate the default conditions for a field. The Find view is always dependent on the open screen.
Users can:
- Select the availability in the column Visible: Always, Never, or Extended. 'Extended' means that this column is not displayed by default, but that the Find pop-up can be further extended to also display this column.
- Select the Default condition for each column. If necessary, they can select another condition later in the Find pop-up.
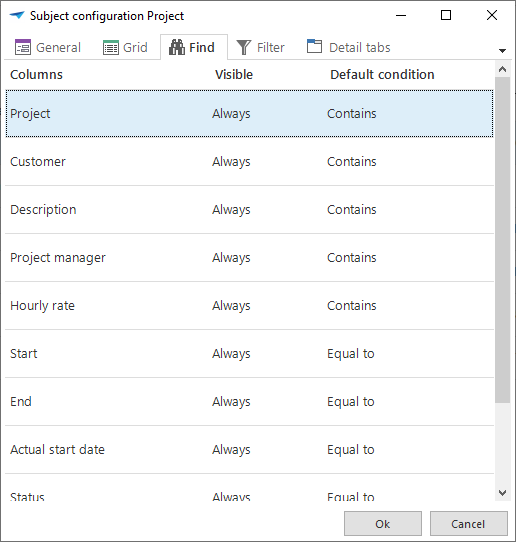 A user-defined configuration for Find