Basics in the Windows user interface
In accordance with our Lifecycle policy, the Windows GUI is no longer supported from Thinkwise Platform version 2026.1 and higher. This means some features on this page are no longer supported. See Transition to the Universal UI for more information.
The goal of this topic is to show you the available features of the Windows interface for a software application developed with the Thinkwise Platform.
This topic only deals with the standard Thinkwise capabilities such as the maintenance of data. Specific calculations and controls are beyond the scope of this topic.
Logging in
After starting the program by double-clicking the application icon, a login popup is shown to login, unless the application administrator setup the application to automatically authenticate users with their Windows credentials.
Password expired
If your password has expired then the following screen appears after logging in.
 Change password
If the password is successfully modified then the application starts up.
It can also be chosen to skip this page. The application will then start. The possibility to change the password will appear again the next time the user logs in.
Help
To support the user, it is possible to create a help document.
In this document the developer can specify what the various components within the application are used for.
The help can be accessed in two ways, via the menu bar under the Help ![]() button at the top right of the screen
and by selecting the F1 key at an arbitrary place in the application (see shortcuts).
button at the top right of the screen
and by selecting the F1 key at an arbitrary place in the application (see shortcuts).
Help via the menu bar
Help via the menu bar opens the Help in the main menu. This is the starting point for the user to search for himself via the content or via the search option. This method is particularly easy when general information about the program is sought.
Using Help
The help page appears when the help is opened.
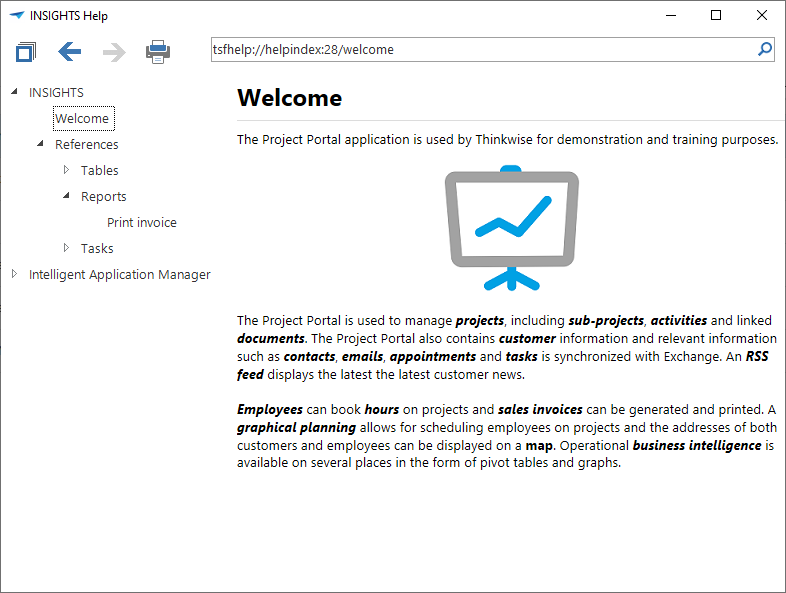 The help menu
This page is divided into a number of sections. There is a menu available on the left-hand side where the different sections (tables) can be found. When these are expanded the underlying information of the columns is available. The possibility to collapse all the table of contents is available in the toolbar at the top of the help screen.
The arrows can be used to navigate within the table of contents. This makes it possible to navigate forwards and backwards.
To be able to provide the help functionality on paper, it is possible to print it using the print icon in the toolbar.
Only the requested screen is printed, not the entire help document.
Navigation with the keyboard
The most obvious navigation method is with the help of the mouse cursor to navigate and the keyboard for data entry. It is however also possible to navigate with the keyboard. This is particularly of importance when working with large data volumes.
Shortcuts
| Shortcut | Meaning | Description |
|---|---|---|
| ↓ / ↑ | Go to next row in grid / Go to previous row in grid | Go to the next (↓) or previous (↑) row in a grid. |
| Ctrl + ↓ / Ctrl + ↑ | Go to next row in form / Go to previous row in form | Go to the next (Ctrl + ↓) or previous (Ctrl + ↑) row in a form. |
| Ctrl + ↓ / Ctrl + ↑ | Include next row in grid / Include previous row in grid | Include the next (Ctrl + ↓) or previous (Ctrl + ↑) row when selecting rows in a grid. |
| Ctrl + + | Add a row | Add a row to the grid or the input screen. When adding a new row, you can also use it to save the row and directly add a new one. |
| Ctrl + Alt + + | Copy a row | Copy a row. The current row is saved, and a new one directly added |
| Ctrl + - | Delete a row | Remove data from the grid or the input screen. |
| Ctrl + E | Edit a row | Edit data in the input screen. |
| Ctrl + Enter | Confirm a row | Save a newly added row. |
| Esc | Cancel | Cancel the processing of data entered in the input fields. |
| F5 | Refresh data set | Re-load the data set. Both the current table and the referred tables are refreshed. Only the selected row of higher level subjects is updated. The data in all sub-components is also updated. |
| Ctrl + Alt + E | Edit in grid | Edit several rows in the grid at the same time. |
| Ctrl + Shift + + | Resize grid columns | Give all columns on the screen the required width to completely display its data. |
| Ctrl + Shift + S | Default sort | Restore the sorting of columns to its original state. |
| Ctrl + S | Sort | Opens a pop-up in which a user can edit the column sorting sequence.. |
| Ctrl + Shift + I | Import | Import data into the screen. For more information, see Import. |
| Ctrl + Shift + U | Update | Mass update data in the screen. For more information, see Update. |
| Ctrl + Shift + E | Export | Export data from the screen. For more information, see Export. |
| Ctrl + F | Find | Search for specific data in the columns. A screen is opened where a user can enter the data they are searching. |
| Ctrl + Alt + R | Quick filtering | Filter the value of the selected cell in the grid. A user can do this multiple times on different columns, further reducing the data set each time. When re-applying the shortcut to a previously filtered column, the filter for that column will be disabled, excluding it from the filtering criteria. |
| Ctrl + R | Filter | Filter rows on a specific value or criteria of a column that the data must meet. Create a list of rows for which specific data meets the specified criteria. |
| Ctrl + Shift + R | Clear filter | Clear an active filter on a grid. |
| Ctrl + G | Search | Moves the focus to the Search field, which can be used to quickly search the data set for a combination of columns. |
| Ctrl + C | Copy to clipboard | Copy the selected rows from a grid to the clipboard. |
| Ctrl + L | Open the look up popup | When the user is editing data in the grid or form, open the look up popup of the active field. |
| Ctrl + P | Open print preview | Open the visible data in a print preview. |
| Ctrl + Space | Row and cell selection switch | Switch between selecting the cell or entire row when editing data in a grid. This can be used, for example, as a predecessing step when copying the contents of the cell or entire row. |
| F1 | Help (context-sensitive) | Go to the help that corresponds with the selected subject. A specific explanation can be found here about the selected field. When a tab instead of a field is selected then the help for the entire table is displayed. |
| Alt + Enter | New line in a text field | Start a new line in a text field. |
| Ctrl + select rows | Select non-consecutive rows | If the rows in a grid are not consecutive and it is necessary to select several rows. |
| Shift + select rows | Select consecutive rows | If the rows in a grid are consecutive and it is necessary to select several rows. |
| Ctrl + select menu item | Open new document | Re-open an already opened screen. |
| ↑ ← ↓ → | Switch between tab levels | Switch between the various levels of tabs. It is also possible to use the arrow keys, as a faster alternative for F6. These keys only work when the title of a tab is selected. |
| Alt + number | To form tab | Go to the form tab that corresponds with the provided number. |
| F3 / Shift + F3 | Find next row / Find previous row | Search for the next (F3) or previous (Shift + F3) row that meets the provided search criteria. |
| Ctrl + PgDn / Ctrl + PgUp | Go to next tab / Go to previous tab | Go to the next (Ctrl + PgDn) or previous (Ctrl + PgUp) tab in a form. |
| F6 / Shift + F6 | Select next component / Select previous component | Select the next F6 or previous (Shift + F6) component. This will change the focus, for example, from a tab, to a search bar, to a grid. |
| Tab / Shift + Tab | Go to next field in row and form / Go to previous field in row and form | Go to the next (Tab) or previous (Shift + Tab) input field or control button behind the input field. Using this does not include fields in the next or previous tab. |
| Ctrl + Home / Ctrl + End | Go to first row / Go to last row | Go to the first (Ctrl + Home) or last (Ctrl + End) row in a grid. |
| Enter / Shift + Enter | Go to next form field / Go to previous form field | Go to the next (Enter) or previous (Shift + Enter) field in a form, including fields in the next or previous tab. |
| Ctrl + Alt + F5 | Refresh model | Reloads the model, so modifications in the end product are immediately visible. This option is only available in the Developer mode. |
| Alt + F1 | Path location | Shows detailed information on the current screen and the focused component. This option is only available in the Developer mode. |
Shortcuts for the grid
The grid shortcuts can be in three different situations:
- Read only (non-edit mode)
- Edit (grid edit mode)
- Edit of a field (cell edit mode)
The following shortcuts can only be used in the grid. The action that is subsequently carried out, is dependent on the situation of the grid.
| Shortcut | Mode | Description |
|---|---|---|
| Home | Non-edit mode | Focus on the first field in the current row. |
| Grid edit mode | Focus on the first editable field in the current row. | |
| Cell edit mode | Focus on the first character in current cell. | |
| End | Non-edit mode | Focus on the last field in the current row. |
| Grid edit mode | Focus on the last editable field in the current row. | |
| Cell edit mode | Focus on the last character in current cell. | |
| Ctrl + Home | Non-edit mode | Focus on the first field in the first row. |
| Grid edit mode | Focus on first editable field in the first row. | |
| Cell edit mode | Focus on the first character in current cell. | |
| Ctrl + End | Non-edit mode | Focus on the last field in the last row. |
| Grid edit mode | Focus on the last editable field in the last row. | |
| Cell edit mode | Focus on the first character in current cell. | |
| Enter | Non-edit mode | Go to the next field. At the last field go to the first field on the next row. |
| Shift + Enter | Non-edit mode | Go to the previous field. At the first field go to the last field on the previous row. |
| Tab | Non-edit mode | Go to the next field. At the last field go to the first field on the next row. |
| Grid edit mode | Go to next field in the current row. At the last field go to the first field on the following row. | |
| Cell edit mode | Go to the next field. At the last field go to the first field on the next row. | |
| Shift + Tab | Non-edit mode | See Tab in opposite direction. |
| Grid edit mode | See Tab in opposite direction. | |
| Cell edit mode | See Tab in opposite direction. | |
| ↑ ← ↓ → | Non-edit mode | Navigate through the grid. |
| Grid edit mode | Navigate through the grid. | |
| Cell edit mode | Navigate in the cell. In the case of a drop down the next or previous value is selected. | |
| Alt + ↓ | Non-edit mode | - |
| Grid edit mode | - | |
| Cell edit mode | Opens the selection grid of the current drop down field. | |
| PgUp | Non-edit mode | Page up, hold same column. |
| Grid edit mode | Page up, hold same column. | |
| Cell edit mode | Page up, hold same column. | |
| PgDn | Non-edit mode | Page down, hold same column. |
| Grid edit mode | Page down, hold same column. | |
| Cell edit mode | Page down, hold same column. | |
| Single click | Non-edit mode | Select cell. |
| Grid edit mode | Select cell. | |
| Cell edit mode | Select cell. | |
| Double click | Non-edit mode | If the grid is a detail subject, a new screen opens with the current grid as main subject. |
| Grid edit mode | - | |
| Cell edit mode | - | |
| Esc | Non-edit mode | - |
| Grid edit mode | If record is changed, cancel changes otherwise go to grid in non-edit mode. | |
| Cell edit mode | Cancel changes. | |
| Ctrl + Enter | Non-edit mode | - |
| Grid edit mode | Save the current row. | |
| Cell edit mode | Save the current row. | |
| Ctrl + Alt + E | Non-edit mode | Place the grid in grid edit mode. |
| Grid edit mode | Save the row. Place the grid in non-edit mode. | |
| Cell edit mode | Save the row. Place the grid in non-edit mode. | |
| Del | Non-edit mode | - |
| Grid edit mode | Delete entire value from the cell. | |
| Cell edit mode | Delete selection or character. | |
| Backspace | Non-edit mode | - |
| Grid edit mode | Delete entire value from the cell. To cell edit mode. | |
| Cell edit mode | Delete character in front of the cursor. |
Glossary
To be able to work well with the program it is important that you recognize a number of definitions by name and understands what they mean.
This chapter contains a short explanation of the most important definitions.
Tree structure menu
The tree structure menu is a menu structure on the side of the screen. This allows the user to navigate to a specific section of the program.
Context menu
The context menu is the menu that appears when the user clicks on the right-hand mouse button in a form, grid, cube or graph. By clicking somewhere in the menu the described action is executed or you can initiate its execution.
Detail tab
The details belonging to a specific record are described on the detail tab.
Form
The data belonging to a specific record is clearly displayed in a form. The user can also edit the data in the form.
Main tab
The main tabs provide the possibility to quickly navigate between various open work screens. The subject of the associated work screen is shown on the main tab.
Button bar
The button bar is positioned at the bottom of a form. Using the button bar and with the help of the mouse cursor the user can navigate, add, edit and delete.
Grid
A grid is a summary of several records presented underneath each other.
Menu bar
The menu bar is the bar with buttons at the top the program. Each contains a number of options.
Maintaining data
Maintenance of data is the adding, editing or deleting of records.
Record
A record is a row of data about a certain subject.
Quick launch toolbar
The quick launch toolbar is a menu structure on the side of the screen. This allows the user to navigate to a specific section of the program.
Quick launch toolbar group
A quick launch toolbar group is a collection of subjects in the quick launch toolbar that are associated with each other in a specific way.
Field
A field is a place where information about a specific subject in a record is displayed or can be edited.
Work screen
The work screen is the screen in the application where the user can edit data.