Work overview
This menu item is only available if your user group is linked to the role Specification developer in IAM.
Introduction to work overview
Development teams can use the Work overview to describe, plan and keep track of development activities.
A work item describes what changes need to be made to a model. A change can be adding something new to a model, updating a model, or removing unused parts of the model. Additionally, work can be used to describe other development activities, such as deployment.
Create a work item
menu Specification > Work overview > tab Form > tab Work item
- Enter the required information.
After creating a work item, tasks are available for changing information in a work item.
 Create a work item
Change the work status
To keep track of the implementation progress, each work item has a Work status.
menu Specification > Work overview > tab Form > tab Work item
- Execute the task Move work status to state
 to update the status of a work item.
Create a work item status
The values for work status can be configured freely.
Advanced menu > Master data > Specification > Work statuses
- Add
 a work status.
 - Enter a Name and Description.
- Enter a Progress value. This value is used for determining the average progress of all work items linked to a requirement, business process, feature, or iteration. Work with a status without a progress value is excluded from this calculation.
- Enter the Sequence no. This number decides the order of the statuses in the combo box when changing the status.
- If a work status should correspond to a certain lane in the taskboard, specify the Taskboard lane no (1-5). When left empty, work with this status will not show up in the taskboard.
- It is possible to define a status as Inactive. If a work item gets an inactive status, it means that no more work is performed on it. By default, inactive work items will not be shown in the business process, feature, iteration overviews, and impact analysis tabs.
One default status is required. To set it, select a status and execute the Set as default status ![]() task.
task.
 A configured work status
Assign a work item to a developer
It is possible to assign a work item to a developer.
Advanced menu > Master data > Specification > Work statuses
- Execute the Assign work item
 task.
task.
To unassign a work item, execute the same task and clear the Assigned to field in the task popup.
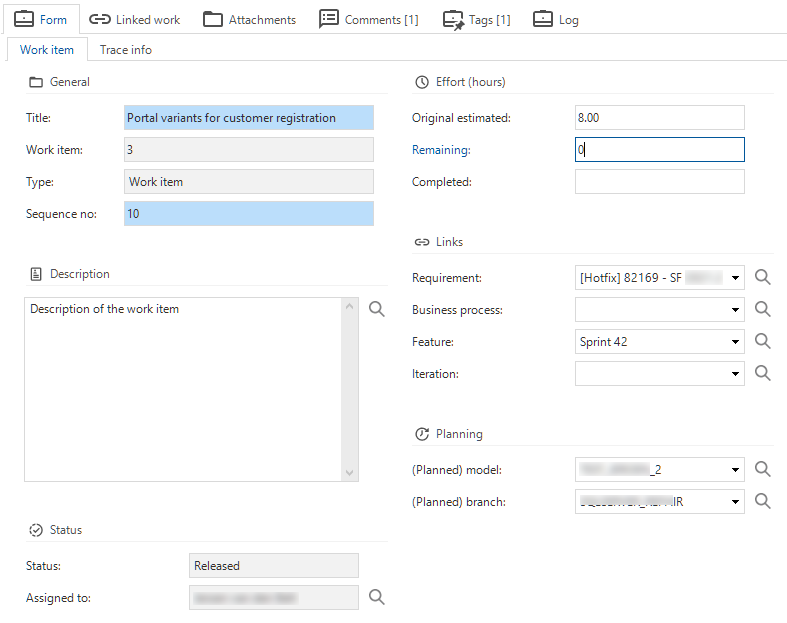
Effort for a work item
menu Specification > Work overview > tab Form > tab Work item
To be able to make an estimation and to keep track of the remaining hours, work items contain the fields Original estimated, Remaining, and Completed.
 Fields for work effort in hours
The sum of the remaining work will be shown in the linked requirement and iteration.
Link a work item to a requirement
menu Specification > Work overview > tab Form > tab Work item
Requirements generally lead to work. When a requirement is not yet implemented, work can be used to describe how the requirement will be implemented. When a requirement is changed, work can be used to describe the required changes in a model.
See Linked work in the Requirements manual.
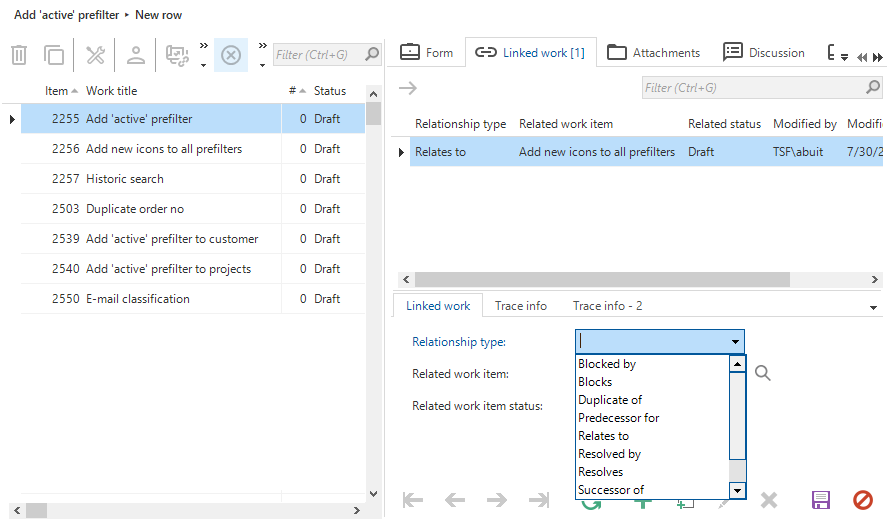
Link a work item to another work item
It is possible to define relationships between two work items. This link will be shown in the Linked work tab for both work items.
menu Specification > Work overview > tab Linked work
Relationships can be bi-directional or uni-directional:
- Bi-directional - When a work item relates to another, the latter work item also relates to the former. For example, Relates to.
- Uni-directional - When a work item is a predecessor of another work item, the latter is a successor of the former. For example, Predecessor of.
It is not possible to link work to itself.
By default, the Software Factory is shipped with the common relationship types. However, you can configure your own types of relationships between work and their directions in the Advanced menu > Master data > Specification > Work relationship types.
 Links between work
Link a work item to a (future) model or branch
To plan when a work item will be developed, you can assign a model and branch to it. This does not need to be an existing model or branch but can also be a model or branch intended to be created in the future.
By default, all changes in the branch compared to a previous model version are assigned to all work items linked to this model version. This is called implicit work linking. By changing the assigned branch of the work, the implicit links with the previous model version are lost.
menu Specification > Work overview > tab Form > tab Work item
- Execute the Link (planned) branch
 task.
task. - Select a Model or Branch. Or, to link to a future model or branch, select the checkbox(es) and enter a name. Any name chosen here is not binding and only serves as an indication that the work will take place in a future branch.
 Link a work item to a (planned) model or branch
It is also possible to enter the (Planned) model and (Planned) branch fields in the Form.
Create a new (future) model or branch
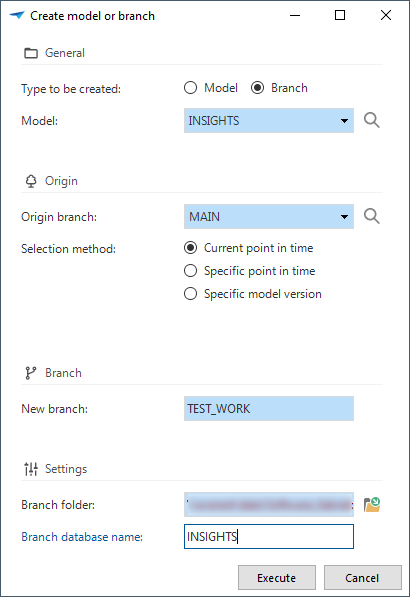
If a work item is linked to a planned (future) branch, you can create this branch directly from the Work overview screen.
Each work item that is selected when a new model or branch is created will be linked to the newly created model or branch.
menu Specification > Work overview > tab Form > tab Work item
- Select the work item(s) that you want to link to the new model or branch.
- Execute the Create model or branch
 task.
task.
This task is not available if the linked branch already has been created or if work is linked to an existing branch.
-
The task provides two options:
- Create new model: enter a Model name, Description, Branch, and RDBMS type.
- Create new branch: select a Model and Origin branch, and the selection method for a point in time on which you want to base the new branch. Then, enter a New branch name, a Branch folder, and a Branch database name.
 Create new branch task
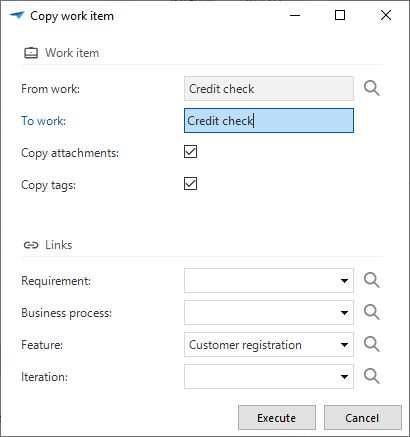
Copy a work item
It is possible to copy a work item.
menu Specification > Work overview
- Execute the task Copy work item
 .
. - Enter a new name in the field To work.
- Select the checkboxes if you want to Copy attachments and Copy tags.
- By selecting a requirement, business process, iteration and feature the work item will be assigned to these items. If these fields are empty, the work item will be created as an unassigned item in the respective tree.
 Copy work item task pop-up
Add an attachment to a work item
menu Specification > Work overview > tab Attachments
Files can be uploaded as attachments to a work item.
Add a comment to a work item
menu Specification > Work overview > tab Comments
The Comments tab can be used to leave comments regarding work.
Use the prefilter Contains unresolved comments ![]() to only show the work items with unresolved comments.
to only show the work items with unresolved comments.
Add tags to a work item
menu Specification > Work overview > tab Tags
To quickly and freely categorize work, tags are available.
Work item log
menu Specification > Work overview > tab Log
The work log records all changes to the links, title, description, status, and attachments of a work item.