Validations
Thinkwise provides a comprehensive set of validations within the Software Factory. Validations are carried out on the model to check for errors. These errors are pre-defined and specified by Thinkwise in a base model. Consider, for instance, a requirement that a primary key always has to be at the top of a table and that each table has to have a standard sort sequence. You can also create your own company or product-specific validations.
View validations
Every step of the development process in the Software Factory has a Validations tab where you can execute the validations for that modeler. So, you can validate your application before synchronization to IAM or deployment.
You can choose to view all validation messages in the tree or in a detail tab to keep the tree more compact:
- If a validation contains more than 25 messages, a node is added to the list. Select the node > to expand the list.
- To show all messages in a detail tab instead of the tree, select a validation and use the prefilter
Hide messages
 .
The Validation messages detail tab contains the same tasks, prefilters, and
Related object tab as the validation messages in the tree. In addition, it provides more options to filter specific messages than the tree.
.
The Validation messages detail tab contains the same tasks, prefilters, and
Related object tab as the validation messages in the tree. In addition, it provides more options to filter specific messages than the tree.
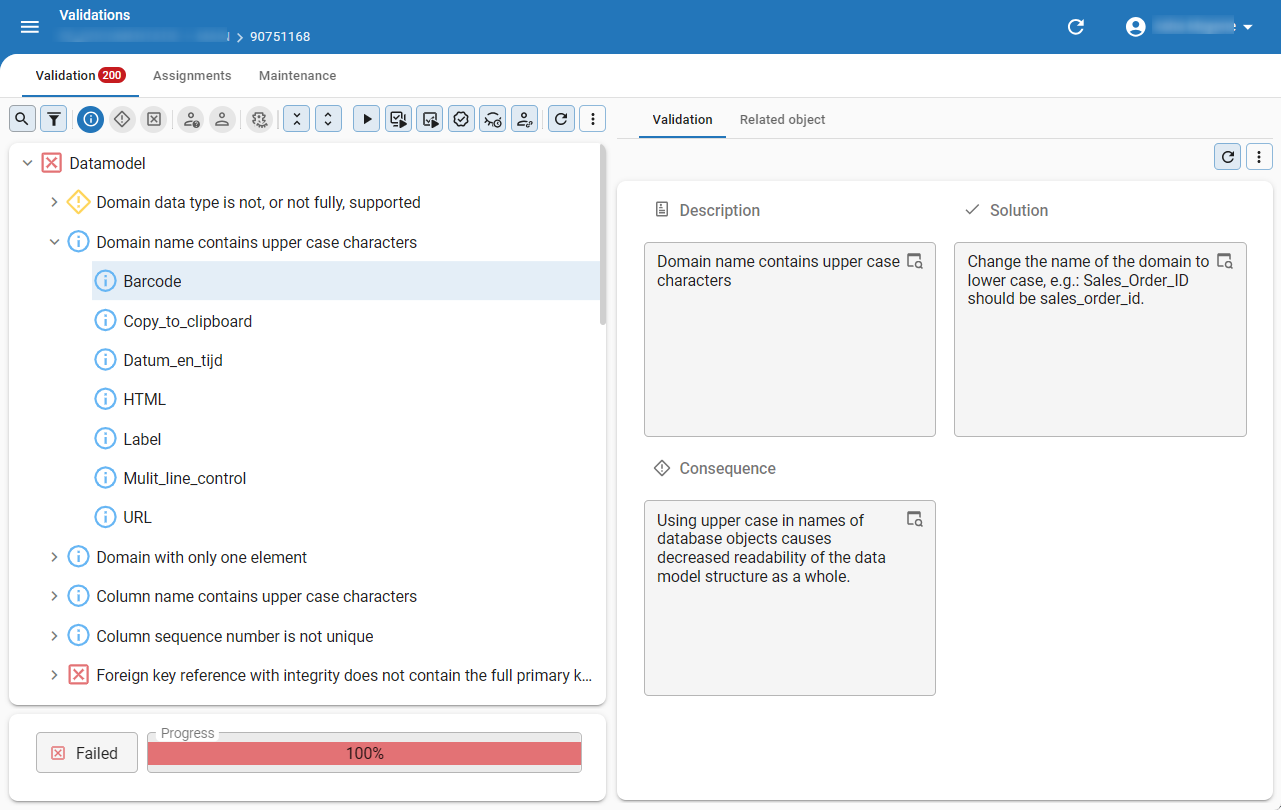 Validation messages in detail tab
Execute a validation
menu Quality > Validations
You can execute a validation at various levels using the following tasks. Multiple validation jobs can be active at once for a branch.
 Execute all validations.
 Execute group - Executes all validations of the selected validation group.
 Execute selected - Executes the selected validation.
Validation status
After execution, an icon indicates the status of each validation. Thinkwise strongly advises to solve all information, warning, and error messages.
menu Quality > Validations
| Pictogram | Status | Description |
|---|---|---|
| OK | No problems found. | |
| Information | Possible problem that is not breaking, but solving it will improve the user experience. | |
| Warning | Possible problem. Check the problem and solve it. | |
| Error | Problem must be resolved. | |
| Unknown | Validation not executed or subject to re-validation |
Prefilters for validations
Prefilters are available to filter the validation messages:
menu Quality > Validations
 Info, warning and error - Shows messages at the information level and higher.
 Warning and error - Only shows messages at the warning level and higher.
 Error - Only shows error messages.
 Unassigned - Only shows messages that are not assigned to anyone.
 Assigned to me - Only shows messages assigned to the current user.
- Hide messages - Hides validation messages.
 New messages in this branch - Only shows messages that are new in this branch. For
this filter to work, the previous branch must be validated.
New messages in this branch - Only shows messages that are new in this branch. For
this filter to work, the previous branch must be validated.
Assign a validation
To assist in resolving validation messages, you can assign messages to specific developers. Use prefilters to view your own or unassigned validation messages.
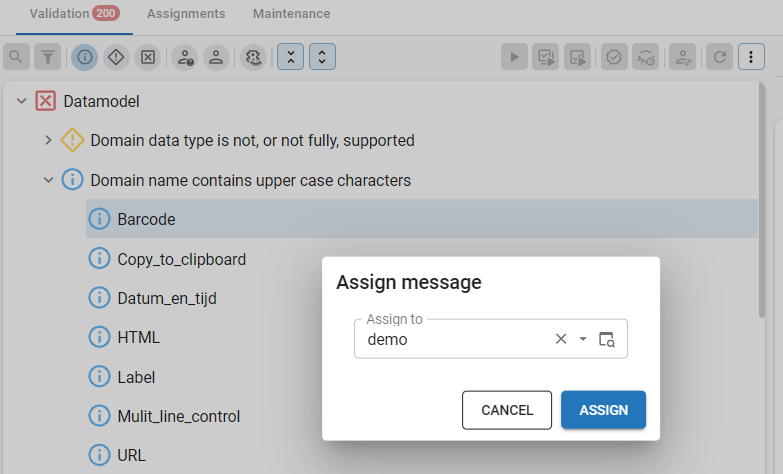
Assign one validation message
To assign one validation message to a developer:
menu Quality > Validations
- Select the validation message.
- Select the task Assign message
 .
. - Select the developer to whom you want to assign the message.
To remove the assignment, you can use the same task.
 Assign one validation message
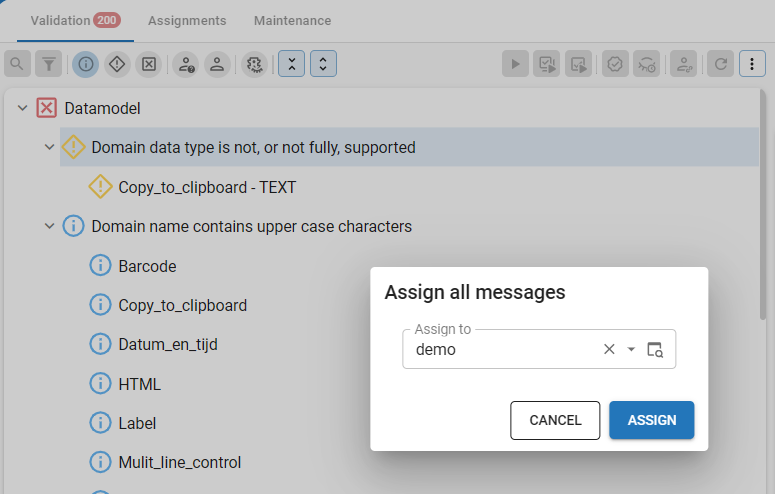
Assign all validation messages
To assign all messages for a validation (including the ones under expand >) to a developer:
menu Quality > Validations > tab Validation
- Select the validation.
- Select the task Assign all messages .
- Select the developer to whom you want to assign the messages.
To remove the assignment, you can use the same task.
 Assign all validation messages
Overview of assigned validation messages
The Assignments tab shows an overview of the validation messages that are assigned to a developer.
menu Quality > Validations > tab Assignments
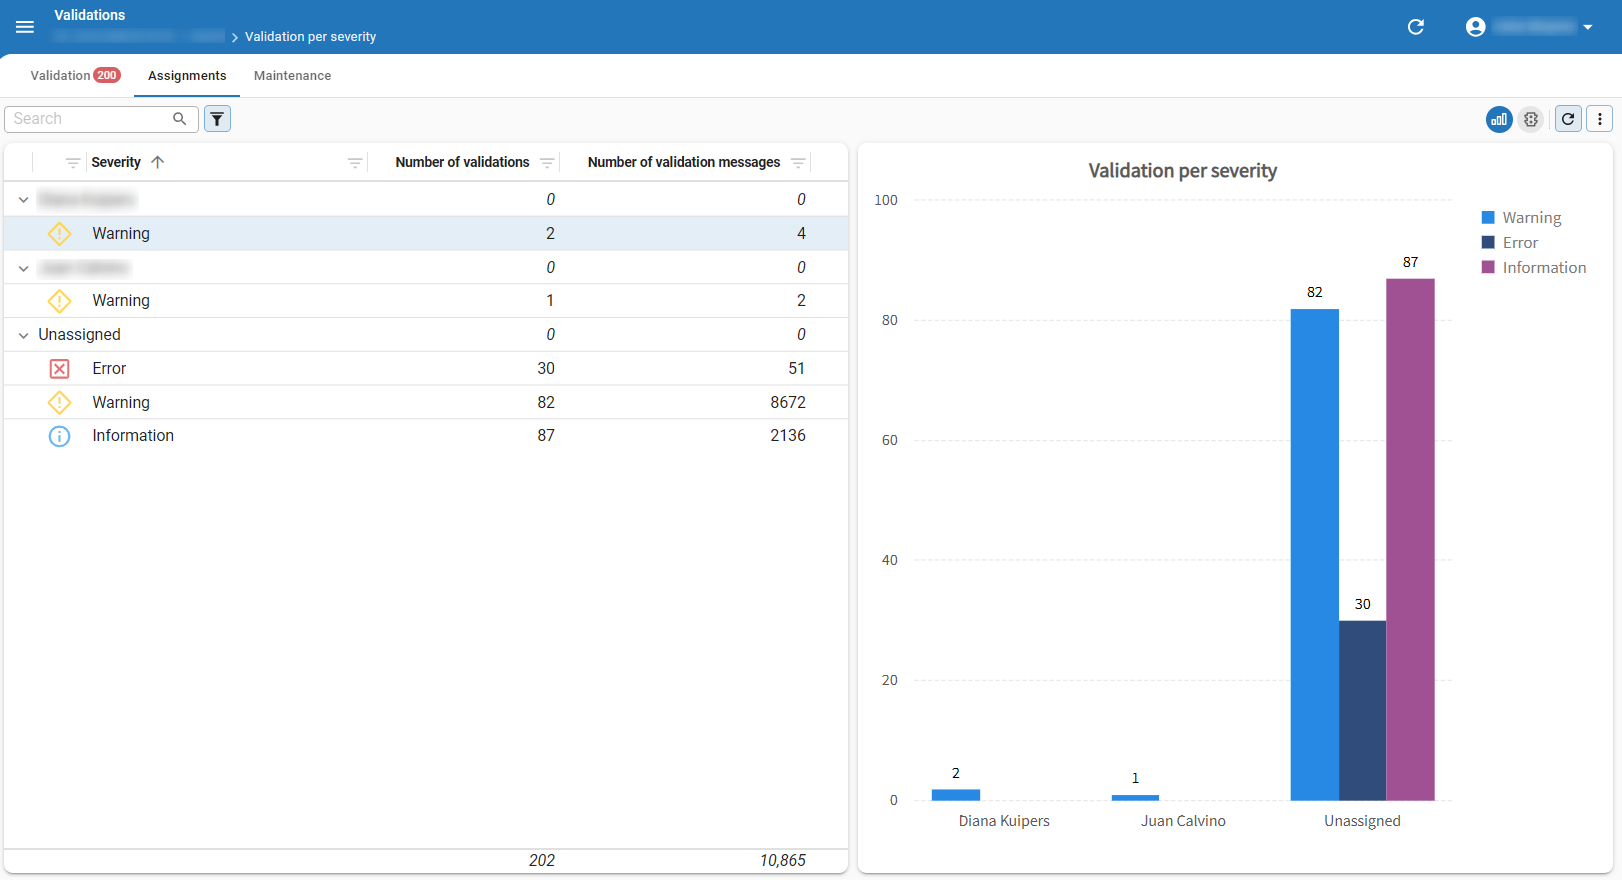 Validation assignments
Approve or hide validation messages
Introduction
Validation messages can be approved or hidden:
- It is not allowed to approve error messages, you can only approve warning or information messages. For your own validations, you can deviate from this behavior by selecting the checkbox Allow approval indefinitely (see Create your own validation).
- You can also temporarily hide a validation message, to indicate that it will be solved later.
Approve or hide one message
To approve or hide one validation message:
menu Quality > Validations > tab Validation
- Select the validation message you want to approve or temporarily hide.
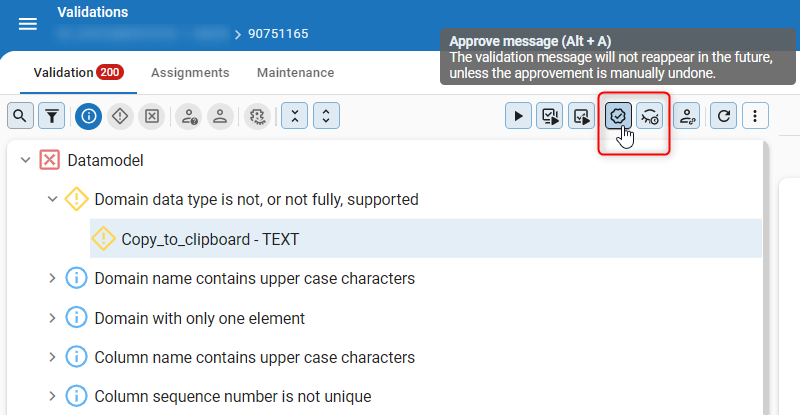
- Approve or temporarily hide the message:
 Approve message - The message will not reappear in the future unless the approval is manually undone.
 Hide message in this branch -
In this branch, the message remains hidden indefinitely or until a set time:
Hide message in this branch -
In this branch, the message remains hidden indefinitely or until a set time:
- Indefinitely - The message will not reappear in the future unless manually undone.
- Point in time - The message will reappear the first time the validation is executed after the set time has passed.
The tree will be updated immediately, it is not necessary to execute the validation again.
 Approve or hide one validation message
Approve or hide all messages for a validation
To approve or hide all messages for a validation (including the ones under expand (+)):
menu Quality > Validations > tab Validation
-
Select the validation for which you want to approve or hide all messages.
-
Select one of the following tasks:
- Approve all messages -
All messages for this validation will not reappear in the future unless the approval is manually undone.
- Hide all messages in this branch -
In this branch, all messages for this validation remain hidden indefinitely or until a set time:
- Indefinitely - The messages will not reappear in the future unless manually undone.
- Point in time - The messages will reappear the first time the validation is executed after the set time has passed.
The tree will be updated immediately, it is not necessary to execute the validation again.
Overview of approved and hidden messages
An overview of all approved and hidden validations is available in the tab Maintenance.
menu Quality > Validations > tab Maintenance > tab Approved messages / Hidden messages
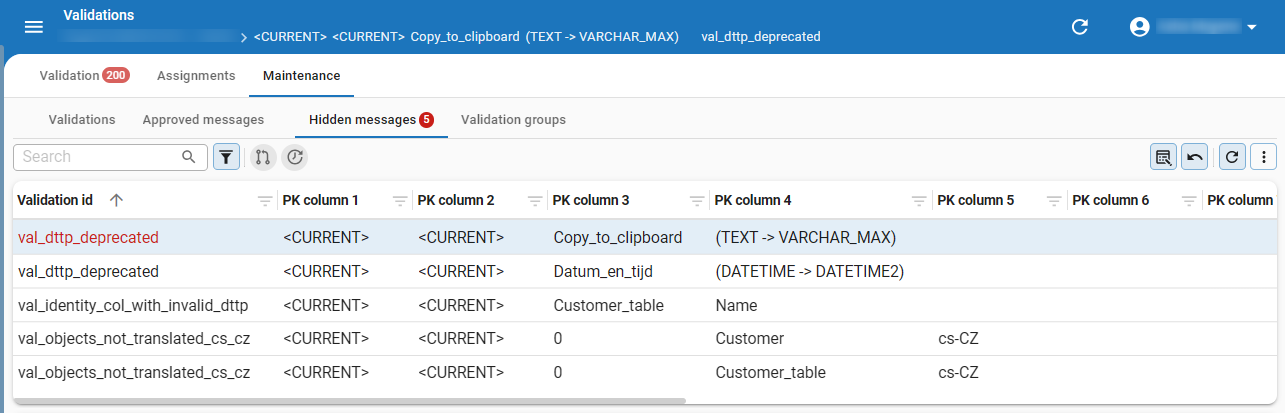 Overview of hidden messages
Edit approval or hiding information
To edit the approval or hiding information for validation messages:
menu Quality > Validations > tab Maintenance > tab Approved messages / Hidden messages
- Select the message for which you want to edit the approval or hiding information.
- Select the task Edit approval/hiding information
 .
. - Edit the information in the task. For approvals, you can only edit the Reason. For hidings, you can edit Point in time and Reason.
Undo approving or hiding
To undo the approval or hiding for a validation message:
menu Quality > Validations > tab Maintenance > tab Approved messages / Hidden messages
- Select the validation message for which you want to undo the approval or hiding.
- Execute the task Undo approving or hiding the message
 .
.
Configure validations from base models
Validations that originate from a base model can have their default settings overridden. You can update the Default enabled, Severity, and Allow approval indefinitely values without modifying the base model itself.
Update validation settings
menu Quality > Validations > tab Maintenance
Use the following tasks to update the settings for a base model validation:
- Enable/disable validation - Enables or disables the validation in the current model and branch.
- Enable/disable allow approval indefinitely - Enables or disables the option to approve the validation indefinitely.
- Update severity - Changes the severity level of the validation.
Once you have manually updated a validation, the updated value is shown in the tab Validation configuration. Use the prefilter Has different configuration to find validations that have been manually updated. You can reset custom validation settings to return to the base model defaults.
Custom values are set within the context of the current model and branch. They are not overwritten when the corresponding base model is generated or merged into the work model, and they remain in place when the full definition of the work model is generated.
Reset custom validation settings
If you have updated the settings for a validation that originates from a base model and want to return to the base model defaults, you can reset the custom values.
To reset a validation to its base model defaults:
menu Quality > Validations > tab Maintenance > tab Validation configuration
- Select the validation for which you want to remove the custom values.
- Select Delete.
Create your own validation
Create a validation
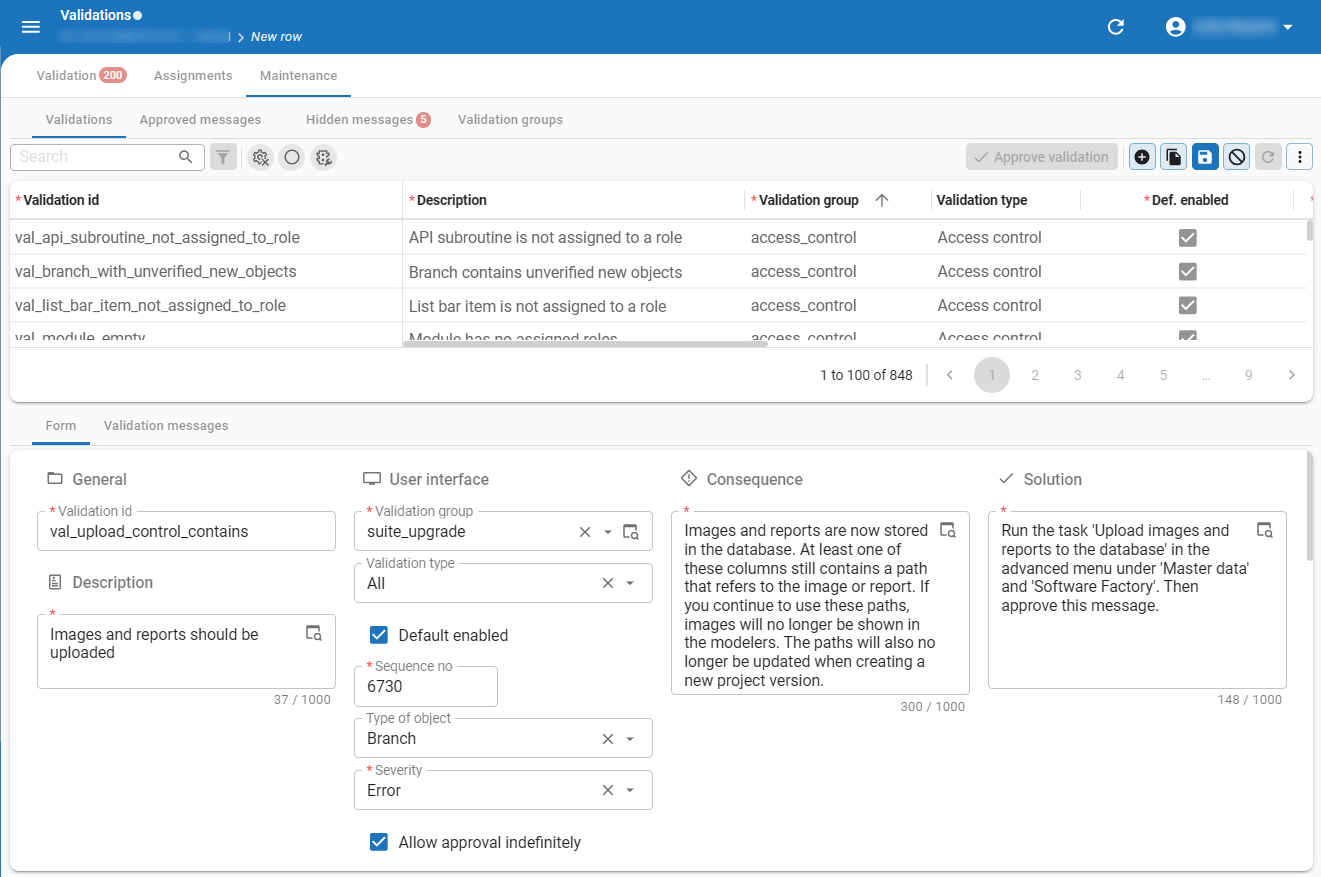
menu Quality > Validations > tab Maintenance > tab Validations > tab Form
- Enter a Validation id.
- Select the Validation group from the drop-down list. See Create a validation group.
- Select the Severity level ('Error', 'Warning', or 'Information').
- If it is allowed to approve the validation indefinitely, select the Allow approval indefinitely checkbox. See Approve a validation.
- Enter the Consequence and Solution.
- In tab Code, enter the required code.
Hits for this validation are available in the tab Validation messages.
 Create a validation
Create a validation group
Validations can be grouped together to display them logically.
To create a validation group:
menu Quality > Validations > tab Maintenance > tab Validations > tab Validation groups > tab Form
- Enter a name for the Validation group.
- Select the Sequence no. With this setting you can influence the order in which the validation group appears.
The validation group is now available for selection if you create or edit a validation.