Tasks
In accordance with our Lifecycle policy, the Windows GUI is no longer supported from Thinkwise Platform version 2026.1 and higher. This means some features on this page are no longer supported. See Transition to the Universal UI for more information.
Introduction to tasks
A task is a piece of business logic that can be executed manually by the user. A task can be linked to one or more tables and will be displayed in the ribbon, the context menu and possibly in the task bar. In that case, the task is called a table task. Columns of the table can be linked to the parameters of the task. The values of the linked columns of the active record are then passed on to the relevant parameters.
A task has a default and a layout mechanism, just as a table. A shortcut combination can also be defined with which the task can be started using the keyboard.
When a task is executed that creates or copies a translatable object, the translation objects are automatically generated. For more information on translation objects, see Translation objects.
You can define parameters for a task, and functionality is provided by lookup references.
 Tasks overview
Go to related screen
This screen contains tasks that take you to the Code overview, Model rights and Menu screens for the selected task. For more information on this generic feature, see Go to a related screen for an object.
Set up a task
Setting up a task consists of the following steps:
- Create a task
- Set up task parameters
- Optional. Create a task lookup
- Optional. Add conditional layout for a task
- Create a table task
- Connect table task parameters
- Optional. Add functionality to a task
Create a task
To create a task:
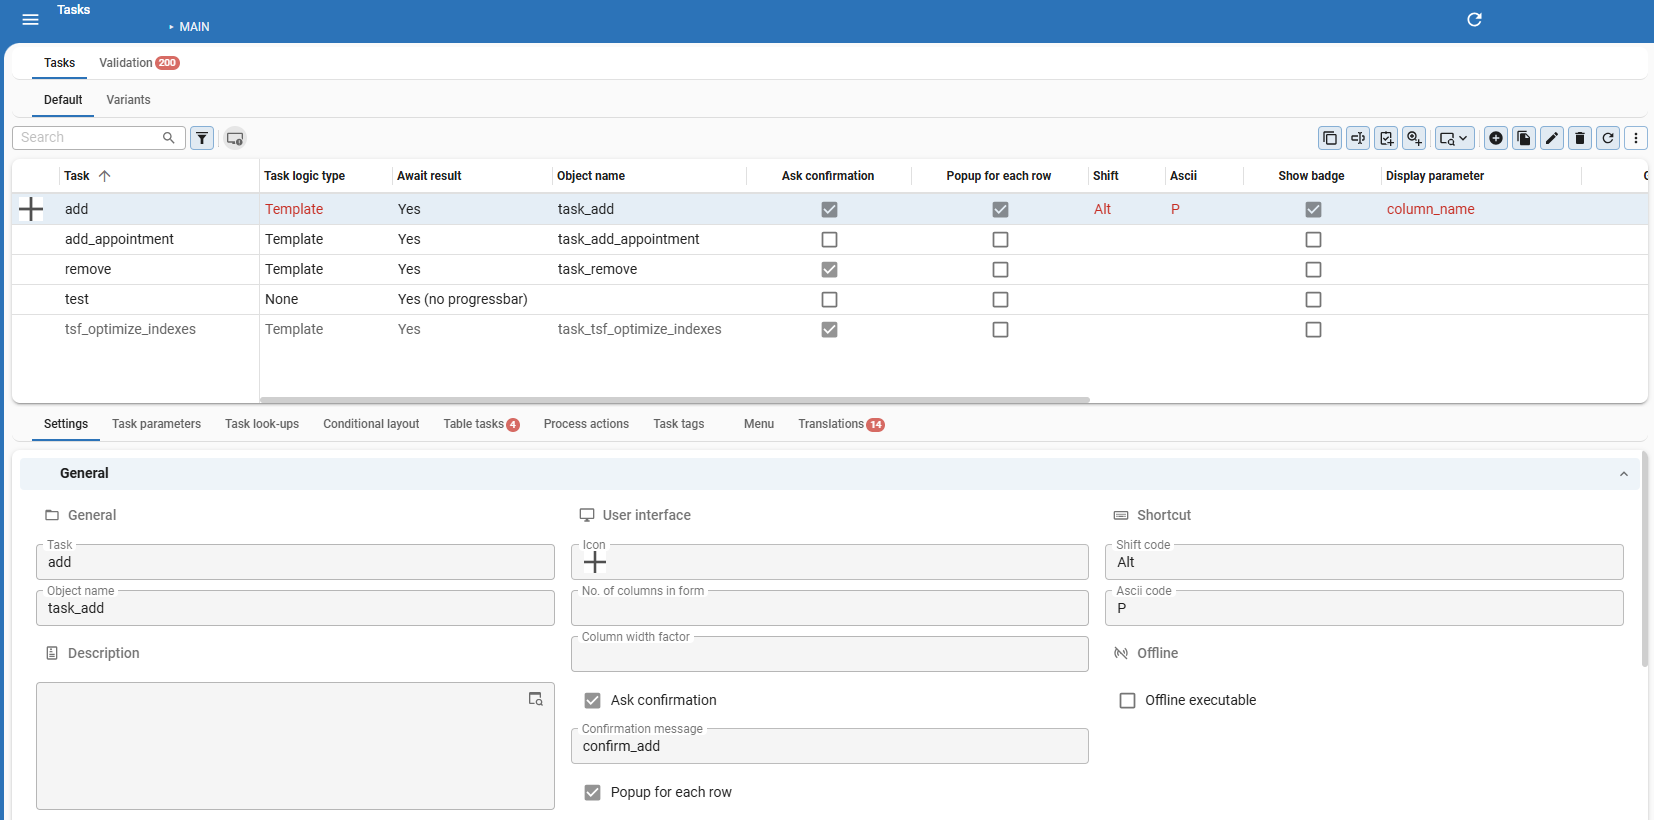
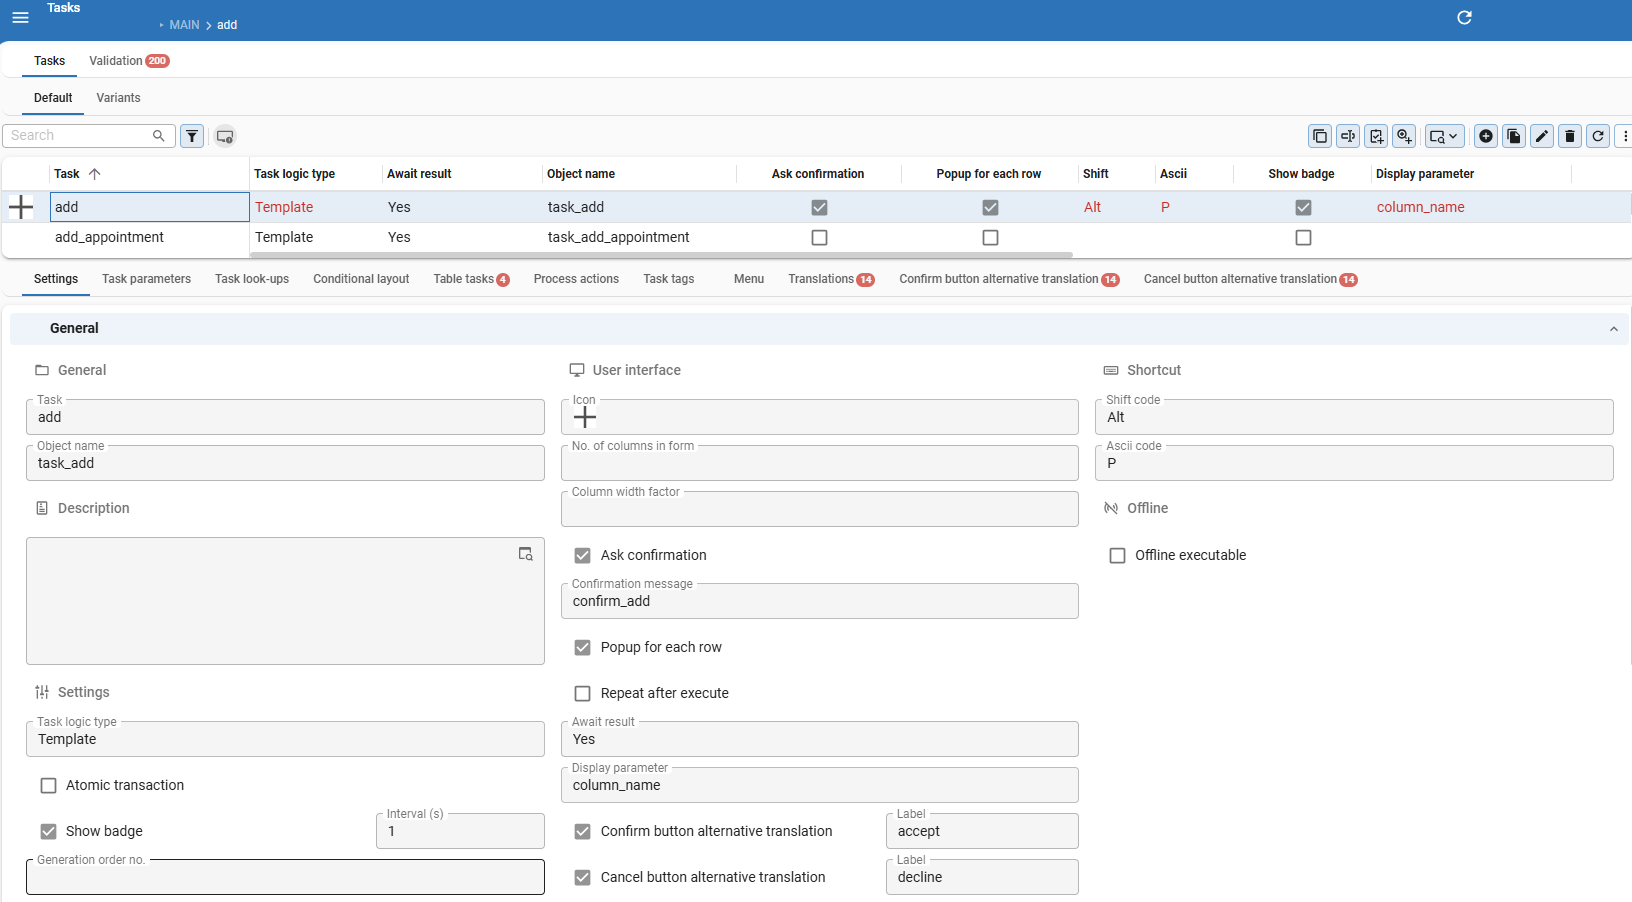
menu Processes > Tasks > tab Tasks > tab Settings > tab General
- Enter a Task name.
- Select the Task logic type. The following task types are supported:
- Windows GUI GUI code (deprecated) - allows for custom C# tasks, such as the TSFtaskMailer, to be linked in. The name of the custom task should be entered in the Object ID field.
- None - represents a dummy task which can be used in a process flow as a starting point or to display a form. For more information, see Task logic type 'None'.
- Template - this is the default value, which creates a stored procedure on the database.
- Windows GUI Windows command (deprecated) - this can be used to call an external program or to open a network or web address. For more information, see Windows command tasks (deprecated).
- If the Task logic type is 'Template', you can select if it should use an Atomic transaction. For more information on atomic transactions, see Subroutine - Atomic transaction. For more information on how to use this in code, see Weave code into atomic tasks.
- To use a badge, select the checkbox Show badge. For more information, see Badges.
- To ensure the task can be executed by the intended roles, assign rights to a role or role groups. For more information, see Assign rights to a role.
- Optional. Change the Generation order no. Only change it to ensure that the tasks with interdependencies are executed in the correct order.
- Optional. Select a keyboard shortcut which can be used to execute the task. Make sure that the screen does not contain multiple tasks using the same shortcut. Also do not use a shortcut that is already used by the GUI, such as Ctrl + R. For more information, see Shortcuts (used by GUI's). Validations are in place to prevent you from selecting such shortcuts.
- Optional. Universal GUI Enter a Form column width factor. This factor determines the relative width of the columns in a form. For more information, see Form column width factor.
- If the task should Ask confirmation before executing, select the corresponding checkbox. You can select a confirmation message. Otherwise, a default message will be shown. The task is executed when a message option with a status code of zero or higher is chosen. See also Messages.
- It is possible to execute tasks on multiple rows, with a Popup for each row. This allows a user to provide input for each row. Without visible parameters, the task will be executed automatically. Universal GUI - It is not possible to abort this flow.
- Select an option from the drop-down Await result on how to deal with tasks that take a long time to process.
- Yes - The user has to wait for the result and a progress indicator is shown.
- Yes (no progress indicator) - The user has to wait for the result (the GUI freezes and hourglass is shown).
- No - The action is executed in the background and the user can continue working.
- Optional - The user has to wait (option 1) but has the possibility to continue the action in the background (option 3). Reports executed in the background can be monitored in the Async action dialog.
- Select the Display parameter to distinguish between multiple instances of a task in the async action dialog.
- Optional. Create an alternative translation for the Confirm and Cancel buttons. See Alternative translation for task buttons.
- Optional. if the task should be Offline executable, see Offline available tasks for more information.
- Optional. if the task should Repeat after execute, see Repeat a task after execution for more information.
 Settings when creating a task
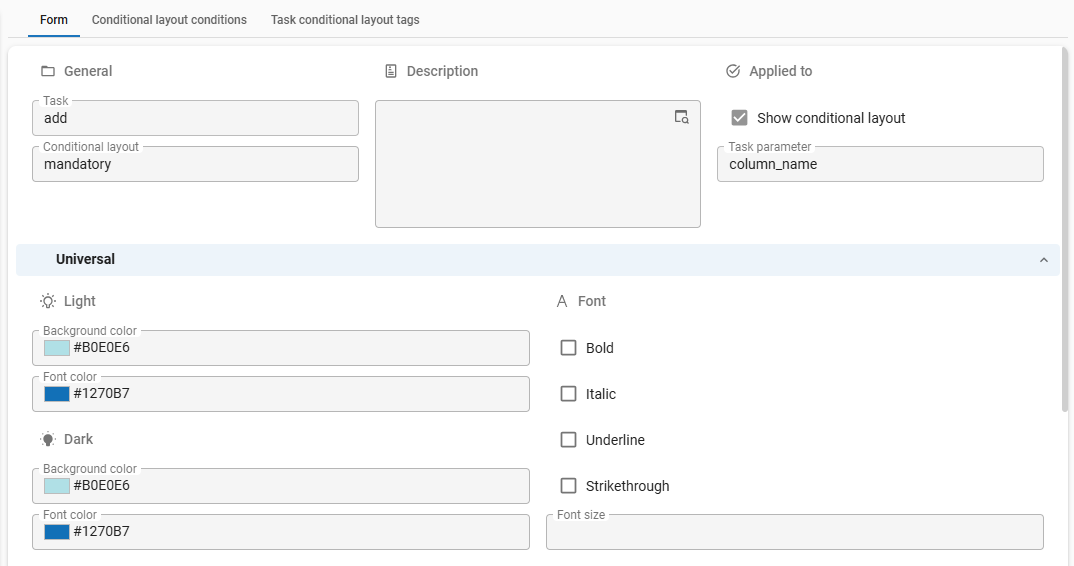
Add conditional layout for a task
menu Processes > Tasks > tab Conditional layout
This is an optional step. Just as with columns, you can give task parameters a background color or a different font. You can use this to draw the user's attention to a specific task parameter. Since a task does not have a grid, this will only be applied to form parameters.
For more information, see Set up a conditional layout.
 Settings when setting up a task conditional layout
Alternative translation for task buttons
Changing a button's translation can be useful for context-specific actions, to clarify the action being performed. You could, for example, change the translations from 'Confirm' to 'Accept', and from 'Cancel' to 'Decline'
To create an alternative translation for a Confirm or Cancel button in a task:
menu Processes > Tasks > tab Default > tab Settings > group User interface
-
Add a translation label:
- For the 'Confirm' button: select the checkbox Confirm button alt. transl. and enter a translation Label.
- For the 'Cancel' button: select the checkbox Cancel button alt. transl. and enter a translation Label.
-
Go to the tab Confirm/Cancel button alternative translations.
-
Enter the alternative translation.
See also Alternative translations for task variant buttons.
Set up task parameters
After you have created a task, you can add parameters that define the input values for the task. Parameters are arranged in a specific sequence and linked to a domain for the data type and the control.
To set up a task parameter:
menu Processes > Tasks > tab Tasks > tab Default > tab Task parameters > tab Form
-
Select the Task for which you want to add a parameter.
-
Enter a Task parameter name. If a task parameter has the same name as the column, the column translation and form translation are automatically copied to the task parameter. For more information, see Translations.
-
Optional. Create an alternative translation for the task parameter. See Alternative translation for a task parameter.
-
Select a Domain, which determines the data type and control of the field (ID).
-
Specify if the task parameter should be Mandatory.
-
Optional. Change the Case type, for example to Upper case.
-
Optional.
In the field Default value type, you can select a Constant value or an Expression:
- Default constant value - A fixed value that is filled when adding a record. With a change, this value is not filled.
- Query - The expression used to determine the default value. The query cannot use values from the other task parameters.
For the following functions, the Software Factory will not generate a function but instead use the given Query as the default value. To use these functions as a default value query, you should specify them without
select.- newid()
- getdate()
- getutcdate()
- sysdatetime()
- dbo.tsf_user()
- dbo.tsf_original_login()
-
Format the task parameters. The following fields are available:
Alternative translation for a task parameter
It is possible to create an alternative translation for a task parameter in a form or tooltip. This translation is used in the user interface instead of the default translation.
To create an alternative translation:
menu Processes > Tasks > tab Default > tab Task parameters
- Select the checkbox Alternative translations.
- Enter an alternative translation Label.
- Save the settings.
- Go to the tab Alternative translations.
- Add an alternative translation.
See also Alternative translation for a task variant parameter.
Add functionality to a task
This is an optional step that depends on the task logic type.
When generating, a program object is created for template-typed tasks. The associated default and layout program objects are also created. The application logic can be modelled and described in the Functionality screen.
Weave code into atomic tasks
You can weave your own code into the catch part of atomic Tasks.
The catch part has been separated into two templates, allowing templates to be weaved in-between.
You could use this, for example, to weave code for logging.
For more information, see Atomic transactions.
menu Business logic > Functionality > tab Assigning > tab Available templates > tab Assigned templates
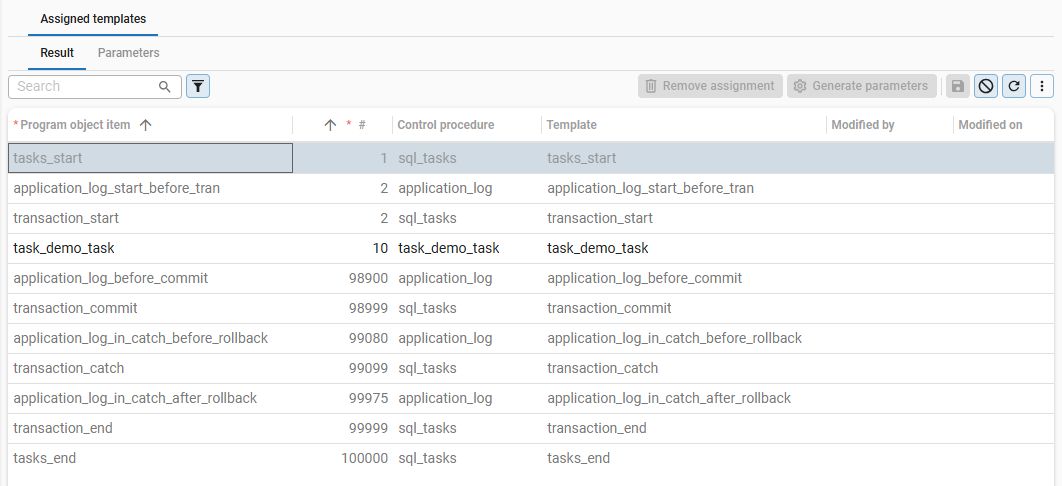 Example: add your own code in the
 catch part
Display progress from a stored procedure
A progress dialog is displayed when long-running tasks or tasks in combination with multi-selection are performed. You can display the progress percentage from (SQL Server) stored procedures while a procedure is being executed.
 Progress Percentage of executing a task
To display the percentage, the procedure tsf_send_progress should be called from the SQL code:
tsf_send_progress *[message id], [parameterstring], [percentage]*;
message id- Optional parameter. Use it to change the text above the progress bar (the default text is: Run task...).parameterstring- Optional parameter. Use this for the parameters in themessage_id. You can also use translations of model objects, such as columns or tables.percentage- The progress of a task is displayed in percentages:- If set to -1, the progress bar stays in the marquee position and does not display a percentage. A marquee position is a moving block or animation within the progress bar that indicates ongoing activity.
- A positive value between 0 and 100 defines the percentage shown in the progress bar. For example, if you set the percentage to 10, the progress bar updates to 10%.
An example when executing a stored procedure from SQL Server is:
exec tsf_send_progress 'copy_customer', '<text>Thinkwise</text>', 82;
Task lookups
Create a task lookup
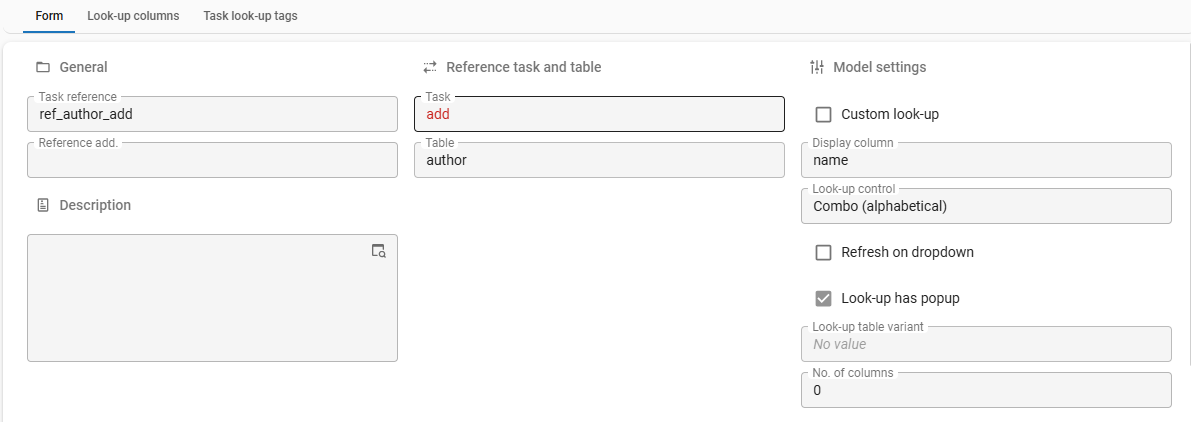
A lookup allows users to select or view a value from a field in an associated table. For each field, you can configure whether a lookup should be displayed, what reference the lookup should use, and how users select a value. You can set up the default settings for a table in Default lookup display settings.
To create a task lookup:
menu Processes > Tasks > tab Default > tab Task look-ups > tab Form
-
Select a Look-up control to configure how the lookup is displayed for the user. The following options are available:
- Auto complete - when typing, the first record that matches the input of the user is displayed automatically.
- Combo (alphabetical) - a value from a combo box can be selected. The list is sorted alphabetically.
- Combo (sorted) - a value from a combo box can be selected. The list is sorted according to the default sorting of the look-up subject.
- Suggestions (contains) - When typing, values containing the input are presented. On a mobile device, a keyboard opens.
- Suggestions (starts with) - When typing, values starting with the input are presented. On a mobile device, a keyboard opens.
When a new table is created, the default lookup control is set to Suggestions (starts with), since this ensures better performance when returning a large number of rows from a lookup table.
tipFor tables with a small dataset, a Combo lookup control may be suitable, since it displays all available values from a lookup table in a drop-down list. For tables with larger datasets, other options like Suggestions (contains) may be more suitable, since this lookup control allows users to search for a value.
-
Optional. You can create a custom look-up by selecting the checkbox Custom look-up. You can use this setting to override the default lookup control and lookup display column.
You can select an alternative Display column, which determines what field is shown to the user when they use the lookup. For example, the default settings for a display column could be to display the customer_name. By using a custom display column, you can set the lookup to display customer_fullname instead.
To configure the settings for the Display column, select the lookup control
 and go to tab Form.
The following settings are available:
and go to tab Form.
The following settings are available: -
Optional. Select the checkbox Look-up has popup to display the look-up table in a pop-up window.
- Optional. Select the checkbox Refresh on dropdown to refresh the lookup data before the combo box expands.
- Optional. Select a Look-up table variant to display a variant of the lookup table.
After you have created the lookup, you must create a task lookup column to display the relevant information from the table you have referenced.
- You can use the task Create reference
 to create a reference and set up the lookup columns immediately.
The reference automatically uses the lookup control defined for the target table.
to create a reference and set up the lookup columns immediately.
The reference automatically uses the lookup control defined for the target table. - You can filter what is shown in a lookup by using prefilters. To do this, set the Look-up state to On, On hidden or On locked. A prefilter is then applied when the lookup is opened, and depending on the Look-up state, it can be modified by the user.
 Lookup settings for tasks
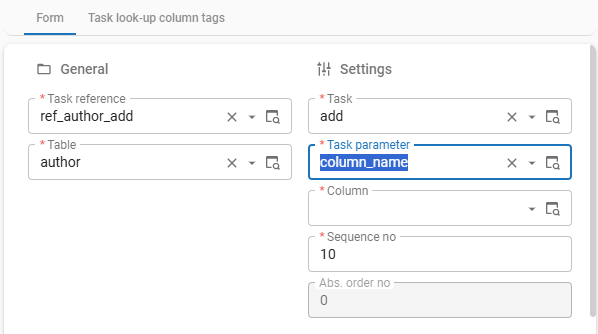
Create a task lookup column
A lookup column defines which data from a referenced table is retrieved and displayed in the lookup. Before you can create a lookup column, you must create a task lookup.
To create a task lookup column:
menu Processes > Tasks > tab Default > tab Task look-ups > tab Look-up columns > tab Form
- Select a Task parameter.
- If a Column with the same name as the task parameter exists, it will automatically be filled. Otherwise, you must select it manually.
- Optional. Add a Sequence no to change the order of the columns.
 Lookup column settings for a task
Table tasks
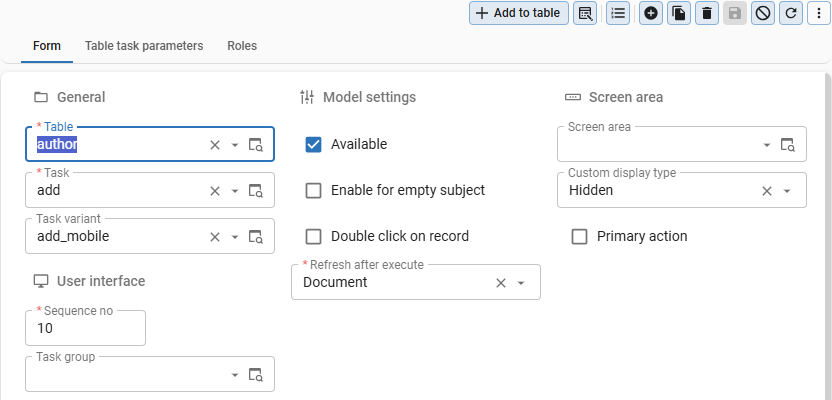
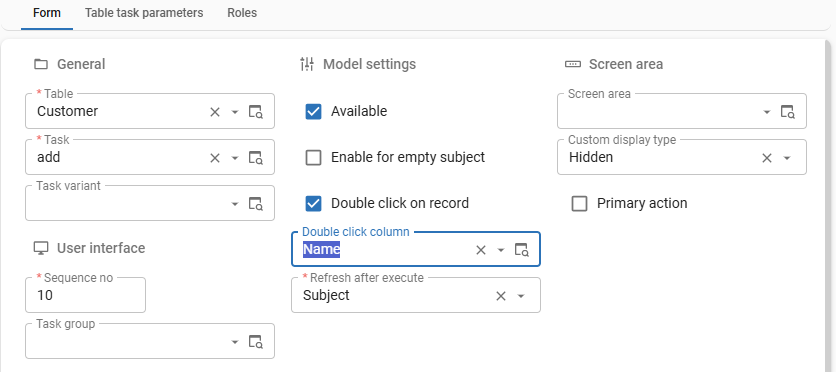
A table task is a task that is linked to one or more tables. In these tables, the task is displayed in the ribbon, the context menu, and possibly the task bar.
Create a table task
To link a table to a task:
menu Processes > Tasks > tab Default/Variants > tab Table tasks > tab Table task > tab Form
-
Select the Table and Task.
-
Optional. Select a Task variant. See Create a task variant.
-
If necessary, change the Sequence no to determine the order of the tasks in the task bar.
-
Optional. Select the Task group from the drop-down list. See Create a task group.
-
To make the task available, select the checkbox Available.
-
By default, a task is available when a screen contains no records. To disable the task in that case, clear the checkbox Enable for empty subject.
noteThe default for field Enable for empty subject is set in the menu Models > Model overview > tab Branches > tab Model settings.
-
To enable immediate task execution by double-clicking on a row, select the checkbox Double click on record. For more information, see Set up a double-click task.
-
To control the performance, configure the Refresh after execute behavior:
- None - the user interface will not refresh any data.
- Row - the user interface will only refresh the current row.
- Universal GUI The parent row will be refreshed one level up.
- Subject - the user interface will refresh the current subject, including lookups and details.
- Universal GUI The parent row will be refreshed one level up.
- Document - the user interface will refresh the main subject, including all lookups and details.
-
Optional. To show a table task in a Task bar or a (Custom) action bar, select the same Screen area as the bar. For more information, see Screen areas.
-
Optional. Select the Custom display type:
- Universal GUI - If there is enough space, the task is presented according to the selected type. If not, the task will be shown in the overflow menu. If left empty, the custom display type of the Custom action bar is used, or else the custom display type of the Action bar.
For example, Icon + text (> text > icon) means that the report is displayed as an icon with text. On a smaller screen with less space, it is displayed as text (the first fallback: > text). With even less space, it is displayed only as an icon (the second fallback: > icon). The overflow menu is always the last fallback type, except for the display type Hidden.
- Windows GUI - The following options are supported:
- Hidden - The task is not shown but can be started with a keyboard shortcut, a double-click task, or a process flow.
- Overflow - The task is not shown in the task bar but is shown in the ribbon menu and context menu.
- In all other cases, the task is shown in the task bar, the ribbon menu, and the context menu. On a smaller screen with less space, it is moved to the overflow menu.
-
Optional. Universal GUI Select Primary action to highlight the task on the screen. This can help establish a clear visual hierarchy in your application by directing the user's attention to specific and important actions.
 Settings for a table task
Create a task group
Table tasks can be grouped together in a task group. This allows you to organize related tasks under a common button, making it easier for users to find and use them.
To create a task group:
menu Processes > Tasks > tab Table tasks > tab Task groups > tab Form
- Create a new Task group and add a Description. The Sequence no. is automatically assigned, but you can change it to determine the order in which the report group appears.
- Optional. Add an Icon to represent the task group.
- Optional. Select the checkbox Submenu to display the tasks in a task group as a submenu. If this option is not selected, the tasks are grouped visually with separators.
- Optional. Select a Custom display type. This allows you to display grouped tasks differently for each screen. This option becomes available when you select Submenu.
When you create or edit a table task, you can now add it to the Task group you created.
Universal UI For more information on grouped actions and their behavior in the Universal UI, see Group actions in the action bar.
Connect table task parameters
After linking a task to a table, connect the table columns to task parameters:
menu Processes > Tasks > tab Table tasks > tab Table task parameters
- Select a Task parameter. The active record's field value is passed on to the parameter as a default value.
- If a Column with the same name as the task parameter exists, it will automatically be filled. Otherwise, you must select it manually.
 Settings when connecting table task parameters
Link a task to a table
You can link a task directly to a table as explained before (see Create a table task).
This is also possible at subject level, in that case you link en existing task to an existing table:
menu User interface > Subjects > tab Overview
See Link a task to a table in the Subjects guide.
Set up a double-click task
It is possible to enable immediate task execution by double-clicking on an item. This setting works for grid, card list, grouped tree, and resource scheduler items. The Universal UI and the Windows GUI support different presentations for double-click tasks with the Custom display type option.
In addition, you can bind the task to a specific column. This can significantly improve the user experience because it allows each column in a grid to start a different process or handle specific data.
To set up a double-click task:
menu Processes > Tasks > tab Table tasks > tab Form > group Model settings
- Select the task that you want to link to the selected table.
- Select the checkbox Double click on record.
- In the field Double click column, select a column from the table. You can override this column choice in a table variant or leave it empty. This transforms the cell-based double-click task into a row-based double-click task in the specific table variant and vice versa.
 Set up a double-click task
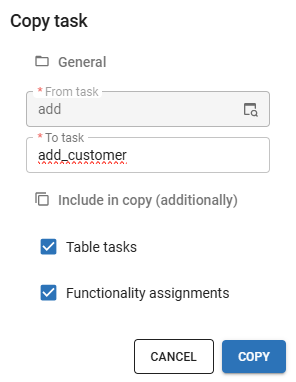
Copy a task
To make a copy of a task:
menu Processes > Tasks > tab Settings
- Execute the Copy task
 task.
task. - Enter a name for the copy in the field To task.
- Select what you want to include in the copy:
- Table tasks - Include the links to one or more tables. See Table tasks.
- Functionality assignments - Include the functionality assignments. If you deselect this option, the copied task will not be assigned to any control procedure. Use this to create a bare object (the copied task). Then, create a new control procedure, and assign the copied task to it.
 Copy a task
Add a task to a menu
If a task is linked to a table, it appears in the ribbon and the context menu of this table. You can also add a task to one or more menus (tree view, list bar, and tiles). In this way, users can start the task without having to open another screen.
To add a task to a menu for the first time:
menu User interface > Menus > tab Menus
- For more information about the configuration of a menu and how to add a task to it, see the Menus guide.
To edit a menu:
menu Processes > Tasks > tab Menu
This tab is read-only. Here, you can see to which menus a task is connected.
- Execute the task Go to menu
 to open the corresponding tree view, list bar, or tile menu item where you can edit it.
Create a task variant
With a task variant, you can create an alternative user experience for the same task. Not all default settings can be changed in a task variant, but it can, for example, have a different icon and translation, default values and conditional layouts than the default. For more information on variants, see Variants.
A task variant is not a copy of the original task. A variant is still linked to the original task, while a copy is not. To create a copy of a task, see Copy a task.
To create a task variant:
menu Processes > Task
- Select the task
 Create a task variant.
 - In the pop-up, select the Task for which you want to create a variant.
- Enter a Task variant name.
- Optional. To generate a different translation for the variant, select the checkbox Translate.
- Select Execute.
- Go to the tab Variant to set up the task variant.
In the tab Changes compared to default, you can view a list of the differences between a task variant and its default task. For more information, see Compare a variant to its default.
Alternative translation for a task variant parameter
It is possible to create an alternative translation for a task variant parameter in a form or tooltip. This translation is used in the user interface instead of the default translation.
To create an alternative translation for a task variant parameter:
menu Processes > Tasks > tab Variants > tab Task parameters
- Select the checkbox Alternative translations.
- Enter an alternative translation Label.
- Save the settings.
- Go to the tab Alternative translations.
- Add an alternative translation.
Alternative translation for task variant buttons
Changing a button's translation can be useful for context-specific actions, to clarify the action being performed. You could, for example, change the translations from 'Confirm' to 'Accept', and from 'Cancel' to 'Decline'
To create an alternative translation for a Confirm or Cancel button in a task variant:
menu Processes > Tasks > tab Variants > tab Form > group User interface
-
Add a translation label:
- For the 'Confirm' button: select the checkbox Confirm button alt. transl. and enter a translation Label.
- For the 'Cancel' button: select the checkbox Cancel button alt. transl. and enter a translation Label.
-
Go to the tab Confirm/Cancel button alternative translations.
-
Enter the alternative translation.
If you have added alternative translations for the 'Confirm' and 'Cancel' buttons on task level, you can disable them for its variant. The task variant will then follow the default translations instead.
Set up special tasks
Drag-drop task
A drag-drop task consists of the task and drag-drop links that define the source and target. A task becomes a drag-drop task through its screen configuration, not through any setting within the task itself.
With a drag-drop task, you can allow users to drag records from a grid or tree to another or the same subject. When the user drops an item on that table or row, the drag-drop task is started.
This can be useful in a Scheduler, for example, to allow users to drag and drop a task from one time cell to another. For more information, see Set up external drag-and-drop on a time cell.
To set up a drag-drop task:
- Set up a task.
- Set up the Drag-drop links.
Windows command task (deprecated)
Windows GUITasks can be used to call an external program or to open a network or web address.
The location of the external program, the network or web address have to be entered in the Object name field.
The Object name is the name of the task as it is created on the database.
For example, if your task_id is add_customer, the Object name on the database is usually task_add_customer.
Any parameters that are added to the task will be passed on to the call of the external program. However, this only works with external programs and not with network or web addresses.
To start Paint for example, enter the program name mspaint.exe in the object name and add a filename parameter to open that file.
Or create your own batch file to print a PDF document:
@CALL START /MIN AcroRd32.exe /N /T %1
With the use of parameters, it is also possible to create dynamic external program tasks. This can be used in situations in which the external program, network or web address to be opened is not always the same but changes depending on the situation. In these cases, a parameter has to be added to the task with the location of the external program, network or web address. The task parameter ID of this parameter has to subsequently be specified between square brackets in the Object name field of the task (e.g., [URL]). For dynamic external program tasks, all other parameters are ignored.
To open a dynamic URL without knowing the default browser, you can trick the task by using 'http:' as Object name and set the first parameter to the URL to be opened. The same goes for other URI schemes like 'mailto:'.
Universal GUI Example: Use a Windows command task to open a URI
menu Processes > Tasks > tab Tasks > tab Settings > tab General
-
In the Task logic type field, specify 'Windows command'.
-
In the Object name field, specify the URI to open.
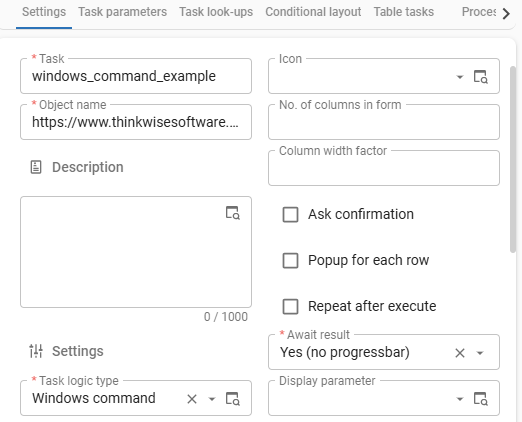 Windows command task opening a URI
When executing this task, the corresponding URI is opened in the browser.
You can also use dynamic URIs via task parameters.
In that case, the Object name field must contain the task parameter id between square brackets: [task_parmtr_id].
Please be aware of the following limitations:
- This implementation only supports opening URIs and not executing Windows commands.
- Windows command tasks cannot be used in process flows.
Task logic type 'None'
Normally, if you select the Task button in the user interface, the task is executed as defined in the model. In some cases you may want to change this default behavior.
For example, you may want to set up a task that behaves differently than the available task logic types. To do this, set the Task logic type to None. The task button in the user interface can then be used as a starting point in a process flow, allowing you to tailor its behavior to your specific needs.
You can also set a Report type to None for reports, see None.
Offline available task
Universal UIIf the internet connection is unavailable, users can continue using some functionality of the application in offline mode. This applies to:
- Tables and table variants (see, Offline available table)
- Table tasks, menu tasks and their variants
To set up an offline available task, the following conditions must be met:
- The extended property AllowOfflineExperience is enabled.
- The task cannot contain lookups.
- All parameters filled through the task should be set to Hidden.
- The task control procedures should accept all input without throwing errors since a user cannot fix these when synchronizing afterward.
The following limitations apply to offline available tasks:
- The task will check for mandatory fields but make no other validations.
- The task will not execute application logic for parameter input. This will be done later when the user is online again.
You can use the following extended properties for additional functionality when working offline:
RepeatOfflineTasksrepeats a task after execution when offline.HideOfflineTasksReadonlyParametershides all read-only task parameters when offline.
If a hard shutdown occurs while the user is offline, the Universal UI will show the login page and the user must have a connection to log in again and continue. No data is lost, however the user must log in again to continue working. A hard shutdown occurs when:
- The application is running as a Progressive Web App (PWA) and the user swipes it away from the app menu.
- The application is running as a webpage and the user stops the browser and restarts it while still offline.
Task which repeats after execution
menu Processes > Tasks > tab Default/Variants > tab Settings > tab General > group User interface
It is possible to specify that, after executing the task, the task pop-up should automatically reopen. You can use this setting, for example, for bar code scanners and task execution after scanning a product. By repeating the task, a user can continue scanning products without manually reopening the task pop-up.
To repeat a task after execution:
- Select the checkbox Repeat after execute.