Roles
Roles can be seen as distinct tasks or activities of an application. It is best practice to define roles during development, since it requires detailed knowledge of the application's functionality.
You can add or modify roles in the Roles screen. You should carefully evaluate the tasks or activities to minimize overlap in rights between different roles. Furthermore, clear and consistent role naming is essential for the IAM administrators who are responsible for managing application authorizations. Since IAM administrators often have limited insight into the application's functionality, they must be able to determine the purpose of a role from its name and description. Roles are often named after the corresponding activity, such as Approve hours or Report a ticket.
Set up a role
Create a role
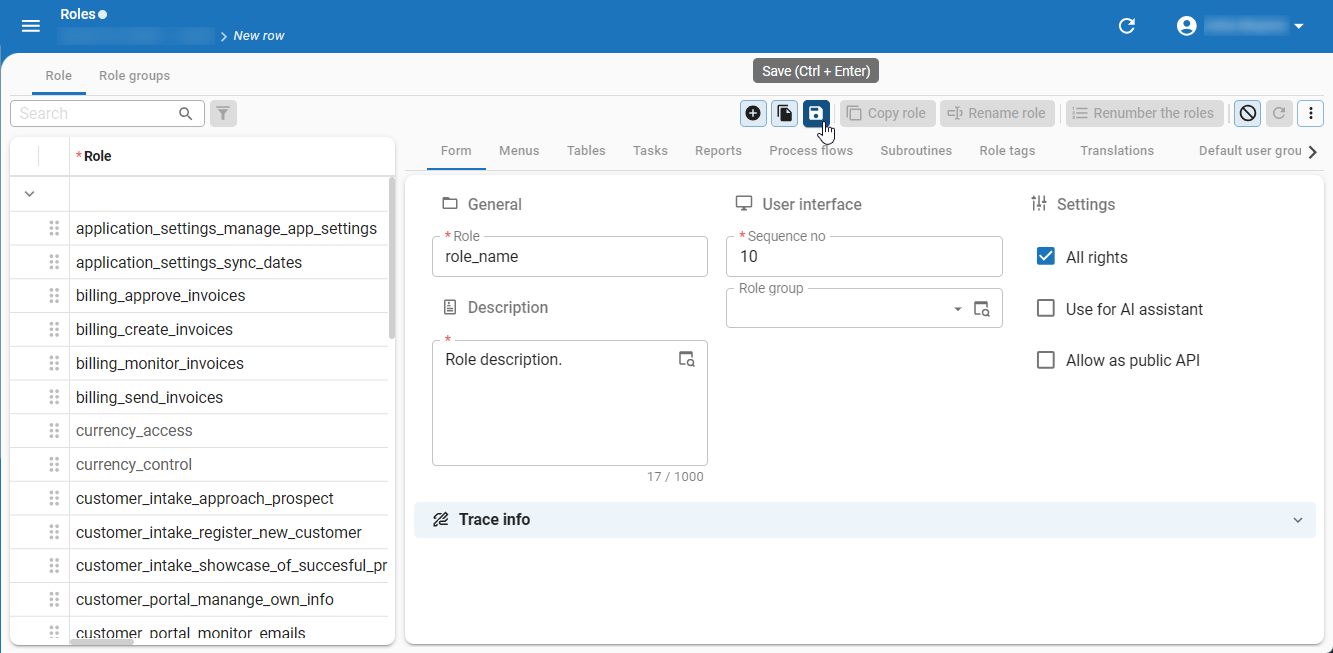
To create a role:
menu Access control > Roles > tab Role > tab Form
-
Enter a name for the Role. We advise you to use lowercase characters, which is a common convention to maintain consistency and readability.
noteIn IAM, the role translations are shown so that main administrators, application administrators, and application owners can see the roles in their own language.
-
Optional: Select the Role group from the drop-down list. See Create a role group. As soon as a role is assigned to a group, the group appears in the grid so you can drag/drop other roles into it.
-
Only for the administrator role: select the checkbox All rights. All other roles should provide a minimum set of rights required for the corresponding task or feature.
-
Only for public API calls: select the checkbox Allow as public API. For more information, see Public API roles.
-
Synchronize the role to IAM to make it available there. For more information, see Synchronization to IAM
If necessary, you can add a tag to a role in tab Role tags. For more information, see Tags.
 Create a role
Create a role group
Role groups are a grouping of roles to support setting up and viewing role authorization. You can use them to display roles in a logical and process-oriented manner.
- The role translations are synchronized to IAM so that the main administrators, application administrators, and application owners can see the roles in their own language.
- For users who create Personal Access Tokens (PATs) for their application, role groups give context to the roles (permissions) in the PAT screen. Add a good translation that they can understand. Without a role group, the roles are listed in a virtual group Miscellaneous.
Role groups are not the same as Default user groups or Modules. See Default user groups and Modules for further information.
To create a role group:
menu Access control > Roles > tab Role groups > tab Form
- Enter a name for the Role group. We advise you to use lowercase characters, which is a common convention to maintain consistency and readability.
- Go to the tab Translations and add a translation that users can understand.
The role group is now available for selection if you create or edit a role.
Public API roles
To integrate your application with other systems, you can use Indicium calls with authentication. For example, as a client application or with an OpenID provider.
However, methods like webhooks or subscriptions do not always allow authentication.
In these cases, you can make the API call public for access without authentication. You can use this for actions like processing appointments and emails with Microsoft Graph. For more information about the base URL for a public API call, see Public API call.
You can only use this for individual API calls. Authentication is always required for your application if you use it with the Universal GUI.
To make a role suitable for a public API call:
menu Access control > Roles > tab Role > tab Form
- Select the checkbox Allow as public API. This option does not affect how the role is used in a GUI.
- Configure the role by assigning rights for objects. See Assign role rights to a role.
- Synchronize the role to IAM as usual.
- In IAM, an application administrator or application owner can complete the configuration. See Configure a public API role in IAM.
Assign role rights
Assign rights to a role
After creating a role, you can assign rights that define what a role can do with an object. You can assign rights for the following objects to a role: menus, tasks, reports, process flows, and subroutines.
To assign rights for a table to a role, see Assign table rights to a role.
To assign rights to a role:
menu Access control > Roles > tab Role
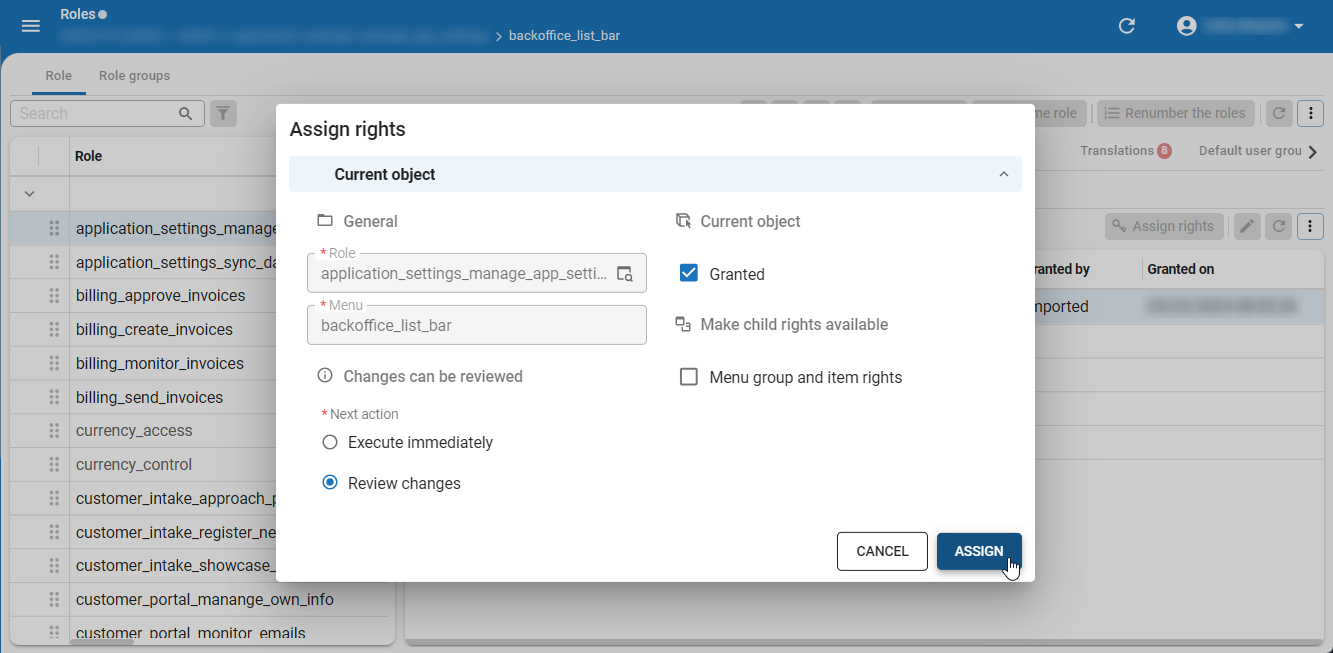
- Go to the tab of the object type you want to assign rights for, for example, Tasks.
- Select the task Assign rights
 or press Ctrl + T.
 - To allow the role to access the object, select the checkbox Granted.
- Optional. Select the rights you want to assign to the object's children by selecting the checkboxes in the group Make child rights available.
-
In the group Changes can be reviewed, select one of the following options:
- Execute immediately - After selecting Execute, the changes are executed immediately.
- Review changes - After selecting Execute, a review screen is opened.
 Example of assigning rights for tasks
Assign rights for tables and their child objects to a role
After creating a role, you can assign rights that define what a role can do with a table. Examples of role rights are Read, Insert, and Delete.
This topic describes how to assign rights for a table to a role; for all other objects, see Assign role rights to a role.
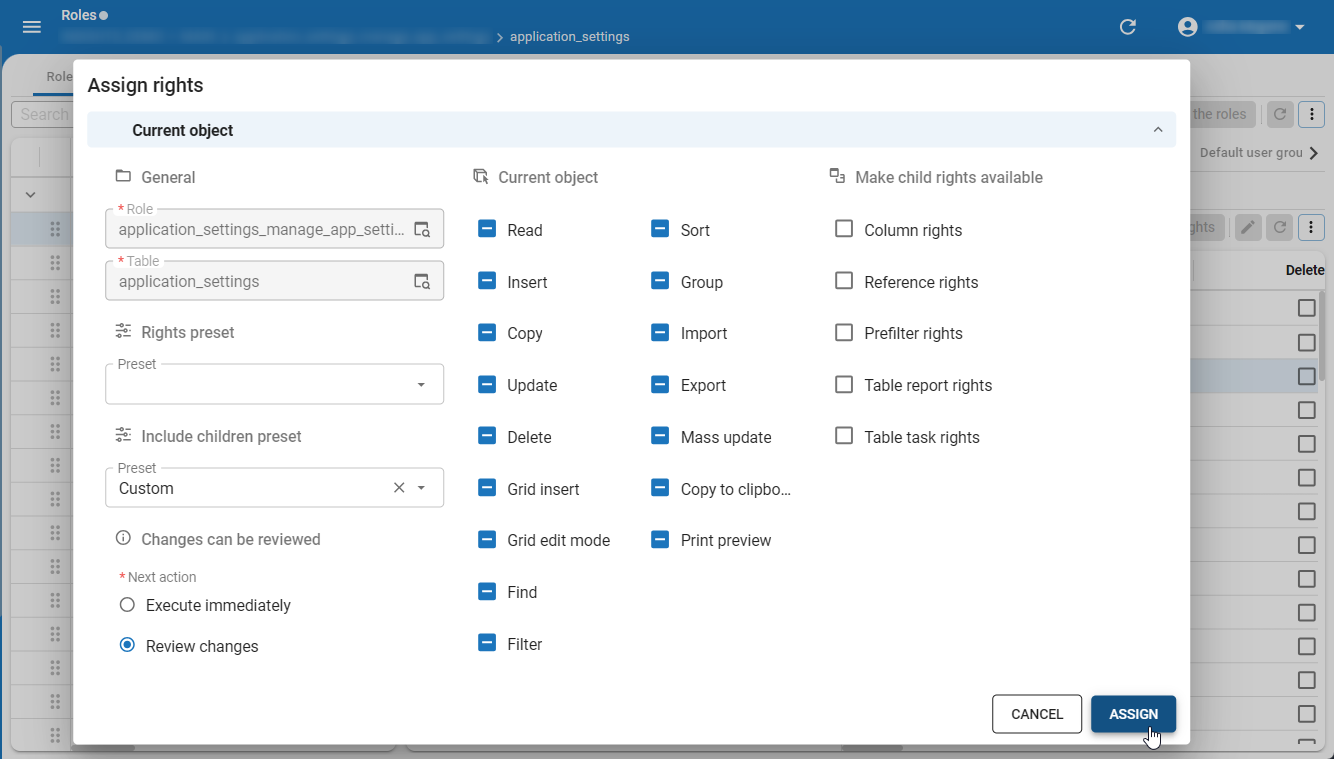
To assign rights for a table to a role:
menu Access control > Roles > tab Role > tab Tables > tab List
- Select the task Assign rights or press Ctrl + T.
- Optional. For the current object, select a Preset in the group Rights preset:
- No rights - All rights checkboxes are cleared or left empty.
- Read rights - Only read rights for the current object are included.
- Full rights - All rights for the current object are included.
- Custom - This option is automatically selected if you deviate from one of the previous options by (de)selecting rights in the group Current object.
Checkboxes marked with
 mean remain unchanged.
- Optional. For the child objects, select a Preset in the group Include children preset:
- Included - All child rights checkboxes are automatically selected.
- Excluded - All child rights checkboxes are automatically cleared.
- Custom - This option is automatically selected if you deviate from one of the previous options by (de)selecting rights in the group Make child rights available.
tip
See also:
- An example on how to assign or change rights for a child object without changing the rights for the parent.
- Assign more detailed rights for one child object (Assign rights for child objects).
-
In the group Changes can be reviewed, select one of the following options:
- Execute immediately - After selecting Execute, the changes are executed immediately.
- Review changes - After selecting Execute, a review screen is opened.
Assign rights for table child objects to a role
After creating a role, you can assign rights that define what a role can do with a table. In that process, you can assign general rights for their child objects (see Assign rights for tables and their child objects to a role).
For each child object (columns, details, prefilters, table tasks, table reports, cubes), you can also assign the rights in more detail.
To assign rights for a child object to a role:
menu Access control > Roles > tab Role > tab Tables
-
Go to the detail tab of the table child object for which you want to assign rights to a role.
-
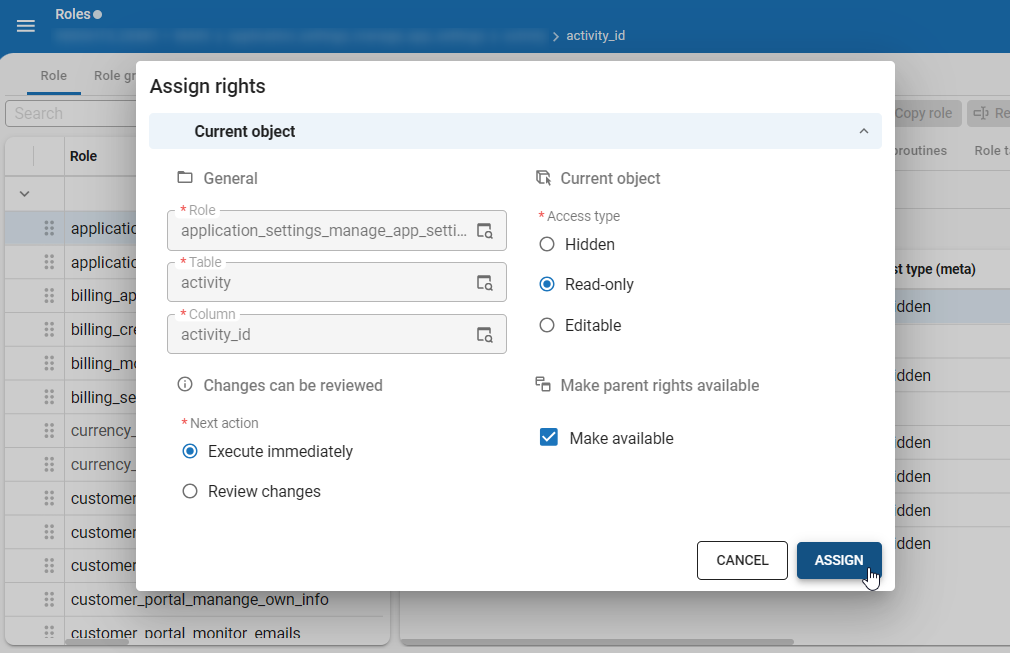
Select the task Assign rights
or press Ctrl + T. -
Select the rights you want to assign. The options are:
- For details, table tasks, and table reports: Granted
- For columns: Access type (Hidden, Read-only, or Editable)
- For prefilters: Visible or Always on
- For cubes: Enable cube panel. For cubes, you can also make the following child rights available: Cube field rights and Cube view rights.
-
If available, the checkbox Make available is selected for the parent rights. This means that the required rights are granted to the parent objects of the selected object. If you do not wish to apply parent rights, clear the checkbox.
-
In the group Changes can be reviewed, select one of the following options:
- Execute immediately - After selecting Execute, the changes are executed immediately.
- Review changes - After selecting Execute, a review screen is opened.
 Assign rights to a column as a child object of a table
Example: change only the child rights for a table
To change only the child rights for a table while keeping the parent rights the same:
menu Access control > Roles > tab Role > tab Tables
- Select the task Assign rights or press Ctrl + T.
- Do not change the current object's Preset or checkboxes.
The checkboxes have already been marked as remain unchanged.
- For the child objects, select a Preset or (de)select the rights checkboxes in the group Make child rights available.
 Example: change the child rights for a table while keeping the parent rights the same
Access types
Available rights
menu Access control > Roles > tab Tables/Tasks/Reports/Process flows/Subroutines/Menus
For each role, the colored icons indicate the resolved rights of an object, based on the granted rights and the availability:
 Unauthorized (no rights) - The data is unknown to the user interface and any API,
so it is impossible for the user to see the data or to approach the data through Indicium.
This is the safest option when it comes to data security in general and to protect sensitive data in accordance with GDPR laws.
Unauthorized (no rights) - The data is unknown to the user interface and any API,
so it is impossible for the user to see the data or to approach the data through Indicium.
This is the safest option when it comes to data security in general and to protect sensitive data in accordance with GDPR laws. Visually hidden - The user is not allowed to see the data in the user interface, which is generally safe,
but in some cases the data might still be approached through Indicium.
Visually hidden - The user is not allowed to see the data in the user interface, which is generally safe,
but in some cases the data might still be approached through Indicium. Read-only - The user can see the data but has no rights to add, edit or delete data.
 Granted (editable) - The user has more rights than read-only, for example, the right to read and to edit data.
Other possible rights are to add and delete data.
Granted (editable) - The user has more rights than read-only, for example, the right to read and to edit data.
Other possible rights are to add and delete data.
Granted, read-only and visually hidden can be applied by combining two settings:
- Column type in the data model (menu Data > Data model > tab Tables > tab Columns).
- Access type (menu Access control > Roles > tab Tables/Reports/Tasks).
- To fully anonymize data, see: Data sensitivity.
- If you are using variants, an object can be unauthorized in its base object, but hidden and thus available in its variant. This reduces the redundant model information that the GUI receives.
- See also The effective access type explained.
- The access type for each user group and user is available in IAM. See Effective group rights and Effective user rights.
Unauthorized columns, task parameters, and report parameters
The Software Factory automatically sets the Effective access type to Unauthorized for columns, task parameters, and report parameters when either the Column type in the data model or the Access type in the role is set to Hidden.
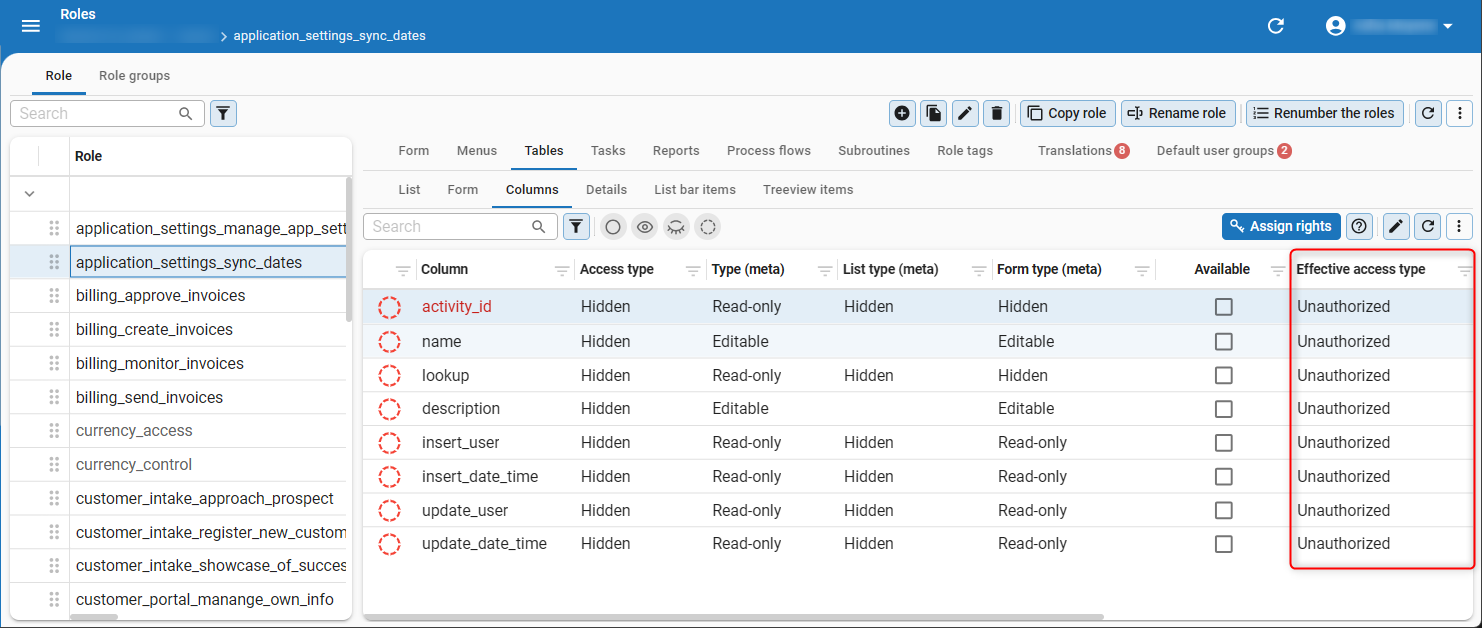 Column with Unauthorized as the effective access type
Exceptions (never unauthorized)
There are a few exceptions to these rules however. In some instances a column will never be unauthorized but only hidden because making data unauthorized would break the user interface:
- A role is an administrator role with All rights assigned to it.
- A column is used as a primary key.
- A column is used as the primary look-up display column.
- A column is used as a conditional layout target.
- A column is used as a conditional layout condition.
- A column is used by any extender in any way, shape or form.
- A column is used in a tree for grouping (parent or child), display or icon (base or variant).
- A column is used in default sorting of a variant default sorting.
- A column is used by another column in the same role as look-up display field.
- A column is used by a granted cube field in the same role.
The effective access type explained
To get a better understanding of the effective access type, an explanation is available in the screens:
- For table (variant) columns: menu Access control > Roles > tab Tables > tab Columns
- For task (variant) parameters: menu Access control > Roles > tab Tasks > tab Task parameters
- For report (variant) parameters: menu Access control > Roles > tab Reports > tab Report parameters
-
Execute the Explain the effective access type task
 to view why the column or parameter has certain rights.
The reason for the effective access type is explained in a pop-up. See also Access types.
-
Execute the Show variant effective rights task
 to view why the variant column or parameter has certain rights.