Create a process flow
Introduction to process flows
A process flow is a series of automated actions within your application like data entry or approvals. It has a starting point, followed by actions connected by steps, and an end. Steps in the process flow can be conditional.
System flows are independent process flows that work without requiring user input. For example, you can create a system flow that updates a table when new data is added or during lunchtime. Creating a system flow is similar to creating a regular process flow.
Best practices
Follow these guidelines to create clear, efficient, and user-friendly process flows:
-
Determine when to use a process flow - Avoid using process flows for tasks that do not follow a fixed order, which may frustrate users.
-
Define the required user input - Reserve process flows for tasks requiring user input and following a specific order. Do not use them for simple tasks that just happen one after another without any user input needed.
-
Keep process flows concise - This makes them easier to debug and maintain. Additionally, multiple starting points enable a single process flow to respond uniformly across various processes while maintaining clarity in the flow description.
-
Apply a uniform and consistent design - Define a uniform design for process flow visualization, ensuring clarity and consistency across the project.
-
Monitor the process flow - When testing a process flow in your application, use the Process flow monitor to see the results. It shows the intermediate steps, which is helpful for debugging or improving the process flow.
noteAn error message during task execution within a process flow does not necessarily mean an unsuccessful process action. The process step may still be marked as "Successful".
Behavior of a process flow
A process flow starts when the user completes an action linked to the designated start action. No other process flow can be active at the same time. For an overview of available process actions, refer to Process flow actions. The descriptions of these process actions will indicate if they can be used as valid starting points for a process flow.
In addition to manually starting a process flow, you can also initiate it by an API action such as adding a row, deleting a row, or executing a task. For more information, see API trigger.
Create a process flow
Setting up a process flow consists of the following steps:
- Create a process flow. Provide a clear name and brief description of its purpose.
- Add process actions. These are the actions a user should take in the interface or that are automatically executed by the system. Connectors enable connections to external applications and services, but do not have a graphical user interface. See Process flow actions for a full list of the available process actions and connectors.
- Add process variables. These store data throughout the process flow and can be linked to input and output parameters.
- Add process steps using the tab Design or the tab Form. These connect process actions and determine the next action based on success or failure of preceding actions.
- Set up starting triggers to determine how the process flow can be started.
- Assign rights to a role for the process flow. This ensures that roles can execute the process flow while restricting access for others.
- Optional. Create a system flow schedule. System flows can be scheduled to run periodically without user input. Use System flow schedules to set the execution frequency.
If a part of a process flow is the same in multiple process flows, you can create a reusable subflow to reduce duplication and simplify process flows. See Create a subflow.
Add a process flow
The tab Process flows shows an overview of the available process flows. To create a new process flow:
menu Processes > Process flows > tab Process flows
- Enter a name for the process flow.
- Optional. If you enable Custom protocol, specify a Custom protocol alias for the third-party application. See Enable the message protocol independent web service.
- Optional. Select the Deep linking allowed checkbox to enable deep links in the process flow. See Enable deep linking.
The Design tab page shows a graphical representation of the selected process flow.
Add process actions
Process actions are the steps a user takes in the interface or actions automatically executed by the system. For the available process actions, see Process flow actions.
You can add a process action in two ways:
menu Processes > Process flows > tab Process actions > tab Design
- On the tab Process actions: select Add
 .
. - On the tab Design: Drag a Process action from the toolbar on to the canvas. Complete the form to configure the process action and select Save.
The following options are available for process actions:
- To check if an action is available for a system flow, open the Process action type lookup
 .
. - Each process action has its own set of input and output parameters.
- tab Input: Input parameters provide a way to configure at runtime what a process action does. They
can be assigned a constant value or a variable. Inside constant values, you can use process flow variables, for example to dynamically create a URL, by
enclosing the variable name in brackets
{and}. - tab Output: Output parameters provide a way to store user input and other data produced by the process action in variables.
- To use returned values (output parameters) from a process action in a process procedure, see Use parameters in a process procedure.
- tab Input: Input parameters provide a way to configure at runtime what a process action does. They
can be assigned a constant value or a variable. Inside constant values, you can use process flow variables, for example to dynamically create a URL, by
enclosing the variable name in brackets
The process actions Add row and Edit row will only start a process flow when adding or modifying records in a Form component with Auto-save disabled. For the configuration of the option Auto-save, see Auto-save.
Components that automatically save changes on navigation or other user actions, such as the Grid, do not support these process action triggers, because the user action will often conflict with subsequent actions in the process flow.
Using variables in the SQL parameter of a database connector process action introduces the risk of SQL injection.
When using the database connector process action, we strongly advise to use ODBC question mark placeholders (?) with the Parameters input option instead.
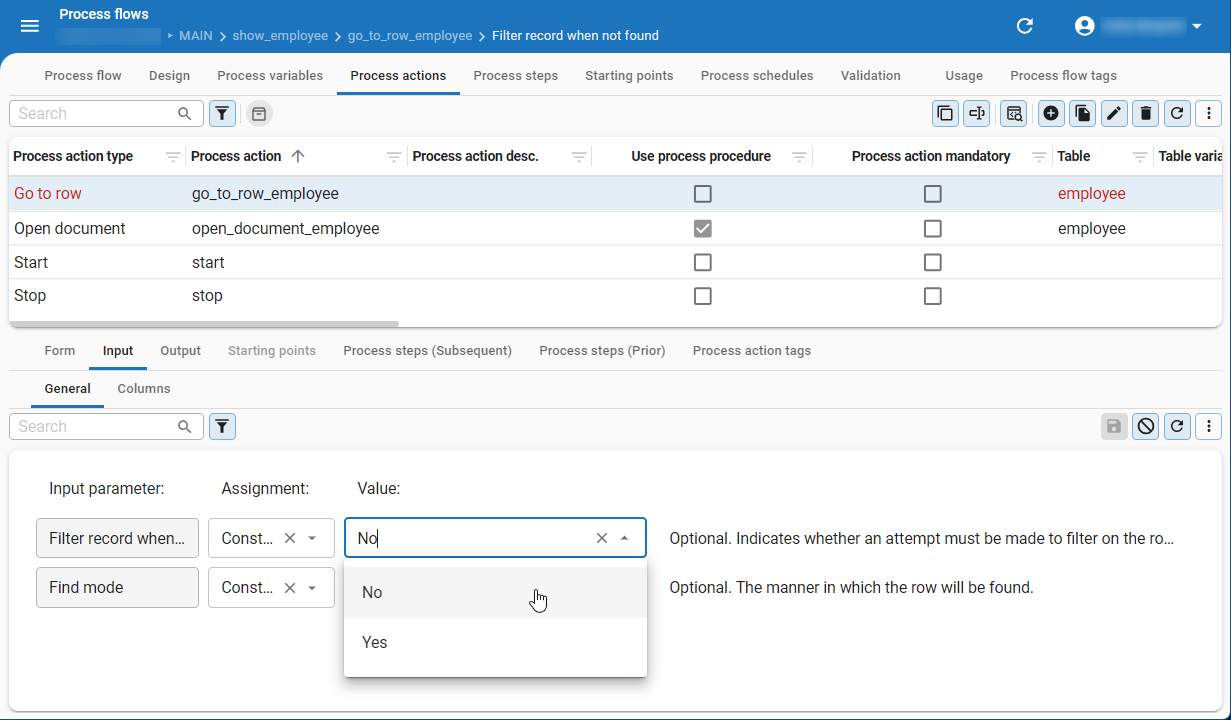 Input parameters configured for the 'Go to row' process action
Add process variables
menu Processes > Process flows > tab Process variables
Process variables can be used to store data produced by process actions and retain this data throughout the lifetime of the process flow. They can be linked to input and output parameters and are also available in the process logic concept. See Business logic in a process flow.
When a process flow is started by a user, process variables cannot provide values to the input parameters of the first process action. This is because process variables only acquire values after the first process action has been completed. Only when started by a deep link, process variables can provide values to the input parameters of the first process action.
The tab Usage shows where the process variable is being used. This can be helpful when, for example, you want to make a change to the process variable and see what impact this might have.
For more information on this generic feature, see Usage.
Add a process step (tab 'Design')
To add a process step in the modeler:
menu Processes > Process flows > tab Design
-
Select a process step connector and drag the mouse to another process action connector. This creates an arrow representing the process step.
The process actions connectors have the following colors:
- Black - represents a starting point. Any color can be connected to a black connector.
- Successful (green) - if the process action is successful, the process flow continues to the next step connected to the green connector.
- Always (blue) - the process flow continues to the next step connected to the blue connector, regardless of the success of the process action.
- Not successful (red) - if the process action is not successful, the process flow continues to the next step connected to the red connector.
To delete a process step, select the arrow and press Delete. You can drag a connector back to the same process step to create a loop.
You can also use the form to add process steps. See Add a process step in the form for more information.
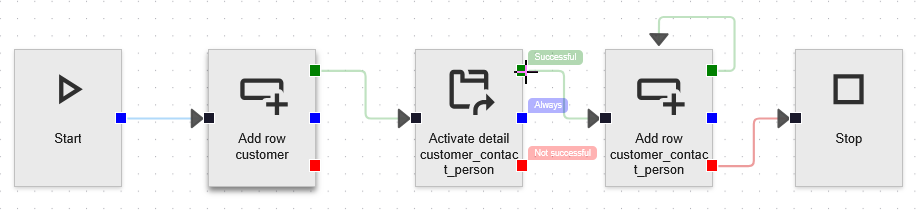 Process flow in the Design tab with 'Start', 'Add row', 'Activate detail', and 'Stop' actions connected by colored step arrows
Add a process step (tab 'Form')
To add a process step in the form:
menu Processes > Process flows > tab Process steps
-
Add
 a process step.
 -
Select the Process flow to which you want to add the process step.
-
Enter a Process step name.
-
Optional. Add a Description.
-
In the group Settings, select the Last process action and the Next process action to link together.
-
Add a condition in the field Last action successful to determine when the process flow should continue to the next process action.
- Always - This process step is always followed, regardless if the process action was successful or not.
- Successful - This process step is followed if the last process action was successful.
- Not successful - This process step is followed if the last process action was not successful.
You can use the Design tab to visually connect process actions together with process steps. For more information, see Add a process step in the modeler.
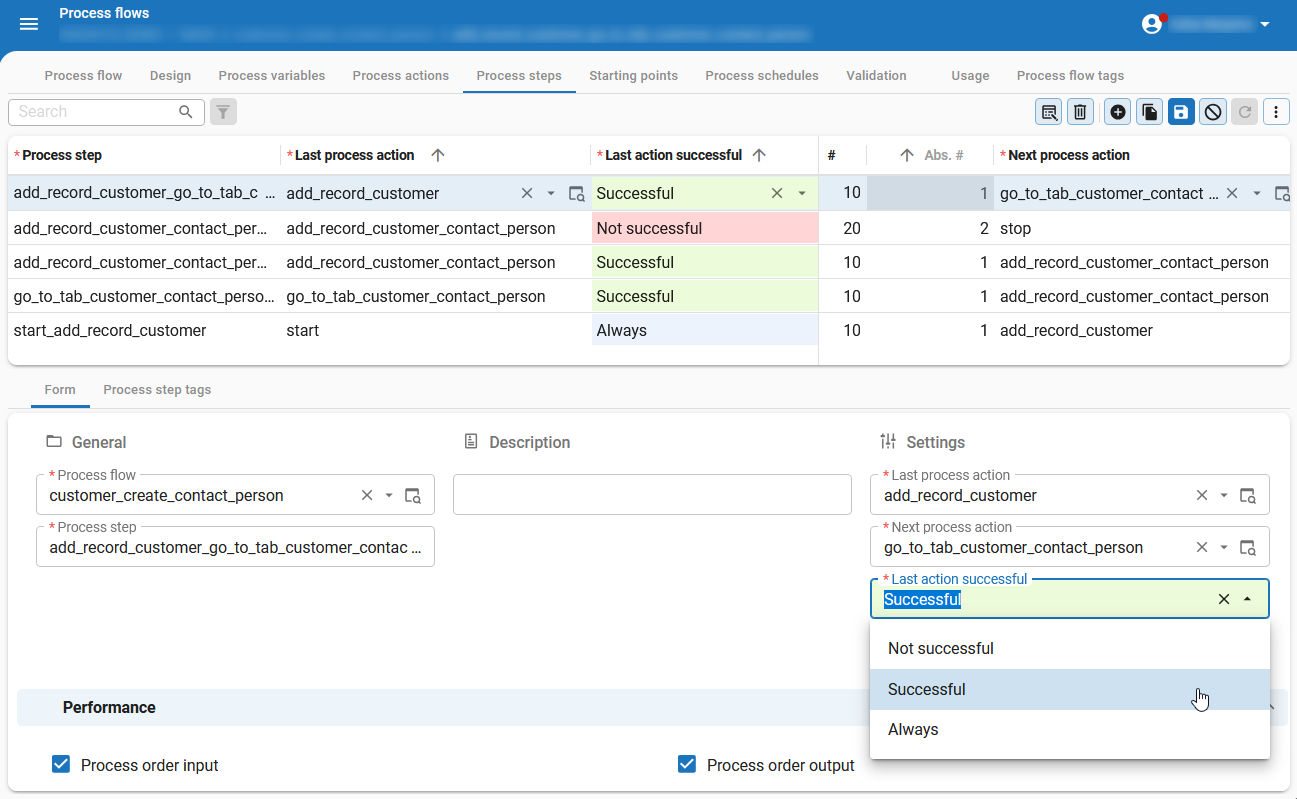 Process steps tab with the field 'Last action successful' expanded to show the available condition options
Modify a process step
To modify a process step:
menu Processes > Process flows > tab Design
- Double-click the arrow connecting the process steps.
If a process action has been completed and several parallel process steps follow, then these process steps are executed based on the specified sequence number. Subsequent actions are executed after the user completes the entire parallel flow.
You can also use business logic (a process procedure) to conditionally set the order and availability of process steps. See Change the course of a process flow.
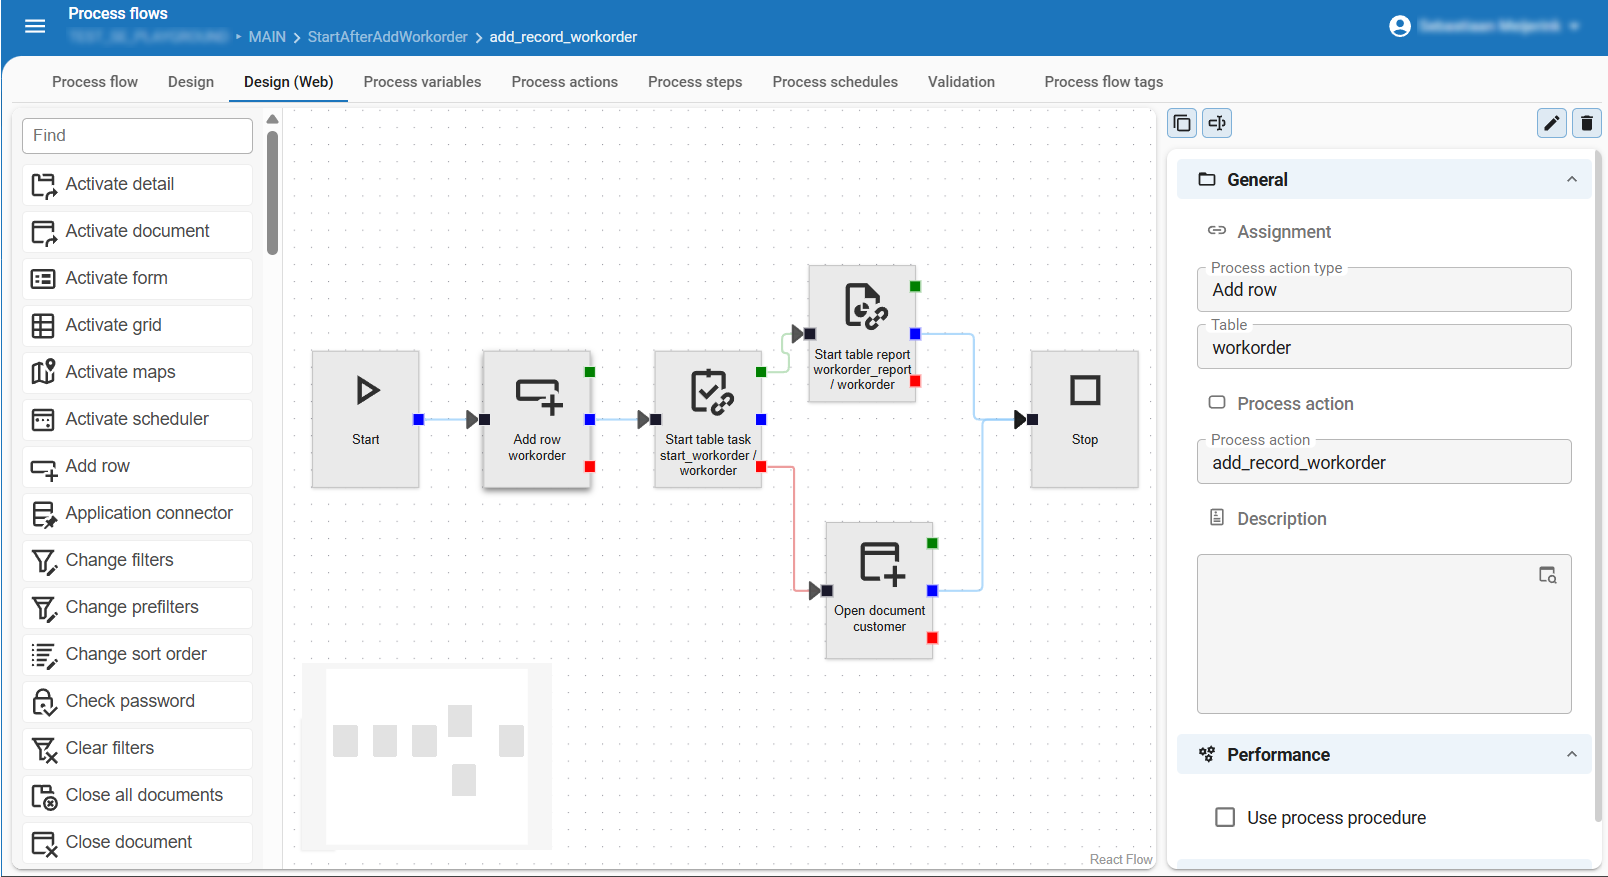 Process flow modeler with branching process steps, an action toolbar, and a configuration panel
Define a process step outside the context of a document
A process flow consists of process steps. These steps may or may not be separately accessible from the document's action bar.
To run a process step that is NOT separately accessible from the document's action bar, for example to run a specific task from the menu:
- Specify action type Start task or Start report for this process step.
- Add process variables to the corresponding task. These variables contain the process flow parameters.
Once this task has been executed as a process step, the process flow continues in the active document if the next step indicates so.
Starting points
menu Processes > Process flows > tab Starting points
You can determine starting points for process actions that can start multiple variants. For example, the process actions Start table task and Start table report. Process flow starting points determine for which variants a process flow is enabled. To do this, you need to have a table with variants in your model.
Set up starting triggers
You can determine which starting triggers are enabled for a process flow.
To set up starting triggers:
menu Processes > Process flows > tab Process flow > group Starting triggers
- Select or clear the checkboxes for the starting triggers:
- User action - If selected, the process flow can be started by user actions in the user interface.
- Deep link - If selected, the process flow can be started via a deep link URL or API call. See also, Deep linking in a process flow.
- Custom protocol - If selected, the process flow can be started via a custom protocol API endpoint. See also, Enable the message protocol independent web service.
- API - If selected, the process flow can be started via an API call. This option is only available when all other checkboxes are cleared. See also, API trigger.
If you plan to reuse process flows as subflows, you can use these settings to prevent unintentional execution. For example, if you have a subflow with Open document process action and use it in multiple places, you may not want the subflow to be started when the Open document action is triggered. You can prevent this by clearing the checkbox User action to prevent the process flow from being started directly from the UI. See also Create a subflow.
Assign rights to a role for a process flow
To ensure that the intended roles can execute a process flow, you must assign rights to these roles. You can do this for the entire process flow or specific process flow actions. System flows and system subflows do not require any rights to be assigned, as the system is performing these actions.
For more information on roles in the Software Factory, see Roles.
To assign rights to a role for a process flow:
menu Access Control > tab Role/Role group
- Go to the tab Process flows.
- Execute the task Assign rights
 .
. - Select the checkbox Granted.
- Select Assign.
Process flow in a lookup
By default, process flows are not executed within a lookup popup or context.
To enable this, first check that all process actions are allowed in a lookup.
Then, set the extended property AllowProcessFlowsInLookupDialogs to Yes.
The process actions that are not allowed in a lookup and that will be skipped are:
- Activate document
- Open document
- Close document
- Zoom detail
- Manual
Connect a process flow to another application
If necessary, there are three ways to connect process flows to other applications:
- Connectors - use a connector to connect to other applications, services and media through various common protocols, for instance, to read a file or to create a folder. A connector is a special type of Process action, see: Connectors.
- Deep linking - a deep link is a link which does not just point to the location of an application but also to a location within that application. The process flow makes a connection between the application and Indicium. See: Deep linking.
- Universal UI A message protocol independent webservice - If a third party application sets the requirements for the message protocol and OData does not suffice, a message protocol independent webservice is available in a process flow. See: A message protocol independent web service in a process flow.
Create a subflow
Subflows are process flows that can be executed within another process flow. You can use them in regular process flows as well as in system flows. They are reusable and easier to manage than manually duplicating actions and steps across multiple flows. Creating a subflow follows the same process as creating a regular process flow. It is also possible to nest subflows within other subflows, allowing for complex and modular process designs. A subflow can return the values of process variables to the process flow that called it.
To add or manage a subflow:
menu Processes > Process flows
-
Create and design a subflow in the same way as you would create a process flow.
note- If you are creating a subflow for a system flow, ensure that the subflow does not include any user interaction process actions.
- User process flows are triggered by user actions in the application interface and are limited to the user's permissions. This means users can only execute actions they have permission for. It is not recommended to include system subflows in a user subflow, since it may not run due to permission limitations.
-
Create a new process flow or open an existing one to which you want to add the subflow.
- For system flows add the process action Execute system subflow to your process flow.
- For user flows add the process action Execute user subflow to your process flow.
-
In the tab Form > group Assignment, select the Subflow you created earlier.
-
Optional. If you plan to reuse subflows flows in different locations, it might be useful to limit the starting triggers of the subflow to prevent unintentional execution. For more information, see Set up starting triggers.
-
Optional. If you are designing a system subflow, you can choose to run it asynchronously. This can be useful to prevent delays in a process flow when the subflow takes a long time to complete. To do this, in the tab Input, select the checkbox Asynchronous.
The following applies to asynchronous subflows:
- Run in the background without blocking the parent process flow.
- Are entirely separated from the parent process flow and cannot impact its continuation. It is not possible to map the output parameters of an asynchronous subflow for later use in the parent process flow.
- Run in the system context, not in the user context.
This means that the
tsf_user()function returns the pool user in an asynchronous subflow, even when a user initiated the parent process flow.
Add input and output parameters to a subflow
In certain situations, you may want to pass data between a parent process flow and its subflow. Or, you may want to retrieve data from the subflow back to the parent process flow. You can do this by using input and output parameters.
To add input and output parameters to a subflow:
menu Processes > Process flows > tab Process variables
- Add a process variable that you want to use as an input or output parameter.
- In the group Subflow, select the checkbox Input or Output to make the process variable available as an input or output parameter.
- In the tab Process actions select the subflow process action.
- Go to the tab Input or Output and add an Assignment and a Value for the parameter.
- Select Save.
Business logic in a process flow
You can use variables to store data from a process action and use this information throughout the lifetime of a process flow. Variables are linked to input and output parameters.
For more information about business logic in general, see the Business logic guide.
Use parameters in a process procedure
To reference and use returned values (output parameters) from a process action in a process procedure:
menu Business logic > Functionality > tab Control procedure
- Select the checkbox Use process procedure in the menu Processes > Process flows > tab Process actions > tab Form > tab Performance.
- For the use of parameters in the Database connector, see SQL statement in a database connector.
Show the process action code
To view the code of a process procedure:
menu Processes > Process flows > tab Design/Process actions
-
Execute task Show process action code
 (Alt + S)
You can include the last preceding program object item, or include all preceding program object items, if any. You can also include the first subsequent program object item, or include all subsequent program object items, if any.
This task is available only for process actions that use logic.
You can recognize those process actions in the tab Design by the ![]() icon.
On the tab Process actions, you can use the prefilter Contains logic
icon.
On the tab Process actions, you can use the prefilter Contains logic![]() .
.
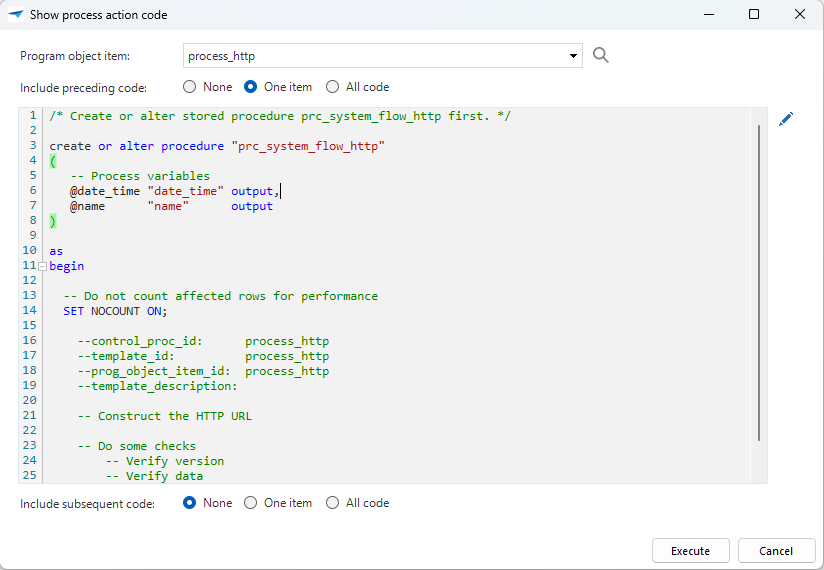 Show process action code dialog with a stored procedure and options to include preceding or subsequent code
Change the course of a process flow
menu Business logic > Functionality > tab Control procedure
The sequence of the steps in a process flow is determined by the settings in the model.
The initial status of the steps is available in all process logic. This status is determined by how the executed process action has been completed:
- When unsuccessful, the next steps for a successful execution are disabled.
- When successful, the next steps for an unsuccessful execution are disabled.
With a process procedure you can influence the course of a process flow by means of the following options:
- Change the sequence of the next immediate steps.
- Enable or disable subsequent steps.
The following information is available when executing the process logic:
| Parameter | |
|---|---|
process_variable_id | All values of variables in the process flow marked as Process input available or Process output available. |
follow_up_process_action_id | All follow up process actions. A value of null, 0 or a negative value means the process action will not be executed. |
If an action has not been completed successfully, some variables may be empty or unvalidated.
For example, you can use output parameter order_status to fill a variable.
Then, use this variable as input for the process procedure.
With this input, you can change the order and execution of steps in a process flow (print a report or not).
The code below ensures that the next step to print_report is not executed if the order_status is 1:
if (@order_status = 1)
begin
  set @print_report = 0
end
Create a system flow
IndiciumSystem flows are process flows entirely handled by Indicium, and does not require any user interaction. They are designed to run in the background and perform tasks such as data synchronization and file management. If you synchronize your work to IAM, you can test and monitor the system flow there. For more information, see Monitor a system flow.
Creating a system flow is similar to creating a process flow.
menu Processes > Process flows > tab Process flows
- Create a process flow.
note
System flow descriptions are synchronized to IAM so main administrators and application administrators in IAM know the purpose of a system flow, see IAM system flows.
- Add a process action without user interaction to your process flow (tab Process actions). Then, the process flow is automatically marked as a system flow.
tip
Open the lookup
to check which action types are available for system flows. - To run multiple system flow instances in parallel, go to the tab Process flows and select the checkbox Multiple running instances.
IAM lets system flow instances run in parallel only when allowed. However, you cannot configure the number of allowed parallel instances. We recommend that you create a queuing table in your end-product. IAM then executes a system flow according to its active schedule and allows multiple instances to run parallel. The system flow also tracks the created queuing table to determine whether or not to continue executing. For example, the system flow could start with a task to consult the queuing table. If the first record's status is 'Open', the flow will continue. If no records are available, the flow will continue to 'Stop'.
Supported system flow actions
Supported system flow actions currently are:
- Application Connector
- Database Connector
- Web connection
- HTTP Connector
- SMTP Connector
- Email connector
- Oauth Connectors
- Check password
- Hash password
- Decision
- Encrypt
- Decrypt
- Execute subflow
- Execute system task
- Generate report
- Read file
- Write file
- Move file
- Copy file
- Print file
- Delete file
- Create folder
- Move folder
- Copy folder
- List folder
- Delete folder
- Provision database
- Send user notification
- Generate report
- Extract JSON data
- Convert JSON to XML
- Convert XML To JSON
System flow schedules
Create a system flow schedule
You can schedule a process flow for execution by the Indicium service tier, but only when it uses process actions that do not require user input. In the Software Factory and IAM, these process flows are referred to as system flows. These include, for example, the available connectors and adapters. You can define more than one schedule for a system flow.
To create a system flow schedule:
menu Processes > Process flows > tab Process schedules
 Mark one of these schedules as the default schedule with which the system flow is executed.
- You can deviate from this default schedule in IAM.
- You can disable process schedules in Indicium's
appsettings.jsonfile. See Disable background operations
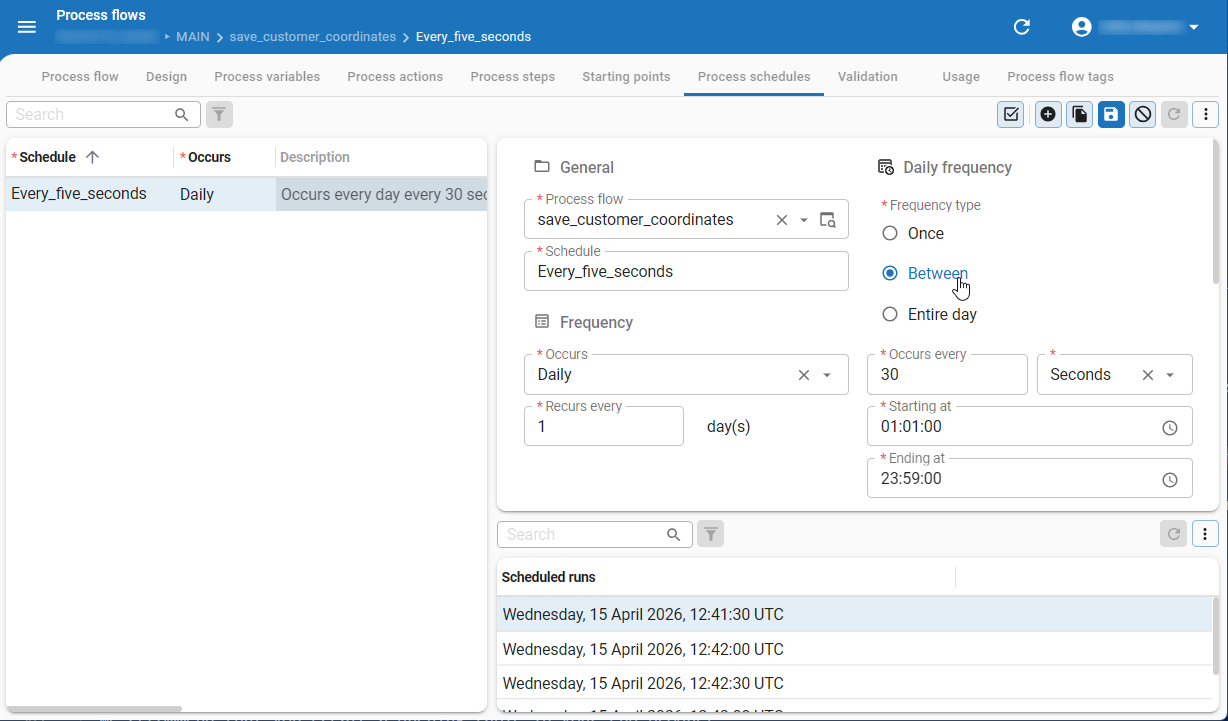 Process schedules tab with a daily schedule configured to run every 30 seconds between 01:01 and 23:59
Allow a custom system flow schedule
In IAM, a main administrator or application administrator can create a custom schedule for a system flow.
First, you need to allow this in the Software Factory:
menu Processes > Process flows
- Select a system flow.
- Select the checkbox Custom schedule allowed. Disabling it will also disable existing custom schedules for the system flow in IAM.
Now, an administrator can create custom schedules for system flows in IAM. See Scheduled system flows in IAM.
Speed up SQL performance (schedule as system flow)
See chapter speed up SQL performance (schedule as system flow) in the IAM manual.
Schedule log settings
See the Schedule log settings in the IAM manual.
Manage users from an application
Users can be managed from an application instead of IAM. This is useful if you want to handle user onboarding and access changes in the end application, without needing to access IAM. To do this, create a process flow in the Software Factory for user management. The process flow can be a system flow or a user process flow.
Limitations of managing users from an application
Managing users from the application side has some limitations compared to managing users from IAM.
Only the following user management actions are supported:
- Creating a user (see also, Add users)
- Updating a user's information
- Assigning a user to a user group (see also, Add a user to a user group)
- Update a user's group assignment
Create a process flow for user management
To create a process flow for user management:
- Create a process flow in the Software Factory.
- Add the relevant process actions and complete the mandatory fields for each action:
- Create IAM user - Creates a new user in IAM.
- Update IAM user - Updates an existing user in IAM.
- Assign user to user group - Assigns a user to a user group, optionally within a specified period.
- Update user group assignment - Updates the period of an existing user group assignment.
- Set up user roles and rights for the process flow:
- Assign rights to the desired roles for the process flow in the Software Factory.
- If not configured yet, assign the role to a user or user group in IAM.
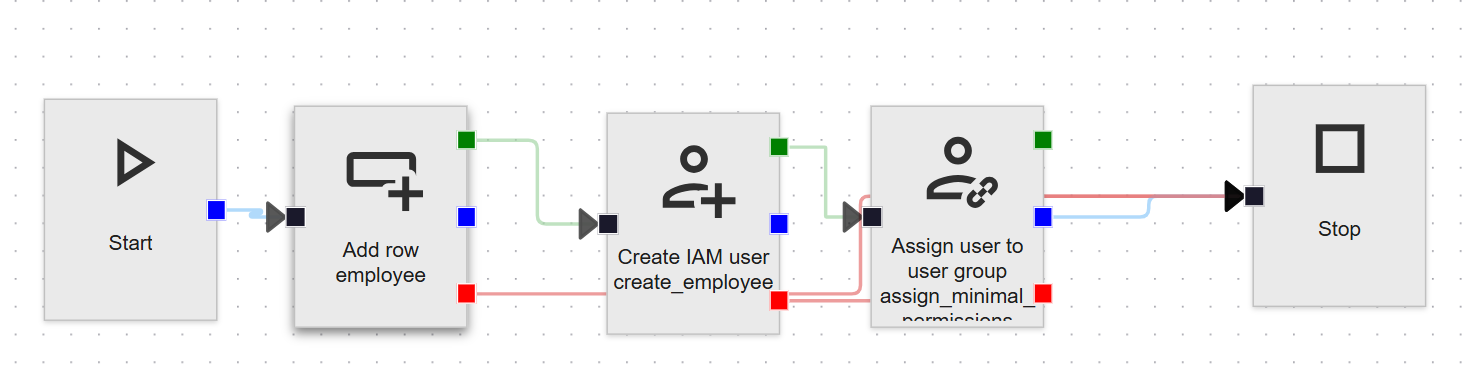 Process flow for user management from an application
Monitor a process or system flow
You can monitor what happens during the execution of a process flow and a system flow. This is useful for troubleshooting and optimizing your process flows.
See:
Deep linking in a process flow
Universal UIIntroduction to deep linking
Deep linking is a different type of process flow that cannot be used in the same way as a regular process flow. You can use it to direct someone from outside your application to a specific location within your application, for example, by sending a link by email or in a chat. When clicking the link, this person is led directly to a specific subject in your application, or a specific record within that subject, and a table task or report can be executed for that record. Therefore, a process flow with a deep link cannot be started from within your application.
Examples of deep linking
Some examples of when you can use deep linking are:
- Mailing a ticket status update to a customer - This flow would contain process flow actions like Open document and Go to row,
and include process variables such as the
ticket_idandstatus. - Ask someone to approve an invoice - This flow would contain process flow actions like Open document, Change filter, Go to row, and Start table report.
- Send a notification about a new order - This flow would contain process flow actions like Open document, Go to row, and Start table task.
Enable deep linking
To enable deep linking:
menu Processes > Process flows
- Select a process flow.
- In the group Starting triggers, select the checkbox Deep linking allowed.
Enable variables in a deep link
Variables in a deep link allow the implementation of more dynamic scenarios, such as navigation to a specific record.
To enable variables in a deep link:
menu Processes > Process flows > tab Process variables
- In the group Deep linking, select the checkbox Available.
- Select the checkbox Mandatory if a deep link should be mandatory for all new process flows.
Prepare and validate deep links
When a deep link is started, it might be necessary to validate or prepare some issues before starting the process flow. For example:
- You want to notify the user if the variable values provided by the deep link make no sense.
- The process flow requires additional variables containing sensitive information that you do not want to include in the deep link.
To fulfill these requirements, you should implement the process procedure of the Start action. Traditional process flows will never initiate the process procedure of the Start action, but deep links will.
The process procedure will receive the values of the variables in the deep link. Based on these values, the values of other variables can be set and determine how the process flow should continue.
Create a deep link
After configuring a process flow for deep linking, you can create the deep link itself.
The format of a deep link URL is:
https://[server]/#application=[application_alias or id]/processflow=[process_flow_id]?[process_parameter1]=[value1]&[process_parameter#]=[value#]
[application_alias or id]- the alias or the id of the application.[process_flow_id]- the ID of the process flow that must be started by the deep link.[process_parameter#]and[value#]- the ID of the process parameter and the value it should receive. You can add multiple process parameter and value pairs, separated by an&character.
Example:
https://universal.mycompany.com/#application=myapp/processflow=startdocument?record_id=2
Result:
The Universal UI opens the application with alias myapp, start process flow startdocument, and set the process flow variable record_id to 2.
The application variable in the URL can be an application alias or an application id.
Start a process flow by posting variables
IndiciumIf deep-linking is enabled in a process flow, you can post process flow variables with their values to start the process flow with those values.
This type of POST request has syntax:
POST iam/{appl}/process_flow_id
body
{
   "{variable}": "{string or date value}",
   "{integer variable}": {int value},
  ...
}
Possible error messages when posting process flow variables
When posting process flow variables, the following BadRequest error messages can occur. The code examples illustrate POST requests that cause these error messages.
-
Request bodies are only allowed for process flows which have deep linking enabled.
POST iam/{appl}/process_flow_where_deeplinking_is_not_allowed
body
{
    "variable": "any value"
} -
Process flows with multiple starting points cannot be supplied with a request body.
POST iam/{appl}/process_flow_where_deeplinking_is_allowed_but_with_multiple_starting_points
body
{
    "variable": "any allowed value"
} -
Process variable
variableIDdoes not exists in process flow:processFlowID.POST iam/{appl}/process_flow_where_deeplinking_is_allowed_but_with_unknown_process_variable
body
{
"unknown_process_variable": "any allowed value"
} -
Process variable
variableIDis not available for deep link.POST iam/{appl}/process_flow_where_deeplinking_is_allowed_but_with_process_variable_which_is_not_allowed_with_deeplink
body
{
"non_allowed_deeplink_process_variable": "any allowed value"
} -
An invalid value was supplied for process variable
variableID. Only primitive values are allowed.POST iam/{appl}/process_flow_where_deeplinking_is_allowed_but_with_process_variable_with_invalid_value
body
{
"process_variable": "any invalid not primitive value"
} -
An invalid value was supplied for process variable
variabeleID. Cannot convertvariable value: any non integer valueto typeint.POST iam/{appl}/process_flow_where_deeplinking_is_allowed_but_with_process_variable_with_invalid_value
body
{
"int_variable": "any non integer value"
} -
The mandatory deep link process variables
missing process variableswere not provided. Please supply these properties to start this deep link process flow.POST iam/{appl}/process_flow_where_deeplinking_is_allowed_with_mandatory_deeplink_process_variable
body
{
} -
Length of
process variablecannot exceedmaximum value.The length of the variable is greater than the set maximum in the domain (menu Data > Domains > tab Form > field Max. value).
POST iam/{appl}/process_flow_with_a_variable_with_a_maximum_domain_length.
body
{
"process_variable": "the entered value that is too large"
} -
Process variablehas too many digits (wasentered number of digits)More decimal points than the set maximum in the domain (menu Data > Domains > tab Form > field Max. value).
POST iam/{appl}/process_flow_with_a_variable_for_a_domain_with_a_maximum_number_of_decimal_points.
body
{
"process_variable": "the entered value with too many decimal points"
} -
Process variableshould be betweenminimum valueandmaximum value(wasentered value).The entered value is outside the allowed range set in the domain (menu Data > Domains > tab Form > fields Max. value and Min. value).
POST iam/{appl}/process_flow_with_a_variable_with_a_maximum_and_minimum_domain_length.
body
{
"process_variable": "the entered value that is too high or low"
}
A message protocol independent web service in a process flow
IndiciumIf a third party application sets the requirements for the message protocol and OData does not suffice, a message protocol independent web service is available in the Software Factory. This web service supports all HTTP-based messaging protocols, such as SOAP, GraphQL, OData and even your own proprietary protocol. It can be utilized when your Thinkwise application regularly receives information from third-party applications. For instance, to receive recurring SOAP messages containing changes from a data supplier or message queues with specific JSON messages.
This process flow behavior can only be used for system flows (i.e. process flows without user interaction). The process flow can be set up as usual, but starting points will automatically be disabled and also deep linking is no longer available.
Message protocol independent web services cannot be scheduled. If you enable this behavior, the Process schedules tab is no longer available.
Enable the message protocol independent web service
To activate this process flow behavior:
menu Processes > Process flows > tab Process flows
- Select the process flow.
- Select the Custom protocol checkbox.
- Optional. In the field API alias, enter the name that suits the requirements of the third party application. If entered, this name will be used in the URL.
API endpoint for message protocol independent web services
When the API box is checked, Indicium creates a special API endpoint:
/open/iam/<appl>/<process_flow_id>.
Or, if an API alias is available, the endpoint is:
/open/iam/<appl>/<process_flow_api_alias>.
The first segment of the endpoint is /open because it is a special endpoint, entirely separate from Indicium's regular OData endpoints.
This endpoint accepts any request type that you send to it, as long as the URL path is as shown above. All requests are valid, no matter what the HTTP method is, whether you add a query string to the URL, which headers you include or what the request body is.
Variables and properties
menu Processes > Process flows > tab Process variables
To be able to make the request, the process variables in the flow need to be connected to a property. Indicium will fill the variable with the value corresponding to the request property from the API call and return the response with values from the process variables with the corresponding response properties.
- When an HTTP request property (Method, Path, Query string, Request body, Request headers) is mapped to a process variable, that process variable is initialized with the corresponding value in the HTTP request that started the process flow.
- When an HTTP response property (Response body, Response code, Response headers) is linked to a process variable, the values of those process variables determine the response that Indicium gives.
Please note the following restrictions that apply to the process variable properties:
- Method - The domain must be a string type, such as (n)varchar or an equivalent type.
- Path - The domain must be a string type, such as (n)varchar or an equivalent type.
- Query string - The domain must be a string type, such as (n)varchar or an equivalent type.
- Request headers (json) - The domain must be a string type, such as (n)varchar or an equivalent type. The value will be formatted in JSON like this:
{ "Header1": [ "value1", "value2" ],"Header2": [ "value"] }. - Request body - The domain must be a string or binary type, such as (n)varchar, varbinary or an equivalent type.
- Response code - The domain must be an integer type, such as int or an equivalent type. The value must be a valid HTTP response status code (e.g. 200, 204, 404, etc.)
- Response headers (json) - The domain must be a string type, such as (n)varchar or an equivalent type. The value must be formatted in JSON like this:
{ "Header1": [ "value1", "value2" ],"Header2": [ "value"] }. - Response body - The domain must be a string or binary type, such as (n)varchar, varbinary or an equivalent type.
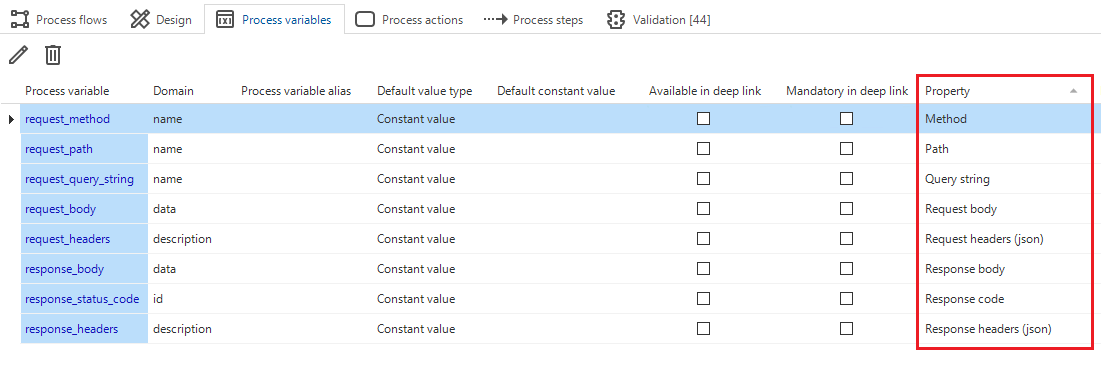 Process variables tab showing HTTP request and response variables linked to their corresponding API properties
Creating a request for a message protocol independent webservice
The base URL of the request must always start with:
/open/iam/<appl>/<process_flow_id>
or
/open/iam/<appl>/<process_flow_api_alias>(see API alias).