Models and branches
Introduction to models and branches
When multiple developers or teams work on different features of an application, they can make additional branches within a model for these features. Each feature can be developed separately in its own branch. When completed, it can be combined (merged) back into the model's origin branch. This way, a new feature can be developed and tested independently from the rest of the model.
To fine-tune your development workflow, you can create multiple branches for multiple features:
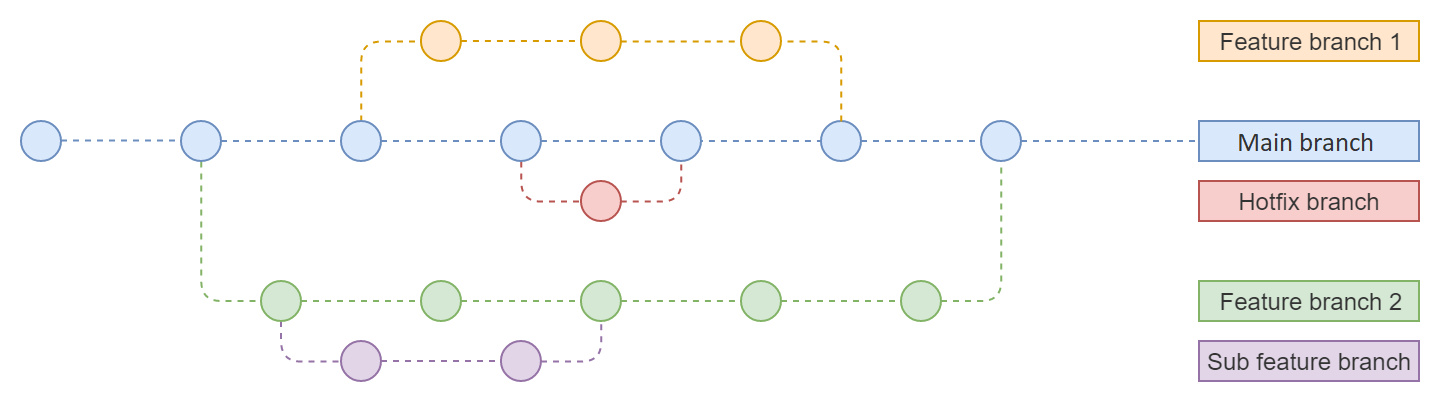
Branching example containing two feature branches, a hotfix branch, and a sub-feature branch
Overview of models and branches
menu Models > Model overview
- The Models tab contains a list of all models in the Software Factory development environment. It allows you to create new models and branches.
- The Branches tab contains a list of the MAIN branch and all other branches of the selected model. It allows you to add a new branch and modify the generic settings for these branches.
- The Quality dashboard tab gives an overview of the overall quality of the selected model.
Select a model and branch on start-up
Upon starting the Software Factory, you need to select the model or branch in which you want to work. By default, your most recent model and branch are selected. This can also be a model or branch you just created and continued working in.
If only one model and branch are available in the prefilters for My models/branches ,
the Software Factory will automatically start this model and branch.
In that case, you can still switch to another model or branch.
See:
- Switch to another model or branch
- Add a model or branch to the 'My models/branches' prefilters
- Remove a model or branch from the 'My models/branches' prefilters.
Switch to another model or branch
To indicate which model and branch you are working in, a breadcrumb trail is available on every screen, displaying the model and branch.
Model/branch breadcrumb
If you want to work in another model or branch, it is possible to switch:
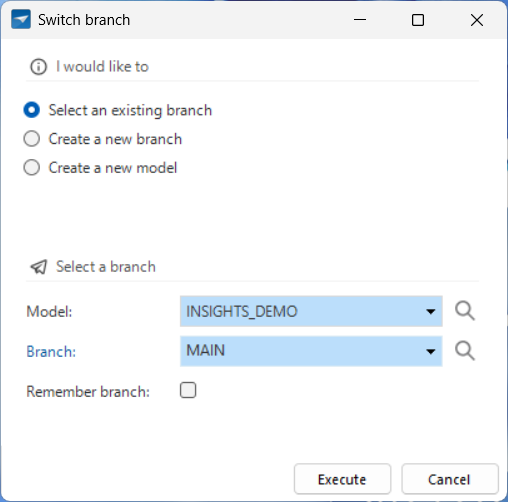
menu Models > Switch branch
- Select a Model.
- Select a Branch.
If necessary, use the lookup to select a model or branch.
If the model or branch you are looking for is not visible, deselect the My models/branches
prefilter.
See also Add a model or branch to 'My models/branches' prefilter and Remove a model or branch from 'My models/branches' prefilter.
After switching to another model or branch, all open windows will be closed to prevent working in your previous model or branch.
The Software Factory keeps track of the model and branch you selected and will automatically select these again when you log in.
Add a model or branch to 'My models/branches' prefilter
You can add models and branches to the prefilter My models/branches .
menu Models > Model overview > tab Models / tab Branches
- If necessary, deselect the prefilter My models/branches
. Now, all available models and branches are visible.
- Select the model or branch you wish to add to the prefilter.
- Execute the task Add to 'My models/branches'
.
- Reselect the prefilter My models/branches
. Now, the model and branch you added are still visible.
Remove a model or branch from 'My models/branches' prefilter
You can remove models and branches from the prefilter My models/branches .
menu Models > Model overview > tab Models / tab Branches
- Select the model or branch you want to remove.
- Execute the task Remove from 'My models/branches'
.
Models
Create a new model with a MAIN branch
To create a model with a MAIN branch:
menu Models > Model overview > tab Models
Execute the task Create model
.
Add a Model name and a Description.
The Branch name is set to 'MAIN' by default. If you follow a different naming convention, you can change this field.
If necessary, change the RDBMS Type. A model can only support one RDBMS type.
Select Execute.
Add a new model
The following configuration settings are retrieved from the Default configuration (menu Maintenance > Configuration).
- Company name.
- Sub name group.
After creating the MAIN branch, a job will be scheduled automatically to generate its definition. You can view this job in the menu Maintenance > Jobs.
Switch to a newly created model or branch
After creating a new model or branch, answer the question if you want to switch to it. This prevents working in the wrong branch.
- If you choose to switch, all open documents will be closed, and your session will be updated to the new model or branch. The Model overview screen will be reopened automatically with the new model/branch combination as the selected row.
- If you do not switch, the Software Factory keeps all documents open in the context of the original model/branch combination. In addition, a new Model overview screen is opened with the new model/branch combination as the selected row.
To switch to the model or branch at a later moment, see Switch to another model or branch.
Start working in the new model or not
Set model details
After creating a new model, set more details:
menu Models > Model overview > tab Models > tab Model overview
Select whether the model is a Base model. If it needs to be linked to new models by default, select Def. base model. Only the MAIN branch of a base model is automatically linked to a new model.
Base models are models that are only used by other models. A base model contains the necessary details for the correct operation of a model, a supplement, or an addition, such as a standard theme or default translations. Also, Thinkstore models can be used as a base model inside your work model. For more information, see the chapter Base model.
Select whether the model is a Work model.
A new model usually is a work model because you are going to develop it. When you create a new work model, the Software Factory will automatically link default base models to it. Only base model branches without origin or default base models will be linked.
To hide a model, clear the checkbox Work model. Then it will no longer show in tasks for selecting a model or switching to another branch. It will also be hidden by prefilters on the screens.
- The Notification email address is used for sending notifications to the development team about the start and finish of definition generation and source code generation. Make sure the notification settings are set in the Default configuration screen to receive emails.
Model settings
Rename a model
At the moment, it is not possible to rename a model or branch because that would cause a loss of history.
Export a model
You can export your own work and base models. By exporting a model, you can share it between different environments. This is a fast and easy way to enrich your models.
Exporting a model only makes sense if it has a branch (a model without a branch is empty).
To export a model:
menu Models > Model overview > tab Models
- Execute the task Export model
.
- Enter a Model and Branch name.
- Select Execute.
- Select a folder and, if necessary, change the name. The default name contains the date and time of the export, the model, and the branch name.
Note that
.dat
is the only allowed extension for importing a model. - Select Save.
The entire model and branch will be compressed and exported, excluding trace columns and non-default runtime configurations. You can download it via the pop-up.
Export base data
Export base data if the model you want to export uses base data which is not present in the receiving Software Factory, like user-created controls or font faces.
To export base data:
menu Advanced > Master data > Software Factory > Export base data
- Execute the task Export base data
.
- Select a folder and, if necessary, change the name. The default name is 'base_data.dat'. Note that
.dat
is the only allowed extension for importing a model. - Select Save.
Import a model
You can import an exported model into another model or even into another Software Factory. This can be done into a model without a branch or into a new model that does not yet exist. You can also merge imported model data with an existing model to update an existing branch. This ensures that the contents of the target branch are completely overwritten to match the exported model exactly.
You can only import a model into another Software Factory if the platform version is the same as the Software Factory from which the model was exported.
The only allowed extension is .dat
.
To import a model:
menu Models > Model overview > tab Models
- Check if it is necessary to import base data before importing the model. See Import base data.
- Execute the task Import model
.
- Select the File path of the
.dat
file you wish to import. - If necessary, change the Model and Branch name.
- Select Execute.
The model will be decompressed and imported. Trace columns will be filled with the user name 'Imported' and the current system date and time.
Import base data
Import base data if the model you want to import uses base data which is not present in the receiving Software Factory, like user-created controls or font faces. You can recognize this situation when an import fails because of missing objects.
Example of a domain which cannot be imported because of a missing user-created datatype
To import base data:
menu Advanced > Master data > Software Factory > Import base data
- Execute the task Import base data
.
- Select the File path of the
.dat
file you wish to import. - Select Execute.
- Import the model again, now that the required base data is present. See Import a model.
Base data may be overwritten when upgrading platform versions.
Base models
Base models are models that are only used by other models. A base model contains details that are necessary for the correct operation of a model, a supplement, or an addition, such as a standard theme or default translations. Also, Thinkstore models can be used as a base model inside your work model.
- To create a base model, see chapter Create a new model with a MAIN branch.
- For more information about base models for languages, see chapter Application languages.
You can link only one branch of a base model to a branch of a work model.
menu Models > Model overview > tab Branches > tab Base models
This tab provides an overview of all base models and whether they are linked to this branch or not.
If necessary, use prefilter Linked to view only the linked base models.
To link a branch of a base model to a branch of a work model:
Select the base model.
Execute task Link base model
.
noteIf you do not want to use the current MAIN branch, execute task Select a previous branch
.
When you link a base model branch to a work model branch, it needs to be generated to obtain the model of the base branch.
To generate the definition immediately, reply Yes to the question "Do you want to generate the definition for model [MODEL NAME] > [BRANCH NAME] immediately?". You can also reply No, link other base model branches, and generate the definition after the last one with the task Generate definition
.
More tasks are available:
Unlink base model - To unlink a base model branch from a work model branch. Note that components of the base model will be removed from the work model during generation. Only components that are no longer in use are removed. It might take multiple generations before all components are cleaned up.
Never unlink the base model SQLSERVER_MODEL_INFO
from a work model. This base model is required for versioning when creating and upgrading code files.
Merge base models into work models - To import the base models for the selected work model without generating. This is an expert function that can be used for testing new features from a base model in a work model.
Branches
Branch diagram
The branch diagram shows a graphical overview of the branches inside the model and how they interact.
menu Models > Model overview > tab Branch diagram
Archived branches are included in this diagram by default, and they are shown in grey.
You can exclude them by executing the task Show/Hide archived branches .
For more information on managing branches, see this blog in the Thinkwise Community.
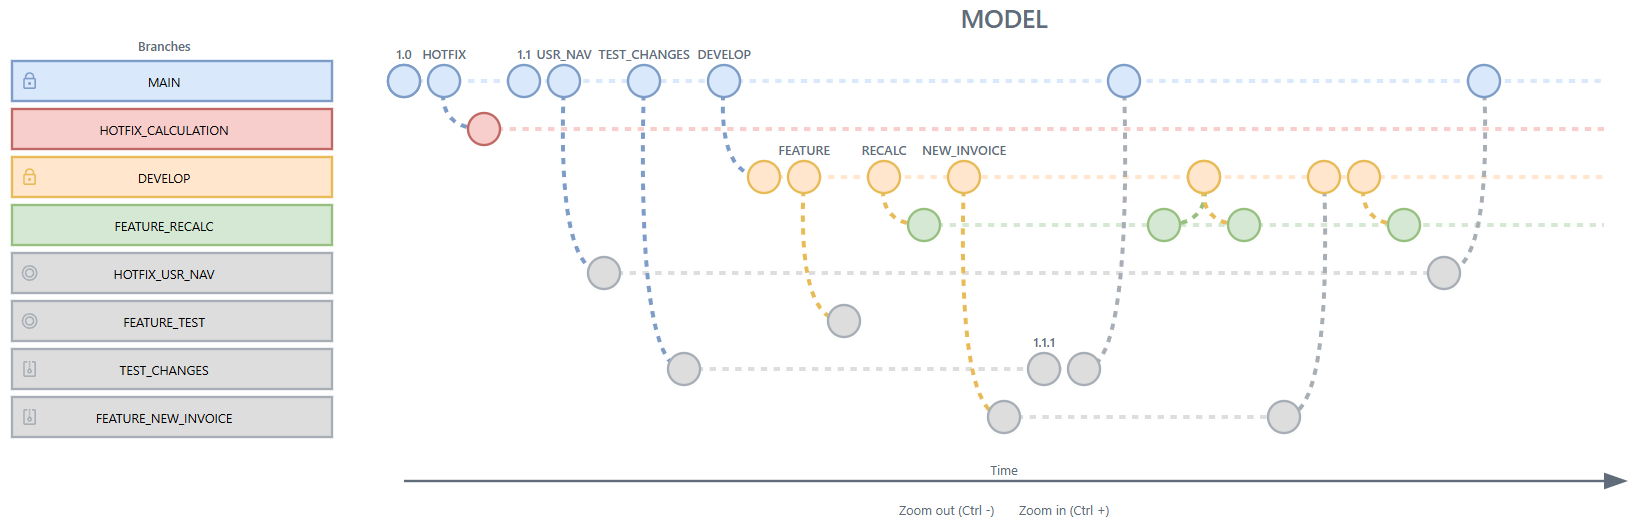
An example of a branch diagram
Create a new branch
A branch is created within a model. The origin is tagged with the current point in time, and the branch is copied from that point in time.
menu Models > Model overview > tab Branches > tab List
Execute the task Create branch
.
Select the Origin branch you want to base your new branch on.
Select the point in time you want to base your new branch on:
- Current point in time - Based on the current branch, as it is now.
- Specific point in time - Based on an earlier point in time, for example, yesterday at 9 AM.
- Select model version - Based on how the branch was at a certain point in time. See Model versions.
Enter a New branch name.
If necessary, select a folder (Branch folder) and the database (Branch database name).
Create a new branch
Only the creator of the branch has access to the active runtime configuration. All other users can activate the runtime configuration for this branch in the menu Maintenance > Users. Select the user, open the tab Runtime configurations, and find the corresponding runtime configuration.
Rename a branch
At the moment, it is not possible to rename a model or branch because that would cause a loss of history.
Delete a branch
When deleting a branch, all underlying data and then the branch itself will be removed. Any related merge session to this branch will no longer be executable.
Instead of deleting a branch entirely, you can also choose to archive the branch.
Revert a branch
In some situations, you may want to revert a branch:
- Without a merge session: if something went wrong in a branch and you want to make a fresh start, you can revert the branch to, for example, yesterday.
- After a merge session: when you completed a merge session and the result is undesired, you can undo the merge session by reverting the branch. For example, when resolved conflicts do not turn out as intended. When executing a merge session, two model versions will be created in the target branch to indicate the moments before and after.
Model versions, before and after a merge
Reverting a branch to an earlier point in time will simply undo any changes done to the model:
menu Models > Model overview > tab Branches > tab List / tab Model versions
Execute the task Revert branch
.
If necessary, change the Model and Branch you wish to revert.
Select whether you want to revert to a Specific point in time or a Specific model version.
Select whether you want to revert to the branch immediately or review the changes first.
Reviewing the changes first will take you to a merge session that shows all the actions that will be taken as if the reversal was initiated in a branch. This type of one-sided merge session will never have conflicts.
Revert a branch
Archive and unarchive a branch
Archiving a branch will delete all its operational data.
This reduces the database size of the Software Factory and increases performance. The branch record and model version information is retained,
which makes it different from deleting a branch entirely.
This provides two additional possibilities compared to deleting a branch:
The branch remains visible in the Branch diagram.
The branch can be unarchived
so that you can work in it again. This will restore all data as stored in the history tables based on the state of the branch just before it was archived. It is not possible to switch to an archived branch to work in it.
If your database contains too much historical data, you can decide to delete the history from a specific point in time, for example, anything older than five years. It will then no longer be possible to unarchive a branch because its historical data cannot be re-inserted.
If neither of these possibilities are desired, you can choose delete the branch entirely.
It is not allowed to archive the MAIN branch or branches that are the origin of other branches that have not been archived.
Set branch details
Branch details
menu Models > Model overview > tab Branches > tab Form
- Database storage location - You can divide the database into separate files and store them on separate drives.
For example, you can store invoices on the SSD and customer data on the HDD. You can mark these storage locations for a table or index to retrieve data faster.
- Table storage
- Index storage
- Data migration and upgrade
- Source branch and Source model version - Shown here for informational purposes only. They can be changed in menu Data > Data migration > tab Tables
with the task Set source for data migration and upgrade
. They can also be changed in the Creation process, when generating the definition or executing all creation steps.
- Source branch and Source model version - Shown here for informational purposes only. They can be changed in menu Data > Data migration > tab Tables
with the task Set source for data migration and upgrade
- Merging
- Origin branch and Origin model version - Shown here for informational purposes only. They indicate from which branch and model version the specified branch originates. This information serves as input for a merge session when the specified branch is being merged again.
Correct foreign key casing
Because incorrect casing may cause problems in the user interfaces or in the Indicium service tier, a task is available to correct the casing, if necessary.
menu Models > Model overview > tab Branches > tab List
- Execute the task Correct foreign key casing
.
Locate an invalid XML character
Some characters, such as the 0x0A
linefeed character, can cause problems when serializing the model to XML.
These (control) characters, which are often not displayed, can be located using this task.
menu Models > Model overview > tab Branches > tab List
- Execute the task Locate invalid XML character
.
- If you already know which table to scan for invalid characters, enter the Table name. Leave it blank to scan all tables.
Retrieve the number of rows
You can query the number of rows for all tables in an end-product database.
This number is stored in the NO_OF_ROWS
table tag and can be used to automatically enrich the model.
For example, by changing the look-up control or screen type of an entity based on the number of rows in the database, to optimize the performance or user experience.
menu Models > Model overview > tab Branches > tab List
- Execute the task Retrieve number of rows
.
Model settings for a branch
For each branch, you can add or change model settings. When you merge a branch to it's MAIN branch, these settings will be included.
menu Models > Model overview > tab Branches > tab Model settings
- General
- Multiple live versions - select to allow more model versions. By default, only one model version can have the status 'Production'.
- Form
- Floating label strategy - Universal GUI Select a strategy for floating labels. See Floating labels strategy.
- Task
- Enable for empty subject - To enable the table task when no records are present on the screen. Adjusting this setting afterward will not change the existing rows. It will only affect the default value for new rows.
- Report
- Enable for empty subject - To enable the table report when no records are present on the screen. Adjusting this setting afterward will not change the existing rows. It will only affect the default value for new rows.
- Data
- Use domains - Enabled by default. When you disable it, all tables will use standard data types instead of the user-defined data types for the domains. Disable it when, for example, you wish to use SQL Data Synchronization to synchronize data between Azure databases since this tool cannot process user-defined data types. If you change this option, all tables need to be rebuilt. They will automatically be set to status 'changed' and added to the data conversion (and therefore to the upgrade script).
Floating labels strategy
Universal GUIFor the Form component, the Software Factory allows separate specifications for Label width (px) and Field width (px) in the Model settings.
However, these specifications do not work well for input controls in the Universal GUI that use floating labels. Instead of placing a label in front of the input control, floating labels are placed inside the input control. When a value is entered, the label floats to the top inside the input control.
Example of a floating label
You can configure per model whether the label width should be ignored for or included into the input control. Only forms and parameter pop-ups will be affected by this setting. The CHECKBOX and LABEL control types will never be affected as they do not use floating labels.
menu Models > Model overview > tab Branches > tab Model settings
Select an option for the Floating labels strategy:
- Ignore the label width - Only the field width is used.
- Include the label width - Default. The label width and the field width will be added up to determine the size of the input controls.
Example
Given the following form configuration in the Software Factory:
The Windows and Web GUIs that do not use floating labels will display the form as follows:
The orange color on top indicates the full form element width including the label. The green color underneath the fields indicates only the input field widths.
For the Universal GUI:
If the Floating labels strategy is set to Include the label width, the form with floating labels will be displayed as follows:
If the Floating labels strategy is set to Ignore the label width, the form will be displayed as follows:
Large labels may get too little space when they are used as floating labels in small input fields.
Branch as model version
Tag a branch as model version
menu Models > Model overview > tab Branches > tab Model versions
You can tag a branch at a certain point in time as a model version. This model version can be used for upgrades or branching and merging.
The column Model version type indicates whether model versions have been added by a process such as merging or archiving. Model version descriptions that have been added by a process cannot be changed, except for descriptions of model versions added by the Creation process.
Model version status
menu Models > Model overview > tab Branches > tab Model versions
The column Status indicates the stage or environment of the branch.
The following statuses are available:
- Test - When the development phase is completed, the branch can be tested.
- Acceptance - During the acceptance phase, users can become acquainted with the system and detect any final errors.
- Production - When the system is accepted, it is put into production. The branch can no longer be modified once it is put into production.
Make a model version available for upgrade logic
menu Models > Model overview > tab Branches > tab Model versions
To make a model version available for upgrade logic, select the checkbox Use upgrade logic and add a Description. See Version specific upgrade scripts.
- The prefilter Named versions
shows all model versions with a description.
- The prefilter Use upgrade logic
shows all model versions where Use upgrade logic is checked.
Model versions
Set a platform for a branch
menu Models > Model overview > tab Branches > tab Platforms
For each branch, you can select a platform (Windows, Web and Universal GUI), the default menu, and default theme.
Platforms for a branch
Application languages
In the Software Factory, languages can be set at different levels:
Setting | |
---|---|
Thinkwise supported languages | Thinkwise supports a basic set of languages. New languages outside this set can be added in the Master data: Advanced menu (right-click on the Default menu): menu Master data > Model > Application languages Windows GUI Here, you can also set a flag icon, visible for the user when they select a language from the ribbon. |
Application languages for a branch | For all Thinkwise-supported languages, a base model with GUI translations is available in: menu Models > Model overview > tab Branches > tab Base models - An overview of the languages in a branch is available in menu Models > Model overview > tab Branches > tab Application languages. - Translation objects are generated for all application-specific terms and need to be translated in every specified language. - To add a new language, link its corresponding base model. See chapter Base models. - All GUI labels and messages are added and translated for all linked Thinkwise-supported languages. - Translations for database errors and warnings are available in a base model for English, German, and Dutch (DB2_MSG_TRANSL, ORACLE_MSG_TRANSL, SQLSERVER_MSG_TRANSL). Each supported database platform contains their own errors. Only base models with the same database platform as the work model will be shown. |
Fallback language | Universal GUI The fallback language is applied when a user uses a language that is not available for the application. The fallback language can replace the selected language when starting the application via IAM and when starting the application directly on the Software Factory. A language can, for example, be available if the application is started via IAM but not if it is started directly on the Software Factory. In that case, the fallback language is used in the Software Factory. - To set the fallback language for a branch: menu Models > Model overview > tab Branches > tab Model settings > tab Model settings - To set the default fallback language for a new model: menu Maintenance > Configuration |
Login language | Global translations are used for the login process in web applications, when a user's identity and application language are not yet known: IAM > menu Settings > Global translations |
Email provider for a branch
You can set up your preferred standard email protocol and related settings for a branch here, such as the server address and port, username, and password.
menu Model overview > tab Branches > tab Email providers
To add an email service:
Click Add
.
Give your Email provider a name.
Select the Email provider type that you want to use. Depending on your selection, different settings are displayed.
Configure the authentication and server settings. For a description of the available settings, see Email authentication settings.
tipWith a 3-tier Software Factory in the Universal GUI, you can store key values encrypted. See Encryption for a branch.
Optionally, enter the From address and From name. The receiver of the email will see these values in the sender information.
Save your email service.
- To use different settings for a specific runtime configuration in the Software Factory, you can set these up in the menu Maintenance > Runtime configurations > tab Email providers. See Runtime configurations for more information.
- To use different email settings for a specific application in IAM, you can set these up in IAM (menu Authorization > Applications > tab Email providers). When setting up your email provider in IAM, you also need to specify the Model, Branch, and Application.
Email authentication settings
Setting | Email provider | Description |
---|---|---|
Use SSL | Microsoft Graph, Mailchimp, Sendgrid, SMTP | Ensure the security of your emails by using encryption. |
Use managed identity | Microsoft Graph | Use an automatically managed identity in Azure Active Directory for sending emails. |
User name | Mailchimp, Sendgrid, SMTP | The user name of your account with the email provider. |
Password | Mailchimp, Sendgrid, SMTP | The password of your account with the email provider. |
Server address | SMTP | The address of the mail server that sends and receives emails. |
Server port | SMTP | The port number on the mail server that is used for SMTP. |
API key | Mailchimp, Sendgrid | An identifier that allows communication with your provider and integration with other platforms and apps. |
Tenant | Microsoft Graph | The name of your Microsoft tenant. Optional if Use managed identity is selected. |
Client | Microsoft Graph | Your client ID. Optional if Use managed identity is selected. |
Client secret | Microsoft Graph | The client secret that belongs to your client ID. Optional if Use managed identity is selected. |
File storage location for a branch
The Thinkwise Platform provides multiple options for storing files like documents and photos.
It is possible to deviate from the initially configured file storage location type. For example, the Software Factory writes its code files to disk (default) but this can be switched to AWS. Then, if a system flow contains a Write file connector using the reconfigured file storage, Indicium would write it to AWS S3.
File storage locations cannot be switched from or to storage type "Database".
For more information about the available file storage types, see File storage types.
To set the initial file storage location for a branch:
menu Models > Model overview > tab Branches > tab File storage locations
Create or update the file storage location.
tipWith a 3-tier Software Factory in the Universal GUI, you can store key values encrypted. See Encryption for a branch.
For each runtime configuration, you can configure the base file storage location in the Software Factory: menu Maintenance > Runtime configurations > tab File storage locations. For more information, see the Runtime configurations manual.
You can override the file storage location in IAM: menu Authorization > Applications. See File storage location settings in IAM.
File storage - allowed extensions
menu Models > Model overview > tab Branches > tab File storage location > tab Extension whitelist
For each file storage location, it's possible to create a whitelist with allowed file extensions. This list can be used to limit the file types that can be uploaded.
Whitelist for allowed extensions in file storage
OAuth server for a branch
menu Models > Model overview > tab Branches > tab OAuth servers
OAuth 2.0 is the industry-standard protocol for authorization. It can be used to connect to other applications like Google, Facebook, Github, etc.
The OAuth servers that are created here, can be used in process flows to create a secure connection for HTTP-connectors to use.
In the Settings group, you can specify the following options:
- Client - The public Client ID.
- Client secret - A string used by the OAuth client to authenticate to the authorization server. It is essentially the application’s password and must be sufficiently random.
If you use an OAuth server, client credentials are sent in the request body by default. This is supported by most OAuth servers. Basic OAuth however, is supported by all OAuth servers. For this reason, you can also send client credentials As Basic Auth header.
tipWith a 3-tier Software Factory in the Universal GUI, you can store key values encrypted. See Encryption for a branch.
The settings in the User login group are only for the OAuth user login connector that uses this server:
- Request refresh token - Request an additional token to allow refreshing the access token when it expires.
- Prompt - Specifies how the user is prompted for authentication:
- Consent - opens a consent dialog after the user signs in, asking the user to grant permissions.
- Login - forces the user to enter their credentials, negating single-sign on.
- Select account - sends the user to an account picker where all accounts remembered in the session will appear.
- None - does not present any interactive prompt to the user. If the request cannot be completed silently via single-sign-on, an error is returned.
- To override these settings for development or testing purposes in the runtime configuration: menu Maintenance > Runtime configurations > tab OAuth servers.
- To override these settings in IAM: menu Authorization > Applications > tab OAuth server configurations.
Database storage location for a branch
menu Models > Model overview > tab Branches > tab Database storage locations
For SQL Server, the file locations for the database can be set here. When empty, the default server settings are used. For more information, see Database files and filegroups.
Printer for a branch
menu Models > Model overview > tab Branches > tab Printers
Here, you can configure and edit the available printers.
Encryption for a branch
Encryption is the safest way to store key values.
You can encrypt the following key values in the database:
- File storage locations: Client secret, Secret access key, SAS token, Password
- Email providers: Client secret, API key, Password
- OAuth servers: Client secret
Encryption is only available in a 3-tier setup, where the Software Factory and IAM are used in the Universal GUI. It is not available for the Software Factory and IAM for the 2-tier Windows or Web GUIs because it requires Indicium support and configuration.
Enable encryption
3-tier Software Factory in the Universal GUITo store encrypted key values in the database:
Configure encryption in Indicium for the platform you are using. For more information, see:
In the Software Factory for Universal GUI, go to the menu Models > Model overview > tab Branches.
When you add a file storage location, email provider, or OAuth server, a popup automatically appears where you can enter the required key values.
For security reasons, change your key values before storing them encrypted, as the model history will still contain the unencrypted keys.
Example of encryption in the Software Factory for the Universal GUI
View where encryption is used
3-tier Software Factory in the Universal GUIIn the Model overview, you can see where encryption is used:
menu Models > Model overview > tab Branches > tab Email providers/File storage locations/OAuth servers
- If the checkbox Encryption used is selected, the values are encrypted.
- If the checkbox Encryption used is not selected, either the values are not encrypted, or no values are stored in the database.
- If the values are visible in the form, they have not been encrypted.
- If the values are not visible in the form, no values have been stored.
Add or change encrypted key values
3-tier Software Factory in the Universal GUITo add or change encrypted key values:
menu Models > Model overview > tab Branches > tab Email providers/File storage locations/OAuth servers
- Execute the task Set key values (encrypted)
.
Override encrypted key values
3-tier Software Factory in the Universal GUIThe default for encryption is set in the Software Factory.
- For an application, you can override the default in IAM. See Encryption for an application.
Runtime configurations
It is possible to use different file storage locations for different runtime configurations. This allows you to, for instance, specify different locations for your development, test, acceptance and production environments. For more information, see runtime configurations.
Quality dashboard
menu Models > Model overview > tab Quality dashboard
In the Quality dashboard, you can monitor the quality of any active branch in this model. Select the branch you want to monitor on the tab Models. For more information, see: Quality dashboard.