Models
Introduction to models
A model, or application model, is the structured collection of metadata that defines your application. It encapsulates all components needed to generate the end product. See also, Model in the glossary and Models and branches for more information.
Create a new model with a MAIN branch
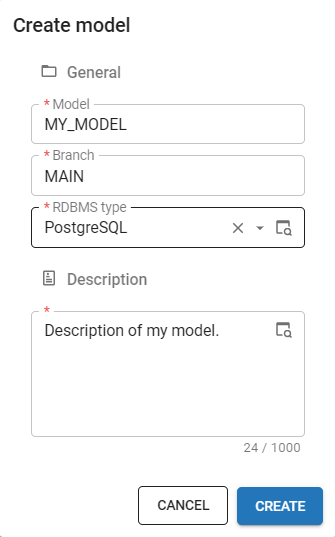
To create a model with a MAIN branch:
menu Models > Model overview > tab Models
- Execute the task Create model
 .
. - Add a Model name and a Description.
- The Branch name is set to 'MAIN' by default. If you follow a different naming convention, you can change this field.
- Select a RDBMS Type. You can add additional RDBMS types later, see Add a new RDBMS type to a model.
- Select Execute.
After creating the MAIN branch, a job will be scheduled automatically to generate its definition. You can view this job in the menu Maintenance > Jobs.
The setting Subname group is retrieved from the Default configuration (menu Maintenance > Configuration). See also, Set a subname group for a branch.
You can also create a new model from the task Switch branch, see Switch to another model or branch.
 Create a new model
Switch to a newly created model or branch
After creating a new model or branch, answer the question if you want to switch to it. This prevents working in the wrong branch.
- If you choose to switch, all open documents will be closed, and your session will be updated to the new model or branch. The Model overview screen will be reopened automatically with the new model/branch combination as the selected row.
- If you do not switch, the Software Factory keeps all documents open in the context of the original model/branch combination. In addition, a new Model overview screen is opened with the new model/branch combination as the selected row.
To switch to the model or branch at a later moment, see Switch to another model or branch.
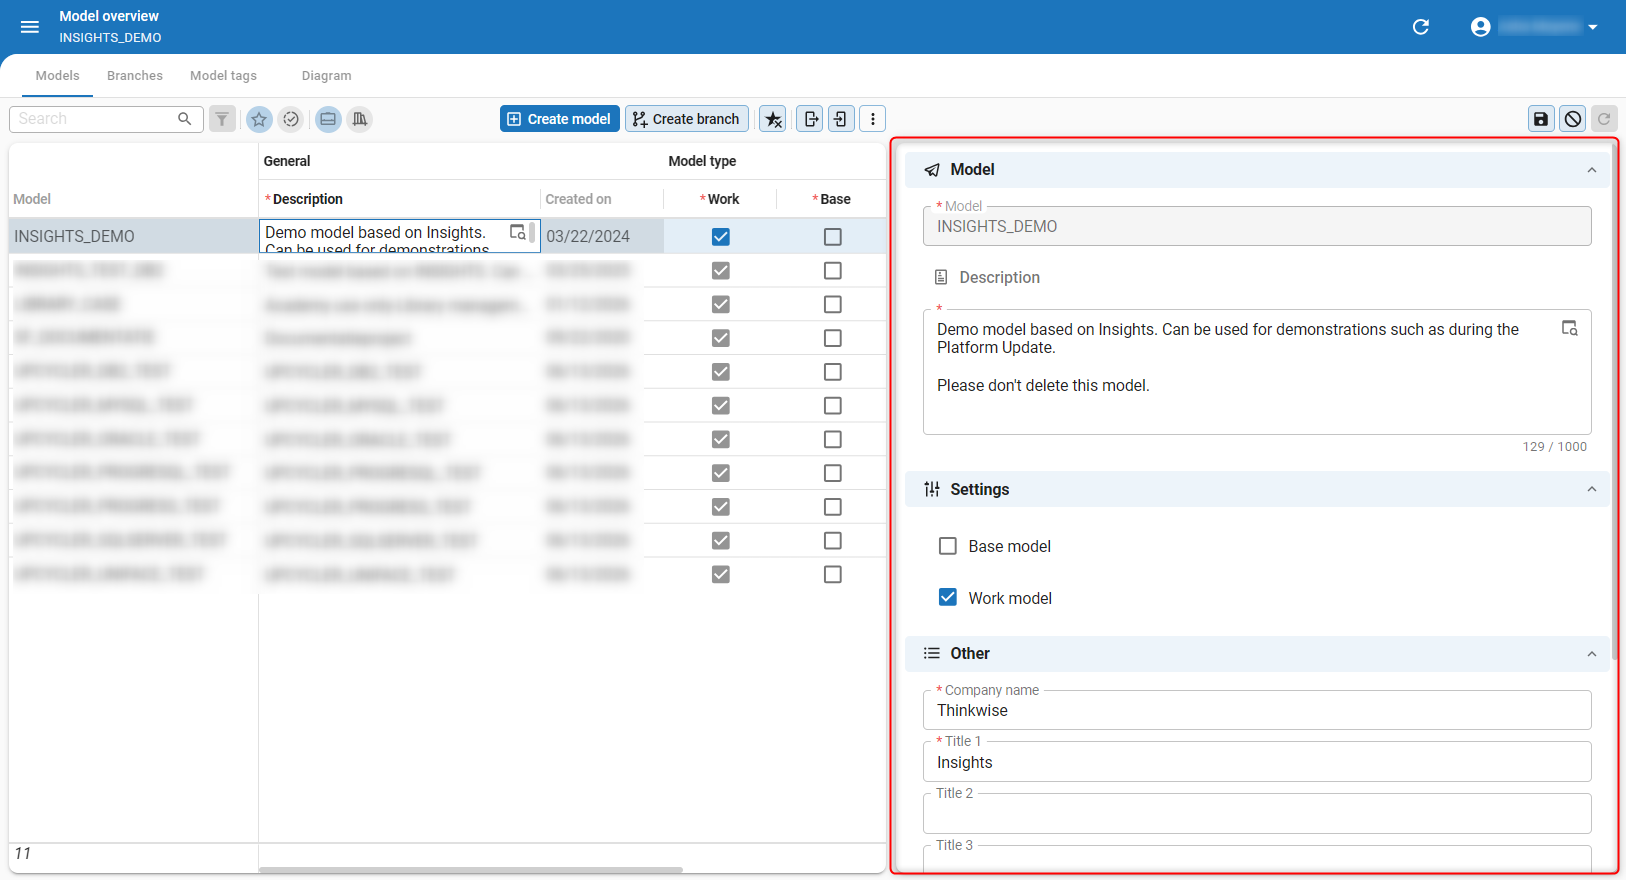
Set model details
After creating a new model, set more details:
menu Models > Model overview > tab Models
-
Select whether the model is a Base model. If it needs to be linked to new models by default, select Def. base model. Only the MAIN branch of a base model is automatically linked to a new model.
Base models are models that are only used by other models. A base model contains the necessary details for the correct operation of a model, a supplement, or an addition, such as a default theme or default translations. Also, Thinkstore models can be used as a base model inside your work model. For more information, see Base models.
-
Select whether the model is a Work model. A new model usually is a work model because you are going to develop it. When you create a new work model, the Software Factory will automatically link default base models to it. Only base model branches without origin or default base models will be linked.
tipTo hide a model, clear the checkbox Work model. Then it will no longer show in tasks for selecting a model or switching to another branch. It will also be hidden by prefilters on the screens.
 Model settings
Rename a model
At the moment, it is not possible to rename a model or branch because that would cause a loss of history.
Base models
Base models are models that are only used by other models. A base model contains details that are necessary for the correct operation of a model, a supplement, or an addition, such as a default theme or default translations. Also, Thinkstore models can be used as a base model inside your work model.
- To create a base model, see Create a new model with a MAIN branch.
- For more information about base models for languages, see Application languages for a branch.
You can link only one branch of a base model to a branch of a work model.
menu Models > Model overview > tab Branches > tab Base models
This tab provides an overview of all base models and whether they are linked to this branch or not.
If necessary, use prefilter Linked ![]() to view only the linked base models.
to view only the linked base models.
To link a branch of a base model to a branch of a work model:
-
Select a base model.
-
Execute the task Link base model
 .note
.noteIf you do not want to use the current MAIN branch, execute task Select previous branch
 .
. -
When you link a base model branch to a work model branch, it needs to be generated to obtain the model of the base branch. The message: "Do you want to generate the definition for model [MODEL NAME] > [BRANCH NAME] immediately?" appears.
- Select Yes to generate the definition immediately.
- Select No to link other base model branches, and generate the definition after the last one with the task Generate definition
 .
.
You can also use the following tasks for a base model:
 Unlink base model - To unlink a base model branch from a work model branch.
Note that components of the base model will be removed from the work model during generation. Only components that are no longer in use are removed.
It might take multiple generations before all components are cleaned up.
warning
Unlink base model - To unlink a base model branch from a work model branch.
Note that components of the base model will be removed from the work model during generation. Only components that are no longer in use are removed.
It might take multiple generations before all components are cleaned up.
warningNever unlink the base models
SQLSERVER_DB,DB2_DBorORACLE_DBfrom a work model. These base models are required for versioning and executing code. Merge base models into work models - To import the base models for the selected work model without generating.
This is an expert function that can be used for testing new features from a base model in a work model.
Merge base models into work models - To import the base models for the selected work model without generating.
This is an expert function that can be used for testing new features from a base model in a work model.
Clean up model history data
Over time, the database can increase in size due to a growing list of deleted and archived models and branches, and their history data. To prevent problems with storage, backup, and restoration, you can clean up the history data.
To clean up these history data manually:
menu Advanced > Master data > Software Factory
- In the menu, select the task Clean up model history
 .
. - Optional. Select the checkbox Delete archived branches. Archived branches cannot be unarchived if you delete them.
- Select the Specific model and Specific branch for which you want to clean up the deleted branches and models.
Use multiple RDBMS types in a model
You can use multiple RDBMS type for one model. This means you can maintain one model that targets multiple database platforms, such as SQL Server and PostgreSQL, without needing to create separate models for each platform.
The RDBMS type is stored at branch level. It is best practice to add a new RDBMS type in a dedicated branch to isolate the changes until you are ready to merge.
Prerequisites for adding a new RDBMS type
Before adding a new RDBMS type, ensure that your model adheres to the following:
- Validations in the current model and branch must pass without errors. This ensures quality and consistency before introducing a new RDBMS type.
- The Incidium pool user must have access to the database of the new RDBMS type. This is necessary for generating and executing code for that RDBMS type. Alternatively, custom pooluser credentials should be set up for the new RDBMS type.
Add a new RDBMS type to a model
To add a new RDBMS type to a model:
menu Models > Model overview > tab Branches
- Create a new branch for the new RDBMS type.
- Go to the tab General settings > tab RDBMS types of the new branch.
- Execute the task Link RDBMS type
 .
. - In the pop-up, select an RDBMS type from the dropdown list.
- Select Execute.
After adding a new RDBMS type, the Software Factory will convert existing domain data types in the model to the appropriate data type. Not all data types can be converted, so check the Validation results and fix any issues before deploying the model. Any other data, such as code in calculated fields and custom queries, must be updated manually.
To unlink an RDBMS type from a branch, execute the task Unlink RDBMS type ![]() in the same tab.
in the same tab.
 Add a new RDBMS type to a branch
Export and import models
Export a model
You can export your own work and base models. By exporting a model, you can share it between different environments. This is a fast and easy way to enrich your models.
Exporting a model only makes sense if it has a branch (a model without a branch is empty).
To export a model:
menu Models > Model overview > tab Models
- Execute the task Export model
 .
. - Enter a Model and Branch name.
- Select Execute.
- Select a folder and, if necessary, change the name. The default name contains the date and time of the export, the model, and the branch name.
Note that
.datis the only allowed extension for importing a model. - Select Save.
The entire model, its base data, and branch are compressed and exported, excluding trace columns and non-default runtime configurations. You can download the export in the pop-up.
Export base data
Export base data if the model you want to export uses base data which is not present in the receiving Software Factory.
Usually, you do not need to export base data because the base data is already present in the exported model.
To export base data:
menu Advanced > Master data > Software Factory > Export base data
- Execute the task Export base data .
- Select a folder and, if necessary, change the name. The default name is 'base_data.dat'. Note that
.datis the only allowed extension for importing a model. - Select Save.
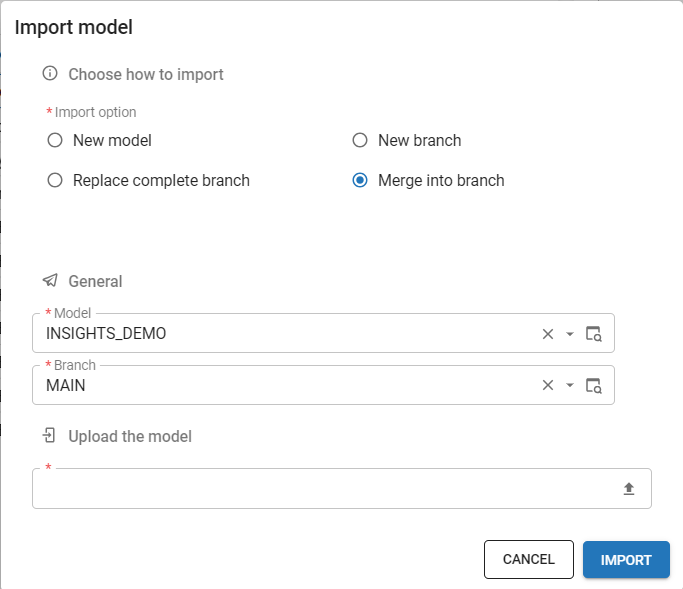
Import a model
You can import exported model data into another branch or model. This is useful when you want to reuse a model from another Software Factory or when you want to merge model data into another model. You can import model data into a model without a branch or into a new model that does not yet exist. Furthermore, you can merge imported model data with an existing model to update an existing branch.
You can only import a model into another Software Factory if the platform version is the same as the Software Factory from which the model was exported.
The only allowed extension is .dat.
To import a model:
menu Models > Model overview > tab Models
- Check if it is necessary to import base data before importing the model, see Import base data.
- Execute the task Import model .
- Select the Import option:
- New model - The imported model is a new model.
- New branch - The imported model is added as a branch of an existing model.
- Replace complete branch - Adds, updates, and deletes all objects based on the imported model.
- Merge into branch - Only adds and updates objects based on the imported model. This option does not delete any existing objects.
- Select the target Model and Branch.
- Upload the
.datfile that you want to import. - Select Execute. The model will be decompressed and imported. Trace columns will be completed with the name 'Imported' and the current system date and time.
The parameter merge_into_existing_model is available to execute the task Import model via code or via API.
A value of 1 indicates that the model.dat will be merged into the branch and will therefore not delete any objects.
 Import a model
Import base data
Import base data if the model you want to import uses base data which is not present in the receiving Software Factory.
Usually, you do not need to import base data because the base data is already present in the exported model.
You can recognize this situation when an import fails because of missing objects.
 Example of a domain which cannot be imported because of a missing user-created datatype
To import base data:
menu Advanced > Master data > Software Factory > Import base data
- Execute the task Import base data .
- Select the File path of the
.datfile you wish to import. - Select Execute.
- Import the model again, now that the required base data is present. See Import a model.
Base data may be overwritten when upgrading platform versions.