Message brokers
Introduction to message brokers
Message brokers allow you to asynchronously send and receive messages between different systems, applications, or services. They act as an intermediary between services. A producer sends data to the broker, which holds it until the consumer is ready to process it. The terms used to describe these roles may differ across different message broker types, but the core concept remains the same.
Message brokers support various messaging protocols and patterns, such as publish-subscribe, point-to-point, and request-reply. Benefits of message brokers include asynchronous communication, improved scalability, and enhanced reliability in communication between systems. Additionally, senders and receivers do not need to know each other. Both sides only need to know the message broker and the relevant topic, so new publishers and subscribers can reach each other immediately.
Currently, you can only publish messages to a message broker. Subscribing to messages from a message broker will be supported in a future release.
 Overview of 'Message brokers' in the Software Factory
Set up a message broker and publish messages
To set up a message broker and publish messages, complete the following steps:
- Set up a message broker.
- Set up messages for a message broker.
- Create a process flow to publish a message.
Set up a message broker
Before you can publish messages to a message broker, you need to set up a message broker in the Software Factory.
To set up a message broker, you need to complete the following steps:
- Create a message broker.
- Configure connection settings.
- Configure authentication settings.
- Optional. Configure last will settings.
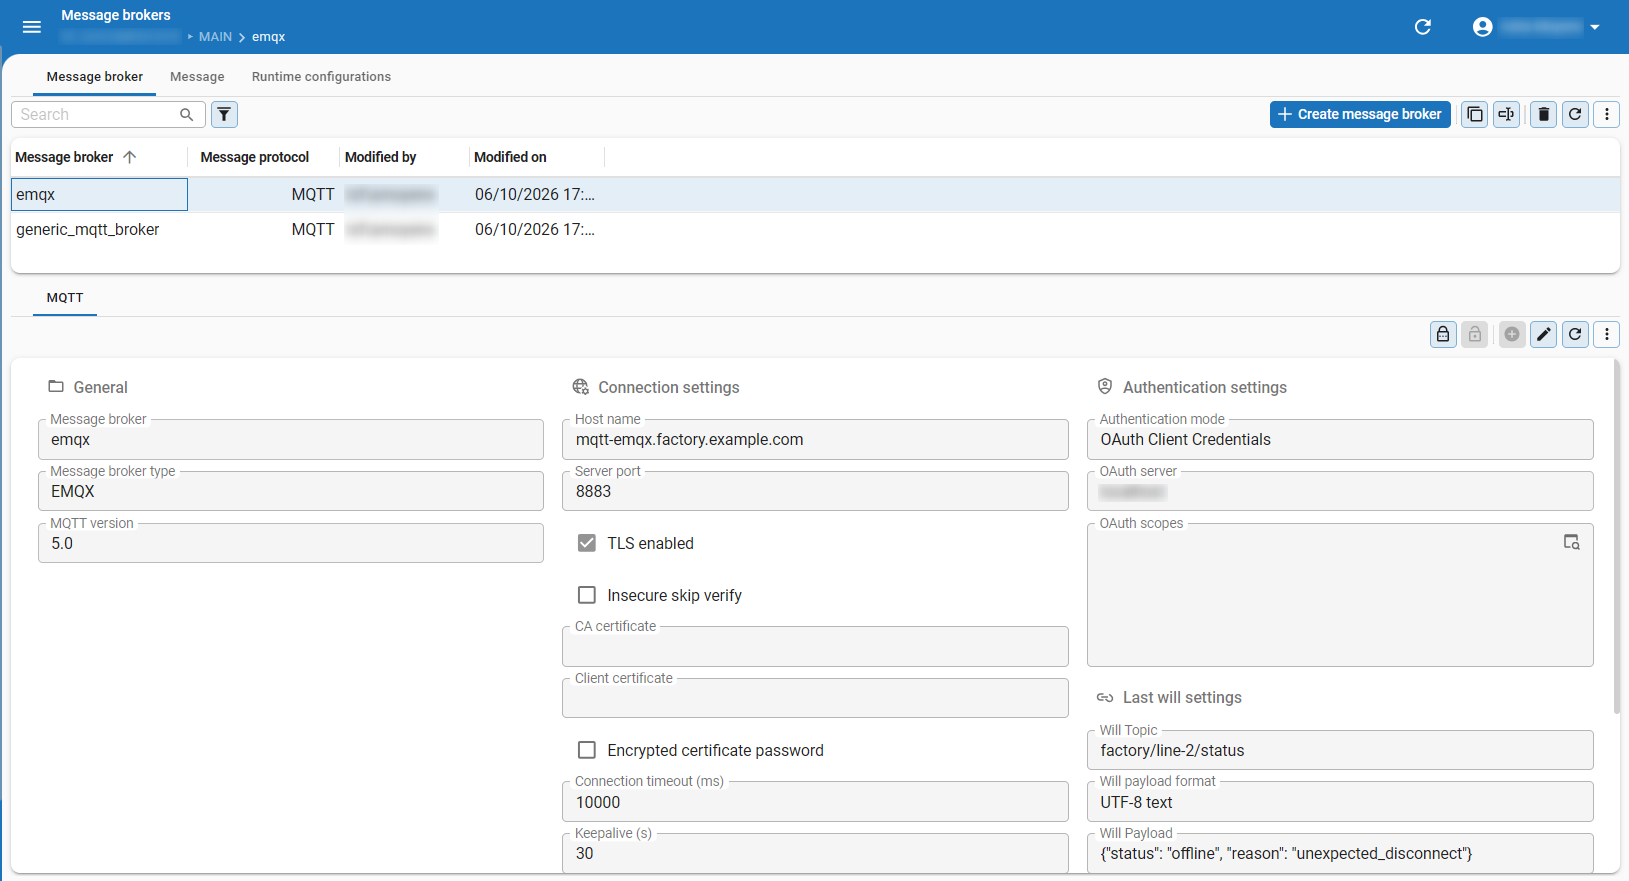
1. Create a message broker
To create a message broker:
menu Integration & AI > Message brokers
-
Execute the task Create a message broker
 .
. -
Enter a name and select the Message protocol. Currently, only MQTT is supported.
-
In the tab MQTT, select a Message broker type from the dropdown list. This filters out configuration options that are not supported by the selected broker type.
Available options are:
- Chariot - Cirrus Link's broker, designed for secure industrial/OT environments (SCADA, ICS).
- EMQX - High-performance, distributed broker with support for various protocols and features.
- Generic MQTT broker - Supports any MQTT compliant broker. Use this option if your broker is not listed. Ensure that the broker supports the options you want to configure.
- HiveMQ - Enterprise-ready, scalable broker with advanced features. Common in industrial IoT.
- Mosquitto - Lightweight, open-source broker. Ideal for small to medium scale applications and IoT devices.
-
Select the MQTT version. The available versions depend on the selected Message broker type. Selecting a version that is not supported by the selected Message broker type results in the connection being unavailable.
noteThe following features are only supported for MQTT version 5.0: Last will messages, User properties, Payload format, Reply expected.
2. Configure connection settings
To configure connection settings for a message broker:
menu Integration & AI > Message brokers > tab MQTT > group Connection settings
- Enter a Host name.
- Enter a Server port.
The default port is
8883when TLS is enabled and1883when TLS is disabled. - Select the checkbox TLS Enabled to enable TLS encryption for a secure connection to your message broker. Read more about TLS here: TLS/SSL.
- If TLS is enabled, configure the following:
-
Select the checkbox Insecure skip verify to skip checking the validity of the TLS certificate.
warningOnly use this setting if necessary for testing purposes, as this will make the connection vulnerable to MITM attacks just like non-TLS connections.
-
Optional. Set up a CA Certificate to allow Indicium to validate the authenticity of the server. This is best practice to ensure a secure connection to the message broker.
-
- Optional. Configure the following settings:
-
Connection timeout (ms) - How long the client waits before failing. The default is '10000'.
-
Keepalive (s) - How often the client sends a ping to the broker to stay connected. The default is '60'.
-
Client ID prefix - Enter a prefix for the MQTT client. This is prefixed to the client ID that Indicium generates.
noteThe MQTT specification limits the client ID to a maximum of 23 characters. In practice, most MQTT brokers support longer client IDs, but it is recommended to keep the client ID within this limit to ensure compatibility. Indicium creates a client ID of 18 characters by default, leaving room for a 5-character prefix.
-
Clean start - If enabled, no session memory is stored and all subscriptions are removed when the client disconnects. If disabled, the broker stores subscriptions and undelivered messages for the client.
-
Session expiry interval (s) - How long the message broker keeps session data after the client disconnects. The default is '300'.
-
3. Configure authentication settings
To configure authentication settings for a message broker:
menu Integration & AI > Message brokers > tab MQTT > group Authentication settings
-
Select an Authentication mode. Available modes are:
- None - No authentication is required to connect to the message broker.
- Username and password - A username and password are required to connect to the message broker.
- OAuth Client Credentials - A configured OAuth server is required to connect to the message broker.
- Select an OAuth server. In this field, you can override the OAuth scopes configured for the OAuth server. This produces a JWT Access Token that can be used for authentication with the message broker.
- Access token - An access token is required to connect to the message broker.
Note that an access token can expire and needs to be manually updated.
If possible, OAuth Client Credentials is the preferred option, as it manages the access token for you.
- Enter a number in the field Access token expiration and select a time unit to specify how long the access token is valid.
-
You can encrypt MQTT key values in the Software Factory and in IAM.
noteMessage broker key values set in the Software Factory are not synced to IAM or vice versa. In development, you can set these values in the Software Factory for testing purposes, but you will need to set them in IAM for production.
-
For development, encrypt credentials by executing the task Set MQTT key values (encrypted)
 in the Software Factory.
Depending on the selected Authentication mode, complete the relevant fields in the task pop-up.
in the Software Factory.
Depending on the selected Authentication mode, complete the relevant fields in the task pop-up.For a Client certificate, upload a client certificate and enter the Encrypted certificate password to encrypt the password for the client certificate. Adding a client certificate is optional, but best practice as it provides an additional layer of security. Read more about Client certificates here: X509 Client Certificate Authentication.
-
For production, the MQTT key values for the application must be configured in IAM for the message broker to use them. For more information, see Encryption of message broker key values.
-
4. Optional. Configure last will settings
You can configure last will settings for a message broker, which is a message that is published by the broker when the connection to the client is lost unexpectedly. This could be due to a network failure, crash, or other unforeseen issues.
Last will messages are only supported for MQTT version 5.0.
To configure last will settings for a message broker:
menu Integration & AI > Message brokers > tab MQTT > group Last will settings
-
Enter a Will topic.
-
Select a Will payload format:
- Unspecified - The payload is treated as is. The broker does not interpret the content of the payload.
- UTF-8 text - The payload is treated as a UTF-8 encoded string. The broker interprets the payload as text.
-
Enter a Will payload.
-
Select a Will QoS (Quality of Service) level. This determines the guarantee of message delivery for the last will message. Available levels are:
- 0 (At most once) - The message is delivered at most once, and delivery is not guaranteed. This is the fastest level and is suited for fire-and-forget scenarios where occasional message loss is acceptable, such as frequent temperature updates.
- 1 (At least once) - The message is delivered at least once, but may be delivered multiple times if acknowledgments are lost. This level provides a balance between speed and reliability.
- 2 (Exactly once) - The message is delivered exactly once by using a four-step handshake process. This is the slowest level, but ensures that messages are not duplicated or lost.
For more information, see What is MQTT Quality of Service (QoS) 0,1, & 2?.
-
Select the checkbox Will retain to retain the last will message on the broker. If enabled, the broker stores the last will message and delivers it to any future subscribers of the will topic.
Set up messages for a message broker
Once you have set up a message broker, you can set up Messages to publish to the message broker. Messages are reusable pieces of logic that can be published using process flows. In a message, you can add input and output parameters to dynamically set the topic, payload, and other MQTT message settings.
To set up messages for a message broker, complete the following steps:
- Create a message.
- Optional. Add input parameters for a message.
- Optional. Add output parameters for a message.
- Create a process flow to publish a message.
1. Create a message
Messages support templates that allow you to make the message more dynamic. You can use dynamic values for the following fields: Topic, Content type, Payload.
To create a message:
menu Integration & AI > Message brokers > tab Messages
-
Select the Message broker you want to create a message for.
-
Go to the tab Message > tab General to Add
a Message. -
In the field Message, enter a message name.
-
Optional. Add a Description for the message.
-
In the field Topic, add a hierarchical string to specify the topic to which the message will be published (for example:
update/temperature). For more information, see Topics, Wildcards, & Best Practices. -
Optional. Configure the following settings:
- Payload format - This is only supported for MQTT version 5.0.
- Unspecified - The payload is treated as is. The broker does not interpret the content of the payload.
- UTF-8 text - The payload is treated as a UTF-8 encoded string. The broker interprets the payload as text.
- Content type - Generally this is a MIME content type, such as
application/jsonortext/plain. - Payload - Enter the content of the message. You can use input parameters to dynamically set the payload when publishing the message in a process flow. This is only supported for MQTT version 5.0.
- Payload format - This is only supported for MQTT version 5.0.
-
Select a QoS level (Quality of Service). This determines the guarantee of message delivery for the message when it is published. Available levels are:
- 0 (At most once) - The message is delivered at most once, and delivery is not guaranteed. This is the fastest level and is suited for fire-and-forget scenarios where occasional message loss is acceptable, such as frequent temperature updates.
- 1 (At least once) - The message is delivered at least once, but may be delivered multiple times if acknowledgments are lost. This level provides a balance between speed and reliability.
- 2 (Exactly once) - The message is delivered exactly once by using a four-step handshake process. This is the slowest level, but ensures that messages are not duplicated or lost.
For more information, see What is MQTT Quality of Service (QoS) 0,1, & 2?.
-
Select whether to Retain the message on the broker. One message per topic can be retained. This message is automatically sent to the subscriber when they subscribe to the topic, and is stored on the broker until it is updated or deleted. For more information, see What are Retained Messages in MQTT?.
-
Optional. Specify an Expiry interval (s) for the message, which determines how long the message is valid on the broker. After the expiry interval has passed, the broker will discard the message.
-
Optional. Select the checkbox Reply expected if you expect a response to the message. If enabled, set a Reply timeout (s) to specify how long the system should wait for a response before returning if no response is received. This is only supported for MQTT version 5.0. See also Set up request-response messages.
-
Optional. In the tab User properties, add additional metadata to the message in the form of key-value pairs. This metadata can be relevant for the way the message is handled. This is only supported for MQTT version 5.0. Complete the following fields:
- User property - Enter a name for the user property.
- Value - Enter a value for the user property.
You can also use input parameters in this field (for example,
{temperature_value}). For more information, see Add input parameters.
For more information on user properties, see What are MQTT User Properties?.
2. Optional. Add input parameters for a message
Input parameters allow you to dynamically set values in a message. This is supported for Topic, Content type, Payload, and User property values. In the process action that publishes the message, you can map each input parameter to a constant or a variable. If left empty, the default value defined on the input parameter is used.
To set up input parameters for a message:
menu Integration & AI > Message brokers > tab Messages > tab Input parameters
- Add an Input parameter.
For example,
temperature_value. - Optional. Add a Description and a Value for the input parameter. The value you enter here is used as a default value.
- Select a Pre-processing script to transform the input parameter value before it is used in the message.
Available options are:
- None - Do not pre-process the value.
- JSON string value - Convert the value to a JSON string.
The character
"will be escaped to\"to ensure it can be used as a JSON value. - XML string value - Convert the value to an XML string.
Special characters will be encoded. For example, the character
<will become<so it can be used as an XML text value. - Base64 code - Encode the value in Base64.
For example, the value
Thinkwisewill becomeVGhpbmt3aXNl.
- Go to the tab Message > tab General and add this parameter as a placeholder in the supported fields using curly braces.
For example, in the Payload field, you can enter
{"temperature": {temperature_value} }to dynamically set the temperature value in the payload when publishing the message.
The input parameters you define here must be mapped to the corresponding process flow that publishes the message, unless the parameter is optional or has a default value. For more information, see Create a process flow to publish a message.
3. Optional. Add output parameters for a message
Output parameters allow you to expose certain data from the message to a process action output parameter.
To set up output parameters for a message:
menu Integration & AI > Message brokers > tab Messages > tab Output parameters
-
Add
an Output parameter.
For example, response_payload. -
Optional. Add a Description for the output parameter.
-
Select a Retrieve value from option to specify what data should be retrieved after publishing it. Available options are:
-
Reply payload - Retrieve the payload from the response.
-
Reply user property - Retrieve the value of a user property from the response. If you select this option, specify the name in the field User property.
-
MQTT publish error code - Retrieve the MQTT specific error code returned by the broker after publishing.
-
MQTT reply error code - Retrieve the MQTT specific error code returned by the broker related to subscribing to the response.
See also MQTT version 5.0 reply error codes and MQTT version 5.0 publish error codes for more detailed information.
note- MQTT publish error code and MQTT reply error code are internal MQTT protocol error codes that are only populated when something unexpected happens during publishing or subscribing to a response.
- Error codes are version specific and newer versions provide more extensive error codes.
- Reply payload, Reply user property and MQTT reply error code are only populated when Reply expected (tab Message) is enabled.
-
-
If you have selected Reply payload or Reply user property, you can configure how the retrieved data is transformed in the group Transformation. Available options are:
- Base64 decode - Decode the value from Base64.
- Apply JSON Path - Use a JSON Path expression to extract a specific value from the JSON response payload. For more information, see JSONPath.
- Always as array - Always return the value as an array.
- Apply XPath - Use an XPath expression to extract a specific value from the XML response payload. For more information, see XPath.
- Apply Regex - Based on a regular expression, extract a value that satisfies the expression.
Multiple transformations can be provided to a single output parameter, and multiple output parameters can reference the same Retrieve value from type.
4. Create a process flow to publish a message
A message can only be published if it is part of a process flow that is set up with a Publish message process action. This can be a system flow or a user process flow.
To create a process flow to publish a message:
menu Processes > Process flows
- Create a process flow.
- Add the process action Publish message to the process flow. Select the Message broker and Message that you set up in the previous steps.
- If you have created input and output parameters, these will appear in the tab Input and tab Output respectively. Configure these values as needed. If you do not configure the parameters here, the default Value you entered when creating the input parameter is used. For more information, see Add process actions.
 Example of a process flow with a Publish message process action
Set up request-response messages
The request-response pattern is only supported for MQTT version 5.0.
You can set up a message to expect a reply by selecting the checkbox Reply expected when creating or editing a message. This can be useful when you want to receive a response after publishing a message.
For example, if the Topic is profile/lookup/by-name and the Payload is {"username": {username} },
select the checkbox Reply expected to wait for a response containing profile information.
The system will wait for the configured Reply timeout (s) before returning if no response is received.
You can also extract data from the response using output parameters, allowing you to use this data later in the process flow.
For more information, see MQTT Request-Response Pattern.