Merging
Introduction to merging
When multiple developers or teams work on different features of an application simultaneously, additional branches can be made within a model for these features. Each feature can be developed separately and, as soon as it is completed, be combined (merged) with the model's origin branch. This way, a new feature can be developed and tested independently from the rest of the model.
It is also possible to merge a branch into a different branch than its origin branch. Whether you merge with the origin or with another branch, it always involves merging the changes from a source branch into a target branch.
Branches
For extensive information, see the Models and branches manual.
1. Create a merge session
Branches can be merged in different ways, for example:
- When a branch is completed and tested, it can be merged back into its origin branch, for example, the MAIN branch.
- A branch can be merged into another target branch. In that case, the Software Factory determines an origin branch and point in time that are shared between the source and target branch.
- A reciprocal merge is a merge session where the source branch is merged into its origin and vice versa.
- An origin branch can be merged into a source branch when the source branch is not yet finished, but you want to include the changes made in the origin branch.
When you create a merge session, changes (actions) are determined by comparing the situation at the origin point in time with the current point in time in the source and target branch. (that is, when the merge session was started). Data migration mappings are included in a merge, see Include data migration mappings during merge.
To create a merge session:
menu Models > Merging > tab Merging
- Execute the task Create merge session
 .
.
In the fields Source branch and Target branch, you will initially only see active branches that have been marked as 'My branches', and their origin branch.
This can make it easier to choose the correct branch to merge from and into.
To merge from or into another branch, you can disable the prefilter My branches ![]() in the lookup pop-up.
in the lookup pop-up.
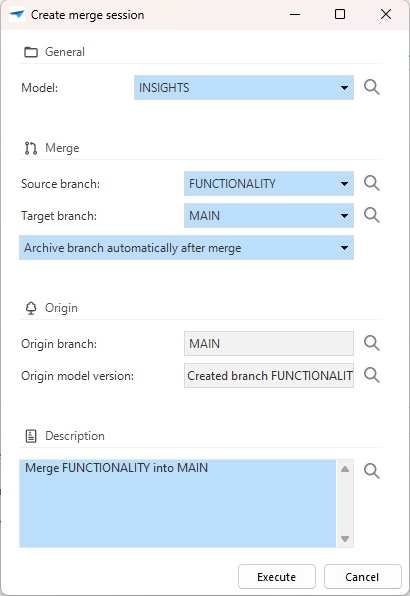 Pop-up for creating a merge session
-
Select the Model.
-
Select which branch (Source branch) needs to be merged into another branch (Target branch).
-
If you are merging the source branch into its origin, select how to continue with the source branch after the merge:
- Keep working in branch, perform reciprocal merge - Select this option to continue working in the source branch. Your changes will be merged into the origin, and the changes in the origin will be merged into your source branch. In the future, you can merge with the origin again. If your source branch is protected, this is the only available option.
- Archive branch automatically after merge - Select this option if you have finished working in the source branch after the merge. Your changes will be merged into the origin, and the source branch will be archived.
- Finalize branch, cannot be merged again - Select this option if you have finished working in the source branch after it has been merged into its origin, but want to keep the source branch available for reference. You cannot merge this branch into another branch again. Though it can be edited, we recommend archiving the branch as soon as possible to prevent development in a finalized branch. A finalized branch is a branch that has been merged into its origin branch and was not immediately archived or reciprocally merged. In the list of available branches for a model, you can recognize a finalized branch by the selected checkbox Finalized (menu Models > Model overview > tab Branches > tab List).
-
The fields in the group Origin show the Origin branch and the Origin model version. These values cannot be changed. The origin model version is the point in time when the source branch was created or last involved in a reciprocal merge. The origin model version is updated ("rebased") when you merge it into the branch; the merge session will only consider changes from that point forward.
-
Click Execute.
Now, a comparison is made. Any conflicts will be identified, so you can define a solution strategy in the next step. Nothing has been modified yet, you can still return to the previous step. If you perform a reciprocal merge, the changes from the branch are merged to the origin and vice versa. Two Merge impact overviews will be available to show the impact for both the source and target branch.
As long as a merge session is not completed, both branches will get the status 'merging' to indicate that a merge session is pending. This will be visible in both the screen Model overview and the task Switch branch. Modifications in a source branch after it is set to status 'merging' may be lost when the merge is executed.
Merges from a source branch into a different branch than the origin are not shown in the branch diagram.
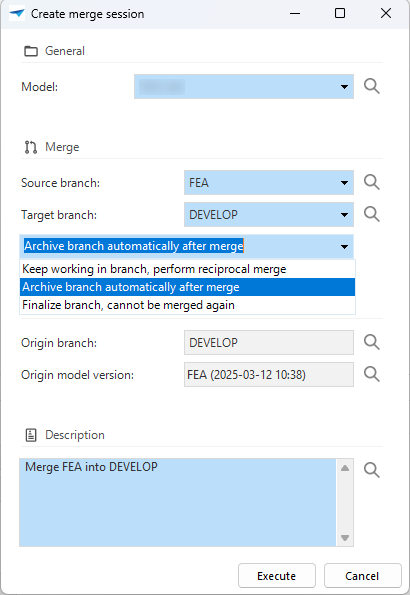 Three choices for a source branch that is merged into its origin branch
2. Resolve conflicts
menu Models > Merging > tab Active conflicts
When the merge session is started, all actions done in the source branch compared to the target branch are analyzed. Conflicts will occur if one the following conditions applies:
- An object has been inserted in both the source and target branch.
- An object has been updated in both the source and target branch.
- An object has been deleted in one branch and updated in the other branch.
The list shows which source and target branch objects are involved in the conflicts that have been found.
Only conflicts that require user input to resolve them are shown in the list. You must resolve all conflicts before you can execute the merge session.
Resolve simple conflicts manually
Simple merge conflicts are conflicts where you can either choose the source branch version or the target branch version of the change.
If a conflict requires you to combine the changes from the source branch with those from the target branch, you can do this in the next step.
To resolve a simple conflict:
menu Models > Merging > tab Active conflicts
-
Select the conflict in the list. The form shows detailed information about the conflict.
-
If desired, compare the changes on the tab Compare: [object type]. Here, you can view what the differences are between the source branch and the target branch. If the target branch has been changed since creating the source branch, you can compare all three versions.
-
Execute the task Resolve conflict
 and select a Resolution for the conflict.
You can choose whether to merge the changes from the source branch or the target branch.
and select a Resolution for the conflict.
You can choose whether to merge the changes from the source branch or the target branch.- For conflicts of the type "Inserted in source branch and target branch",
you can choose not only what to do with the conflict actions but also with the dependent actions.
Resolution Description - Carry out source branch action - Keep related target branch changes as-is
- Keep target branch as-is - Carry out related source branch actionsApplies dependent actions, and results in (new) conflicts if they are conflicted. - Keep target branch as-is - Prevent related source branch actions
- Carry out source branch action - Revert related target branch changesOnly applies the dependent action of the selected branch, but not the dependent actions of the other branch. - For other types of simple conflicts:
Resolution Description - Keep target branch as-is
- Carry out source branch actionOnly choose what to do with the conflict action (not necessary for the dependent action). For example, when the delete action of a table is chosen, the table is no longer available, so column insert or update actions cannot be executed. A basic explanation of the resolution is added automatically.
- For conflicts of the type "Inserted in source branch and target branch",
you can choose not only what to do with the conflict actions but also with the dependent actions.
-
Optional. To resolve the conflict again, execute the task Reset merge conflict
 .
.
Once a conflict is resolved, the chosen resolution gets a green background in the list.
You can resolve multiple conflicts at once with the the task Resolve conflict ![]() .
These conflicts all get the same resolution.
.
These conflicts all get the same resolution.
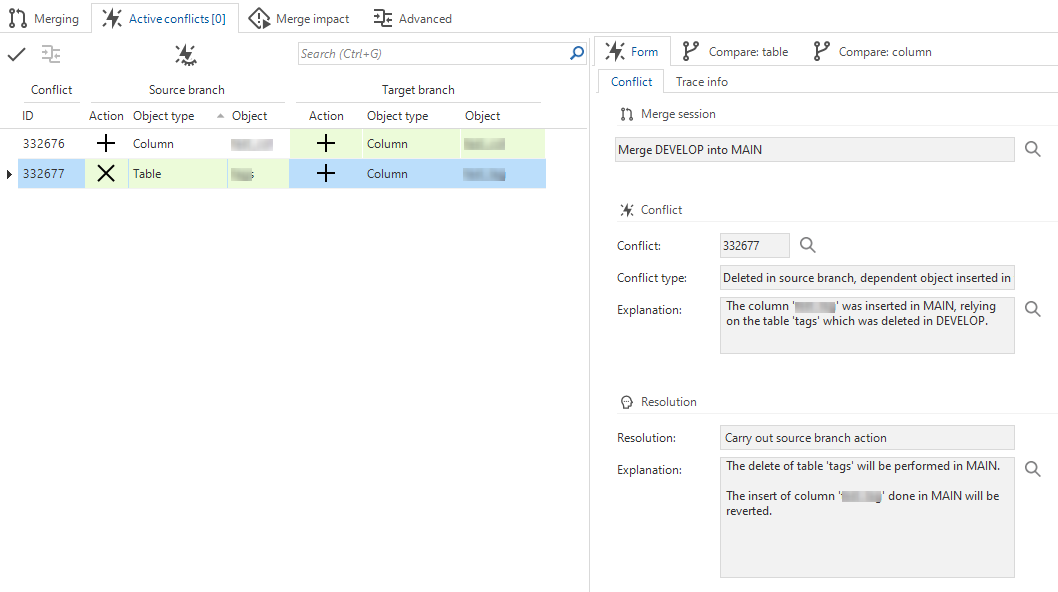 Overview of conflicts
Resolve complex conflicts with the code editor
Complex conflicts can occur if code has been changed in both the source branch and the target branch. Both versions contain part of the resolution. You can resolve these complex conflicts by combining the changes from both branches.
To resolve complex conflicts:
menu Models > Merging > tab Active conflicts
- Select a conflict from the tab Active conflicts. Details of the conflict are shown in the tab Form.
- If necessary, compare the changes in the tab Compare: [object type]. Here, you can view what the differences are between the source and target branch. If the target branch has been changed since creating the source branch, you can compare all three versions.
- Execute the task Resolve code difference
 .
. - Compare and merge changes from both the source and target branch.
- Select Resolve conflict to save changes.
- Optional. To resolve the conflict again, execute the task Reset merge conflict .
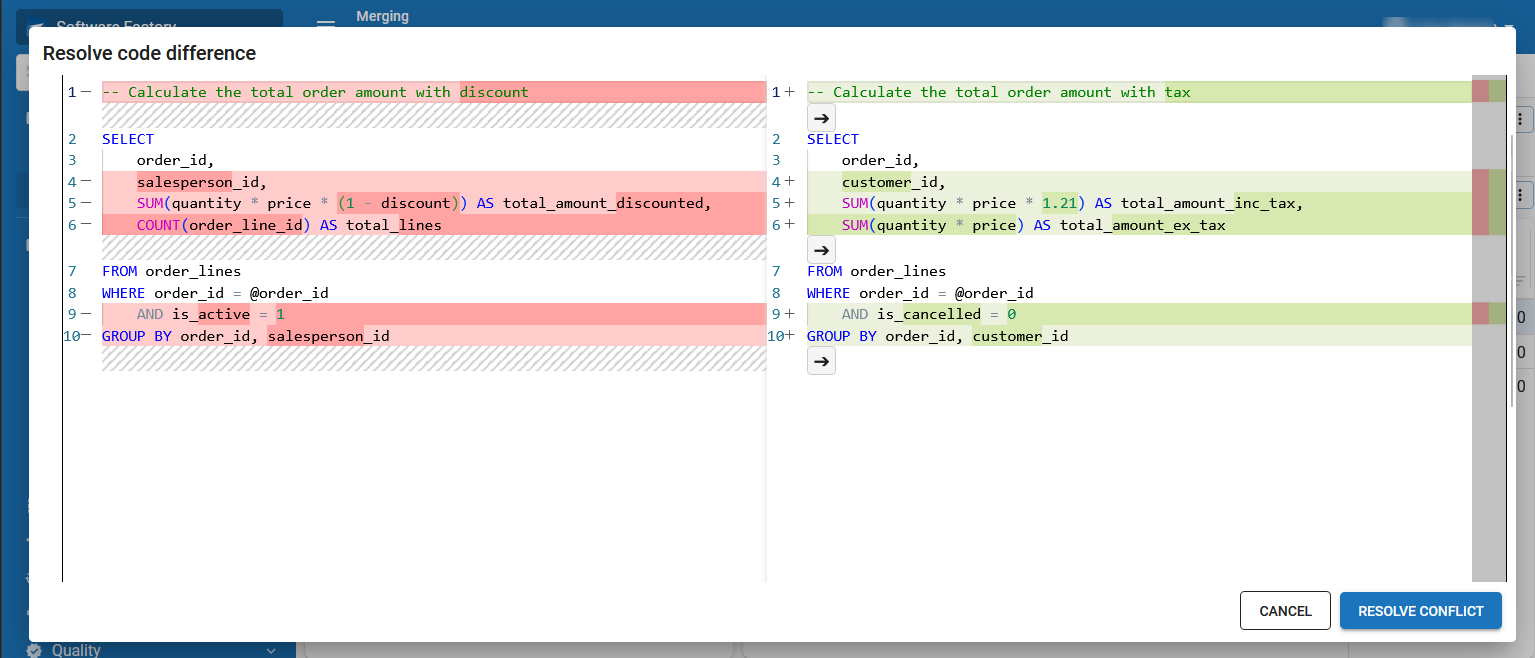 Resolve code differences in the code editor
Review automatic resolutions of merge conflicts
This step is optional. The tab Active conflicts is not shown if only automatically resolved conflicts are present.
If identical delete or update actions are detected, conflicts are created and automatically resolved. To review these automatic resolutions:
menu Models > Merging > tab Active conflicts
- Disable the prefilters (Hide all solved conflicts
 )
and Hide automatically resolved conflicts
)
and Hide automatically resolved conflicts  .
. - Review the automatic resolutions.
- Optional. To resolve the conflict again, execute the task Reset merge conflict .
3. Review merge actions
The merge actions that are to be executed are now ready for review. Depending on the complexity of the merge, you can either:
- Review the merge impact: A general overview of the planned merge actions. Follow this step if you do not need to exclude actions (or their dependent actions) from the merge. Usually, this is the correct choice.
- Advanced: review the actions: An editable overview of the generated actions. You can decide for each action whether you want to apply it, and whether you want to apply its dependent actions.
Review merge impact
To view all the actions that will be performed during the execution of a merge session:
menu Models > Merging > tab Merge impact
Here, the consolidated actions are displayed in a list. The column Impact shows the action type based on the choices you have made in the previous steps:
- Insert - This record only exists in the source branch and will be added to the target branch of the merge session.
 Update - This record has been edited in the source branch only, and the changes will be merged into the target branch.
 Overwrite - This existing record in the target branch will be overwritten with the changes made in the source branch.
 Revert delete - This record was deleted in the target branch, and will be restored.
The other columns show information about the merge impact on the object.
Advanced: review actions
To view all the actions that have been generated:
menu Models > Merging > tab Advanced
If necessary, you can select for each action whether and how it should be applied or ignored (tab Form > group Apply).
You can use the following prefilters for viewing your pending actions:
 Actions with impact on the branch -
Displays the actions that will affect the target branch when the merge session is executed.
This provides insight into actions that may require additional checking to know if it is legitimate to apply them.
Actions with impact on the branch -
Displays the actions that will affect the target branch when the merge session is executed.
This provides insight into actions that may require additional checking to know if it is legitimate to apply them. Actions that will be ignored -
Displays the actions that will not be applied when the merge session is executed.
This may be because they are the same in the source and target branch due to manual selection.
This provides insight into actions that may require additional checking to know if it is legitimate for them not to be applied.
Actions that will be ignored -
Displays the actions that will not be applied when the merge session is executed.
This may be because they are the same in the source and target branch due to manual selection.
This provides insight into actions that may require additional checking to know if it is legitimate for them not to be applied.
Advanced: exclude actions
Sometimes you want to exclude certain actions from the merge execution. For example, when a specific table is not yet finalized, but you want to merge the rest of the changes.
To exclude an action from the merge execution:
menu Models > Merging > tab Merge impact or Advanced
- Execute the task Exclude merge action
 .
It excludes the action and its dependencies from the merge execution.
If a merge session is outdated and needs to be refreshed, the excluded actions will still be excluded, unless they cause a conflict.
.
It excludes the action and its dependencies from the merge execution.
If a merge session is outdated and needs to be refreshed, the excluded actions will still be excluded, unless they cause a conflict.
You can only exclude actions if they can be applied (with or without dependencies). Actions involved in a conflict must be resolved through the regular conflict resolution.
To undo the exclusion of an action, you can re-apply the action for the merge execution:
menu Models > Merging > tab Advanced
- Find the excluded action.
- Execute the task Re-apply merge action
 .
.
4. Check merge session
To ensure you are working with the latest branch data when merging branches:
menu Models > Merging > tab Merging
- Execute the task Check merge session
 .
.
If any changes are detected, you will be prompted to refresh the merge session. This recreates the merge session with the latest branch versions and automatically reapplies any conflict resolutions you have made if possible.
The merge session check is also performed automatically after creating a merge session and before executing it. The column Last refreshed on shows the last time the merge session was checked or updated.
5. Execute a merge session
When all conflicts have been resolved, you can execute a merge session. In this step, only the required changes will be executed:
- Changes in the target branch will be reversed if they do not need to be merged according to your choice of conflict resolution (if available).
- Then, the changes in the source branch will be added.
To execute the merge session:
menu Models > Merging > tab Merging
-
Execute the task Execute merge session
 to perform the actual merge.
Or: execute the task Schedule execute merge session
 .
This can be useful, for example, if you want to merge outside working hours.
Once the scheduled merge session is executed, you can find the result in the tab Execute merge session log.
.
This can be useful, for example, if you want to merge outside working hours.
Once the scheduled merge session is executed, you can find the result in the tab Execute merge session log. -
Once a source branch is merged into the target branch, it will be deactivated after the merge. If you wish to continue working in that source branch, clear the checkbox Archive branch.
After the merge, the target branch is updated according to the conflict resolution you selected.

Include data migration mappings during merge
When merging a source branch into the origin and/or vice versa, the mappings from the source branch will be combined and applied to the new model version created in the origin after the merge.
When merging a source branch into another branch than the origin, data migration settings in the source branch will not be migrated to the target branch, as they are probably incompatible with all the existing data migrations in the target branch.
Here is how it works:
- When merging a source branch (like DEVELOP) into a target branch (like FEATURE), any mappings made in the source branch since creating the target branch will also apply to the target branch.
- When merging a source branch (like FEATURE) back into its origin (like DEVELOP), any mappings made in the source branch since it branched from the origin will also apply to the origin branch.
This ensures that the mappings done in the source branch will be reapplied when configuring an upgrade in the target branch and vice versa.
Suppose there are mappings from upgrades of model versions done outside of the source branch (for example, upgrading from MAIN to your FEATURE branch, even though FEATURE was branched from DEVELOP). In that case, those mappings will also be copied to be applied to the target branch of the merge session (in this case, from MAIN to DEVELOP).
Cancel a merge session
During a merge session, you might want to cancel the process, for example, to make more adjustments in the branch before proceeding. In that case, you can delete the merge session. The source and target branch will no longer have the status merging, and will be exactly as they were before you started the merge session. Your conflict resolutions will not be saved.
To cancel a merge session:
menu Models > Merging > tab Merging
- Select the merge session in the list.
- Select Delete
 and confirm.
Any pending changes will be canceled and no changes will be made to the target branch.
and confirm.
Any pending changes will be canceled and no changes will be made to the target branch.
Undo a merge session
For more information, see Revert a branch.