Generic features
The Software Factory offers features that are relevant to all or many objects, and therefore apply to multiple topics covered in this guide.
Generic tasks
Copy an object
You can copy objects in the Software Factory. When you copy an object, the pop-up may contain the following fields depending on the object:
- From - parameters identifying the source or parent object. These fields are read-only and informative.
- To - parameters identifying the target object. These fields can be filled or changed. Usually, you only have to complete the last To field, which is used to specify a name for the target object. Any preceding To fields are pre-filled with the same parent as the From fields, ensuring the target object is placed under the same parent as the source object.
To copy an object:
- Execute the task Copy [object name]
.
- Enter a new name for the object in the field To [object name].
- Select Execute.
Example of a copy task with additional options
Rename an object
You can rename objects in the Software Factory.
In general, when the task Rename [object name] is available, it is not possible to rename an object directly in the form.
When you rename an object, the pop-up may contain the following fields depending on the object:
- From - parameters identifying the source or parent object. These fields are read-only and informative.
- To - parameters identifying the target object. These fields can be filled or changed. Usually, you only have to complete the last To field, which is used to specify a name for the target object. Any preceding To fields are pre-filled with the same parent as the From fields, ensuring the target object is placed under the same parent as the source object.
To rename an object:
- Execute the task Rename [object name]
.
- Enter a new name in the field To [object name].
- Select Execute.
Example of a rename task
Go to a related screen for an object
In several screens, tasks are available to help you go quickly to the corresponding object in another screen. When executing such a task, you will automatically be navigated to the newly opened screen. A filter will be applied to the object, so you will not be distracted by the other objects that are present.
Edit code
Edit code in the Software Factory
You can edit code directly in the Software Factory.
To edit code in the Software Factory:
- Select Edit
from the action bar in any screens with a Code field.
- Edit the code and select Save from the action bar.
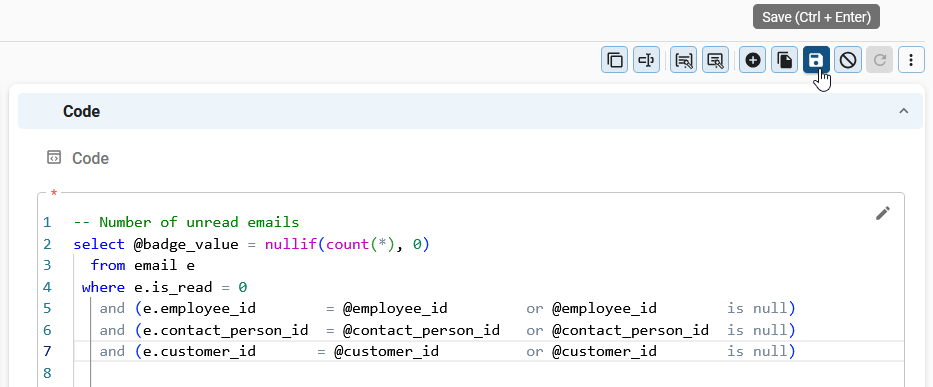 Select 'Save' in the action bar to save your changes
Edit code locally
You can edit code locally in an external IDE, such as Visual Studio Code. The following prerequisites apply:
- Use a compatible browser, such as Chrome or Edge. Automatic code syncing is based on browsers that support the File System Access API. You can check browser compatibility at Can I use... File System Access API. Firefox and Safari do not yet support this API, so do not use these browsers when editing code locally.
- Install the Thinkwise Workspace Listener.
To edit code in the Software Factory:
- Select Edit code in external file
in any Code field.
- If this is the first time you are editing code in this model, select Select workspace. Select the same Workspace folder as configured in the Thinkwise Workspace Listener, since it is used to store local copies of the code files.
- Give permissions if the browser requests access to the local file system.
- Edit the code and Save. Local changes are automatically synchronized with the Software Factory.
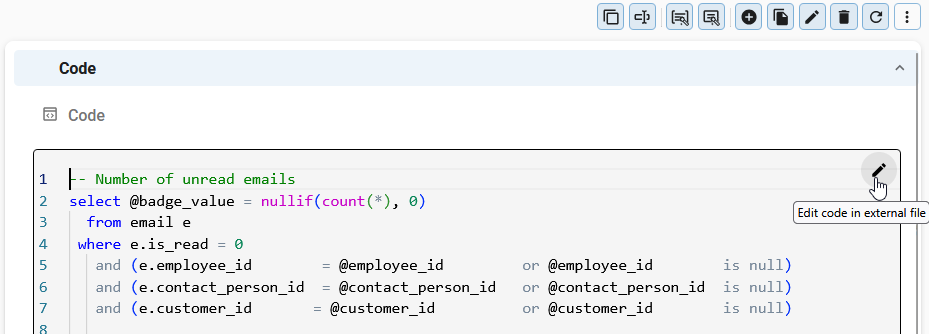 Edit code locally in an external file
Install the Thinkwise Workspace Listener
The Thinkwise Workspace Listener is a companion application for the Software Factory that supports the local code editing. For example, when you make changes in the Program object code, they are automatically applied in the relevant Templates. Note that this is a Windows only application that ensures that a code file is automatically opened with your preferred local IDE.
You can still edit and sync local code files without the Thinkwise Workspace Listener, however you will need to manually open the code files every time.
Use a compatible browser, such as Chrome or Edge, when editing code locally. Automatic code syncing is based on browsers that support the File System Access API. You can check browser compatibility at Can I use... File System Access API. For more information, see Edit code locally.
To install the Thinkwise Workspace Listener:
- Download the Thinkwise Workspace Listener from TCP.
- Execute the application and select a Destination folder, where the application should be installed.
- Select Install.
- Open the Thinkwise Workspace Listener and select a Monitored workspace folder. Select this folder from the Software Factory when you are editing a code file in an external editor for the first time.
- Optional. Add Whitelisted extensions to whitelist specific file extensions that can be opened by the Thinkwise Workspace Listener.
- Optional. Select the checkbox Start on system startup to automatically start the Thinkwise Workspace Listener when you start up your computer.
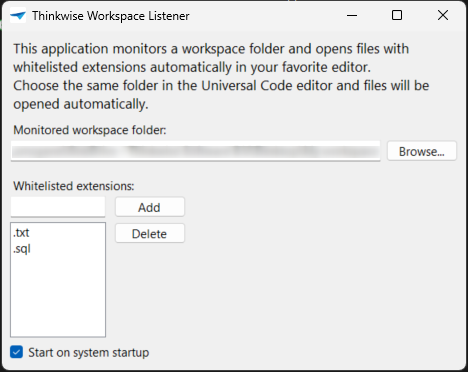 Use the Thinkwise Workspace Listener to improve the local code editing experience
Generic tabs
Translations
For every translatable object, a tab Translation is available. The visible data in this tab is determined based on the selected object. See also Translations.
Tags
For every taggable object, a tab Tags is available. The visible data in this tab is determined based on the selected object. See also Tags.
Trace
Used to display the trace fields. See also Trace.
Usage
Some objects can be used in multiple places in the Software Factory. Think of a domain (in columns/task parameters/report parameters), a message (in tasks as confirmation), or screen area (in detail tabs/prefilters/cube views etc.). The screens for these objects contain the tab container Usage, in which tabs are displayed showing where the respective object is being used. This can be useful when, for example, you want to make a change to the object and see what impact this might have.
Data
Tables:
menu Data > Data model > tab Tables
Go to Subjects (Alt + S): View the table in the screen Subjects.
Go to Code overview (Alt + O): View the table in the screen Code Overview.
Go to Model rights (Alt + M): View the table in the screen Tables.
User interface
Menus:
menu User interface > Menus > tab Menus
Go to Model rights (Alt + M): View the menu in the screen Menus.
Subjects:
menu User interface > Subjects > tab Default
Go to Data model (Alt + S): View the table in the screen Data model.
Go to Code overview (Alt + O): View the table in the screen Code Overview.
Go to Model rights (Alt + M): View the table in the screen Subjects.
Processes
Process flows:
menu Processes > Process flows > tab Process flows
Go to Code overview (Alt + O): View the process flow in the screen Code Overview.
Go to Model rights (Alt + M): View the process in the screen Process flows.
Process actions:
menu Processes > Process flows > tab Process actions
Go to Code overview (Alt + O): View the process action in the screen Code Overview.
Tasks:
menu Processes > Tasks > tab Default
Go to Code overview (Alt + O): View the task in the screen Code Overview.
Go to Model rights (Alt + M): View the task in the screen Tasks.
Go to menu: Open the corresponding tree view, list bar, or tile menu item.
Reports:
menu Processes > Reports > tab Default
Go to Code overview (Alt + O): View the report in the screen Code Overview.
Go to Model rights (Alt + M): View the report in the screen Reports.
Go to menu: Open the corresponding tree view, list bar, or tile menu item.
Business logic
Functionality:
menu Business logic > Functionality > tab Deploy
Go to control procedure in Functionality (Alt + C): View the control procedure in the screen Functionality.
Go to Template in Functionality (Alt + T): View the template in the screen Functionality.
Go to Task (Alt + O): View the task in the screen Tasks.
Go to Data model (Alt + O): View the data model in the screen Data model.
Go to Process action (Alt + O): View the process action in the screen Process actions.
Go to Subroutine (Alt + O): View the subroutine in the screen Subroutines.
Go to Report (Alt + O): View the report in the screen RReports.
Subroutines:
menu Business logic > Subroutines > tab Default
Go to Code overview (Alt + O): View the subroutine in the screen Code Overview.
Go to Model rights (Alt + M): View the subroutine in the screen Subroutines.
Code search:
menu Business logic > Code search > tab Search results
Go to control procedure in Functionality (Alt + C): View the control procedure in the screen Functionality.
Go to template in Functionality (Alt + T): View the template in the screen Functionality.
Go to Code overview (Alt + O): View the table in the screen Code Overview.
Code overview:
menu Business logic > Code overview > tab Deploy
Go to control procedure in Functionality (Alt + C): View the control procedure in the screen Functionality.
Go to Template in Functionality (Alt + T): View the template in the screen Functionality.
Quality
Code review:
menu Quality > Code review > tab Code review
Go to control procedure in Functionality (Alt + C): View the control procedure in the screen Functionality.
Unit tests:
menu Quality > Unit tests
Go to control procedure in Functionality (Alt + C): View the control procedure in the screen Functionality. Only available if the unit test has a linked control procedure.
Go to Mock data: View the data set in the screen Mock data.
Track changes
Use trace fields
Trace fields are added to all objects to see who added a row or who made the last change.
By default, all trace fields are shown on the form in a separate tab Trace info, and the Modified fields are shown in the grid. There are exceptions to this behavior.
- When a new row is added, the Added and Modified fields are filled. Initially, the insert date/time and update date/time are the same and contain the (database) date/time of the last field edit.
- When an existing row is changed, only the Modified fields are filled with the date/time of the last field edit.
- For more information about Generated and By control procedure, see Identify a generated object.
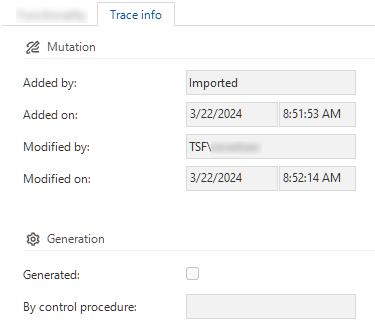 Example of a tab containing trace information
View an object's history
Historical overviews are available on a large number of screens in the Software Factory. For example, in:
- menu Business logic > Functionality > tab Control procedure
- menu Data > Data model > tab Tables
- menu User interface > Messages
These overviews are based on temporal tables. They include each point in time that a row was created, updated, or deleted. This offers insight into a row's status in the various model versions. All changes are in the model's timeline, making it also visible if no changes have been made in a model version.
Changed columns are shaded yellow, and rows that have been added, changed, or deleted are marked.
To see the history of an object:
-
Select the object.
-
Activate the history with the CTRL+H.
- Tab Form contains the object's query fields if present. These are not shown in the list to maintain readability.
- You can recognize an object or code that has been generated by AI by the magic wand
icon.
- Tab Associated work contains an overview of the work items linked to this object. See the Work overview guide.
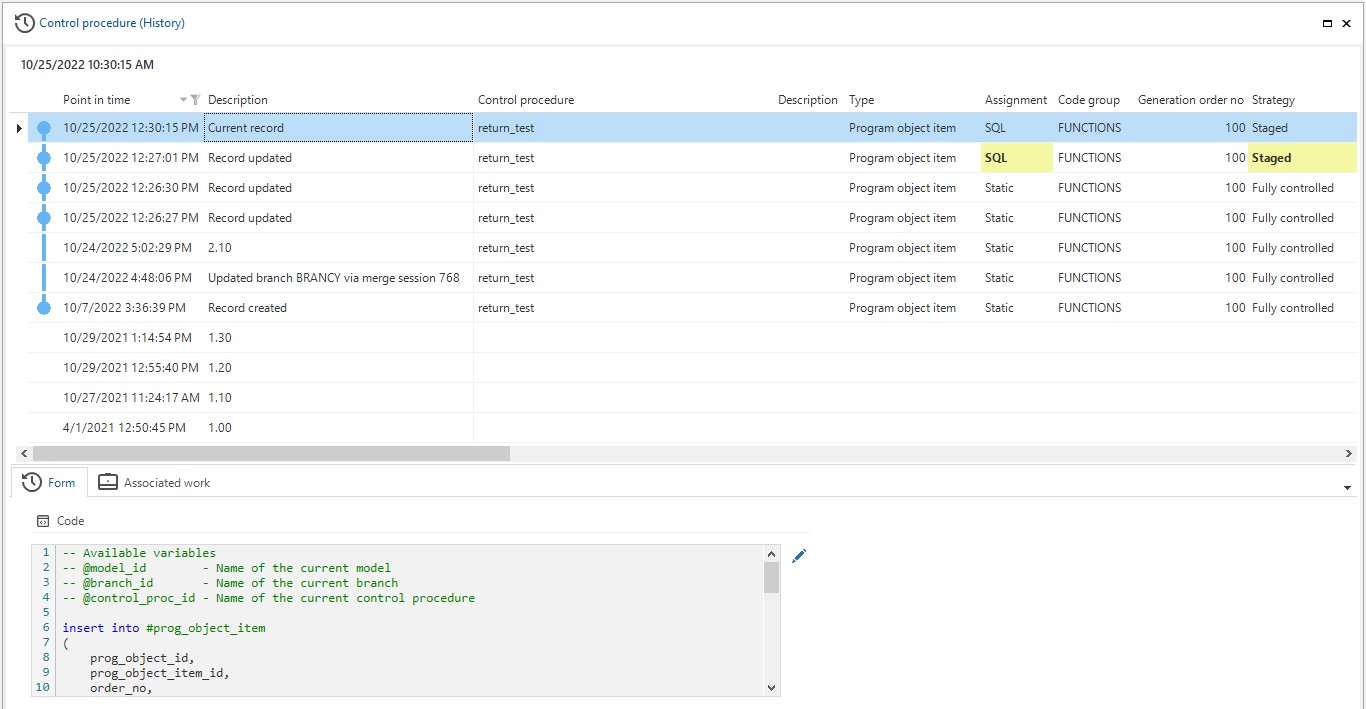 Use CTRL+H to see the history and linked work items for an object
Generated objects
Identify a generated object
Nearly all objects in a model have a tab called Trace info that contains the group Generation. This group contains the field By control procedure, which shows the name of the meta control procedure responsible for the object. If applicable, this field must be filled using the Dynamic model.
See also When are generated objects deleted.
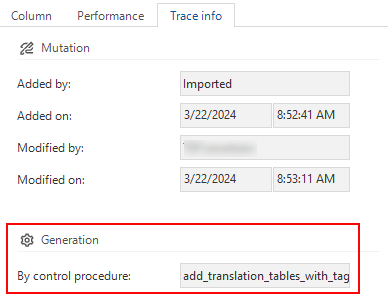 The control procedure that generated the object
Copy a generated object
When you copy an object that has been generated by a control procedure, the object and its underlying objects will remain generated. This means it will be read-only. It can still be managed by the Dynamic model. In most situations, this behavior is desired, but in some cases, some objects may be deleted after generating the definition for your branch.
Verify that the meta control procedure that must generate the object does actually generate it.
Unlink a generated object from its control procedure
You can unlink a generated object from its control procedure. If an object is no longer linked, it is no longer read-only and can be changed.
Unlinking a generated object is an expert feature, as it then becomes your responsibility to maintain. If the object originates from a Thinkwise base model, the Thinkwise Platform will no longer be able to maintain it once unlinked.
For example, if you have a meta control procedure that adds a column Active to every table, the column Active remains generated when it is being copied. However, when you change the table to a view, you can choose to unlink the column Active and make it read-only.
The task for unlinking a generated object is available for every object that can be generated.
To unlink a generated object from its control procedure:
- If necessary, deactivate the prefilter Hide generated
.
- Select the generated object.
- Execute the task Unlink generated object (Ctrl + U) from the context menu or the ribbon.
The task is not available in the taskbar because it is an expert feature that you should only use if you fully understand the Dynamic Model.
Tags
A tag is a freely definable property that can be linked to rows of a table and can be provided with a value. They provide information that is not available in the Software Factory's meta model.
You can use tags administratively or in a meta control procedure (dynamic model) to manipulate your model. For example, to indicate whether a table is deprecated or should not contain trace columns.
Tags are available for most entities in the Software Factory, for example, tables, tasks, reports, and roles.
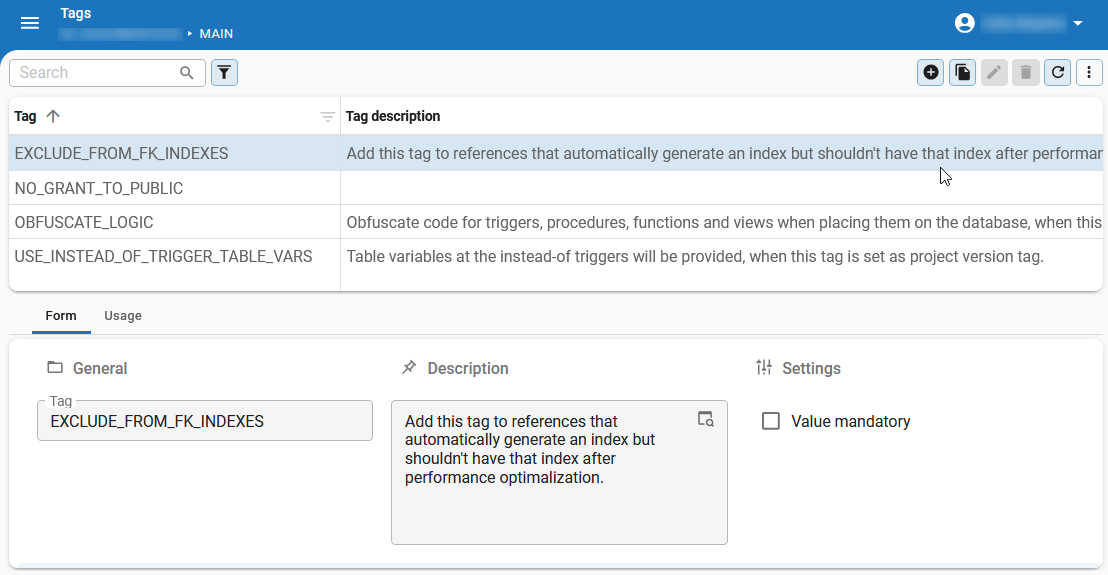 View tags available in the model
Some examples where you can add or edit tags:
- An overview of all tags within a model: menu Enrichments > Tags or menu Models > Model overview > Models > tab Model tags.
- Tables: menu Data > Data model > tab Tables > tab Table tags.
- Columns: menu Data > Data model > tab Tables > tab Columns > tab Column tags.
- Tasks: menu Processes > Tasks > tab Default > tab Task tags.
- Reports: menu Processes > Reports > tab Default > tab Report tags.
- Roles: menu Access control > Roles > tab Form > tab Role tags.