Deployment package
Introduction to deploying applications
Deployment packages provide a way to easily deploy applications created with the Thinkwise Platform to different locations, customers or tenants. Deployment packages can be executed using the Thinkwise Deployment Center, either using the graphical user interface (GUI) or the command line interface (CLI). The CLI can also be used together with deployment and release management tools like Octopus Deploy to automate deployments.
It is important to know that:
- All jobs are performed by Indicium. So, the creation of the deployment package will continue even if you close the Software Factory GUI.
- Since all jobs are performed by Indicium, it is possible to automate the entire process.
- All developers can track a job's progress. For example, if one developer starts creating a deployment package, another developer can see this in their Deployment package screen. This behavior extends to the validation- and unit test tabs in various modelers, and to the Validation and Unit test screens that can be opened directly from the menu.
Create a deployment package
You can create a deployment package for a branch in the Deployment package screen.
- Creating a deployment package can be automated via the Indicium API. See Automate the creation of a deployment package.
- The file storage location for this process needs to be configured in IAM: menu Authorization > Applications > tab General settings > tab File storage locations. For more information, see Configure the file storage location.
To create a deployment package:
menu Deployment > Deployment package > tab Deployment package
-
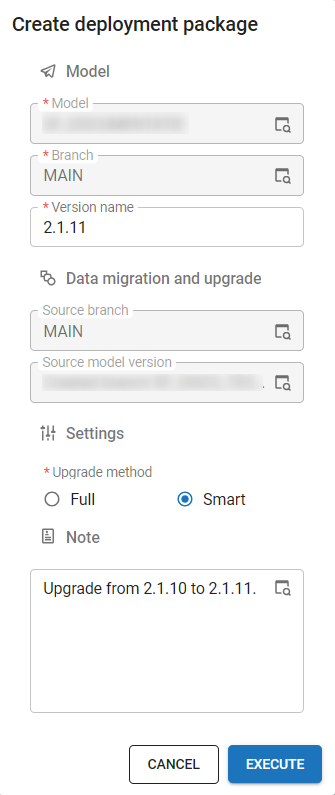
Execute the task Create deployment package
 .
The model and branch are preselected.
.
The model and branch are preselected. -
Enter a Version name for the model version that will be created with the deployment package. This name will be stored in the menu Models > Model overview > tab Branches > tab Model settings.
-
Select an Upgrade method. See Generation method.
-
In the field Note, you can add the reason for creating the deployment package. The reason is also visible in the History tab.
-
Select Execute. This will:
- Generate the branch definition.
- Validate the branch definition.
- Generate the branch code for the full install and the full/smart upgrade.
- The upgrade will be generated full or smart depending on the choice made in the Upgrade method field.
- Generate the synchronization script for IAM.
- Verify the synchronized model.
- Generate the manifest for the Thinkwise Deployment Center.
After a successful run, all deployment package files are written to the configured file storage location. A field containing the exact location appears on the screen.
You can Copy
 the path and paste it at the location where the files are available,
for example, in the File Explorer or an Amazon S3 bucket.note
the path and paste it at the location where the files are available,
for example, in the File Explorer or an Amazon S3 bucket.noteCreating a deployment package can take a while.
-
Download the Deployment Center from TCP. It is used to execute the deployment package files.
-
Once the download is complete, extract the Deployment Center files.
-
Add the extracted Deployment Center files to the configured file storage location.
- To start the deployment with a user interface (GUI), run
twdeployerGUI.exe. - To start the deployment with a Command Line Interface (CLI), run
twdeployer.exe.
- To start the deployment with a user interface (GUI), run
 Creating a deployment package
Download a deployment package
After creating a deployment package, you can download it as a .zip file to use or distribute outside of the configured file storage location.
To download a deployment package:
menu Deployment > Deployment package > tab Deployment package
- Execute the task Download deployment package
 .
. - If you have multiple RDBMS types configured, select an RDBMS type to download the package for.
Leaving the RDBMS type field empty will result in a
.zipfile containing deployment packages for all configured RDBMS types. - Select Execute.
Include modules in the deployment package
menu Deployment > Deployment package > tab Deployment package > tab Modules
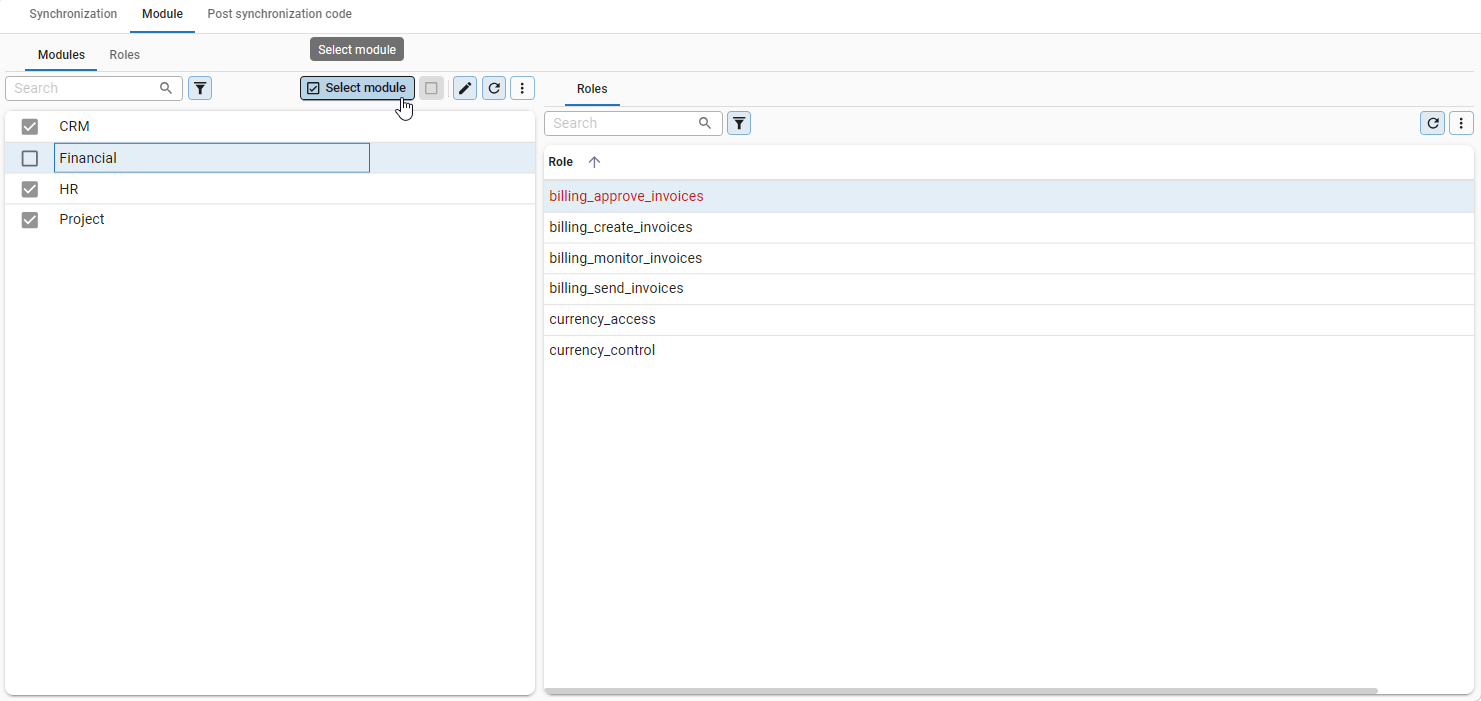
If a branch contains any modules, a list of available modules will be shown. Select or clear the modules to include or exclude them from the deployment package.
The Roles tab shows all roles and the modules to which they belong. A checkmark before the role indicates whether it is included in the deployment package.
- Any roles that are not assigned to a module will always be deployed by default.
- Clearing modules that were previously deployed will remove them from your application during the next deployment.
 Selected modules
Post synchronization code
menu Deployment > Deployment package > tab Post synchronization code
It is possible to add arbitrary SQL code to a deployment package. This code will be executed on IAM after the synchronization to IAM has been finished.
The code can, for example, respond to the tag mechanism in IAM in order to control what the code affects. Tags are available for users, user groups, tenants and applications. See: User tags, User group tags, Tenant tags, or Applications tags.
The current model_id and branch_id are available as variables, as long as there are no "GO" statements encountered.
This code is different from the post synchronization code in the Synchronization to IAM screen.
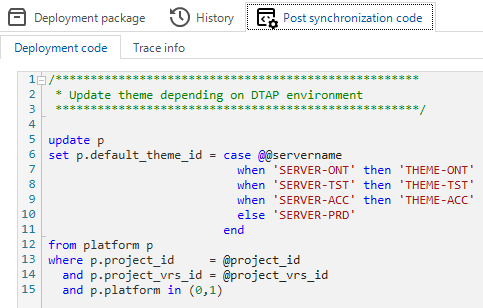
An example of how to use the Post synchronization code
Automate the creation of a deployment package
See Automate deployment.
History
menu Deployment > Deployment package > tab History
The History tab page shows a list of previously created deployment packages.