Data model
Introduction to the Data Model
The data model screen allows you to visually design the data model of your application.
-
A data model consists of tables, containing columns, and references, to create relations between tables. Rows (records) can be stored in a table. Each row consists of fields (columns).
-
Views can also be included in a data model along with physical tables. A view gives a runtime presentation of data from one or more tables in one concentrated overview and is therefore always up-to-date. There are no rows stored in a view.
-
DB2 Oracle It is also possible to create a snapshot. In a snapshot, just as in a view, data from one or more tables can be combined, though in a snapshot this data is actually saved. This can considerably improve performance. The RDBMS has provisions to easily refresh the data in a snapshot (sometimes even automatically).
-
Not yet available A function-typed table is read-only and uses a table-valued function generated by the Software Factory as a data source. It can solve performance problems if data in a query is filtered based on parameters instead of retrieving all data and then filtering.
-
A reference is a relation between tables. The integrity between these tables is automatically guaranteed on the basis of a column comparison. A reference consists of a target and source table. The source table is the lookup table.
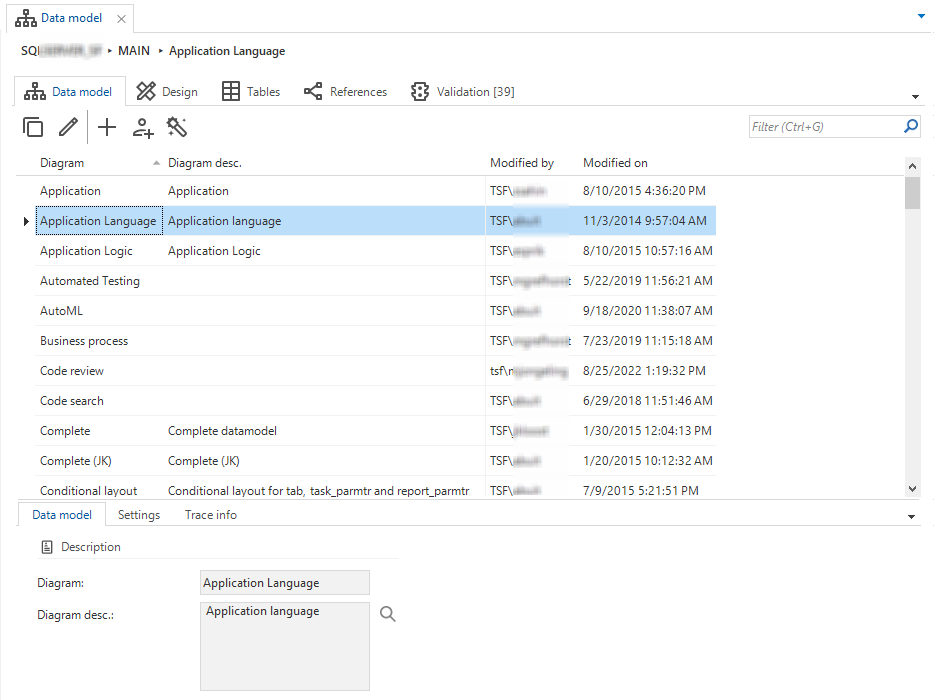 The Data model screen
Create AI-generated data model
To create an AI-generated data model:
menu Data > Data model > tab Data model
- Start the task
Create AI-generated data model.
- Describe the desired data model.
Upon execution, the task creates and activates the data model. The AI then generates a diagram with tables, references, and new domains as needed. Unlike the enrichment Create a sample data model with AI, the task does not allow you to select the specific tables, columns, and references to generate. See the example of the enrichment Create a sample data model with AI.
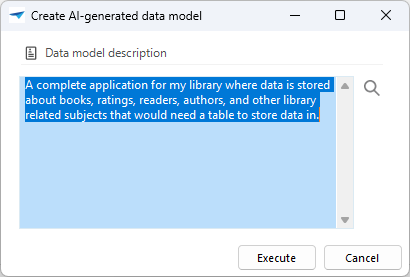 The data model description
Diagrams
menu Data > Data model > tab Design
Since a data model can consist of many tables with columns, an overview can quickly become very unclear. To avoid this, it is possible to produce several diagrams each describing a subset of the complete model. A task is available to produce one's own diagram. This diagram is always at the top of the list of diagrams and can only be used by the user who is logged in. This prevents two developers getting in each other's way when designing.
It is possible to create a personal diagram. This diagram is not visible for other developers and is not bound by any rules. It is also possible to import existing diagrams into a personal diagram. When a personal diagram already exists, the choice is provided whether the personal diagram should be replaced or merged with the diagram that must be imported.
Design a diagram
Diagrams, and therefore the data model, can be designed graphically via the Design tab
menu Data > Data model > tab Design
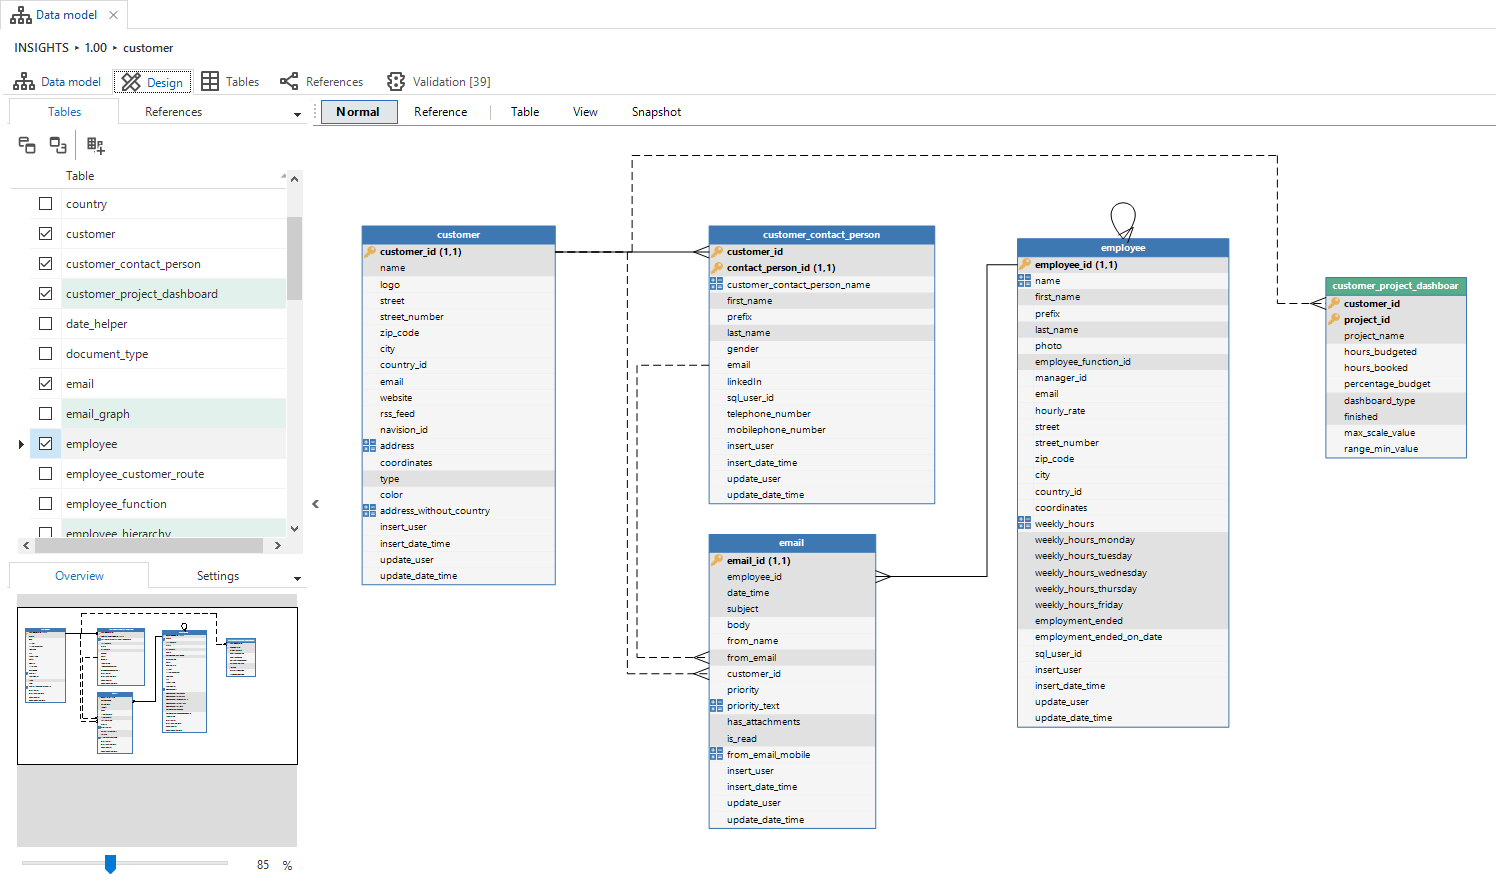 Tables and views in the Design tab page
This screen has a number of functions that help when designing the data model. A list is visible in the left hand column with all the tables and views. Besides this, there is a similar list with all the references. These can be checked and unchecked to use them within the diagram. In both lists it is possible to find objects using the find-option in the context menu (or by using the shortcut CTRL + F).
Under this list, there is an overview of the diagram and there are a number of standard parameters that can be modified.
Tasks are available above the tables to automatically add extra levels or link tables to the diagram.
The One level deeper and One level higher tasks select all linked tables above or below the selected table. This allows fast development of a diagram, which displays linked tables.
The Link table task automatically creates a link table between two tables. It can be indicated in the pop-up which table is the main table and which is the subordinate.
To create a link table between two tables, both tables have to have a primary key
Context menu options for diagrams
menu Data > Data model > tab Design
The context menu in the Design tab
The context menu (right-hand mouse button in the work sheet) offers the following options:
-
Refresh - re-load the data model, for instance, to see modifications from other designers.
-
Diagram - has a sub-menu to save, load and rename diagrams.
-
Arrange - produces a graphical display by manually positioning the tables yourself. The distance is determined through an option in Settings.
-
Arrange references - leave the tables alone, but position the references so that they do not run through the tables.
-
Fit to screen - remove the white edges around the data model.
-
Align - has a sub-menu to align selected objects in various directions.
-
Print - the data model is printed on the standard printer.
-
Print preview - displays a print preview.
-
Export - has a sub-menu to export the graphical data model to various formats such as GIF, PNG, PDF, etc.
-
Normal/Reference - switch between Normal and References. If References is selected, it is possible to draw references between columns.
-
Add - a table or reference can be directly added to the model.
-
Delete - delete a table or reference from the diagram and/or model. With delete table, the table is not deleted but only removed from the data model. With delete reference, there is a choice between removing the reference just from the diagram or also from the model.
You can add new tables, views and snapshots (DB2 Oracle) in the tab Tables next to Design but also via the buttons in the diagram.
Buttons to add tables, views and snapshots in the Design tab
Add a table
To add a table to the data model:
menu Data > Data model > tab Tables > tab Form
- Enter a Table name.
- In the field Table type, select Table.
- Optional. If you add an Icon to a table, it will be displayed with the screen title in the menu and on (detail) tabs.
- Optional. Select a Storage location.
- Select if the database management system should keep a table into memory to optimize performance. For more information, see Memory optimized.
- Optional. Select System versioning if you want to keep a full history of data changes.
- Optional. In group Partition settings, select if you want to use Data partitioning.
- To link tables, create a reference.
- To constrain the possible data in the table, add check constraints.
When not in add or edit mode, you can use AI to generate a description or application logic for the table.
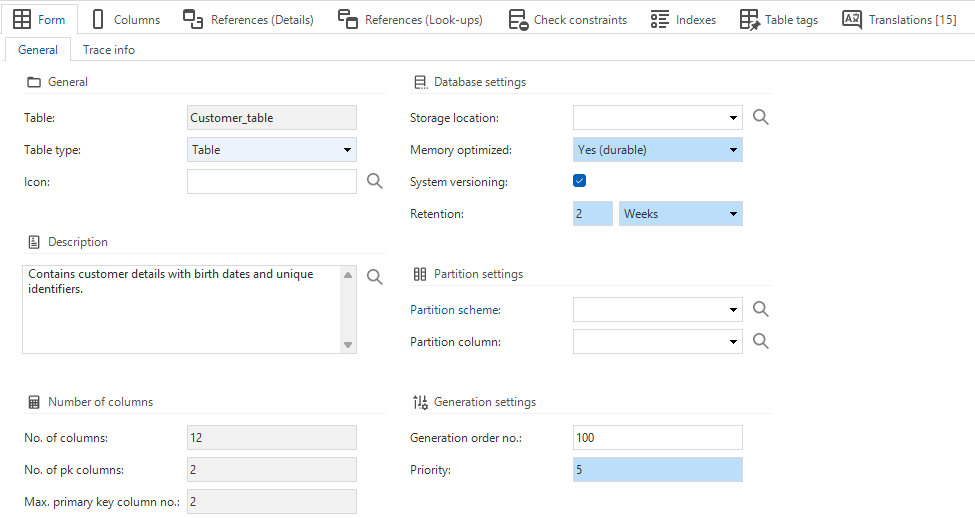 Add a table
Go to related screens
menu Data > Data model > tab Tables
The Tables screen contains tasks that take you to related screens for the selected table. For more information on this generic feature, see Go to a related screen for an object.
Copy a table
It is possible to make a copy of a table.
Creating a copy of a table is not the same as creating a table variant. A copy is a separate table, while a variant is still linked to the original table. To create a table variant, see Create a table variant.
menu Data > Data model > tab Tables
-
Execute the Copy table
task.
-
Enter a name for the copy in the field To table.
By default, the table is copied including all columns and settings, such as grid and form order, sorting, conditional layout, and prefilters.
-
Select what else you want to include in the copy:
- References (details) - References to details. Default not included. See References.
- References (lookups) - References to lookups. Default not included. See References.
- Components - Include component data: maps, schedulers, and cubes.
- Table reports - Include the links to reports. See Table reports.
- Table tasks - Include the links to tasks. See Table tasks.
- Functionality assignments - Include the functionality assignments. If you deselect this option, the copied table will not be assigned to any control procedure. Use this to create a bare object (the copied table). Then, create a new control procedure, and assign the copied table to it.
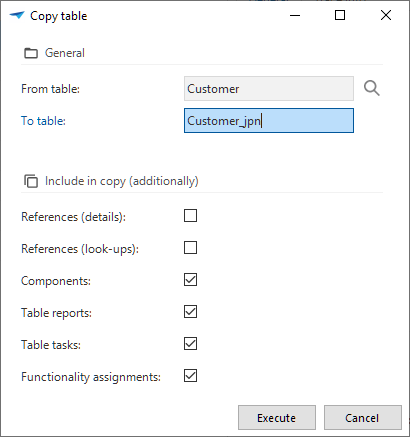 Copy a table
Database storage location
You can divide the database into separate files and store them on separate drives. For example, you can store invoices on the SSD and customer data on the HDD. This can improve performance because data can be retrieved faster.
To use a storage location:
menu Data > Data model > tab Tables > tab Form
- Select a Storage location for the table.
Memory optimized
It is possible to specify if the database management system should keep a table into memory to optimize performance.
To enable this feature:
menu Data > Data model > tab Tables > tab Form
-
In field Memory optimized, select an option:
- No
- Yes (durable)
- Yes (transient) - only available for SQL server models
For more information, see:
- SQL server
- DB2 (uses the property
KEEPINMEM). - Oracle (uses the option
CACHE).
Data partitioning
Warning: This is an advanced feature that should not be used without a proper understanding of SQL Server's implementation of partitioning.
Partitioning allows data in a table to be stored in separate chunks on the file system. For very large tables this could lead to a performance increase.
To get started with partitioning for your application, a partition scheme needs to be created:
menu Data > Data model > tab Tables > tab Form
-
Open the pop-up next to the Partition scheme field.
-
The following information is required:
- Partition Scheme: A name for the partition scheme.
- Domain: A domain to determine which data type will be used to partition the data. This domain needs to be of the same data type as the column that is going to be used as the partition column.
- Range: The alignment for the boundaries of the partition ranges. The boundaries can be aligned either left or right.
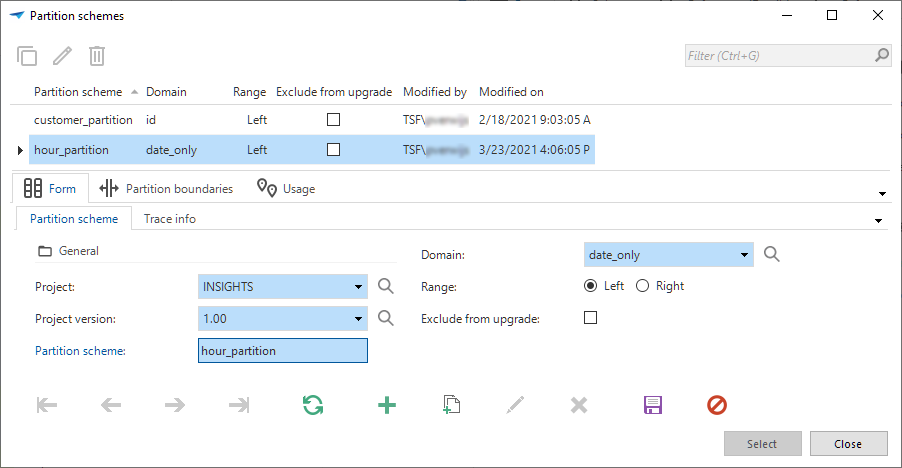 Enter a partition scheme
 -
Open the Partition boundaries detail tab. Boundaries determine where the data is going to be split. In the example below, every year on January 1st.
-
Set the partition boundaries.
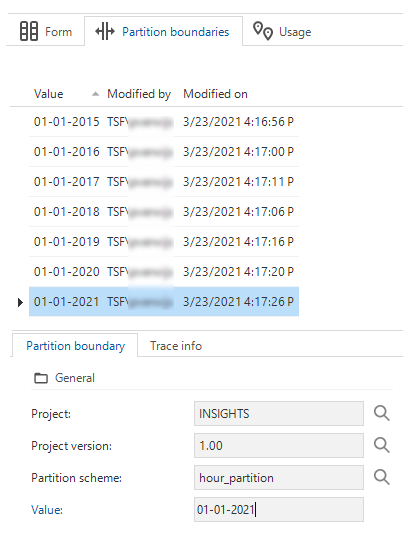 Set the partition boundaries
 -
Return to the underlying table.
To apply the partitioning to a table:
-
Select one of the created partitions in the field Partition scheme, and select a column in the field Partition column. The partition column is the column that contains the data that will be used to partition the table.
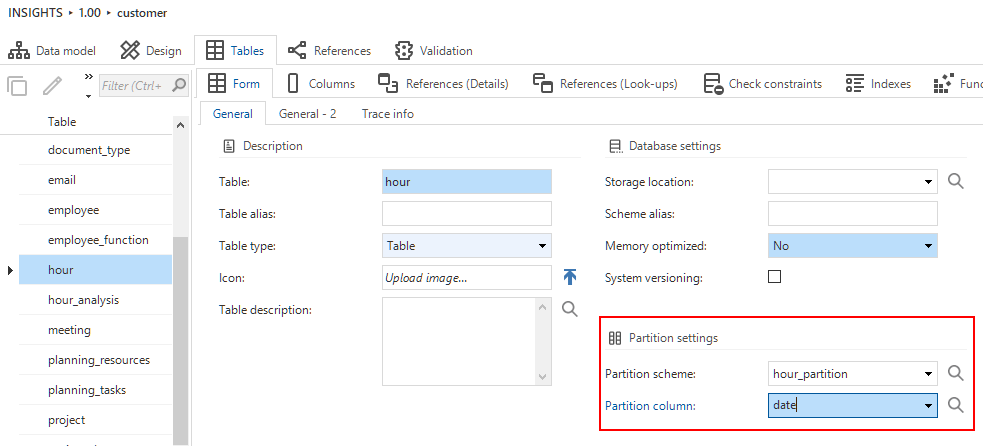
-
A database upgrade is necessary to apply or remove data partitioning, since this concerns a change in the data model.
Create application logic using AI
You can use AI to create application logic.
menu Data > Data model > tab Tables
- Start the task Generate application logic with AI
.
- Describe the desired business rule in natural language. The AI will automatically create the application logic and open the control procedure.
The AI generates application logic based on the selected table. However, if your text describes something unrelated to the data in that table, the AI might assign the logic to a different table.
See also the enrichment Generate application logic based on natural language business rules.
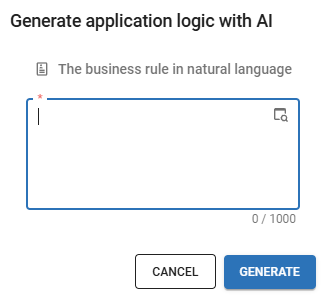 Create application logic
Add a table description using AI
You can use AI to create table descriptions.
menu Data > Data model > tab Tables
- Select the table to which you want to add a description.
- Start the task Generate table description with AI
.
The AI generates a table description automatically and adds it to the selected table's Description field.
Table variants
Create a table variant
A table variant allows you to create different versions of a table. This is useful when you want to display relevant data in different ways, for specific roles or scenarios without having to create multiple views. For example, a default table might display all records in a grid format, while a variant can display fewer columns for a particular GUI. However, if you alter the original table, the changes will also be applied to the variant unless the settings for the variant were previously modified. For more information on table variants, see Variants.
A table variant is not a copy of the original table. A variant is still linked to the original table, while a copy is not. To create a copy of a table, see Copy a table.
To create a table variant:
menu User Interface > Subjects > tab Subjects > tab Default/Variants
- Select the task Create a table variant
.
- Select the Table that you want to create a variant for.
- Enter a Table variant name.
- Optional. To generate a different translation for the variant, select the checkbox Translate.
- Go to the tab Variants and change the settings of your variant as needed. For more information on settings, see Settings for Subjects.
In the tab Changes compared to default, you can view a list of the differences between a table variant and its default table. For more information, see Compare a variant to its default.
Alternative translation for a table variant column
It is possible to create an alternative translation for a table variant column in a form, grid, card list, or tooltip. This translation is used in the user interface instead of the default translation. See also Alternative translations.
To create an alternative translation:
menu User interface > Subjects > tab Variants > tab Columns > tab Form
- Select the checkbox Alternative translations.
- Enter an alternative translation Label.
- Save the settings.
- Go to the tab Alternative translations.
- Add an alternative translation.
Table history
For both SQL server and Oracle, it is possible to activate system versioning for a table.
System versioning is a feature that automatically tracks the history of data changes in a table. Tracking the history of data changes is useful for auditing, compliance, and recovering previous data when needed.
System versioning for SQL Server
SQL Server supports temporal tables (also known as system-versioned temporal tables) as a database feature.
Temporal tables are a type of table designed to keep a full history of data changes. They automatically track the history of data changes, making it easier to analyze historical data or audit changes. Temporal tables consist of two tables: a current table (the main table) and a history table. The current table stores the latest data, while the history table stores all the previous versions of the data. More information about system versioning can be found in the Microsoft documentation.
To activate system versioning for a table:
menu Data > Data model > tab Tables > tab Form
- Select the checkbox System versioning.
- Enter a Retention period. The default is Indefinitely. To prevent potential issues with storage costs and performance, enter a reasonable value in years, months, weeks, or days. The retention period is applied to the table when creating the database or executing an upgrade. During an upgrade, only historical data within the specified retention period is copied.
Activating system versioning for a table is a datamodel change. As a result, the Software Factory:
- Generates code in the
CREATEandUPGRADEscripts. The two date fields (tsf_valid_fromandtsf_valid_to) are generated in the script automatically, as hidden fields. They are not created in the Column list in the Software Factory. - Creates a history table with the name
[table_id]_history. This table appears in the CREATE and UPGRADE scripts, but not in the list of tables in the Software Factory. Because of this, the settings in Data mapping for the original table will also apply to the history table.
To query data from a table for a certain point in time, you can use for system_time as of. For example:
select *
from customer
for system_time as of '2019-09-01 T10:00:00.0000000'
Note that in the result of this example, columns tsf_valid_from and tsf_valid_to are not shown because they are hidden.
To see the values of these columns, you have to make them explicit in the select list. For example:
select customer_name, tsf_valid_from, tsf_valid_to
from customer
for system_time as of '2019-09-01 T10:00:00.0000000'
Flashback database for Oracle
Oracle uses the Flashback Database setting to keep a history of changes to a table. This setting cannot be activated via the Software Factory and it requires an Oracle database administrator to enable it. Flashback Database uses its own logging mechanism, creating flashback logs and storing them in the fast recovery area. You can only use Flashback Database if flashback logs are available. To take advantage of this feature, you must set up your database in advance to create flashback logs. To enable Flashback Database, you configure a fast recovery area and set a flashback retention target. This retention target specifies how far back you can rewind a database with Flashback Database
More information about Flashback Database can be found in the Oracle documentation.
Columns
The columns are defined within a table:
menu Data > Data model > tab Tables > tab Columns
In the topics below, the settings for columns are explained.
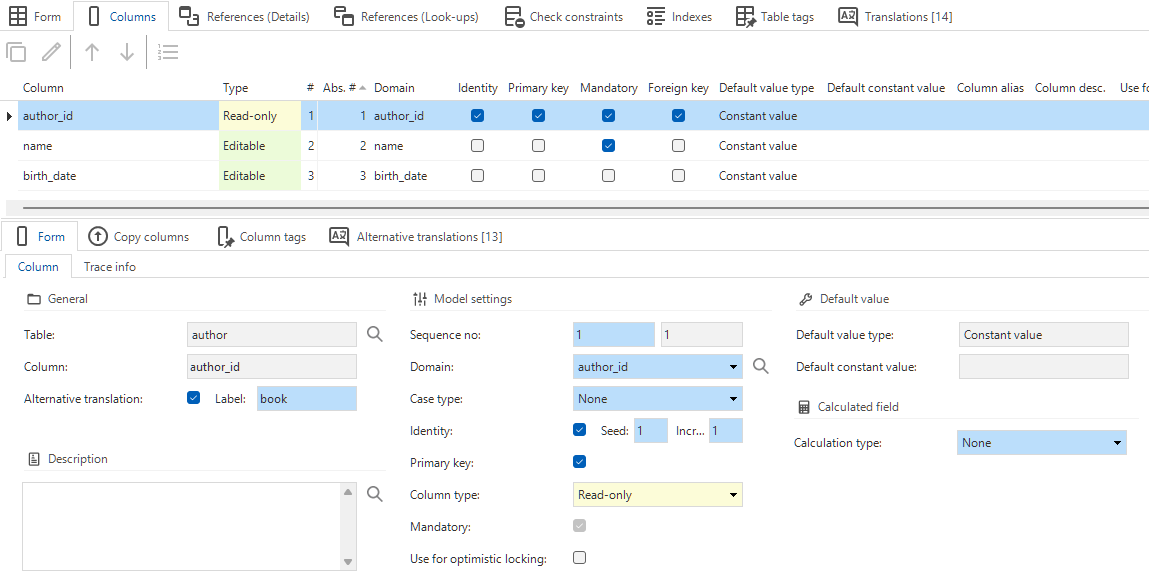 Column settings
General
menu Data > Data model > tab Tables > tab Columns
- Table - the table within which the column is created (ID)
- Column - the column name in the database (ID)
- Alternative translation - the alternative translation for the column name
Alternative translation for a column
It is possible to create an alternative translation for a column in a form, grid, card list, or tooltip. This translation is used in the user interface instead of the default translation. See also Alternative translations.
To create an alternative translation for a column:
menu Data > Data model > tab Tables > tab Columns
- Select the checkbox Alternative translation and enter an alternative translation label.
- Save the settings.
- Go to the tab Alternative translations.
- Add an alternative translation.
Model settings
menu Data > Data model > tab Tables > tab Columns
- Sequence number - determines the physical sequence in the database.
- Domain - determines the data type and control of the field (ID).
- Case type - determines whether this field is only filled with upper case letters, lower case letters or a combination of both.
- Identity - the database will automatically issue a number for this field.
- Seed - begin value of the number.
- Increment - steps with which the number is increased.
- Primary key - determines whether the field is part of the primary key. A table's first column is by default marked as a primary key. Clear the checkbox if you want to deviate from this.
- Column type - determines how the column is displayed (Editable / Read only / Hidden). Combined with the Access type the column display can also be Unauthorized (see Access types).
- Mandatory - determines whether a field is mandatory or optional.
- Foreign key - indicates whether a field is a foreign key from another table.
- Use for optimistic locking - indicates whether Indicium includes the column in a comparison to determine whether the record has been changed while editing. You will be notified if the comparison determines that the row has been edited.
- Default value - See Default value for a column.
Default value for a column
menu Data > Data model > tab Tables > tab Columns
In the field Default value type, you can select a Constant value or an Expression:
- Default constant value - A fixed value that is filled when adding a record. With a change, this value is not filled.
- Query - The expression used to determine the default value. The query cannot use values from a new record.
For the following functions, the Software Factory will not generate a function but instead use the given Query as the default value.
To use these functions as a default value query, you should specify them without select.
- newid()
- getdate()
- getutcdate()
- sysdatetime()
- dbo.tsf_user()
- dbo.tsf_original_login()
- Default values for columns will be placed in the database.
- Default queries may be placed in the database to be used by insert statements in application logic. This depends on whether or not the database platform supports this. SQL Server databases are currently the only databases that support this.
Calculated field
menu Data > Data model > tab Tables > tab Columns
-
Calculation type - indicates with which calculation the field is filled. A choice can be made from:
-
None - the user should enter a value.
-
Expression - the UI executes the calculations. This is not stored in the database, neither is the column. Using the
T1alias is possible.
For example:
concat_ws(' ', t1.first_name, t1.last_name)- Calculated column - a virtual column that calculates its values.
Do not specify an alias for columns.
For example:
(100.0 + tax_percentage) / 100.0 -
-
Calculated column (function) - the database executes the calculation with help of a function. Specify a query that should be wrapped by the Software Factory into a function. This function will then be used for the calculated field's value. Use an
@[col_id]for its value.For example:
select sum(order_total) from sales_order where sales_order_id = @sales_order_id -
Query - specify a query to have a value in this field calculated by the UI or database. This value is not stored in the database.
For example: price * quantity.
Expression dependencies
It is possible in the Software Factory to define virtual fields that are not stored in the database but are evaluated by the user interfaces. This type of field is called an expression field. For these expression fields, that are sometimes also called lookup info fields, no upgrade of your application is necessary.
Example
A person can be displayed as first name + prefix + surname. This name is composed and therefore does not have to be stored in the database but is often used in the GUI.
With calculated fields, a query has to be provided with which the value is retrieved by the user interface. For instance, this can be a composition of several fields, a (range) function or a subquery. Reference can be made in the query to other fields from the table by using the alias t1.
The query that is provided with expression fields will be added to the select clause of the query. For example:
select
t1.[customer_id],
t1.[customer_naam],
(  select t1.street + ' ' + t1.number_number + ', ' + c.name
   from country c
   where c.country_id = t1.country_id
) as t1.[address]
from customer t1
The columns on which the expression is dependent are shown on the Expression dependencies tab. If one of these columns changes in your application, then the expression field will also be updated. If, for instance, street changes, then the composite address has to use the new street.
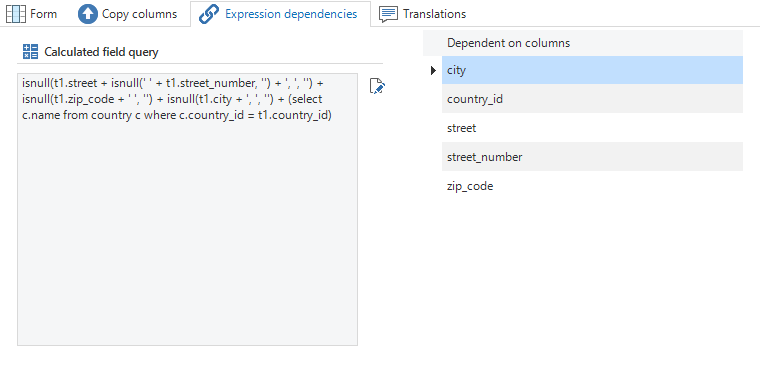 Calculated field with a Query
Copy columns
Columns for a table or view can be copied from all existing tables and views using the task Copy on the tab Copy columns.
When executing the task Copy columns, a pop-up screen is displayed to optionally enter a prefix for the copied columns. For example, the column name can be copied from the employee table using the prefix employee, resulting in column ID employee_name. When the column ID already starts with the specified prefix, then the prefix is ignored.
In addition to copying the prefix, you can also copy the identity settings (Identity, Seed, and Increment) and the settings Primary key and Mandatory. This provides more control over the desired configuration of the new column. For example, including the setting Mandatory copies the mandatory status (on or off) from the source column.
Once you have copied columns to a table or view, all columns in the table or view are automatically renumbered.
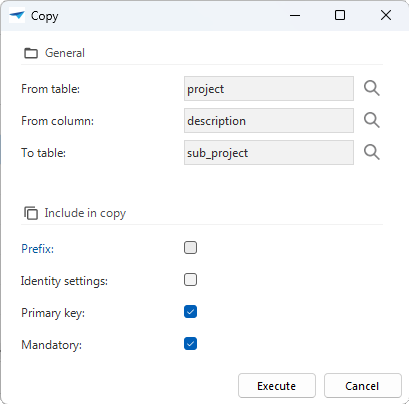 Pop-up for copying tables
After all columns are defined and/or copied and Automatic or Modifiable is chosen for the view option, then the from clause of the view can be constructed by executing the task Generate view from clause.
Add a view
A view is a logical table that is composed from fields from other tables.
The data in a view is not stored in the database but composed at runtime on the basis of a query. If you want to store the data, use a snapshot (DB2 Oracle) instead.
To add a view:
menu Data > Data model > tab Tables
-
Enter a name for the view in field Table.
-
In the field Table type, select View.
-
Select a Creation method.
- Meta auto - use this method when only data from the referenced (source) tables need to be used in the view. The from clause is created automatically. This is generated, but it can also be forced by executing the Generate view from clause task.
- Meta custom - use this method to be able to modify the from clause, where clause, group by clause or having clause of the view. The select clause is built up on the basis of the view table and view column fields in the columns.
- Template - use this if you want to create a template in which the entire query is written, which then needs to be woven into the view's program object. This option offers the most control, and the freedom to use the most complex selection structures or to build them dynamically. See also Add a template.
-
Optional. Only for a Template you can add logic to determine the contents of the view. In the template, the entire query is defined for the data that will be displayed. The columns that you defined for the view in the data model are reflected in the view definition in the corresponding program object code. These must all be populated from the template.
Example template code for a view
select
   h.hour_id,
   h.project_id,
   h.description,
   e.name as employee_name
from hour h
join employee e
on e.employee_id = h.employee_id -
If you are using calculated fields, see Calculated fields for performance considerations.
In the tab Design (menu Data > Data model > tab Design), you can also use the button View to jump to the tab Tables in add mode, with View already selected as the Table type.
Button to add a view to a data model
Add a snapshot
DB2 OracleIn a snapshot you can combine data from one or more tables. These data are saved, which can considerably improve performance because the RDBMS has provisions to easily refresh the data in a snapshot (sometimes even automatically). If you do not want to store the data, use a view instead.
To add a snapshot:
menu Data > Data model > tab Tables
-
Enter a name for the snapshot in the field Table.
-
In the field Table type, select Snapshot.
-
Select a Creation method.
- Meta auto - use this method when only data from the referenced (source) tables need to be used in the snapshot. The from clause is created automatically.
- Meta custom - use this method to be able to modify the from clause, where clause, group by clause or having clause of the snapshot. The select clause is built up on the basis of the view table and view column fields in the columns.
- Template - use this to create a template in which the entire select query is written, which then needs to be woven into the snapshot. This option offers the most control, and the freedom to use the most complex selection structures or to build them dynamically. See also Add a template.
-
Optional. Only for a Template you can add logic to determine the contents of the snapshot. In the template, the entire query is defined for the data that will be displayed. The columns that you defined for the snapshot in the data model are reflected in the snapshot definition in the corresponding program object code. These must all be populated from the template.
Example template code for a snapshot
select
   h.hour_id,
   h.project_id,
   h.description,
   e.name as employee_name
from hour h
join employee e
on e.employee_id = h.employee_id -
If you are using calculated fields, see Calculated fields for performance considerations.
In the tab Design (menu Data > Data model > tab Design), you can also use the button Snapshot to jump to the tab Tables in add mode, with Snapshot already selected as the Table type.
Button to add a snapshot to a data model
Table-valued function as a table
This functionality is not yet availableIt is possible to use a table-valued function as a table. A function-typed table is read-only and uses a table-valued function generated by the Software Factory as a data source.
A function-typed table can solve performance problems, for example, when retrieving the history in a query within a specific timeframe. The performance improves if data in a query is filtered based on parameters instead of retrieving all data and then filtering. Another example is the selection of a specific model or company throughout the entire application.
This feature is only available for SQL Server (and not yet for DB2 or Oracle) and only supports inline statements.
To create a table-valued function:
menu Data > Data model > tab Tables > tab Form
-
Select Table type 'Function'.
Table type 'Function'
-
In tab Tables, open tab Columns > tab Form.
Now set the input parameters for the function table:
-
For the relevant columns, check the Function input parameter box.
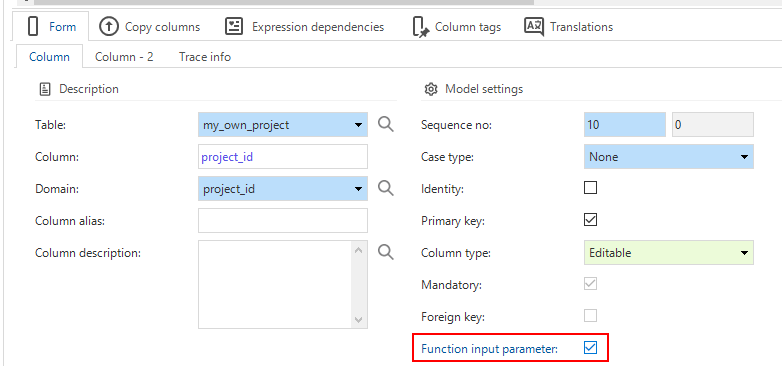 Function input parameter
Now add code to the function with a control procedure:
menu Business Logic > Functionality > tab Control procedure
-
Add the code. A return value has to contain the table as declared in the data model.
To fill the function input parameters:
menu User interface > Subjects > tab Data > tab Prefilters > tab Prefilter > tab Form
-
Add a prefilter to the table with "equal to" or "is null" conditions.
Generated code for a function table
The numbers [1], [2], etc refer to the steps as described above.
/* Drop function my_own_project first. */

if exists (select 1 from sysobjects
           where name = 'my_own_project' and (type = 'FN' or type = 'TF' or type = 'IF'))
   drop function my_own_project
go

create function my_own_project                          --[1]
(
   @project_id       project_id                         --[2, 3]
)
returns table
-- This function returns an inline table with the following definition:
--(
--   project_description   description   primary key,   --[2]
--   amount_of_hours       amount        null           --[2]
--)


    --control_proc_id:      function_my_own_project     --[4]
    --template_id:          function_my_own_project
    --prog_object_item_id:  function_my_own_project
    --template_description: Select my project from project.
    return (                                            --[4]
        select
            project_description,
            amount_of_hours
        from project
       where project_id = @project_id
           );

go

grant select on my_own_project to public
go
Indexes (optimize performance)
The Software Factory automatically creates indexes for foreign keys and sort sequences. To optimize performance, it might be necessary to add additional indexes to a table.
menu Data > Data model > tab Tables > tab Indexes
-
Select a Table.
-
Enter an Index name.
-
Select the Type of index. The following types are supported:
- Clustered
- Clustered columnstore - See Columnstore indexes.
- Non-clustered
- Non-clustered (history) - See Non-clustered history indexes.
- Non-clustered columnstore - See Columnstore indexes.
- Full-text (SQL Server)
- Encoded vector (DB2)
-
Optional: You can divide the database into separate files and store them on separate drives. For example, you can store invoices on the SSD and customer data on the HDD. You can do this by selecting a Storage location for an index to retrieve data faster.
-
Optional: Select the checkbox Unique if an index has to be unique. Unique indexes can be marked to Exclude null values. In this case, if any of the rows’ indexed columns contain a null value, the row will not be checked by the unique index. You can use it, for example, for a table with users where the
usr_idis your PK (and thus unique), but you also want theusr_nameto be unique. -
Optional: If you are using SQL Server, it is possible to enter a Where clause, creating a filtered index. This can be beneficial for performance, for example, when only active records need to have an index.
After running the Creation process, the specified index will be included in the indexes script.
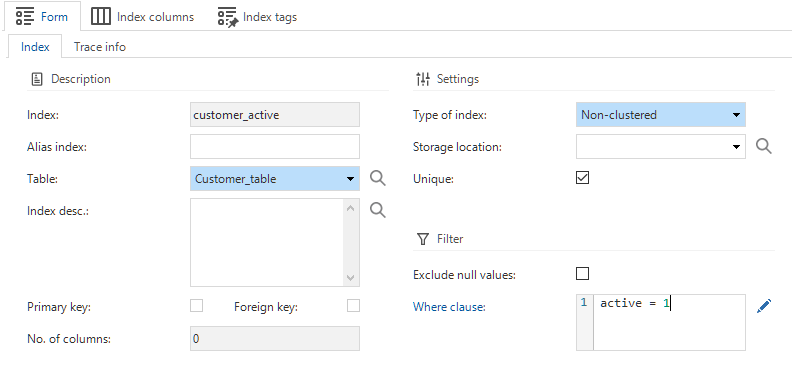 An index for a table
Columnstore indexes
Columnstore indexes store data by column instead of by row, offering significant data compression and reducing storage needs. This leads to faster queries because less data is accessed during query execution.
For more general information about columnstore indexes, see the Microsoft documentation
An example of columnstore indexing is available in the Thinkstore. It is called Columnstore index and AI search. The data model in this example consists of a product table that can compare itself to other products within that table and provide a matching score. A higher score indicates that the product is more similar to the selected product. This is also called LLM embedding.
To add a columnstore index to a table:
menu Data > Data model > tab Tables > tab Indexes
-
Select a Table.
-
Enter an Index name.
-
In the field Type of index, select Non-clustered columnstore.
For more detailed information on how to add indexes to the Software Factory, see: Indexes (optimize performance).
Non-clustered history indexes
Non-clustered history indexes are used to optimize performance when querying a history table.
Due to a bug in SQL Server, using a MERGE statement to populate a system-versioned temporal table with an identity column
can lead to issues with a Non-clustered (history) index on a history table, particularly with larger datasets.
This may result in the following error: "Attempting to set a non-NULL-able column's value to NULL."
A workaround is to add a WHERE clause to the index,
creating a filtered index to ensure that all indexed columns are not NULL (for example, WHERE [Index_Column] IS NOT NULL).
This workaround can be applied when the system-versioned temporal table includes an identity column,
but it prevents capturing and reusing the generated identity value because the MERGE statement does not produce an OUTPUT.
To add a non-clustered history index to a table:
menu Data > Data model > tab Tables > tab Indexes
-
Select a Table.
-
Enter an Index name.
-
In the field Type of index, select Non-clustered (history).
-
Go to the tab Index columns and add the columns that have to be included in the index.
noteColumns in a Non-clustered (history) index cannot yet be marked as Included (nonkey).
For more detailed information on how to add indexes to the Software Factory, see: Indexes (optimize performance).
References
Create a reference
A reference is a relation between two tables. The target table has one or more fields (the foreign key) of which the combined values have to appear as the primary key in the source table. This column comparison is specified in the reference columns.
To create a reference:
menu Data > Data model > tab Design
- In Reference status, drag with the mouse from the source table to the target table.
- In Normal status, hold down the CTRL key and drag with the mouse from the source table to the target table.
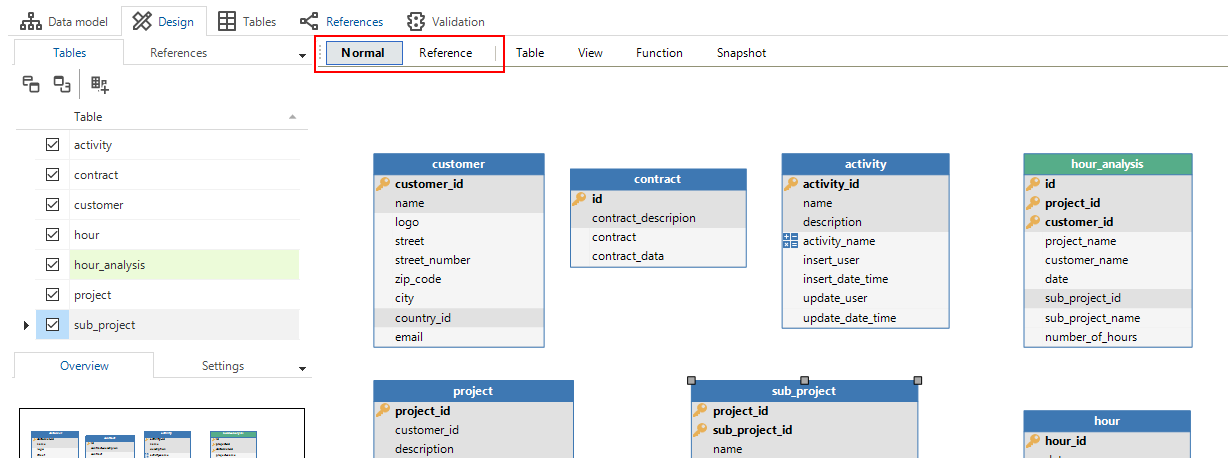 Tables and views
If you release the mouse button, the pop-up Create reference appears. Specify the column comparison:
- The column comparison is based on the primary key of the source table, which therefore has to be present.
- Source and target table - The tables you connected.
- Integrity - If you clear the checkbox Check integrity, the reference is only used to display details or lookups in the user interfaces. The integrity between tables is not checked by the RDBMS. If the source or target table is a view, the integrity cannot be checked.
- Source and target columns - If a column from the source table is not available in the target table, it gets a checkmark to indicate that it will be created. If you deselect the column, you can choose an existing column from the target table.
- User interface - You can also select whether the reference has to be used as a lookup (Show lookup) or a detail (Show detail).
 Pop-up for creating references
Two references to the same table
If you created two references to the same table (a detail or lookup), you can add an addendum to distinguish between the two references. This is a simple way to make a detail more specific without using a variant. The addendum can be translated.
For example, if the references are as follows:
ref_customer_addressref_customer_address_visitref_customer_address_shipping
The translations in the detail tabs and tiles could be:
- Address
- Address (Visit)
- Address (Shipping)
To add a reference addendum:
menu Data > Data model > tab Tables > tab References (details)/References (lookups)
- Select the reference you want to add an addendum to.
- In column Reference add., enter a name for the reference addendum.
Reference column details
After creating a reference, you can further specify or change the reference columns.
To change the configuration:
menu Data > Data model > tab References > tab Reference columns
You can change the following:
- Reference
- Source table
- Source column
- Target table
- Target column
- Sequence number
- Use detail null comparison - See Use detail null comparison.
Use detail null comparison
Usually, when details are loaded, the value of the parent record (source) must be equal to the value of the table (target).
If both are NULL, they are not considered a match.
However, it is possible to allow NULL values in the reference columns.
This can result in a detail record being shown even even if the parent record has a NULL value.
For example, in this situation:
| ref | Parent (source): employee | Detail (target): project |
|---|---|---|
| ref_col | employee.expertise | project.required_expertise |
-
By default, if the employee.expertise is
NULL, no projects are shown:employee.expertise Resulting details (No record selected) No projects Record with expertise: 1 All projects with required_expertise: 1 Record with expertise: 2 All projects with required_expertise: 2 Record with expertise: NULLNo projects -
If a
NULLcomparison is allowed, projects that do not require expertise are shown for employees with no expertise:employee.expertise Resulting details (No record selected) No projects Record with expertise: 1 All projects with required_expertise: 1 Record with expertise: 2 All projects with required_expertise: 2 Record with expertise: NULLAll projects with required_expertise: NULL
To allow a NULL comparison:
menu Data > Data model > tab References > tab Reference columns
- Select the checkbox Use detail null comparison.
Check constraints for tables
A check constraint is a rule that specifies the values allowed in a particular column of a table.
It ensures that the data entered into the column meets certain criteria, helping to maintain data integrity.
At the moment of saving, the entered data is validated against the check constraint.
A check constraint can be defined on one or more columns of a table, for example a < b.
Universal GUI You can add a translation to the constraint that will be shown in the user interface as an error message.
- To check the user input at the time of entry instead at the moment of saving, use dynamic domain input constraints.
- The Software Factory also captures database errors like check constraints, and delivers them to the user in a more user-friendly format using translated messages. To add your own general messages for capturing database errors, using regular expressions, see Database message translation.
To add a check constraint to a table:
menu Data > Data model > tab Tables > tab Check constraints
- Complete the Check constraint name. The first part is already filled in (
c_[table name]_). - Enter the Check constraint query.
- Universal GUI Optional. Select the checkbox Translate and add a translation for the constraint in the tab Translations, which becomes available after selecting the checkbox. The translation will be treated by the Universal GUI as an error message for this unique check constraint.
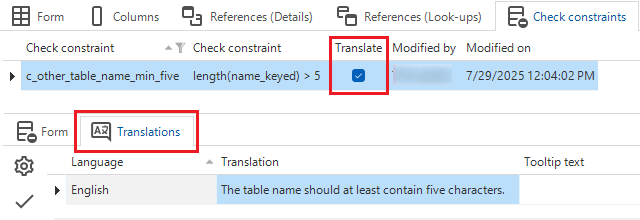 Translation for a check constraint will be shown in the Universal GUI as an error message
Validation
Validating the data model is possible in the Validation tab. Through this, errors can already be identified at an early stage. The Validation component is explained in more detail here.
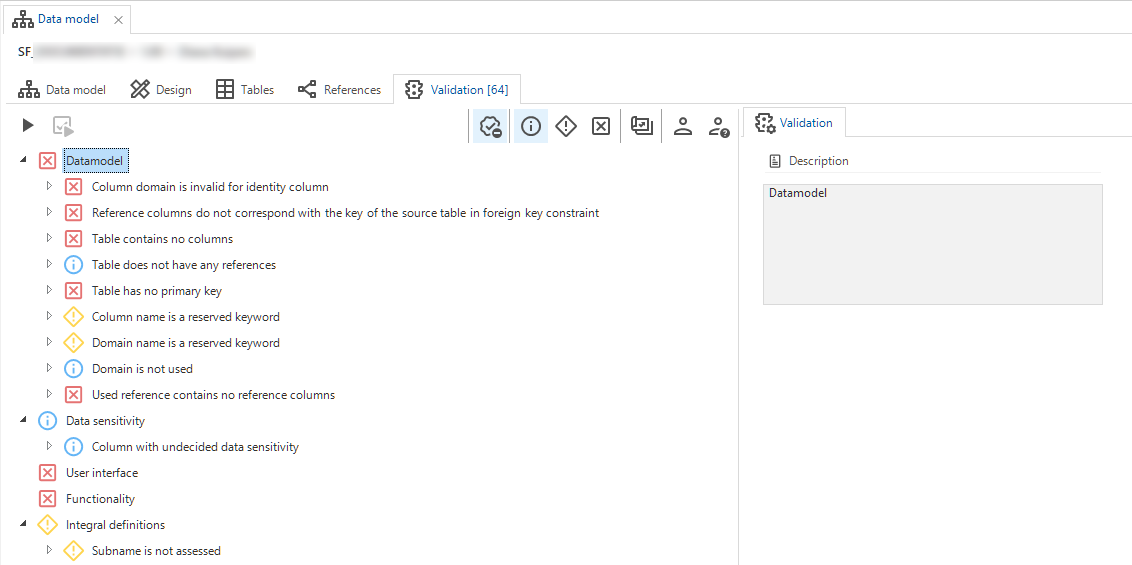 Example of the validation screen
Start the application
When the data model is completed, the database can be created or upgraded. This is described in Creation. When there is no user interface set up, there is nothing visible in your application. Tables are accessible after a menu has been set up.
Starting the user interface is possible once the database has been created or by using the Mock Database Provider to display a preview without an application database.
View an object's history
Historical overviews are available on a large number of screens in the Software Factory. For example, in:
- menu Business logic > Functionality > tab Control procedure
- menu Data > Data model > tab Tables
- menu User interface > Messages
These overviews are based on temporal tables. They include each point in time a record was created, updated, or deleted. This offers insight into a record's status in the various model versions. All changes are in the model's timeline, making it also visible if no changes have been made in a model version.
Changed columns will be shaded yellow, and records that have been added, changed, or deleted will be marked.
To see the history of an object:
- Select an object.
- Activate the history with the CTRL+H.
Tab Form contains the object's query fields if present. These are not shown in the list to maintain readability.
Tab Associated work contains an overview of the work items linked to this object. See the Work overview guide.
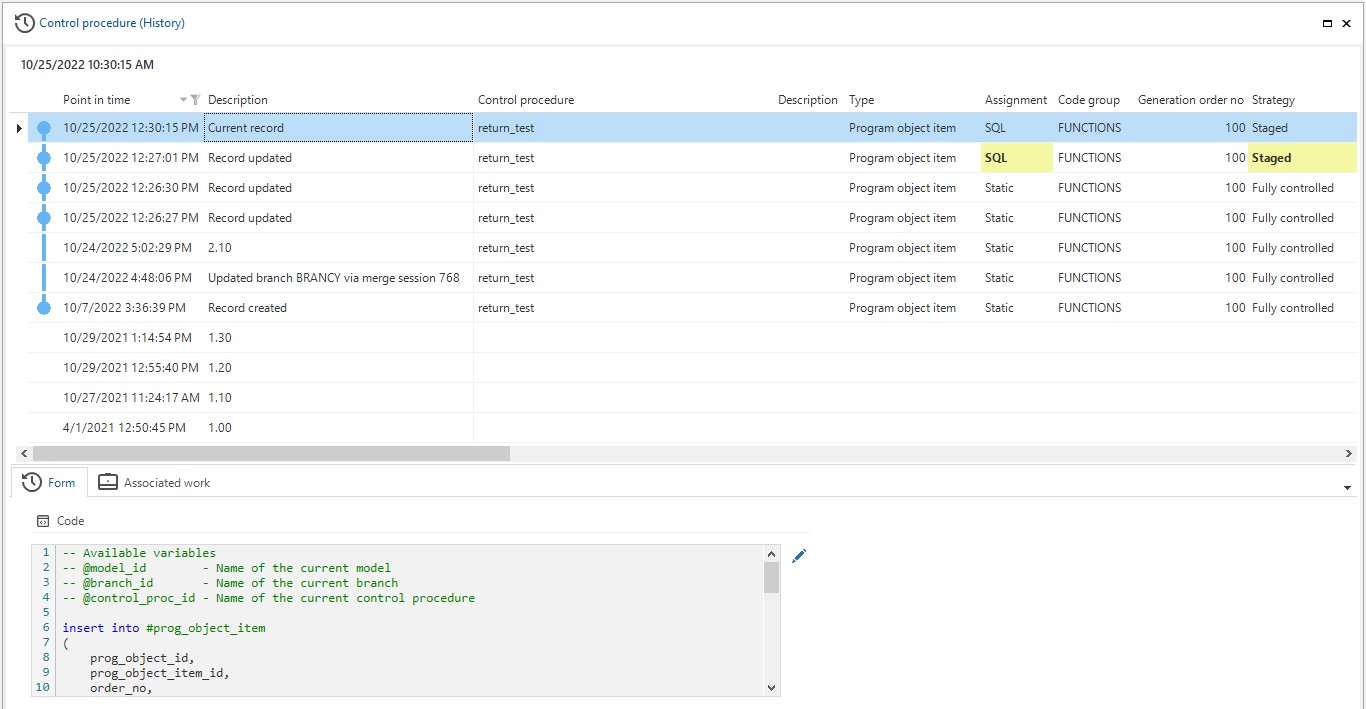 Use CTRL+H to see the history and linked work items for an object