Creation
Introduction to Creation
Creation is the process of generating, validating, and executing the source code of your application. It is a crucial step in the Software Factory workflow, allowing you to create a deployable version of your application based on the model you have defined.
In the Creation screen, you can easily deploy a new or updated version of your application. The creation and deployment process involves several steps, which are explained in detail below.
It is important that you know the following:
- All jobs are performed by Indicium - This means that generation, validation, and so forth, will continue even if you close the Software Factory GUI. Since all jobs are performed by Indicium, it is possible to automate the entire process.
- All developers can track a job's progress - For example, if one developer starts generating the definition of a branch, another developer can see this in their Creation screen. This behavior extends to the validation- and unit test tabs in various modelers, and to the Validation and Unit test screens that can be opened directly from the menu.
You can execute all steps at once:
Or execute steps separately:
Configure the file storage location for system flows
The platform's system flows for writing code files, program objects, the manifest, and the IAM synchronization script use process actions that need a file storage location.
Before creating your software, configure the file storage location path in IAM:
IAM > menu Authorization > Applications
- Select your SQLSERVER_SF application in tab List.
- Navigate to tab General settings > tab File storage locations.
- In column File storage, select the file storage location
generated_scripts_location. - Edit field Path or change the file storage type using the task Switch file storage location type
 .
.
If the file storage type is File system, you can use variables in the path. For example D:\files\%FileLocation%\file.txt,
where %FileLocation% is: thinkwise\textfiles.
See also: Set a different subfolder for code files and program objects.
Set a different subfolder for code files and program objects
The default file storage location is set in IAM, in the menu Authorization > Applications > tab General settings > tab File storage locations. The default subfolders for writing code files and program objects to storage are:
-
Code files -
\Source_code\Groups -
Program objects -
\Source_code\Program_objects.For example, the standard code file
Functionswill be written to theFile storage location+\Source_code\Groups\060_Functions.sql(the code file's relative path).
If you want to use other subfolders than the default, you can specify those for code files in the Software Factory, in the menu Models > Model content > tab Code files > tab List > tab Code file > field File specification.
Execute all creation steps
By executing all creation steps, you do not need to run each step separately. For detailed information on each step, refer to the corresponding topics below.
menu Deployment > Creation > tab Generate definition
-
Execute the task Execute all creation steps
 ( Alt + A).
 -
In the popup, select your source for data migration and upgrade. For more detailed information, see Generate definition.
-
Select your Next action: Continue creation or Review mapping and select Execute.
-
Optional. Enter a model Version name. This name identifies the model version and is shown in the manifest and deployment package folder.
-
In field Execute, select whether you want to run:
- Complete - all steps are selected, deselecting a step is not possible.
- Selected - all steps are selected, you can deselect the steps you do not want to execute.
- Selected (start with none) - none of the steps are selected, you can select the steps you want to execute.
- Custom - select a custom preset in the field Creation preset. When you use a custom preset, you can still reconfigure the settings for each step. For more information, see Set up a creation preset.
-
Determine for each step whether it should be executed and, when applicable, what the error handling should be.
-
For the source code, you can define the Upgrade method (Full or Smart).
-
Select Execute.
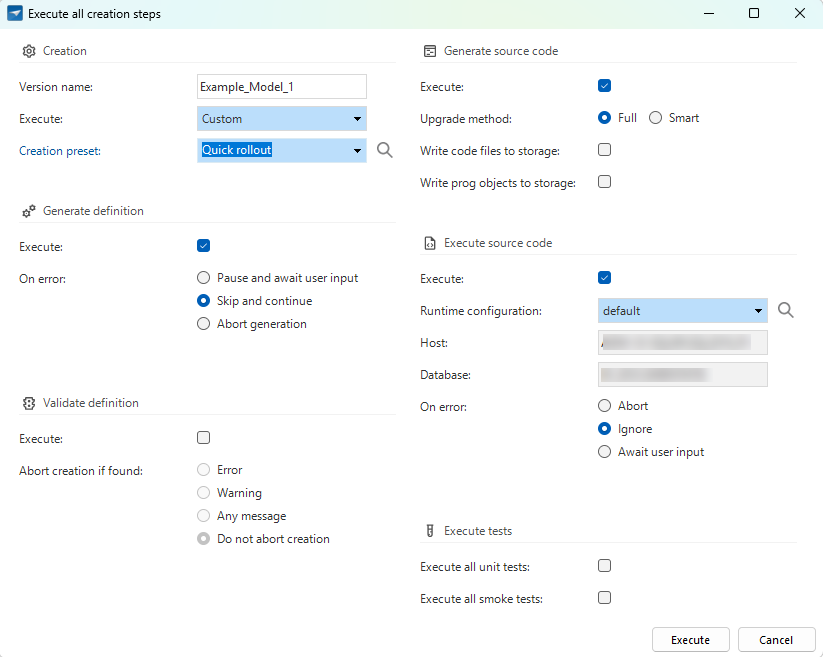 Settings to execute all creation steps
Set up a creation preset
You can set up a Creation preset to select the steps you want to execute when you run the task
Execute all creation steps ![]() .
This is useful when you quickly want to execute a specific set of steps without having to select or define them each time.
The presets are available for all users in the Software Factory and for every model and branch.
.
This is useful when you quickly want to execute a specific set of steps without having to select or define them each time.
The presets are available for all users in the Software Factory and for every model and branch.
To set up a creation preset:
menu Maintenance > Creation presets
- Enter a Creation preset name.
- Define the settings for the steps in the groups:
- Optional. You can assign a default Creation preset to a user in the menu Maintenance > Users. For more information, see Configure a user.
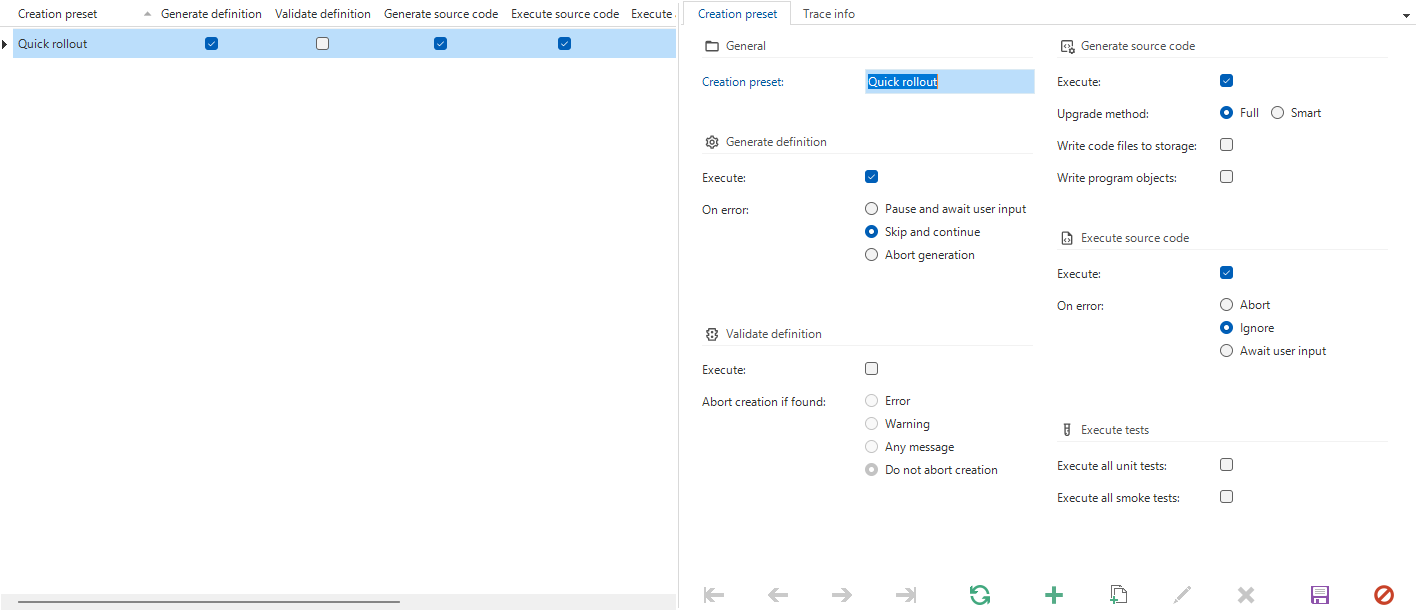 Set up a creation preset
1. Generate definition
If you choose to run each Creation step separately, you start with generating the definition.
In this step, your branch is generated and marked as a moment in time (in model_vrs).
menu Deployment > Creation > tab Generate definition
-
Execute the task Generate definition
 (Alt + G).
 -
In the pop-up, select your source for data migration and upgrade. Two selection methods are available:
- Obtain from database - If necessary, select a Runtime configuration.
- Specific model version - Select a Source branch and a Source model version.
This pop-up will not be presented the first time a definition is generated, i.e. when no source branch and source model version have been specified yet. For more information, see Source model version.
-
Select the Next action:
- Continue creation - The Generate definition process will be started.
- Review mapping - The Data migration screen will be opened to review the mapping.
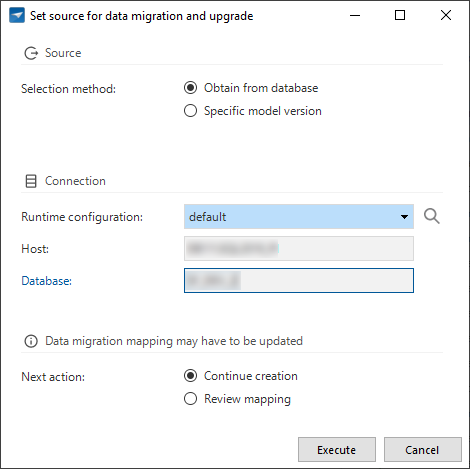 Set source for data migration and upgrade.
When the generation has finished, the application model is composed and extended using the defined generic concepts (for example, for trace functionality and logging), and the platform-specific definition is created. The generation strategy is set in the control procedures.
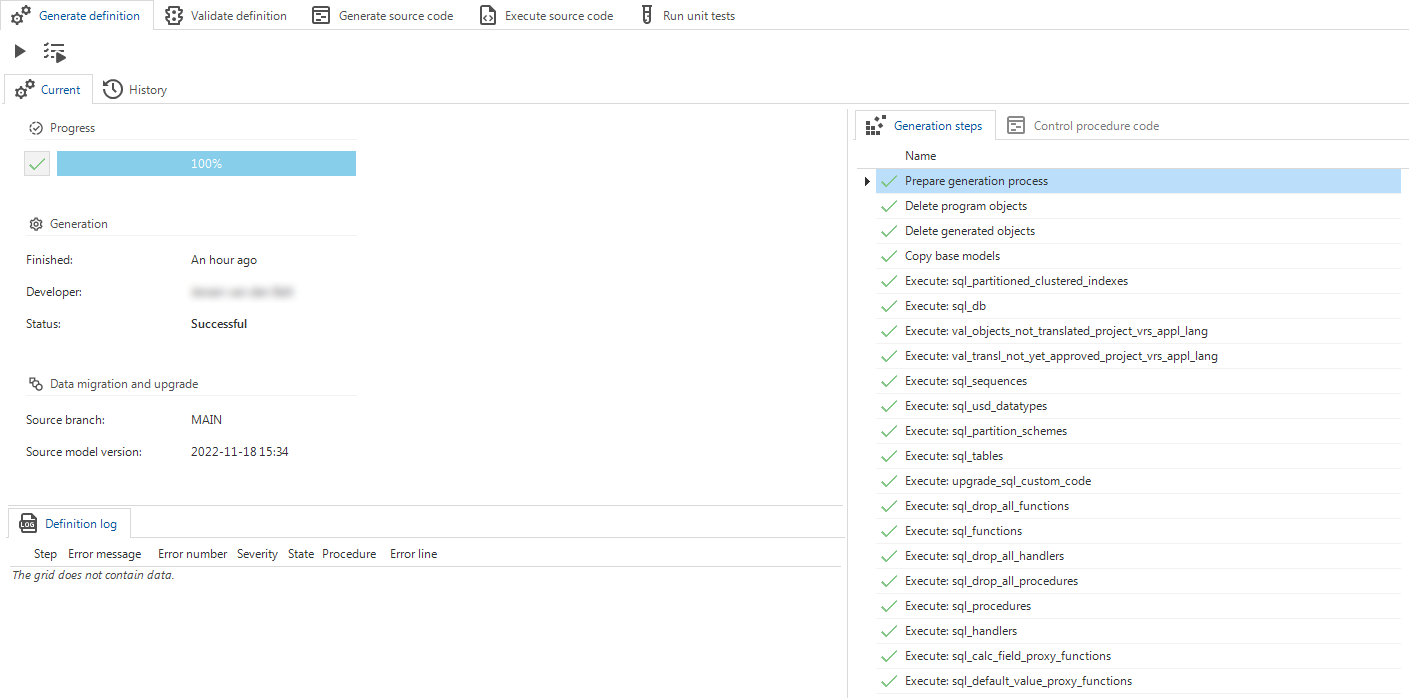 Generation definition
When are generated objects deleted
All generated objects will be deleted unless they are still referenced by other model objects as menu items, diagrams, lookup references, variants, etc. This maintains the integrity between roles and model objects and prevents problems.
If not referenced, generated object will be deleted in the following cases:
- The object is copied from a base model and no longer present in the base model.
- The object is generated by a control procedure with generation strategy Delete. In the tab Trace info, the field By control procedure shows the name of the control procedure that generated the object.
See also: Identify a generated object.
Errors while generating the definition
If an error occurs during the generation of the definition, the generation will halt and you are prompted with various options to either continue or abort code execution. This choice may also be made by a different developer than the developer initiating the definition generation.
 Retry executing the generation step. This option can be chosen when the occurred error is fixed in the meanwhile.
 Skip the generation step and continue with the next generation step.
 Abort the definition generation completely.
To find the failed steps:
- Select one of the steps in the right-hand pane.
- Navigate to the Start tab in the ribbon or open the context menu.
- Select Prefilters > Failed
 or press ALT+F.
2. Validate definition
After the generation, the definition must be validated.
menu Deployment > Creation > tab Validate definition
- Execute all validations.
 Execute the validation for the selected group.
 Executes the selected validation.
It is important to resolve all Error and Validation messages before generating the source code. If this requires modifications to the model, you need to generate the definition again.
See Validation for more information about the validation.
3. Generate source code
After the definition has been generated and validated, the actual source code can be generated.
If configured, a notification email is sent to the notification email address set in Model overview at the start and finish of this step.
menu Deployment > Creation > tab Generate source code
-
Select Generate source code
(Alt + G). -
Select an Upgrade method.
-
If you want to write Code files to storage, select the checkbox. The code files are by default written to the
\Source_code\Groupsfolder. A field containing the exact location appears on the screen.You can Copy
 the path and paste it at the location where the files are available,
for example, in the File Explorer or an Amazon S3 bucket.
the path and paste it at the location where the files are available,
for example, in the File Explorer or an Amazon S3 bucket.The code in the storage is not used when executing code files on the database from this screen. Changes to the code files in storage have no effect.
-
If you want to write Program objects to storage, select the checkbox. The program objects are by default written to the
\Source_code\Program_objectsfolder. A field containing the exact location appears on the screen.You can Copy
the path and paste it at the location where the files are available,
for example, in the File Explorer or an Amazon S3 bucket.
To deviate from the default subfolders for code files or program objects, see Set a different subfolder for code files and program objects.
- Select Execute.
 Generate source code
The source code is generated. To provide insight into the progress, each code group shows the number of program objects it contains.
The generated code is stored in the Software Factory. Errors will be logged in the menu Maintenance > Jobs > Generate source code.
To find the failed steps:
- Select one of the steps in the right-hand pane.
- Navigate to the Start tab in the ribbon or open the context menu.
- Select Prefilters > Failed or press ALT+F.
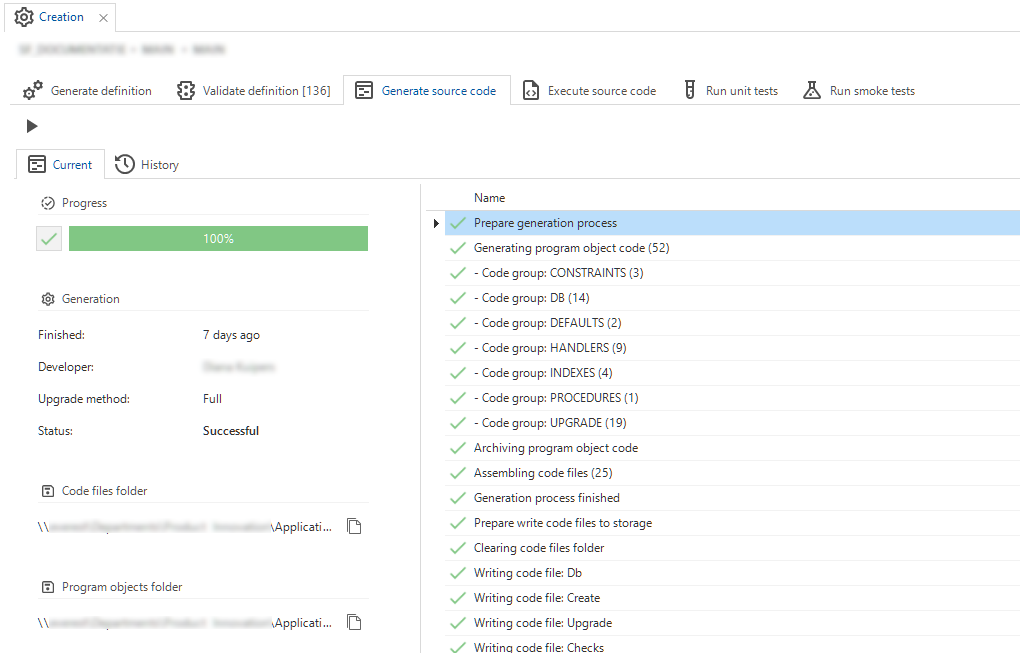 Generated source code with folders for code files and program objects
Generation method
There are two options for generating the code, depending on the situation.
For cherry-pick execution of specific pieces of logic, use the Functionality modeler or the Code overview screen.
Full
This option is desired when the end product database still has to be created or still has to be brought in line with the model, and the end product database does not correspond with a previous version of the model.
The program code of all the objects is assembled. Subsequently, all program objects are used to compile the code files.
All the database objects that are not defined in the model, for example, indexes and procedures, are removed.
Smart
With this option, only modified objects are reapplied to the database. However, this option can only be used when the end product database is the same as the previous version of the model. This is often the case when upgrading a production version. The smart way of generating significantly speeds up the upgrading process, because unmodified objects are not rebuilt.
The program code of all the objects is assembled. An analysis is performed to determine which program objects are actually used during the compilation of the code files.
The condition for performing the analysis is that the program objects of the previous version of the model are available and compiled to code. This is because the analysis looks among other things at the modified code in program objects.
On any Software Factory prior to the 2023.1: If you perform a smart upgrade, make sure that the previous version is fully generated. For example, generated objects may have been deleted during the implementation of a branch. These then appear as newly installed objects during the difference analysis.
4. Execute source code
When all source code is generated, it must be deployed to the database.
This is done in the Execute source code step.
The model version will be recorded in the sf_model_info table and thus used for creating and upgrading code files (creating and upgrading databases).
Make a backup of your end-product before executing this step.
You can execute the source code in several ways.
menu Deployment > Creation > tab Execute source code
-
Connect
 (Ctrl + Alt + C) to select a runtime configuration.
The server and database of this runtime configuration will be used to create or upgrade the database and deploy the business logic code.
Use this task also to reconnect to a different runtime
configuration.
(Ctrl + Alt + C) to select a runtime configuration.
The server and database of this runtime configuration will be used to create or upgrade the database and deploy the business logic code.
Use this task also to reconnect to a different runtime
configuration.
The connection remains available until a new Generate definition or Source code job has been started for this branch or if a timeout of 5 minutes has been reached. You can also close the connection manually .
.
The default selection of code files to be executed may vary depending on whether or not the database exists and the current versioning information stored in the database. You can change the default selection by selecting or clearing the checkboxes, or with the tasks Select all code files and Deselect all code files
  .
. -
The db code file is selected automatically if the database does not yet exist.
-
The create code file is selected automatically if the database does not exist or is empty. For example, when you connect to a manually created database on Azure SQL Database.
-
The upgrade code file is selected automatically if the database exists and the product information in this database indicates that an upgrade is required.
-
Execute selected code files
(Alt + S) -
As long as the connection to the database is available, you can select and execute code files. -
Execute all code files
(Alt + E) - Only available if the connection to the database has not yet been established.
Select a runtime configuration.
The server and database of this runtime configuration will be used to create or upgrade the database and deploy the business logic code.
No further input is asked, and all the code files are executed directly on the runtime configuration.
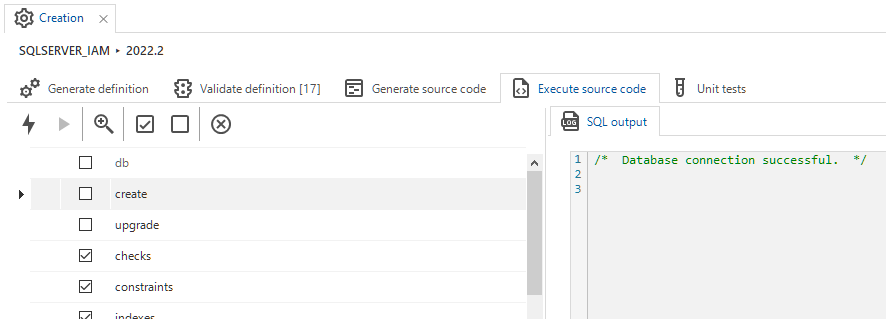 Execute source code
When all code has been executed and/or compiled, your end-product is ready for use.
On any Software Factory prior to the 2023.1: After the database has been created, no more data model modifications should be done in the current project version. You will have to make a new version.
Errors while executing source code
menu Deployment > Creation > tab Execute source code
The log in this tab shows the errors together with the run query.
While the source code is being executed, only the last error is shown. After the job completes, the full log is shown with all errors and informative messages.
You are prompted with various options to either continue or abort code execution. This choice may also be made by a different developer than the one initiating the code execution.
- Ignore the error and continue the current code file execution.
 Skip the code file and continue with the next code file.
- Abort the execution completely.
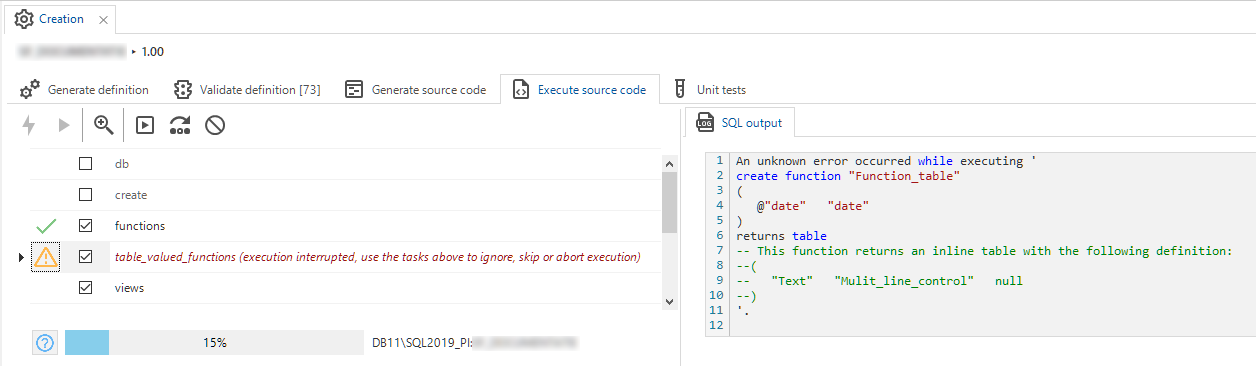 Error in executing source code
Upgrade an existing database
When the structure of a table is changed, the old table will be renamed and a new table will be created. The upgrade script ensures that the data is migrated from the renamed table to the new table. Lastly, the (now superfluous) renamed table is deleted. Next, the business functionality is immediately reapplied.
When an existing database is upgraded, it is possible that not all data conforms to the (new) checks and constraints. To check the database, the base model SQLSERVER_VERIFICATION, DB2_VERIFICATION or ORACLE_VERIFICATION can be linked. After having carried out all of the steps again, an extra code file with controls will have been generated, which can be executed on the database.
5. Run unit tests
After an upgrade, you can run all unit tests as a regression test, to ensure that further changes have not broken any units that were already tested.
menu Deployment > Creation > tab Run unit tests
You can run the unit tests in two ways. In both scenarios, you are first prompted to select a runtime configuration. The server and database of this runtime configuration will be used to run the unit tests on.
- (Ctrl + E) Execute all unit tests.
- Execute the selected unit tests.
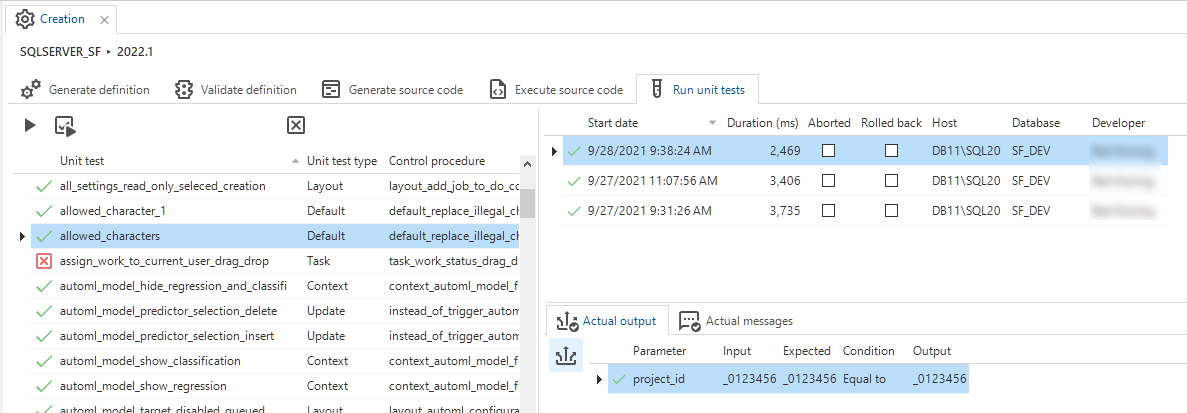 Unit tests as a regression test
6. Run smoke tests
After an upgrade, you can run all smoke tests to ensure that there are no simple failures in the model that were missed.
menu Deployment > Creation > tab Run smoke tests
You can run the smoke tests in two ways:
- Start smoke test - Run the full smoke test.
The smoke test is based on the model as it was during definition generation.
If you execute this task you are prompted to select a runtime configuration.
The server and database of this runtime configuration are used to run the smoke test.
- Re-run selected smoke test step(s) - Run the selected single test steps again
with the latest code based on the model.
For more information on running smoke tests, see Run the smoke tests.
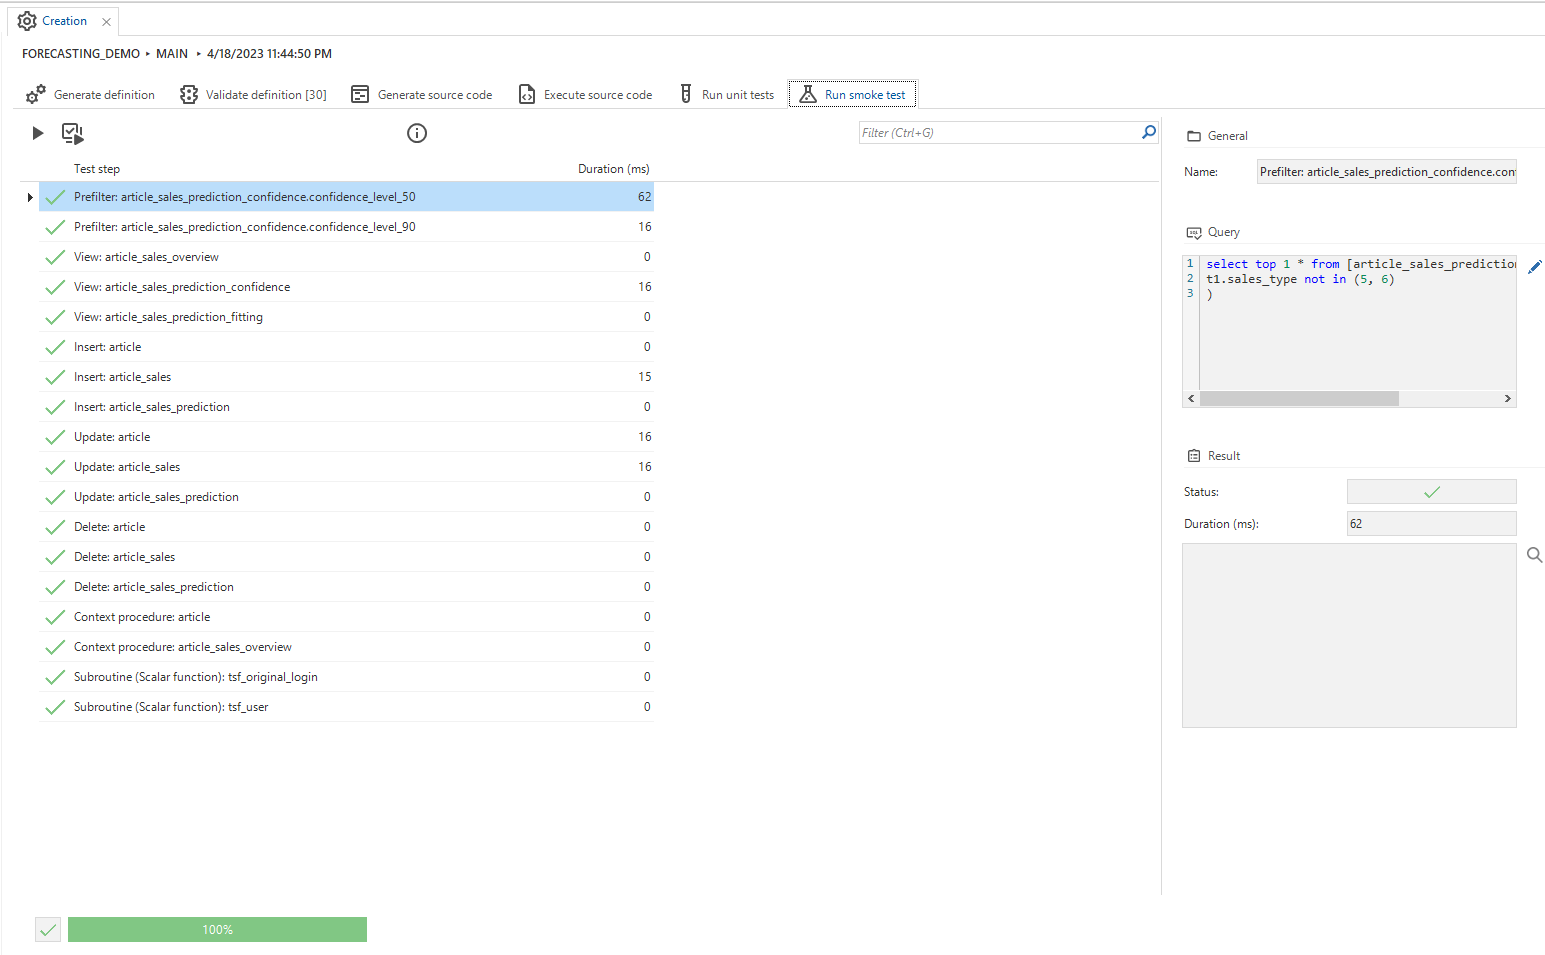 Executing smoke tests
Creation job overview
An overview of all Creation jobs for all models and branches is available in the Log menu.
menu Maintenance > Jobs > tab Job
The following prefilters are available:
 - View only active jobs. Deselect to see the completed and failed jobs.
 - View only jobs that have been executed by you.
 - View only jobs for your models.
To cancel or abort a job:
- Click to cancel a queued or active job.
- Click
 to abort a job. Only abort a job if Indicium is no longer running it, for example, due
to a restart. By aborting the job, you inform Indicium that it is no longer running and therefore new jobs can be started.
to abort a job. Only abort a job if Indicium is no longer running it, for example, due
to a restart. By aborting the job, you inform Indicium that it is no longer running and therefore new jobs can be started.
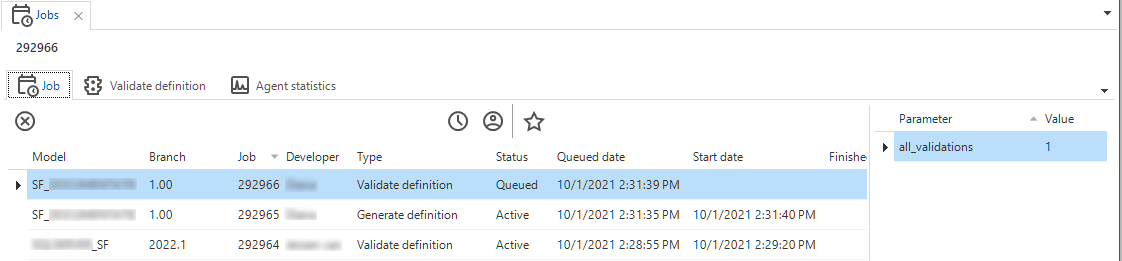 Example: two active jobs for two models, and one queued job
Inspect errors in a job
To inspect errors that occurred in a job:
menu Maintenance > Jobs > tab Job
- Deselect the Active jobs prefilter. Now, the completed and failed jobs are visible.
- In the job overview, select the failed job. Its errors are available in a separate log tab or the job's output tab.
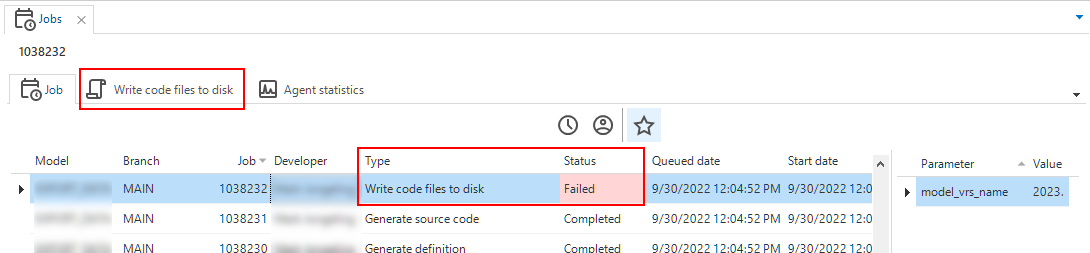 Errors in a job are available in a separate tab
Automate the Creation process
See Automate deployment.
Limit database authorization with a tag
By default, a grant .. on .. public line is added after DLL statements in logic, such as the creation of tables, user-defined data types, views and stored procedures.
To suppress this line, you need to add a tag to a model:
Advanced menu > Model management > Models > tab Model tags > tab Model tags
- Select the Model for which you want to suppress
grant .. on .. public. - In field Tag, add tag
NO_GRANT_TO_PUBLIC. - Generate the model's definition to activate the tag.
Now, the grant .. on .. public line will no longer be added to the logic within the context of your model.
This affects database authorization for functionality and upgrades for the entire model.
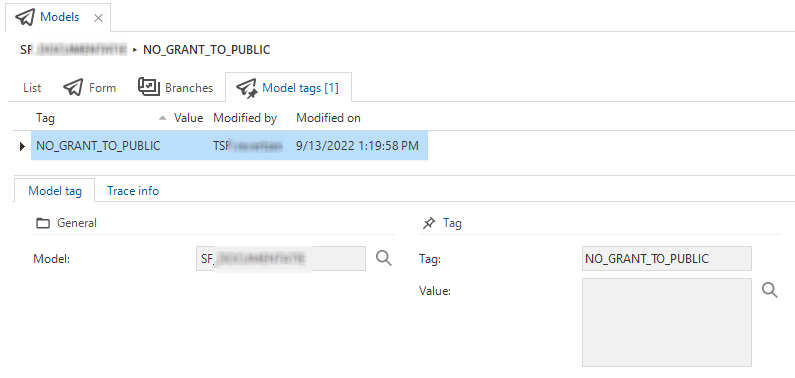 Tag: NO_GRANT_TO_PUBLIC
Troubleshoot the Creation process
Indicium error
If Indicium throws an error about creating a folder for a job in the creation or synchronization process, the file storage location probably has not been configured.