Branches
In accordance with our Lifecycle policy, the Windows GUI is no longer supported from Thinkwise Platform version 2026.1 and higher. This means some features on this page are no longer supported. See Transition to the Universal UI for more information.
Introduction to branches
A branch is line of development within a model. It is based on an origin branch at a particular point in time. Using a branch, you can develop features in parallel with other developers or teams. See also, Branch in the glossary and Models and branches for more information.
Create a new branch
A new branch is created from the chosen point in time of the origin branch. When you create a new branch, non-stale program objects are automatically copied to the new branch. For more information, see Program objects and items.
menu Models > Model overview > tab Branches > tab List
-
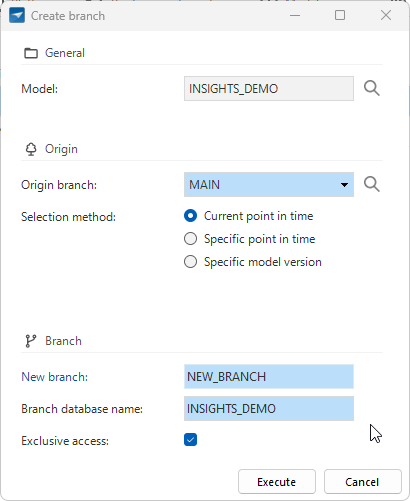
Execute the task Create branch
 .
. -
Select the Origin branch you want to base your new branch on.
-
Select the point in time you want to base your new branch on:
- Current point in time - Based on the current branch, as it is now.
- Specific point in time - Based on an earlier point in time, for example, yesterday at 9 AM.
- Select model version - Based on how the branch was at a certain point in time. See Model versions.
-
Enter a New branch name.
-
Select a Branch database name if you want to use a different database name than the default one.
-
Optional. Select Exclusive access to give full access to yourself and automatically assign read-only rights to all other users. You can reconfigure the rights at any time after creating a branch. For more information, see Set up branch access.
Only the creator of the branch has access to the active runtime configuration. All other users have to configure the runtime configuration for a branch. For more information, see Active runtime configurations per user.
You can also create a new branch from the task Switch branch, see Switch to another model or branch.
 Create a new branch
Protect a branch
Branch protection prevents the archiving or deletion of a branch. It safeguards branches with indefinite lifespans. Branches named MAIN, RELEASE, and DEVELOP are automatically protected. A branch will also automatically become protected when used as an origin for another branch. You can remove its protected status once all its branches are archived and fully deleted. For other branches, you can manually add or remove protection as needed.
You can recognize a protected branch by the padlock icon ![]() in the Branch diagram.
in the Branch diagram.
Protecting a branch is not the same as limiting direct access to a branch. See Set up branch access.
Deleting a model still leads to the removal of all its associated branches.
To add protection to a branch:
Models > Model Overview > tab Branch
- Select the branch you want to protect.
- Go to the tab Form.
- Select the checkbox Protected.
Clear this checkbox when you intend to archive or delete a branch.
Set up branch access
To prevent accidental changes, you can allow or limit direct access to a branch for each user. For example, for the MAIN branch it can be useful to limit branch access because changes are typically made through merging. Users without permission to change a branch will only be notified of their restricted access when attempting to save a record or execute a task.
The following rules apply:
- The user who creates a branch always has full access to that branch.
- Only users in the IAM user group SF Main developer can manage branch access for other users. For information on adding users to a user group, see Add users to a user group.
-
Limiting access to a branch is not the same as branch protection. See Protect a branch. A protected branch cannot be archived or deleted by any user.
-
When you set access rights for a branch, the pool user (the user under which Indicium runs) may not be able to process data. This can happen, for example, if Indicium retrieves the source version of your application, but the branch is read-only for the pool user. In that case, Indicium cannot process the data. Grant the user full access rights to resolve the issue.
You can configure branch access for each user, for a specific branch or as a default for all branches.
To allow or limit access to a specific branch for a user:
menu Maintenance > Users > tab Branch Access
- Select the branch.
- Select one of the following options in the field Branch access:
- Full access - allows the user full access to the branch.
- Read-only - the user is not allowed to make changes to the branch.
- Only allow merging - allows the user to merge changes into the branch but not edit it directly.
To set up the default branch access for a user:
menu Maintenance > Users > tab Branch Access
- Select the task Set default branch access
 .
. - Select one of the options listed above in the field Branch access.
Rename a branch
At the moment, it is not possible to rename a model or branch because that would cause a loss of history.
Delete a branch
When you delete an active or an archived branch, all underlying data and associated merge sessions will be deleted as well. Instead of deleting an active branch, you can also choose to archive the branch.
To delete a branch:
menu Models > Model overview > tab Branches > tab List
- Select the branch you want to delete.
- Go to the tab Form.
- Select Delete
 and confirm.
Revert a branch
In some situations, you may want to revert a branch:
- Without a merge session: if something went wrong in a branch and you want to make a fresh start, you can revert the branch to, for example, yesterday.
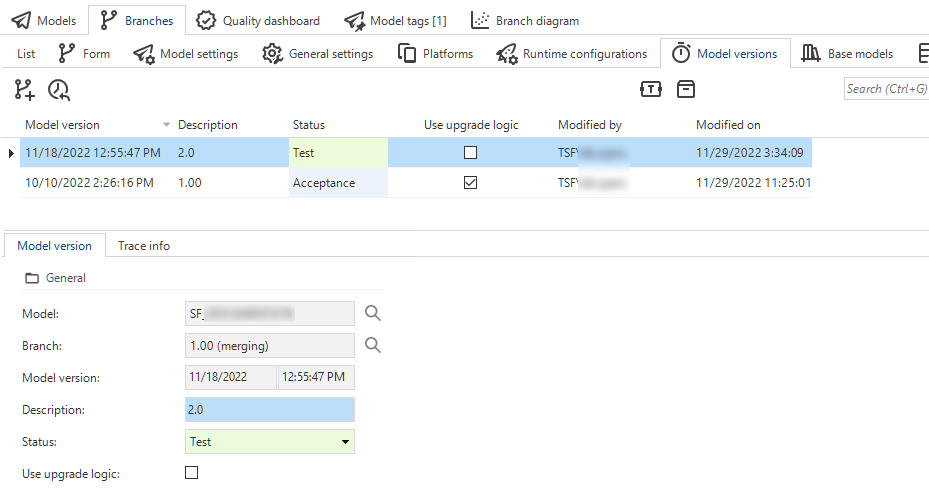
- After a merge session: when you completed a merge session and the result is undesired, you can undo the merge session by reverting the branch. For example, when resolved conflicts do not turn out as intended. When executing a merge session, two model versions will be created in the target branch to indicate the moments before and after.
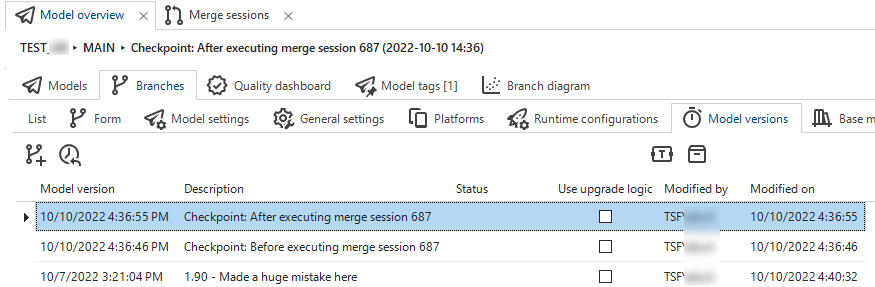 Model versions, before and after a merge
Reverting a branch to an earlier point in time will simply undo any changes done to the model:
menu Models > Model overview > tab Branches > tab List / tab Model versions
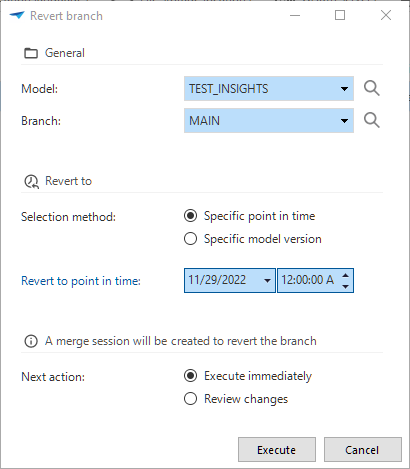
- Execute the task Revert branch
 .
. - If necessary, change the Model and Branch you wish to revert.
- Select whether you want to revert to a Specific point in time or a Specific model version.
- Select whether you want to revert to the branch immediately or review the changes first.
Reviewing the changes first will take you to a merge session that shows all the actions that will be taken as if the reversal was initiated in a branch. This type of one-sided merge session will never have conflicts.
 Revert a branch
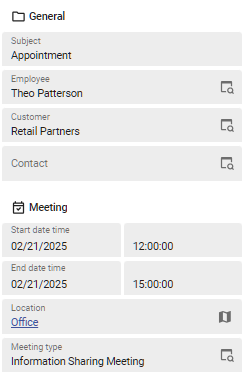
Set branch details
Branch details
menu Models > Model overview > tab Branches > tab Form
- Database storage location - You can divide the database into separate files and store them on separate drives.
For example, you can store invoices on the SSD and customer data on the HDD. You can mark these storage locations for a table or index to retrieve data faster.
- Table storage
- Index storage
- Data migration and upgrade
- Source branch and Source model version - Shown here for informational purposes only. They can be changed in menu Data > Data migration > tab Tables
with the task Set source for data migration and upgrade
 . They can also be changed in the Creation process,
when generating the definition or executing all creation steps.
. They can also be changed in the Creation process,
when generating the definition or executing all creation steps.
- Source branch and Source model version - Shown here for informational purposes only. They can be changed in menu Data > Data migration > tab Tables
with the task Set source for data migration and upgrade
- Merging
- Origin branch and Origin model version - Shown here for informational purposes only. They indicate from which branch and model version the specified branch originates. This information serves as input for a merge session when the specified branch is being merged again.
Correct foreign key casing
Because incorrect casing may cause problems in the user interfaces or in the Indicium service tier, a task is available to correct the casing, if necessary.
menu Models > Model overview > tab Branches > tab List
- Execute the task Correct foreign key casing
 .
.
Locate an invalid XML character
Some characters, such as the 0x0A linefeed character, can cause problems when serializing the model to XML.
These (control) characters, which are often not displayed, can be located using this task.
menu Models > Model overview > tab Branches > tab List
- Execute the task Locate invalid XML character
 .
. - If you already know which table to scan for invalid characters, enter the Table name. Leave it blank to scan all tables.
Retrieve the number of rows
You can query the number of rows for all tables in an end-product database.
This number is stored in the NO_OF_ROWS table tag and can be used to automatically enrich the model.
For example, by changing the look-up control or screen type of an entity based on the number of rows in the database, to optimize the performance or user experience.
menu Models > Model overview > tab Branches > tab List
- Execute the task Retrieve number of rows
 .
.
Default model settings for a branch
For each branch, you can add or change default model settings. When you merge a branch to its MAIN branch, these settings will be included.
menu Models > Model overview > tab Branches > tab Model settings
- General
- Multiple live versions - select to allow more model versions. By default, only one model version can have the status 'Production'.
- Screen type
- Show tab icons - Universal UI Select to show icons on detail tabs and tab containers in the user interface. See Label and icon of a tab container.
- Form
- Form column width factor - Universal UI Enter a factor that determines the relative width of the columns in a form. The default is 1.00. For more information, see Form column width factor.
- Floating label strategy - Universal UI Select a strategy for floating labels. See Floating labels strategy.
- Grid
- Page size - number of records shown per page in a grid. For more information, see Page size.
- Auto column width - the user interface will automatically adjust the column widths to fit the content. For more information, see Auto column width. The default is Headers and Data.
- Task
- Form column width factor - Universal UI Enter a factor that determines the relative width of the columns in a form. The default is 1.00. For more information, see Form column width factor.
- Enable for empty subject - to enable the table task when no records are present on the screen. Adjusting this setting afterward will not change the existing rows. It will only affect the default value for new rows.
- Enable for empty subject - To enable the table task when no records are present on the screen. Adjusting this setting afterward will not change the existing rows. It will only affect the default value for new rows.
- Report
- Form column width factor - Universal UI Enter a factor that determines the relative width of the columns in a form. The default is 1.00. For more information, see Form column width factor.
- Enable for empty subject - To enable the table report when no records are present on the screen. Adjusting this setting afterward will not change the existing rows. It will only affect the default value for new rows.
- Data
- Use domains - Enabled by default. When you disable it, all tables will use standard data types instead of the user-defined data types for the domains. Disable it when, for example, you wish to use SQL Data Synchronization to synchronize data between Azure databases since this tool cannot process user-defined data types. If you change this option, all tables need to be rebuilt. They will automatically be set to status 'changed' and added to the data conversion (and therefore to the upgrade script).
- Prefilter
- Lenient prefilter queries - This checkbox is deactivated by default and should remain so.
When deactivated, Indicium can optimize prefilter queries and performance.
Only use this setting temporarily if you have a lot of prefilter queries that do not yet use the alias
t1. Change those queries as soon as possible, then deactivate the setting again. See Prefilter type for more information.
- Lenient prefilter queries - This checkbox is deactivated by default and should remain so.
When deactivated, Indicium can optimize prefilter queries and performance.
Only use this setting temporarily if you have a lot of prefilter queries that do not yet use the alias
Form settings
In the Windows GUI a form consists of one or more horizontal tabs. A tab contains one or more columns which contain the form fields. The column and field sizes are configured in pixels. Groups are not automatically kept together, but form fields can be forced to a new column.
In the Universal UI, a form consists of one or more vertical sections. A section contains one or more columns which contain the form fields. The column and field sizes are relative to the available space, because the Universal UI is a responsive user interface that automatically adjusts to a user's screen size. Form fields can be placed in form groups to keep them together, to prevent them from being spread out over multiple columns.
To configure the default form settings for a model:
menu Models > Model overview > tab Branches > tab Model settings
- In the group Form, enter a number in the field No of columns in form. This limits the number of columns in a form.
- Configure the Label width, Field width, Field height Height between fields, and Width between fields for the form. The Windows GUI uses the absolute values, while the Universal UI will convert the values to relative numbers.
- Universal UI Enter a Column width factor to determine the relative width of the columns in a form. The default is 1.00. For more information, see Form column width factor.
You can deviate from the default form settings for subjects and variants, tasks, and reports.
Form column width factor
Universal UIFields in a form are placed in one or more sections. Every section has form fields placed into one or more evenly spaced vertical lists of fields, which are the form columns. The Column width factor is a relative number that determines the width of the columns in a form.
The example below shows a form on a desktop. In this form, the columns are placed next to each other because the available horizontal space is sufficient:
 A desktop screen with two columns
On a mobile device, the columns are merged into one column as soon as the available horizontal space is insufficient:
 A mobile screen where two columns are merged into one
With the Form column width factor, you can manipulate the point at which the columns are merged into one. For example, a factor of 0.50 would show 3 or 4 columns on a desktop, and 2 columns on a mobile device.
To change the Column width factor:
menu Models > Model overview > tab Branches > tab Model settings
- Enter a number in the field Column width factor. The default is 1.00.
Floating labels strategy
Universal UIFor the Form component, the Software Factory allows separate specifications for Label width (px) and Field width (px) in the Model settings.
However, these specifications do not work well for input controls in the Universal UI that use floating labels. Instead of placing a label in front of the input control, floating labels are placed inside the input control. When a value is entered, the label floats to the top inside the input control.
 Example of a floating label
You can configure per model whether the label width should be ignored for or included into the input control. Only forms and parameter pop-ups will be affected by this setting. The CHECKBOX and LABEL control types will never be affected as they do not use floating labels.
menu Models > Model overview > tab Branches > tab Model settings
-
Select an option for the Floating labels strategy:
- Ignore the label width - Only the field width is used.
- Include the label width - Default. The label width and the field width will be added up to determine the size of the input controls.
Example
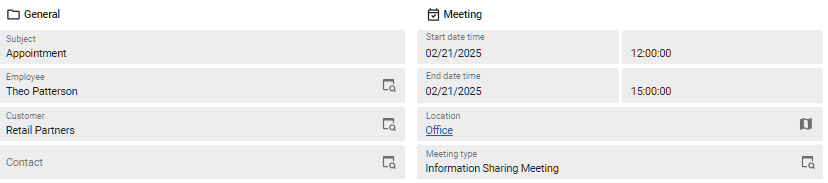
Given the following form configuration in the Software Factory:

The Windows GUIs that do not use floating labels will display the form as follows:

The orange color on top indicates the full form element width including the label. The green color underneath the fields indicates only the input field widths.
For the Universal UI:
-
If the Floating labels strategy is set to Include the label width, the form with floating labels will be displayed as follows:

-
If the Floating labels strategy is set to Ignore the label width, the form will be displayed as follows:

Large labels may get too little space when they are used as floating labels in small input fields.
Branch as model version
Tag a branch as model version
menu Models > Model overview > tab Branches > tab Model versions
You can tag a branch at a certain point in time as a model version. This model version can be used for upgrades or branching and merging.
The column Model version type indicates whether model versions have been added by a process such as merging or archiving. Model version descriptions that have been added by a process cannot be changed, except for descriptions of model versions added by the Creation process.
Model version status
menu Models > Model overview > tab Branches > tab Model versions
The column Status indicates the stage or environment of the branch.
The following statuses are available:
- Test - When the development phase is completed, the branch can be tested.
- Acceptance - During the acceptance phase, users can become acquainted with the system and detect any final errors.
- Production - When the system is accepted, it is put into production. The branch can no longer be modified once it is put into production.
Make a model version available for upgrade logic
menu Models > Model overview > tab Branches > tab Model versions
To make a model version available for upgrade logic, select the checkbox Use upgrade logic and add a Description. See Version specific upgrade scripts.
- The prefilter Named versions
 shows all model versions with a description.
 - The prefilter Use upgrade logic
 shows all model versions where Use upgrade logic is checked.
 Model versions
Set a platform for a branch
menu Models > Model overview > tab Branches > tab Platforms
For each branch, you can select a platform (Windows and Universal), the default menu, and default theme.
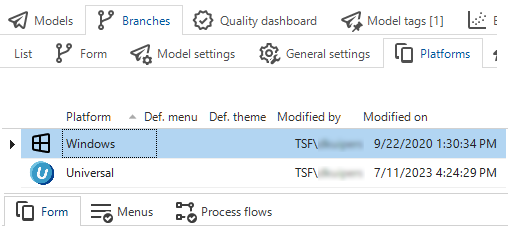 Platforms for a branch
Branch language
For more information, see Application languages for a branch.
Database storage location for a branch
menu Models > Model overview > tab Branches > tab Database storage locations
For SQL Server, the file locations for the database can be set here. When empty, the default server settings are used. For more information, see Database files and file groups.
Printer for a branch
menu Models > Model overview > tab Branches > tab General settings > tab Printers
Here, you can configure and edit the available printers.
The tab Usage shows where the printer is being used. This can be helpful when, for example, you want to make a change to the printer and see what impact this might have.
For more information on this generic feature, see Usage.
Runtime configurations
You can create different runtime configurations for development, test, acceptance, or production environments. Each runtime configuration contains information on how to launch the end product. You can vary per runtime configuration, for example, which email providers or file storage locations you use. For more information, see runtime configurations.
Branch maintenance
Archive and unarchive a branch
Archiving a branch will delete all its operational data. This reduces the database size of the Software Factory and increases performance. The branch record and model version information is retained, which makes it different from deleting a branch entirely. Note the following:
- It is not possible to switch to an archived branch to work in it.
- It is not allowed to archive the MAIN branch or branches that are the origin of other branches that have not been archived.
Archiving differs in two ways from deleting a branch:
- The branch remains visible in the Branch diagram.
- The branch can be unarchived so you can work in it again. This restores all data as stored in the history tables based on the state of the branch just before it was archived.
If you do not want these possibilities, you can choose to delete the branch.
If your database contains too much historical data, you can decide to delete the history data of all branches that no longer exist. See also Clean up archived branches.
To archive or unarchive a branch:
menu Models > Model overview > tab Branches > tab List / tab Model versions
- To archive a branch, execute the task Archive branch
 .
. - To unarchive a branch, execute the task Unarchive branch
 .
.
Clean up archived branches
A system flow is available to automatically clean up archived branches and their history that exceed a retention period. Archived branches cannot be unarchived if you delete them.
To configure this retention period for archived branches:
menu Maintenance > Configuration
- Select the Archived branch retention. The default value is 60 days.
You can set up custom schedules for applications in IAM:
menu Authorization > Applications (SQLSERVER_SF) > General settings > Scheduled system flows for the system flow system_flow_clean_archived_branch_history.
See System flow schedules.