Users
Introduction to users
The Users screen contains an overview of all users and user-related information, such as group memberships, effective rights and session logs. To grant a user access to a Thinkwise application, the user needs to be added to the Intelligent Application Manager first.
Add users
main administrator user administratorTo add a new user:
menu Authorization > Users > tab User
 Add a new user
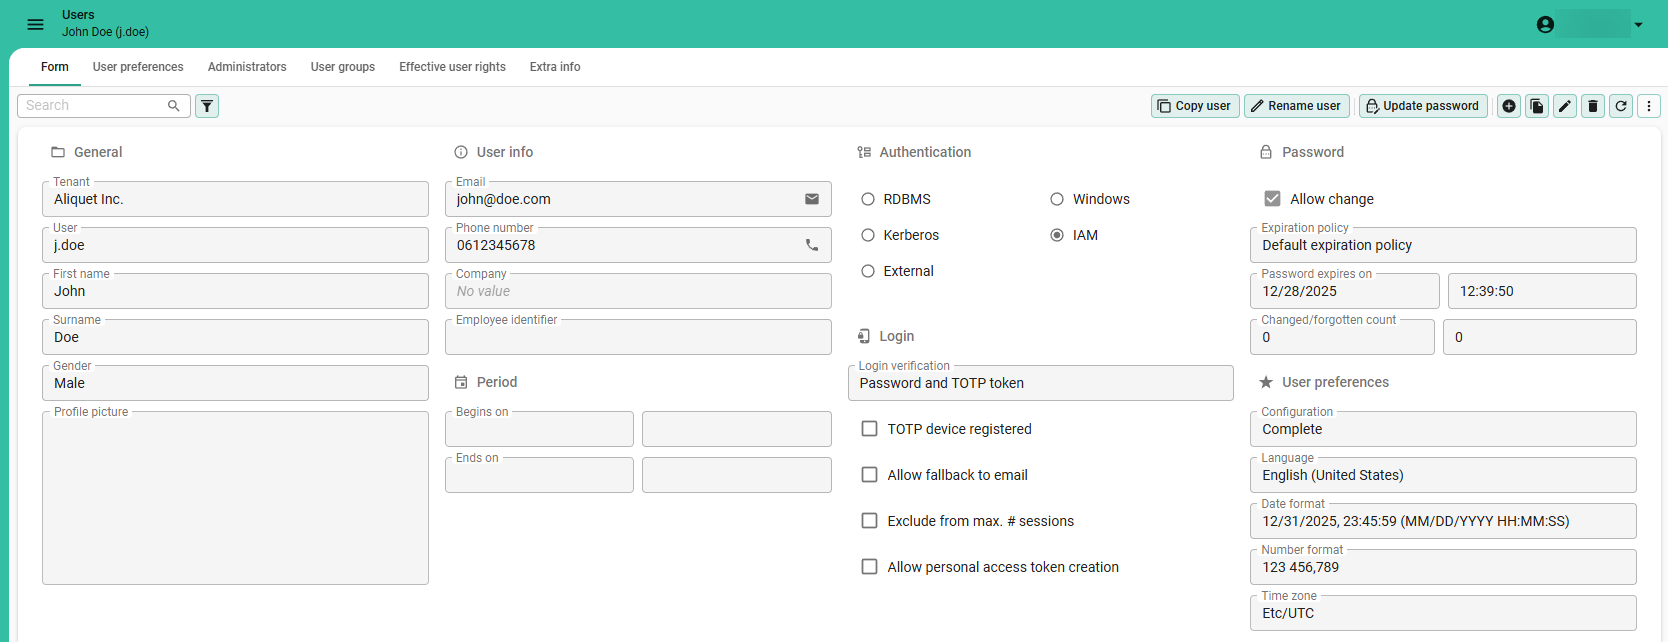
Add general user information
main administrator user administratormenu Authorization > Users > tab Form > group General
-
If necessary, add a Tenant.
-
The User id is the login name of the user. Depending on the Authentication type, this could be the Windows domain user, database user, Kerberos user or an identifying name.
-
The Visitor field can be checked to indicate whether a user is an external visitor of the application (as opposed to an internal or hired employee).
Add an email, telephone number, company, ID
main administrator user administratormenu Authorization > Users > tab Form > group User info
Here you can provide additional user information, such as the company a user belongs to and the company-specific employee ID.
Add a start and end date
main administrator user administratormenu Authorization > Users > tab Form > group Period
Define a start and end date to control a user's access to applications. Upon reaching the end date and time, the user's access to all applications will be automatically denied.
Editing these fields does not automatically update the fields Begins on and Ends on of related tables, like User Groups and Administrator screens.
Main administrators are not restricted by start and end dates to ensure they always have access for management purposes. When a record is inserted, the user is considered a Main administrator until the record is deleted.
Configure user preferences
main administratormenu Authorization > Users > tab Form > group User preferences
Here you can specify the default language and time zone for the user and which level of user preferences should be available. For information about copying, importing, and exporting user preferences, see User preferences.
Manage favorites for a user
main administrator group administratorFavorites are screens, tasks, reports, or processes that are automatically loaded during start-up. If configured, users can mark these items as Favorite in the Universal UI. You can view and remove favorites for a user.
To manage items favorites for a user:
menu Authorization > Users > tab User preferences > tab Favorites
Here, you can remove items from the Favorites list if necessary.
- Start objects for user groups can be viewed, added, and removed by administrators. They are opened automatically on start-up and are grouped under Open documents in the user interface. Tasks and reports are not shown, but executed automatically in the background. To configure start objects for a user group, see Add start objects for a user group.
- Favorites are managed by the users themselves and can be viewed or removed by administrators. To allow users to add menu items to Favorites, see Allow a user to change preferences.
Authentication
main administrator user administratormenu Authorization > Users > tab Form > group Authentication
The Thinkwise Platform provides various authentication types: RDBMS, Windows, Kerberos, IAM and External.
For an overview of the different authentication types, see Authentication.
Manage push notification subscriptions
Universal GUI main administrator user administratorYou can manage a user's push notification subscriptions. You can not add subscriptions for a user, a user can only add subscriptions themselves. For more information, see Push notifications and Ad-hoc push notifications.
To manage push notification subscriptions for a user:
menu Authorization > Users
-
Select a User.
-
Go to tab Extra info > tab Push notification subscriptions. Here, you can:
- View existing subscriptions
- Add an expiration time to a subscription
- Remove subscriptions
User preference configuration, application language, and time zone
menu Authorization > Users > tab Form > group User preferences
For more information, see Configure user preferences.
Country, location, and department
main administrator user administratormenu Authorization > Users > tab Master data
This tab contains information about the user's country, location or department. This information is also available in the IAM analysis tools.
User tags
main administratormenu Authorization > Users > tab User tags
On the tab User tags, you can maintain information about users that is not already available in the Intelligent Application Manager.
When you copy a user, the tags will be copied with it.
Sessions
Session expiration
Indicium main administratorBy default, sessions in the Thinkwise platform expire after 30 minutes of user inactivity. When the session expires, the user must re-authenticate to access the Thinkwise environment. If a user selects the option Stay signed in, the session expires after 14 days of inactivity.
To change the session expiration time:
menu Settings > Global Settings > tab Form
-
Enter a value in the field Session expiration. This value specifies how long users can remain idle before the session expires and re-authentication is required to access the Thinkwise environment.
noteUsers authenticated via OpenID use the session expiration configured at the OpenID provider in IAM. It makes sense to align this setting with the OpenID identity provider expiration settings, see Register an OpenID identity provider.
-
Enter a value in the field Extended session expiration. This value specifies how long users can remain idle before the session expires and re-authentication is required when the option Stay signed in is selected.
Exclude from maximum number of sessions
main administrator user administratorA user can only have a limited number of concurrent sessions in a specific application. This limit is set for all users in IAM. See Applications.
Service accounts are subject to this limit by default. However, you can allow a service account an unlimited number of sessions for any application to which it has rights. Other users' sessions are still limited.
To remove this limit for a service account:
menu Authorization > Users > tab Form > group Login
- Select Exclude from max. # sessions.
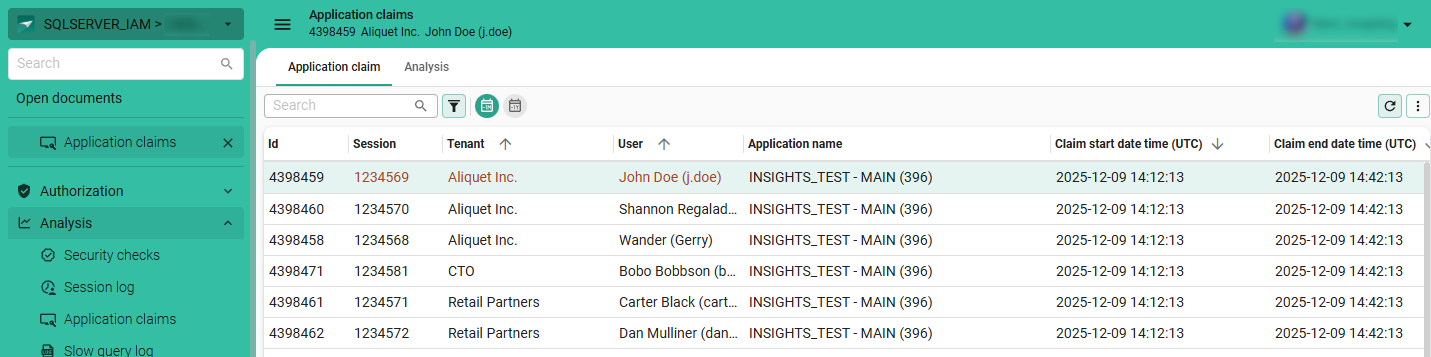
View application claims
main administratorYou can view which users were active at a specific time in an application in IAM. Application claims gives a more accurate view of user activity than the Session log, since users may leave sessions open without being active.
To view the application claims for a user:
menu Analysis > Application claims
The screen provides an overview of each user's application claims, including their start and end times in UTC. By going to the tab Analysis, you can further analyze the data by selecting various fields to create pivot tables and charts.
You can view the number of active users and active system flows for an application. See also View active users.
 View which users have claimed an application
Session analysis for all users
main administratorTo inspect the session log for all users:
menu Analysis > Session analysis
- Tab Cube contains a pivot table where you can select the fields, series, categories, and values to analyze.
- Tab Chart shows the data in a chart format.
In addition to session logs, you can also view application claims for all users. Application claims give a more accurate view of user activity than the session log. See View application claims.
Session log for one user
main administrator user administratorTo inspect the session log for one user:
menu Authorization > Users > tab Session log
- Select a user for whom you want to view the session log.
Session log retention period
main administratorOld user session log records are automatically deleted by a recurring system flow based on the selected retention period. To prevent the session log from growing too large, set a retention period:
menu Settings > Global settings > tab Form
- Select a retention period of 1 year, 5 years, or Indefinitely. For new IAM environments, the default value is 1 year.
IAM uses the following system flow for deleting old session log records: system_flow_clean_up.
For more information about viewing and managing this system flow, see Create a custom schedule for an IAM system flow.
Login and password
Allow creation of personal access tokens
main administrator user administratorFor more information, see Personal Access Tokens.
Two-factor authentication
main administrator user administratormenu Authorization > Users > tab Form > group Login
- In field Login verification, select if a user is required to use two-factor authentication:
- Password - the user logs in with a password only.
- Password and SMS - the user logs in with a password and a code that is sent by SMS.
- Password and email - the user logs in with a password and a code that is sent by email. For additional settings, see System emails.
- Password and TOTP token - the user logs in with a password and a code that is generated by a TOTP authenticator
- Set up Two factor token system emails, see System emails.
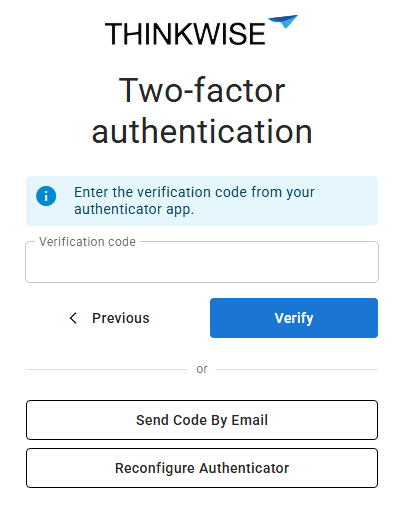
TOTP (Time-based one-time password)
main administrator user administratorIf TOTP (Time-based One-Time Password) authentication is used, the user receives a secret key code on the first login. This code needs to be registered in a TOTP authenticator app, like Google Authenticator or Microsoft Authenticator, by entering the key or scanning the QR code. If the user has successfully registered their TOTP device, the TOTP device registered checkbox will be checked.
Every time the user wants to log in, they need to enter the time-based code generated by the TOTP authenticator app. To allow a fallback to email-based two-factor authentication, for example if the user does not have access to their smartphone, select the checkbox Allow fallback to email. On the log in page, the user can then select the option Send code by email for a one-time code to be sent to their email address.
Users can also select Reconfigure authenticator to reset their TOTP device, for example when their device is stolen.
You can change whether authentication links are displayed on the TOTP setup page by overriding
the authenticator_play_store_link and authenticator_app_store_link translations.
If you leave the translation of the links empty, the button will be hidden.
For more information, see Add translations to a web domain.
 Two-factor authentication using TOTP
Initial password (RDBMS)
main administrator user administratormenu Authorization > Users > tab Form > group Password
For RDBMS authentication you can specify an Initial password. This password is used to generate a script for creating users on the database. It can be used to keep track of the initial password and communicate this password to the users. This password cannot be used to log on to the application. Make sure to clear this field after RDBMS users are created or the password for IAM users is updated.
The system keeps track of how often a password is changed or reset (Changed/forgotten count). This number is incremented every time the user requests a new password or changes their password, and when the password is changed by an administrator.
Allow change password
main administrator user administratorTo allow a user to change their own password:
menu Authorization > Users > tab Form > group Password
- Select the checkbox Allow change. See also the Universal GUI User manual.
- Set up Password reset system emails, see System emails.
If a user has not set a password yet, they can set it via email using the link 'Forgot your password' on the login page.
Password expiration period
main administratorTo set the expiration period for an application's password:
menu Settings > Global settings
- Enter a number of days in the field Password expires in (days).
- Set up Password reset system emails, see System emails. When a password is expired, the user will receive an email asking them to reset their password.
This setting is used in the expiration policy you can set for a user.
 Number of expiration days for a password
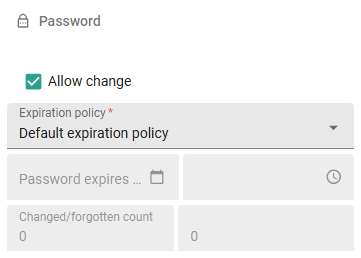
Password expiration policy
main administrator user administratorTo set the expiration policy for a user:
menu Authorization > Users > tab Form > group Password
- Select Allow change. This allows a user to change the password from the user interface.
- Set up Password reset system emails, see System emails. When a password is expired, the user will receive an email asking them to reset their password.
- Select an Expiration policy:
- Force expired - The user needs to change the password on the next login.
- Default expiration policy - After the number of days specified, the user needs to change the password. If the field Password expires in (days) is empty, passwords with Default expiration policy will never expire.
- Never expires - Use this for service accounts that never need to expire and have no user available to change the password.
 Password expiration policy
Password strength
main administratorTo set the minimum password strength for IAM authenticated users:
menu Settings > Global settings
The following calculation is used to determine the password strength:
- The total password length gives up to 3 points (at 10 characters)
- Two uppercase characters and two lowercase characters gives 0.6 points
- Two numbers gives 0.6 points
- Two symbols gives 0.8 points
Setting the minimum password strength to 5 will require the user to match all the password requirements. Setting the minimum password strength to 4 allows the user to skip either symbols, numbers or varying casing.
When the user attempts a password change and the password strength is insufficient, they will be notified of the shortcomings of the desired password.
Password strength requirements for RDBMS accounts or Windows accounts is delegated to the database server or active directory.
To ensure users are using a compliant password after increasing the minimum password strength, you can force each user to change their password. Go to the menu Authorization > Users > tab Form > group Password, select the checkbox Allow change, and set the Expiration policy to Force expired. See also Password expiration policy.
To change this setting for multiple users or all users at once: select the desired users, open the overflow menu and select Update (#). Select the fields Allow change and Password expiration policy, set to the appropriate values, and select Update.
User preferences
You can configure user preferences for a user or user groups in IAM. These preferences allow users to personalize their user interface and experience in Thinkwise applications. Default configurations are available, however, you can also create a custom configuration.
Select a configuration for a user
main administratormenu Authorization > Users > tab Form > group User preferences
-
Select a Configuration or create a new configuration.
Available configurations are:
- None - No user preferences are stored and the user preferences ribbon is hidden.
- Resize - Users can collapse and expand their menu and ribbon. Furthermore, they can change the sort sequence.
- Move - Users can Resize screen elements, configure their Favorites, and set the sort sequence of all subjects. For more information, see Add start object for a user and Add menu items to 'Favorites'.
- OnOff - All options except for changing screen types.
- Complete - All user preferences options are available to the user. See also Overview of user preferences for a user.
-
Optional. Specify the following settings:
- Language - This is the default application language for the user.
- Date format - This is the default date format for the user.
- Number format - This is the default number format for the user.
Users can override the default language and select a preferred date and number format in the profile menu > User preferences. See Theme and localization.
-
Select a Time zone. You can also add time zone claim mappings for users through Provisioning.
- Community post - Advanced Localization: Customize Date and Number Display Formats
Create or edit a user preference configuration
main administratorTo edit or create a user preference configuration:
menu Advanced > Master data > User preference availability > tab Form > tab User preference availability
In the group General settings availability, you can configure the following settings:
- Language - Allow users to select their preferred application language.
- Date format - Universal UI allow users to select their preferred date format.
- Number format - Universal UI allow users to select their preferred number format.
- Time zone - Universal UI allow users to select their preferred time zone.
- Load on start up - Windows GUI allow users to select whether an application is loaded on start up of the user interface. See Load on start up.
- Application order - Windows GUI allow users to order applications.
In the group Form settings availability, you can configure the following setting:
- Tab section expanded state - Universal UI allow users to collapse or expand sections. For more information, see Collapse a section by default in the Software Factory.
In the group Setting for prefilter, you can configure the following settings:
- Custom prefilters - Allow users to create their own prefilters. The configurations OnOff and Complete have custom prefilters enabled by default.
- Prefilter status - Remember a user's default prefilter status. See User preferences for prefilters.
Some settings are not supported as user preferences in the Universal UI. This applies to the following settings:
- Show menu
- Show ribbon - Windows GUI only
- List bar expanded
- List bar group order
- Module expanded
- Auto resizing columns
- Default filter conditions
- Filter field visibility
- Filter field order
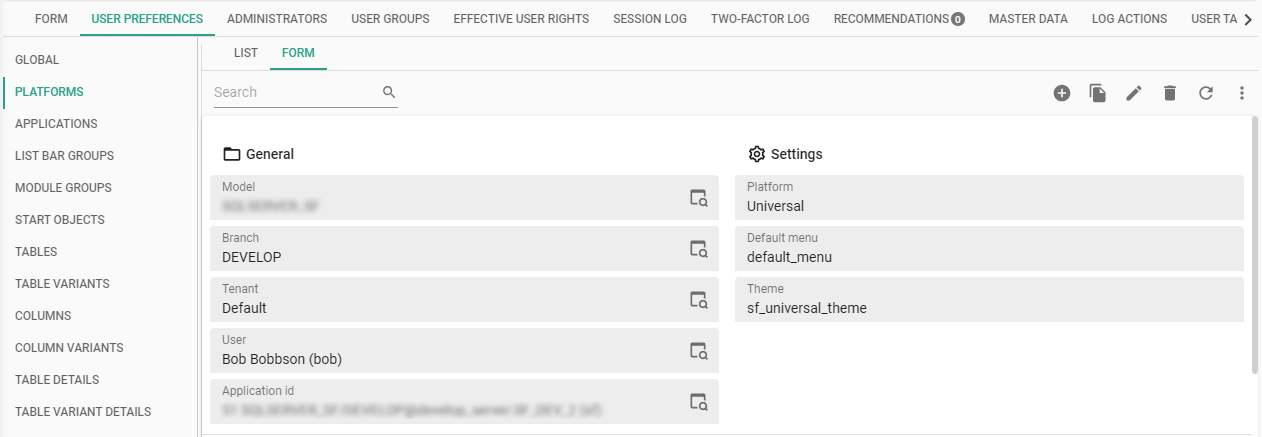
Overview of user preferences for a user
main administratormenu Authorization > Users > tab User preferences
On this tab, you can view and manage the stored user preferences of the selected user. For example, the default platform, menu, and theme, but also screens, tables, columns, and prefilters.
 User preferences
Copy user preferences from another user
main administratorYou can copy the user preferences of a user account to another user account if it is in the same IAM environment. If a preference setting already exists, this value will NOT be changed.
menu Authorization > Users > tab User preferences > tab Global
To copy user preferences from one user's account to another:
- In the grid, select the target user account to which you want to copy the preferences.
- Select the task Re-apply all user preferences
 .
. - In the dialog box, select the option Copy. The field To user is prefilled.
- Select the From tenant and From user information of the user account from which you want to copy the preferences.
- Select Copy. The user preferences of the To user are overwritten with the user preferences of the From user.
Export user preferences
main administratorYou can export the user preferences of a user account to a JSON file. This file contains all the information that is included on the tab User preferences.
To export user preferences to a JSON file:
menu Authorization > Users > tab User preferences > tab Global
- In the grid, select the user account of which you want to download the preferences.
- Select the task Export all user preferences
 .
. - In the dialog box, specify the Model, Branch, and Application from which you want to download the data.
- Select Export. The user preferences of the selected user are downloaded to your computer.
Import user preferences
main administratorYou can import user preferences from a JSON file and apply them to a user account. This JSON file contains all the information that is included on the tab User preferences. Such a JSON file is generated when you export user preferences.
To import user preferences from a JSON file:
menu Authorization > Users > tab Global
- In the grid, select the target user account to which you want to import the preferences.
- Select the task Re-apply all user preferences .
- In the dialog box, select the option Import. The fields To user and To tenant are prefilled.
- Select the Model, Branch, and Application to which you want to import the data.
- Upload the JSON file that contains the user preferences.
- Select Import. The user preferences of the To user are overwritten by the preferences in the JSON file.
Clean up unused preferences
main administratorYou can clean up the user preferences of applications that no longer exist.
menu Optimization
- Execute the task Clean up unused preferences
 .
.
Any unused preferences that are found are deleted automatically.
Re-migrate classic user preferences
main administratorThe Thinkwise platform's user interfaces used to configure and store user preferences path-based before version 2024.1 (see Introduction to user preferences). This is called the classic structure. User preferences for user interfaces using Indicium (the Universal GUI) store user preferences per model object or model object variant.
During the upgrade to platform version 2024.1, the user preferences have been migrated automatically. If you have continued using a user interface from a version before 2024.1 after that, you can migrate your user preferences again later.
To migrate your classic user preferences:
menu Authorization > Users
-
Start the task Re-migrate classic UP
 .
. -
Limit the re-migration to a certain tenant, user, or user group, and to a certain model, branch, and application.
warningAny previously migrated (or created) model-based user preferences for the chosen users will be removed to make room for the migration of path-based user preferences.
-
Select Execute.
Alternatively, you can start the task Re-migrate classic UP from the menu Advanced > Administration to quickly pick a set of applications, users, or user groups to re-migrate.
Note that classic user preferences cannot always be migrated 1-to-1 to the new structure. If a conflict occurs, the migration will pick the most relevant path. This favors user preferences configured for more accessible paths over nested paths that reside deeper in detail and lookup structures.
User roles and rights
Assign an administrator role to a user
main administrator user administratorTo assign an administrator role to a user:
menu Authorization > Users > tab Administrators
See also Which role can assign another role?.
Add a user to a user group
main administrator group administrator group ownerTo add a user to a user group:
menu Authorization > Users > tab User groups
See also User groups.
Overview of effective user rights
main administratorAn overview is available of all the effective access types that a user has.
To get a better understanding of the effective access type:
menu Authorization > Users > tab Effective user rights
-
Execute the task Explain
 .
.The reason for the effective access type is explained in a pop-up. See also Access types.
Security checks (data accessibility)
Introduction to security checks
Which data is accessible to an end user depends on the configuration of various actors and settings, such as:
- In the Software Factory:
- The configuration of authorization prefilters
- The configuration of rights granted by the roles
- In the Intelligent Application Manager:
- The account status of the user
- The user groups to which the user has been added
- The user group status
- The roles which have been granted to each application
- The application status
- In the end application data:
- The settings in operational data that determine the outcome of authorization prefilters
To ensure all actors and settings are aligned, you can use the security checks in IAM. A security check is configured for a user and revolves around the tables using a certain domain in an application. The checks are verified by simulating the user with the application data and the configured rights.
Examples of security checks:
- The user b.hanssen may never see columns with value
j.vandyk@competitor.comusing the domainemailin application 395 - myproduct. - The user s.harris may only see records with values
5,6, and7for columns using the domaincustomer_idin application 395 - myproduct. - The user s.harris may not see records with values
conceptornullfor columns using the domaininvoice_statusin application 395 - myproduct.
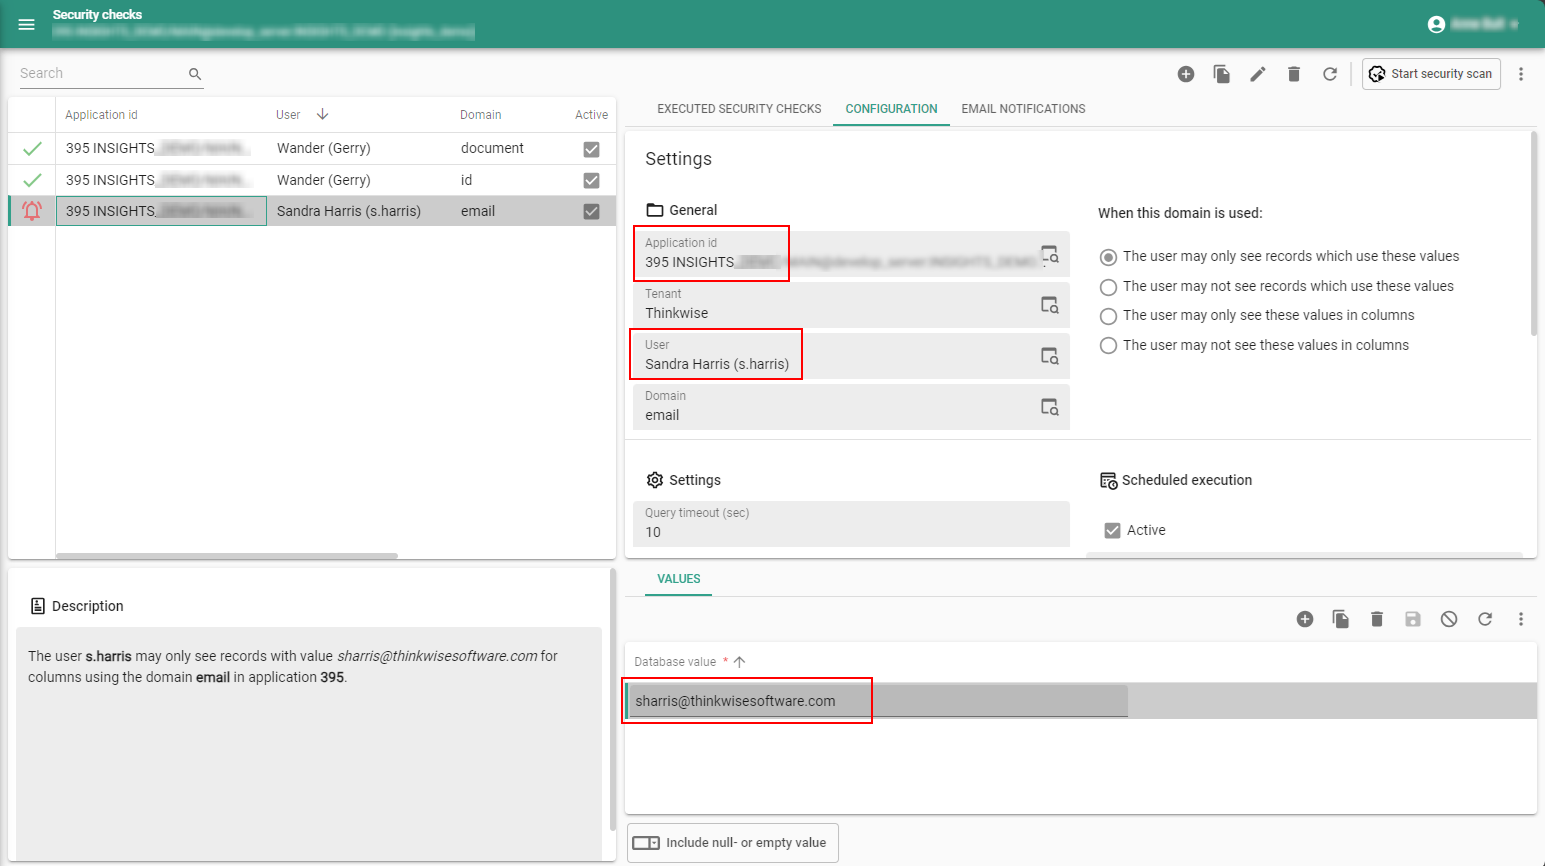
Configure a security check
main administratorTo configure a security check:
menu Analysis > Security checks > tab Configuration
-
Select an Application id.
-
Select a Tenant.
-
Select a User.
-
Select a Domain.
-
Select the condition for this domain:
- The user may only see records which use these values.
- The user may not see records which use these values.
- The user may only see these values in columns.
- The user may not see these values in columns.
-
Enter the Query timeout in seconds. This is the maximum time in seconds that the query may take to execute. If it takes longer than the specified time, the query is aborted (the security check is not marked as failed).
-
Optional. You can run the security check manually but also schedule it to run automatically. Select the checkbox Active to enable the schedule and set the No. of runs per day.
-
Click Save.
-
Go to the tab Values.
-
Add the database values that are relevant for the security check. Include or exclude null or empty values.
 Security check configuration
Configure an email notification for a scheduled security check
main administratorThe following configuration is required to send an email notification:
- An email provider for IAM (menu Settings > Global settings > tab Email provider).
- A notification email template (menu Settings > Global settings > tab Email templates).
To configure an email notification to be sent when a security check turns up with results:
menu Analysis > Security checks > tab Email notifications
- Select a Tenant.
- Select a User. This user will receive the email notification. No administrator role is required.
Manually run a security check
main administratorYou can schedule a security check (see Configure a security check) to be executed a number of times per day but you an also run it manually:
menu Analysis > Security checks
-
Execute the task Start security scan
 .
It may take up to 15 seconds before the execution of the security check starts.
.
It may take up to 15 seconds before the execution of the security check starts.- The result of the security check is shown in tab List
- The executed steps are shown in tab Steps
- If you have configured an email notification, the assigned user will receive an email if the security check turns up with results.
Delete a user
main administratormenu Authorization > Users > tab List
To delete a user:
- Make sure that you are viewing all users:
- Universal GUI Turn off the prefilter Active or new
 .
. - Windows GUI Turn off the prefilters Active users
 and Inactive users
  .
.
- Universal GUI Turn off the prefilter Active or new
- Select the user(s) you want to remove.
- Delete the user(s).
Analyze user behavior and apply recommendations
For each user, you can analyze their behavior and preferences.
menu Authorization > Users > tab Recommendations
- Select a user.
- Execute the task Start analysis
 .
. - In the tab Form, in the field Apply, select whether you want to apply each recommendation (Yes or No).
- To apply the recommendations, execute the task Apply recommendations
 .
.
Logs
Two-factor log
main administrator user administratormenu Authorization > Users > tab Two-factor log
This is a log of when a user is logged in using SMS, email or TOTP two-factor authentication. An overview of the sessions for all the users is available from the menu Analysis. See Session analysis for all users.
Open ID log
main administratormenu Authorization > Users > tab Log actions
This tab contains a user's Open ID login actions. See OpenID.