User notifications
Introduction to user notifications
Universal GUI main administrator application administrator group administrator group owner user administratorDepending on your rights, you can send a notification to all the users within a tenant, application, or user group, or the subset of users you are responsible for.
Notifications can be sent to users in the following ways:
- As an in-app notification from IAM.
- As a push notification as part of a process flow.
- As an email notification from IAM.
- As a system email from IAM, that is automatically sent out by the system.
- As an in-app notification that is part of a system flow, for example, to notify a user that a file has been uploaded. You can configure these notifications only in the Software Factory. See Send user notification.
- Community post - Right channel, right moment: choosing the best notification
In-app notifications
main administrator application administrator group administrator group owner user administratorTo send an in-app notification:
menu Authorization > Tenants/Applications/User groups/Users
- Select a Tenant/Application/User group/User.
- Execute the task Add notification for [all users/all user group users/user]
 .
. - Select the Notification type: In-app notification.
- Add the Text you want to send.
- Optional. Enter an Expires on date and time. This determines when the notification expires.
Notifications are sent to the specified users as soon as they are logged in or, if they are already logged in, when they interact with the GUI.
IAM uses the following system flow for deleting sent or expired notifications: system_flow_clean_usr_notification.
For more information about viewing and managing this system flow, see Create a custom schedule for an IAM system flow.
Push notifications
Universal GUIPush notifications are useful for sending timely and relevant information to users, such as notifying them about important updates or events.
The following applies for push notifications:
- Users can receive push notifications when they are not actively using the application.
- A push notification may take up to a minute to arrive.
- Push notifications are only displayed for a short period of time, depending on the device and operating system.
- On some platforms, notifications are only delivered while the browser or app is running. If closed or offline, notifications will appear the next time a user opens the browser or app.
- If a notification’s expiration time has passed, it will not be shown to the user. For example, if the browser is offline on a ship when a notification is sent, the notification can still be shown once the browser reconnects. But if it expires before that moment, the user will not see it.
- When a user selects a push notification, and if the notification contains a Deep link URL, the application opens at that URL. If the application is already open, the application is brought to the foreground.
Prerequisites
- Configure Indicium and add an email address to IAM.
- The user interface must be able to run in an environment that supports push notifications (see MDN Push API browser compatibility).
- The user interface must be connected to the internet.
- On iOS devices, the application must be installed as a Progressive Web App (PWA) on the device.
- Users must subscribe to
and allow push notifications on the same device where the application is installed.
- Only users with an active push notification subscription receive the notification.
- If a user has no active subscription, the notification is sent once a subscription is registered or reactivated.
- For more information about the supported browsers, see the Lifecycle policy.
- For Chrome, the browser must be open to receive push notifications. The application does not need to be open.
- For Edge, the browser can be closed to receive push notifications.
- Do not include sensitive information in notifications, since they may appear on the screen and be accessible without authentication.
Set up push notifications in a process flow
Universal GUIYou can set up a process flow to send push notifications to users based on specific triggers or events. A push notification is automatically sent when the process flow is triggered and executed. A use case for this is notifying users when a purchase invoice is processed and requires their approval.
To set up push notifications in a process flow:
- Create a process flow.
- Add the process action Send user notification to your process flow.
- Complete the following input parameters in the tab Input:
- Notification title - the title of the notification.
- Notification text - the message you want to send.
- Optional. Complete the following input parameters:
- User ID of the recipient.
- Expiry date time (UTC) - the date and time when the notification expires.
- Deep link URL - determines where the user is directed when they select the notification. For more information, see Deep link URLs for push notifications.
- Icon URL - link to an icon that is shown in the notification. Note that the icon must be publicly hosted. When you do not provide an icon URL, the PWA application icon or browser icon is used instead.
- Go to Process actions > tab Input and set the Notification type to Push notification.
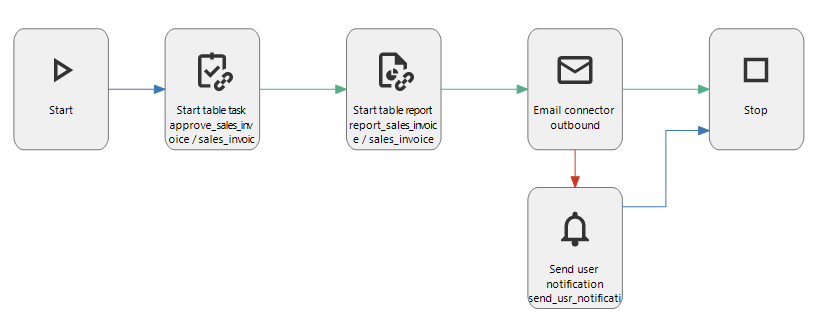 Example process flow for sending push notifications
Send an ad-hoc push notification
Universal GUI main administrator user administratorAd-hoc notifications are useful to send urgent or important messages to users. You can use these to send one-time notifications and alerts to specific users, user groups, applications, or tenants. For example, you can notify users about scheduled maintenance or unexpected downtime. Users must have an active push notification subscription to receive the notification. For more information, see Subscribe/unsubscribe to push notifications.
To send an ad-hoc push notification:
menu Authorization > Tenants/Applications/User groups/Users
- Select a Tenant/Application/User group/User.
- Execute the task Add notification for [all users/all user group users/user] .
- Select the Notification type: Push notification.
- Complete the following fields:
- Notification title
- Text
- Optional. Complete the following fields:
- Expires on - date and time when the notification expires.
- Deep link URL - determines where the user is directed when they select the notification. For more information, see Deep link URLs for push notifications.
- Icon URL - link to an icon that is shown in the notification. Note that the icon must be publicly hosted. When you do not provide an icon URL, the PWA application icon or browser icon is used instead.
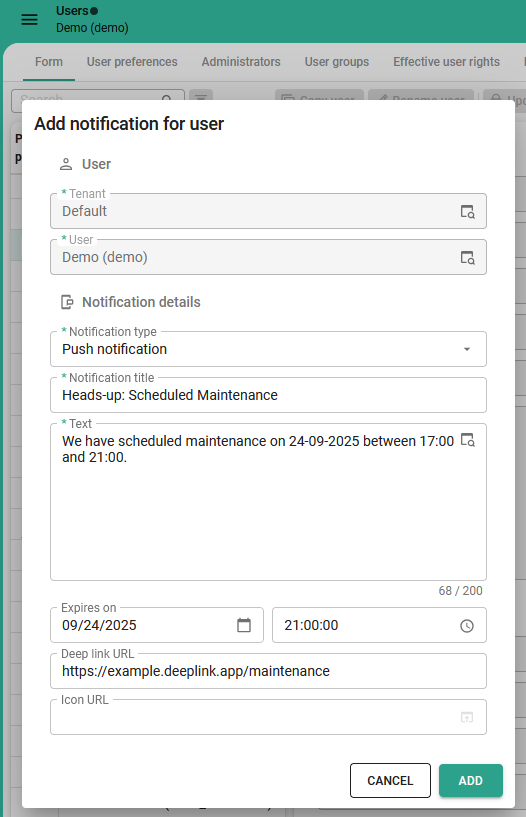 Add an ad-hoc push notification
Deep link URLs for push notifications
We recommend using a deep link URL that leads the user to the source of the information shared in the notification. For more information about supported routes and deep link formats, see HTML Control.
- You can use a relative path (for example,
#application=1234or/#application=1234) that is appended to the application’s origin. - You can use an absolute URL (for example,
https://example.thinkwise.app/#application=1234). - If you do not add a deep link, the user will be taken to the application's origin.
- A deep link can point to an internal application route or an external URL (for example,
https://developer.mozilla.org/en-US/).
Notification email
main administrator application administrator group administrator group owner user administratorYou can use a notification email to send notifications, confirmations, reminders, or alerts to users. For example, you can send a notification email about upcoming maintenance or to a specific user regarding their account. You can only email users with a registered email address in IAM.
You can also set this up for tenants, which is useful for sending notifications to all users in a tenant. For more information on tenants, see Notification emails for tenants.
1. Configure an email provider
main administratorTo send notification emails, you must first set up an email provider for IAM.
See Email providers.
2. Configure a template
main administratorTo send email notifications, you need to configure an email template. If you configured a template in the user's preferred language, they will receive it in that language. If not, IAM uses the template that you marked as default (see step 4).
To configure a template for your notification email:
menu Settings > Global settings > tab Email templates > tab Notification email templates
-
Enter a Template name.
-
In the tab Configurations, select the Notification email template.
-
Select a Language.
-
Optional: If you want this to be your default template, select the Default template box.
-
Enter a Title and Email body.
tipYou can use email body parameters to add user-specific details in your email body.
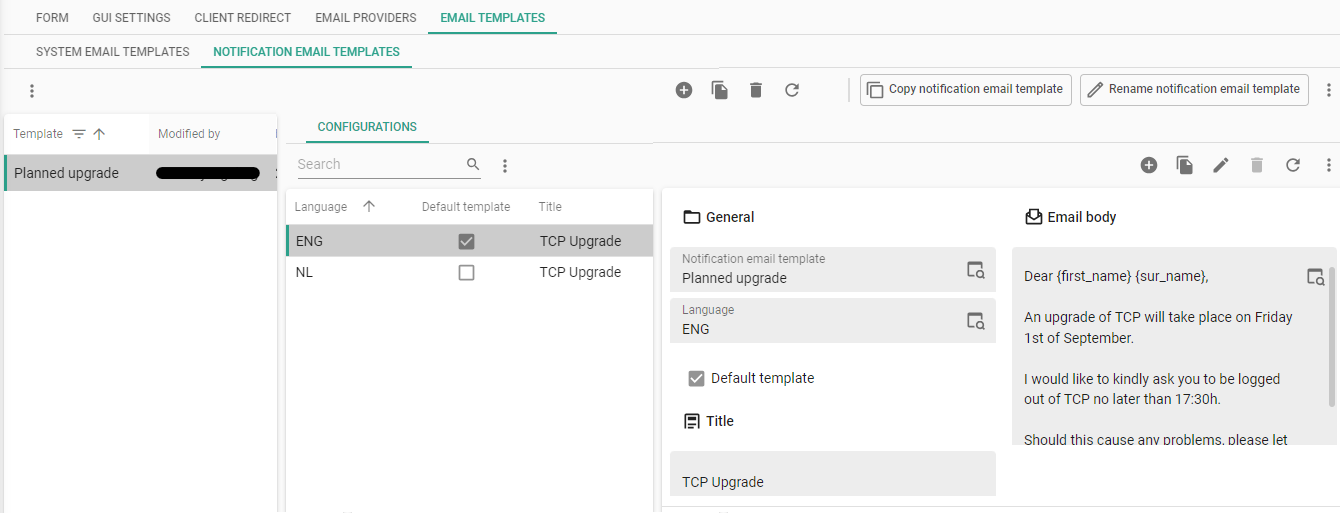 A template for a notification email
3. Send a notification email
main administrator application administrator group administrator group owner user administratorTo send an email notification:
menu Authorization > Tenants/Applications/User groups/Users
- Start the task Add notifications .
- Select the Notification type: Email notification.
- Select an Email template. A preview is available. You can only edit it by changing the template. See Configure a template.
IAM checks the notification queue every 10 seconds. If an email notification has been added, it will be sent.
IAM uses the following system flows:
- For checking and sending email notifications:
system_flow_send_email_notification. - For deleting sent or expired notifications:
system_flow_clean_usr_notification.
For more information about viewing and managing these system flows, see Create a custom schedule for an IAM system flow.
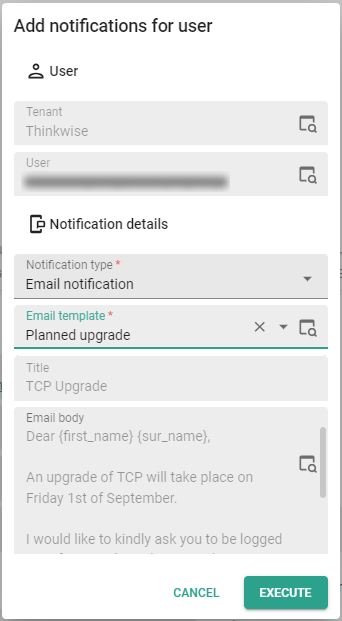 Add an email notification
System emails
Indicium main administratorA system email is an automated message that is sent by Indicium when a certain requirement is triggered. System emails are typically used to send notifications, confirmations, reminders or alerts. For example, when a user's Personal Access Token is about to expire, Indicium sends out a system email that notifies the user.
Configure a system email template
main administratorYou can customize the default system email templates. If you have set up templates in different languages, the user will receive the system email in their preferred language. If not, Indicium uses the template that you marked as Default template.
To configure a system email template:
menu Settings > Global settings > tab Email templates > tab System email templates > tab System email template
- Set up an email provider.
- Ensure the user is correctly set up and their email address is configured. For more information, see Add users.
- Select an E-mail template, see Available system email templates.
- Select a Language.
- Optional. To set this template as default, select the checkbox Default template. You must always select a default system email template. If a template for the user's preferred language does not exist, Indicium will use the default template.
- Complete the fields Title and Email body.
- Optional. You can enter the sender's name (From name) and email address (From address) in the menu Settings > Global settings > tab Email providers.
- You can use email body parameters to add user-specific details in your system email body. In-app notifications sent with system emails cannot be customized.
- You can delete templates that you do not need. For example, if you do not want to specify or maintain a template for each language, you can delete all other languages and only keep a default language.
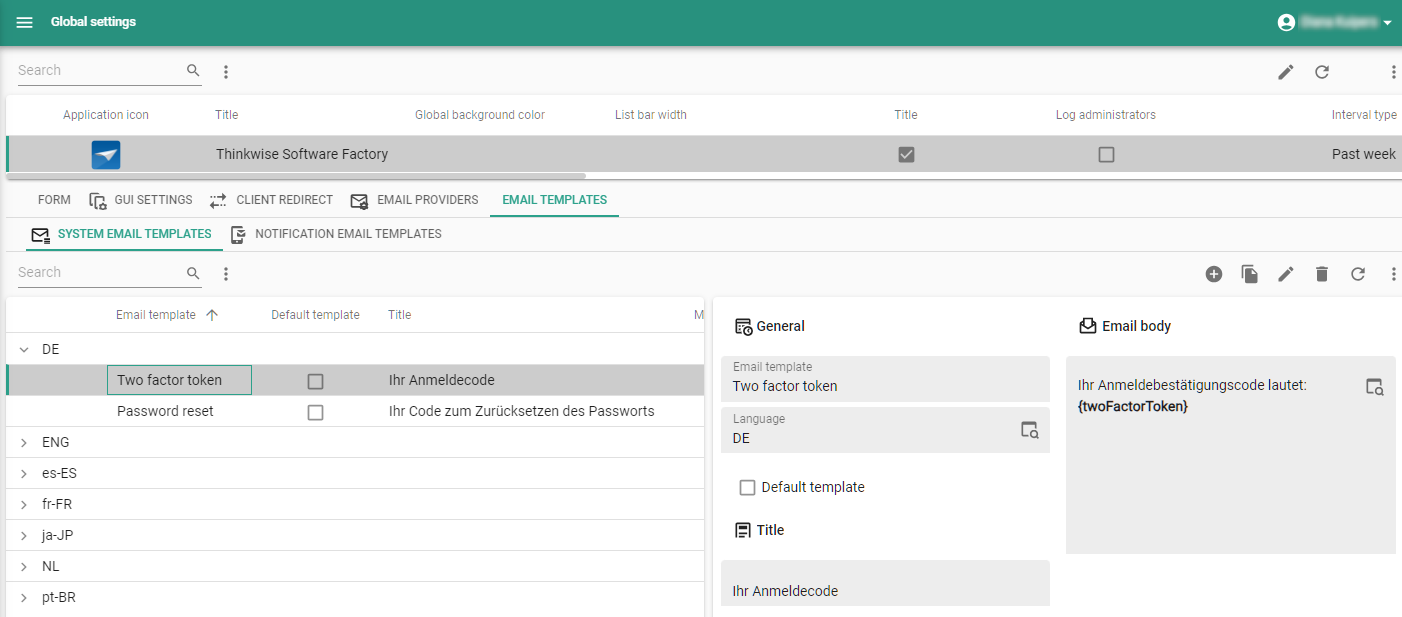 Setting up a system email for two-factor authentication
Available system email templates
The following templates are available for user notifications:
- Password reset - template for if a user needs to set up a password or reset their password. See Login and password for more information on setting up login details.
- Two factor token - template for if a user needs to log in with two-factor authentication. See Two-factor authentication for more information on setting up two-factor authentication.
- Personal access token expires - template for if a users' PAT token is about to expire. See Set up notifications for a PAT for more information on setting up notifications for PATs.
The following templates are available for Thinkwise Platform license notifications:
- License about to expire - template to notify main administrators that the license is about to expire.
When the license is about to expire:
- A daily email and in-app notifications are sent to all main administrators.
- A daily mail is sent to the maintenance Email address.
- License expired - template to notify main administrators that the license has expired.
When the license is expired:
- Daily in-app notifications are sent to all main administrators.
- A daily mail is sent to the maintenance Email address.
- License invalid - template to notify main administrators that there is no valid license registered.
- Daily in-app notifications are sent to all main administrators.
- A daily mail is sent to the maintenance Email address.
Email body parameters
You can personalize the email body with parameters. See the table below for the available options.
For example you can use the parameters {first_name} and {sur_name} as Dear {first_name} {sur_name}.
The parameters will be completed with the users' first name and surname.
If this information for a parameter is not available it will be left empty.
| Parameter | Description | Availability |
|---|---|---|
{first_name} | Adds the user's first name | All templates |
{sur_name} | Adds the user's surname | All templates |
{db_name} | Adds the name of the database containing IAM | License templates |
{expiry_date} | Adds the expiry date of the license | License templates |
{server_name} | Adds the name of the server hosting the IAM database | License templates |
{resetToken} | Contains the reset token for password reset | Password reset template |
{token_name} | Adds the user's PAT name | Personal access token template |
{twoFactorToken} | Contains the two-factor authentication token for login | Two factor token template |
{url} | Full URL to reset password or 2FA page with query strings filled in | Relevant to password reset and 2FA. If Indicium is hosted with two or more different domains, the {url} parameter will return to the domain from which it was called. |
Notification overview
main administrator application administrator group administrator group owner user administratorFor an overview of all the notifications:
menu Analysis > Notifications > tab Notifications
- Pending notifications remain visible until they have been shown to the user or until their expiration date.
- You can set the number of expired or sent notifications that should remain visible
in the menu Settings > Global settings > group User > field Notification retention (items).
Deselect the prefilter Pending
 to see them.
 - Here, you can only add, edit, and delete the notifications without a system flow. System flow notifications can only be configured and changed in the Software Factory. See System flow notifications.
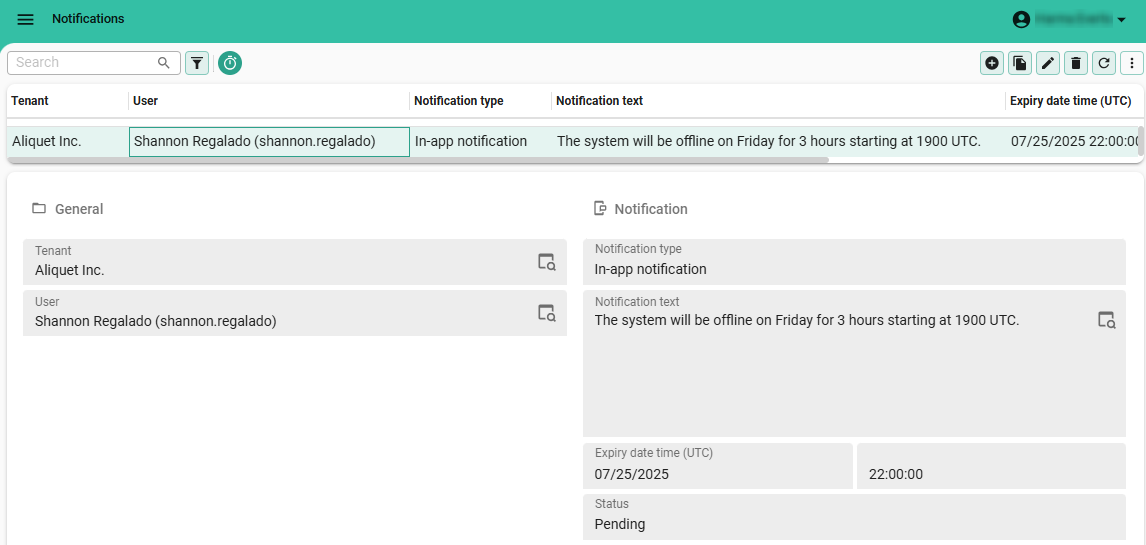 Example notification