User analysis
Introduction to user analysis
You can analyze user behavior using sessions and logs. You can also apply recommendations to a user based on their behavior and preferences. Additionally, you can configure security checks to verify whether a user has access to the correct data in an application.
Analyze user behavior
main administrator user administratorFor each user, you can analyze their behavior and preferences.
menu Authorization > Users > tab Recommendations
- Select a user.
- Execute the task Start analysis
 .
. - In the tab Form, in the field Apply, select whether you want to apply each recommendation (Yes or No).
- To apply the recommendations, execute the task Apply recommendations
 .
.
Sessions
Session expiration
Indicium main administratorBy default, sessions in the Thinkwise platform expire after 30 minutes of user inactivity. When the session expires, the user must re-authenticate to access the Thinkwise environment. If a user selects the option Stay signed in, the session expires after 14 days of inactivity.
To change the session expiration time:
menu Settings > Global Settings > tab Form
-
Enter a value in the field Session expiration. This value specifies how long users can remain idle before the session expires and re-authentication is required to access the Thinkwise environment.
noteUsers authenticated via OpenID use the session expiration configured at the OpenID provider in IAM. It makes sense to align this setting with the OpenID identity provider expiration settings, see Register an OpenID identity provider.
-
Enter a value in the field Extended session expiration. This value specifies how long users can remain idle before the session expires and re-authentication is required when the option Stay signed in is selected.
Exclude from maximum number of sessions
main administrator user administratorA user can only have a limited number of concurrent sessions in a specific application. This limit is set for all users in IAM. See Applications.
Service accounts are subject to this limit by default. However, you can allow a service account an unlimited number of sessions for any application to which it has rights. Other users' sessions are still limited.
To remove this limit for a service account:
menu Authorization > Users > tab Form > group Login
- Select Exclude from max. # sessions.
View application claims
main administratorYou can view which users were active at a specific time in an application in IAM. Application claims gives a more accurate view of user activity than the Session log, since users may leave sessions open without being active.
To view the application claims for a user:
menu Analysis > Application claims
The screen provides an overview of each user's application claims, including their start and end times in UTC. By going to the tab Analysis, you can further analyze the data by selecting various fields to create pivot tables and charts.
You can view the number of active users and active system flows for an application. See also View active users.
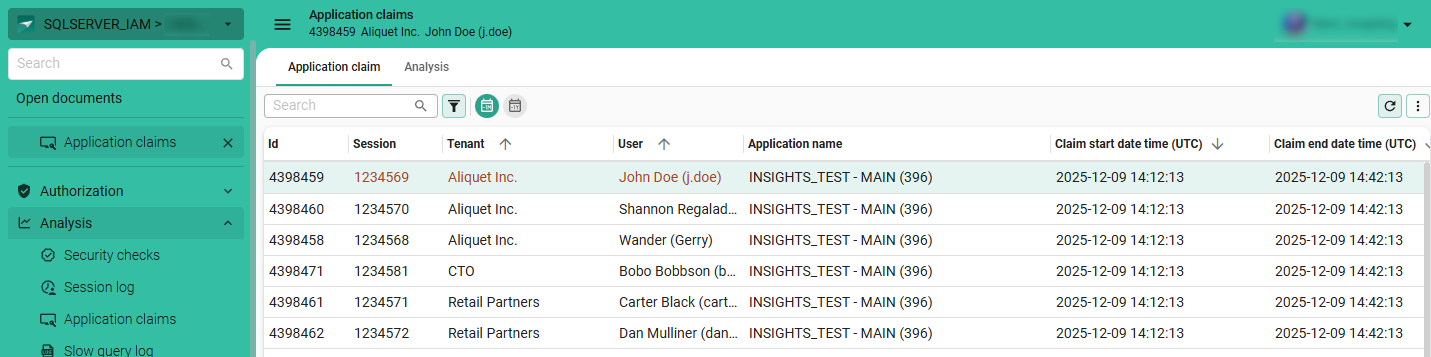 View which users have claimed an application
Session analysis for all users
main administratorTo inspect the session log for all users:
menu Analysis > Session analysis
- Tab Cube contains a pivot table where you can select the fields, series, categories, and values to analyze.
- Tab Chart shows the data in a chart format.
In addition to session logs, you can also view application claims for all users. Application claims give a more accurate view of user activity than the session log. See View application claims.
Session log for one user
main administrator user administratorTo inspect the session log for one user:
menu Authorization > Users > tab Session log
- Select a user for whom you want to view the session log.
Session log retention period
main administratorOld user session log records are automatically deleted by a recurring system flow based on the selected retention period. To prevent the session log from growing too large, set a retention period:
menu Settings > Global settings > tab Form
- Select a retention period of 1 year, 5 years, or Indefinitely. For new IAM environments, the default value is 1 year.
IAM uses the following system flow for deleting old session log records: system_flow_clean_up.
For more information about viewing and managing this system flow, see Create a custom schedule for an IAM system flow.
Logs
Two-factor log
main administrator user administratormenu Authorization > Users > tab Two-factor log
This is a log of when a user is logged in using SMS, email or TOTP two-factor authentication. An overview of the sessions for all the users is available from the menu Analysis. See Session analysis for all users.
Open ID log
main administratormenu Authorization > Users > tab Log actions
This tab contains a user's Open ID login actions. See OpenID.
Security checks (data accessibility)
Which data is accessible to a user depends on the configuration of various actors and settings, such as:
- In the Software Factory:
- The configuration of authorization prefilters
- The configuration of rights granted by the roles
- In the Intelligent Application Manager:
- The account status of the user
- The user groups to which the user has been added
- The user group status
- The roles which have been granted to each application
- The application status
- In the end application data:
- The settings in operational data that determine the outcome of authorization prefilters
To ensure all actors and settings are aligned, you can use the security checks in IAM. A security check is configured for a user and revolves around the tables using a certain domain in an application. The checks are verified by simulating the user with the application data and the configured rights.
Examples of security checks:
- The user b.hanssen may never see columns with value
j.vandyk@competitor.comusing the domainemailin application 395 - myproduct. - The user s.harris may only see records with values
5,6, and7for columns using the domaincustomer_idin application 395 - myproduct. - The user s.harris may not see records with values
conceptornullfor columns using the domaininvoice_statusin application 395 - myproduct.
Configure a security check
main administratorTo configure a security check:
menu Analysis > Security checks > tab Configuration
-
Select an Application id.
-
Select a Tenant.
-
Select a User.
-
Select a Domain.
-
Select the condition for this domain:
- The user may only see records which use these values.
- The user may not see records which use these values.
- The user may only see these values in columns.
- The user may not see these values in columns.
-
Enter the Query timeout in seconds. This is the maximum time in seconds that the query may take to execute. If it takes longer than the specified time, the query is aborted (the security check is not marked as failed).
-
Optional. You can run the security check manually but also schedule it to run automatically. Select the checkbox Active to enable the schedule and set the No. of runs per day.
-
Click Save.
-
Go to the tab Values.
-
Add the database values that are relevant for the security check. Include or exclude null or empty values.
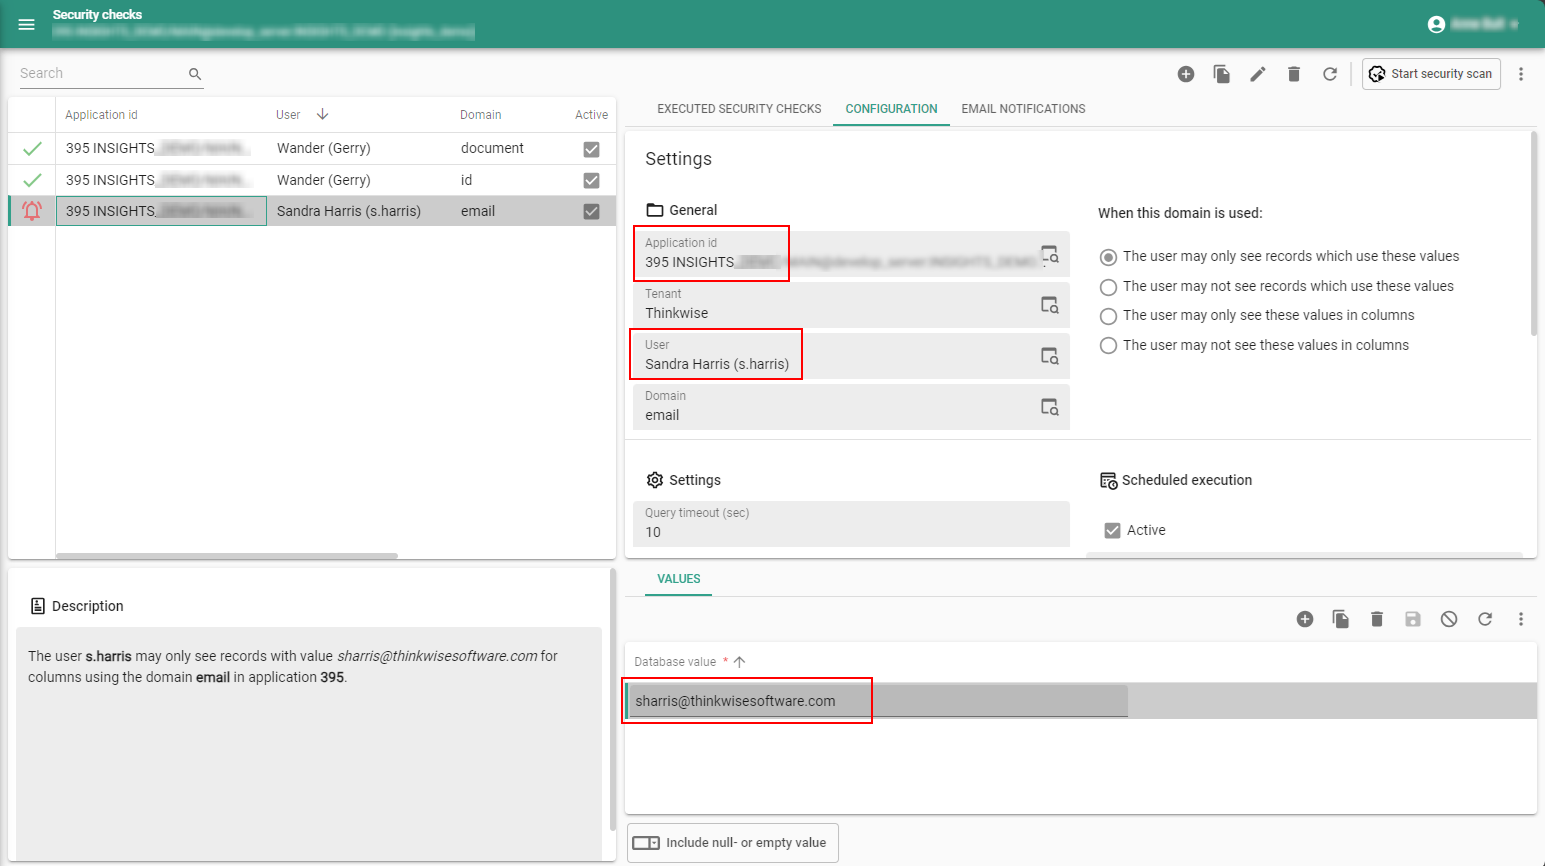 Security check configuration
Configure an email notification for a scheduled security check
main administratorThe following configuration is required to send an email notification:
- An email provider for IAM (menu Settings > Global settings > tab Email provider).
- A notification email template (menu Settings > Global settings > tab Email templates).
To configure an email notification to be sent when a security check turns up with results:
menu Analysis > Security checks > tab Email notifications
- Select a Tenant.
- Select a User. This user will receive the email notification. No administrator role is required.
Manually run a security check
main administratorYou can schedule a security check (see Configure a security check) to be executed a number of times per day but you an also run it manually:
menu Analysis > Security checks
-
Execute the task Start security scan
 .
It may take up to 15 seconds before the execution of the security check starts.
.
It may take up to 15 seconds before the execution of the security check starts.- The result of the security check is shown in tab List
- The executed steps are shown in tab Steps
- If you have configured an email notification, the assigned user will receive an email if the security check turns up with results.