OpenID (SSO)
Introduction to OpenID
What is OpenID Connect?
For more information about which authentication method to use, see Authentication.
OpenID Connect is used for user authentication. It is a secure and simple way for users to log in to your application by using an existing account (such as a Google or Facebook account), so they can access your application without needing to create a new account. This process is known as Single Sign-On (SSO). You can use it to offer your users a seamless login experience.
OpenID Connect also provides a way to collect basic user profile information in a standardized way. You can use this information to personalize the user experience in your application.
Technically, OpenID Connect is an identity layer built on top of the OAuth 2.0 protocol. OAuth 2.0 is used for authorization (granting access to resources), while OpenID Connect is used for authentication (verifying the identity of a user). An issuer is an entity that issues tokens to clients. It is a URL that uniquely identifies the OpenID Provider.
Microsoft provides a good explanation of OpenID Connect in their documentation.
 A login screen with multiple OpenID providers
OpenID Connect in the Thinkwise Platform
The Thinkwise Platform can be used as the OpenID client or as the OpenID provider:
-
If you use an external OpenID identity provider (such as Microsoft, Google, GitHub, or Facebook) to grant users access to your Thinkwise application, the Thinkwise Platform acts as the OpenID client. This setup is described in this guide, see:
-
If you use the Thinkwise Platform to grant users access to your application, the Thinkwise Platform acts as the OpenID provider. In that case, the Thinkwise Platform allows external websites to authenticate the accounts registered in IAM. This setup is described in the Client applications guide.
OpenID providers
Register an OpenID identity provider
Indicium main administratorOpenID Connect defines several authentication flows, but only Identity Providers that use the OAuth Authorization code grant type can be
integrated into Indicium.
It is possible to integrate multiple external Identity Providers.
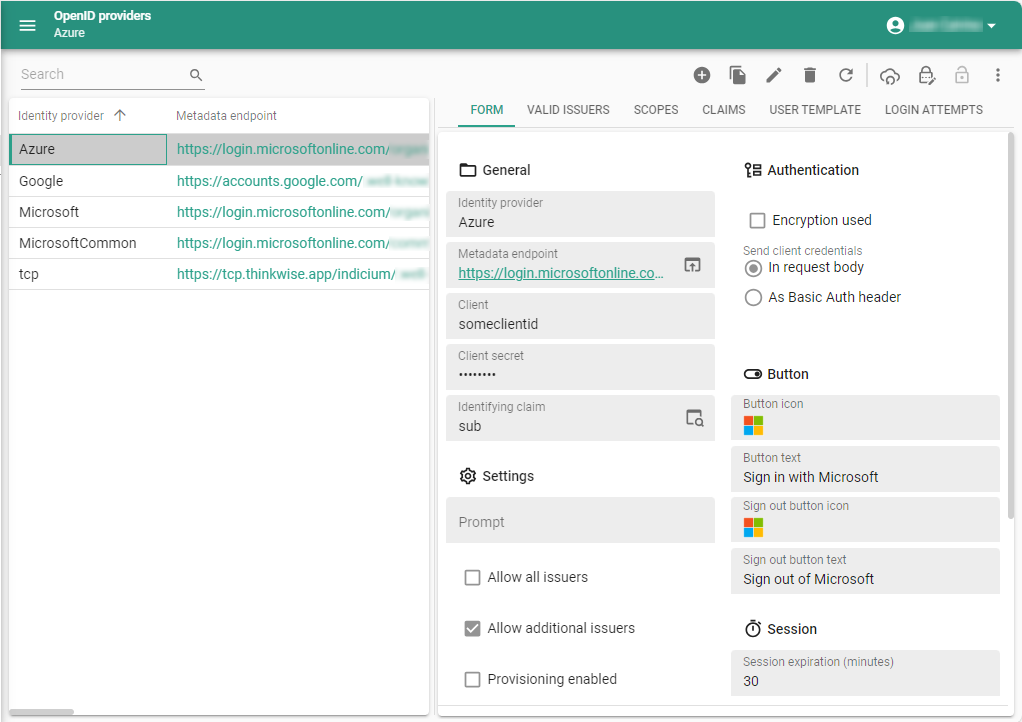
To register an OpenID identity provider:
menu Authorization > OpenID providers > tab Form
-
Enter an Identity provider name. You can freely choose a name for each configuration, for example, "Microsoft", "Google", or "Azure AD".
-
Enter the following information that you can find in the configuration of the OpenID provider that you want to use. For more information about how to find this information in some common OpenID providers, see OpenID providers.
- Metadata endpoint - the location of the OpenID configuration at the identity provider's server. This URL always ends with
/.well-known/openid-configuration. - Client ID - a unique identifier for the client application (i.e. the application for which you are setting up SSO).
- Client secret - a secret known only to the client application and the authorization server.
- Metadata endpoint - the location of the OpenID configuration at the identity provider's server. This URL always ends with
-
Select an Identifying claim. When the identity provider receives proof of authentication, IAM uses the identifying claim to find the user. Generally, you should select the sub claim here. Only deviate from sub with caution. See Identifying claim to find a user.
warningThis field is filled automatically with the value
subwhen you save the form. Check if this value is correct for your situation. If necessary, change it to another claim. -
The other fields and settings are optional and can be configured as needed:
- Prompt - select what happens when a user logs in with an OpenID identity provider.
- Allow all issuers - allow everyone to log in.
- Allow additional issuers - limit who can log in. An extra user setting is required.
- Provisioning enabled - automatically create and update users. Use this when you have allowed everyone to log in.
- Encryption used - encrypt the client secret.
- Send client credentials - how the client credentials are communicated to the identity provider.
- Button - select an icon and text for the sign-in and sign-out buttons.
- Session expiration - how long users can remain idle before they have to re-authenticate.
You can configure which OpenID providers are available for a specific domain. This allows you to tailor the login experience for different customers who may have different requirements or preferences. For more information, see Set up login pages with web domains.
 Register OpenID providers
Add redirect URLs for your OpenID provider
In the portal of your OpenID provider, you have to configure the login and logout call:
- Post sign-in redirect URL:
/signin-{name}- where{name}is the name of the Identity Provider in IAM. - Post sign-out redirect URL:
/signout-{name}- where{name}is the name of the Identity Provider in IAM.
Examples:
http://{server_address}/{indicium_name}/signin-Microsofthttp://{server_address}/{indicium_name}/signout-Microsoft
Encrypt a secret
Indicium 3-tier IAM in the Universal GUI main administratorYou can encrypt the client secret for OpenId providers in the database.
Encryption is only available in a 3-tier setup, where the Software Factory and IAM are used in the Universal GUI. It is not available for the Software Factory and IAM for the 2-tier Windows GUI because it requires Indicium support and configuration.
Prerequisite for storing a client secret: configure the encryption in Indicium (appsettings.json) for the platform you are using.
See Indicium encryption.
To store the client secret for OpenId Providers:
menu Authorization > OpenID providers > tab Form
- Execute the task Encrypt OpenID provider
 to add an encrypted client secret to a provider.
Identifying claim to find a user
Indicium main administratormenu Authorization > OpenID providers > tab Form
IAM uses the value of the Identifying claim (the user ID or the user's email address) to find the user.
- sub (meaning: subject) - Generally, you should select the sub claim here. Only deviate from this with caution.
- Azure AD The sub claim is unique for each application in the Azure AD tenant. Instead, you could use oid (meaning: object id), which is a unique identifier for the user across applications in the Azure AD tenant. The profile scope is required to receive this claim. See also the Microsoft documentation about ID token claims.
- email - If the email address is a valid identification for users in IAM, you may choose to select email as an identifying claim.
- Be careful using email when provisioning is enabled because the user's email address may change over time. If that happens, the system will treat it as a different user.
- It is also possible to use an entirely different claim to match the authenticated user to an IAM account. The same rule applies: use with caution.
Client credentials communication
Indicium main administratorThe client ID and secret can be communicated to the identity provider in the request body or as a header. Most providers (for example, Azure AD) support both.
To select how the client credentials are communicated to an identity provider:
menu Authorization > OpenID providers > tab Form
- Select In request body or As Basic Auth header.
Allow who can log in
Allow everyone to log in
Indicium main administratorIf you are using Microsoft Entra as an OpenID provider, and you do not know who is going to log in to your application, you can create a public login screen. Use this, for example, in a business-to-anyone, a business-to-business, or a business-to-consumer situation.
To allow everyone to log in:
menu Authorization > OpenID providers > tab Form
- Check that you use a Metadata endpoint with a
common,organizations, orconsumerstenant. See Microsoft Entra endpoints. - Select the checkbox Allow all issuers.
Limit who can log in
Indicium main administratorIf you are using Microsoft Entra as an OpenID provider, and have two or more tenants, you can limit who can log in to your application.
To restrict who can log in to your application:
menu Authorization > OpenID providers > tab Form
-
Check that you use a Metadata endpoint with an
organizationstenant. See Microsoft Entra endpoints.tipIf you only have one tenant, use the
GUIDreference to your tenant in the metadata endpoint instead of theorganizationstenant. If you use theGUIDreference, clear the checkboxes Allow all issuers and Clear all issuers. -
Select the checkbox Allow additional issuers and save this setting.
-
Go to the tab Valid issuer and add two or more issuers. Issuers are the URLs that uniquely identify the OpenID Provider.
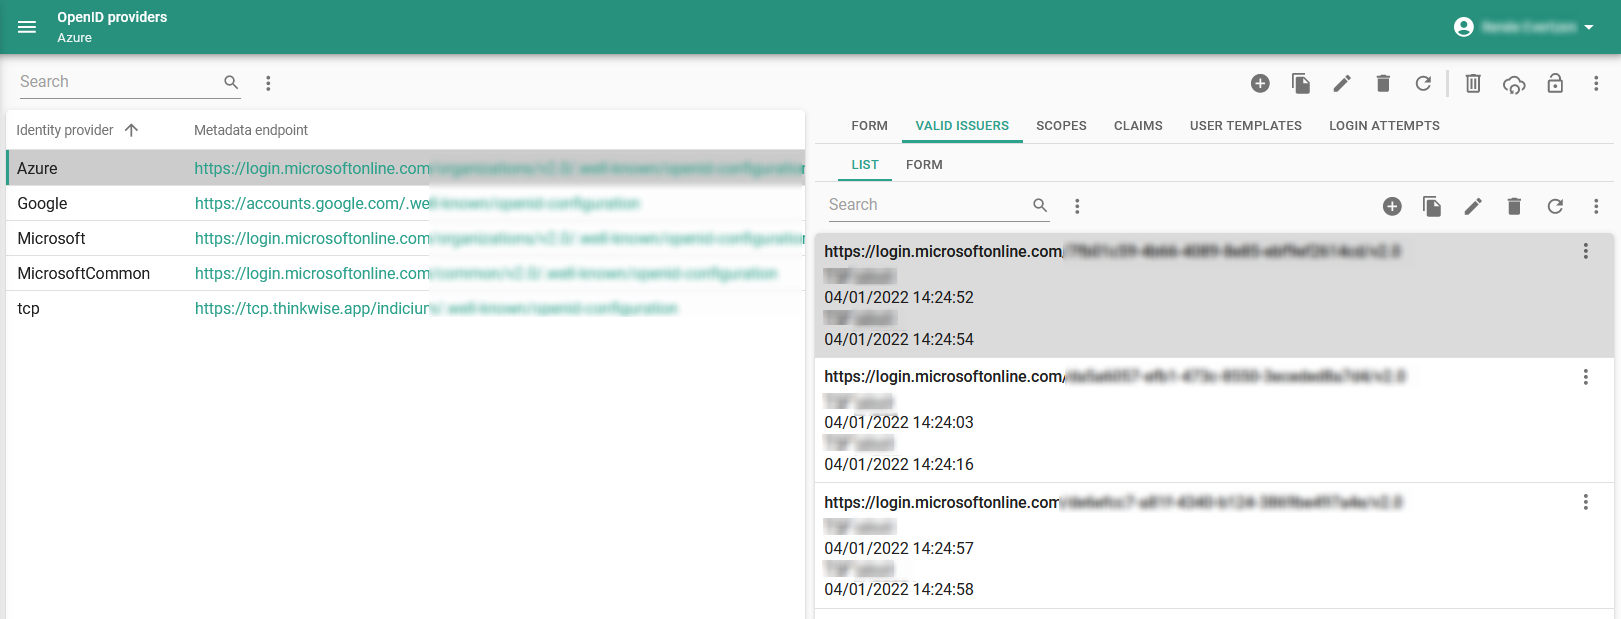 Valid issuers
Allow existing users to log in with an OpenID provider
Indicium main administratorIf you have an existing user base in IAM, you need to allow these users to log in with an OpenID provider:
menu Authorization > Users > tab Form
-
Select the user.
-
In the group Authentication, select External.
-
Optional: in the field Identity provider, select the OpenID provider that the user should use to log in.
- If you select an identity provider: the user can 3-tier log in with the selected provider using OpenID Connect, or 2-tier with an Azure DB and a Microsoft Entra ID.
- If you leave the field empty, the user can only log in 2-tier with an Azure DB and a Microsoft Entra ID.
Provisioning
Enable provisioning
Indicium main administratorWith provisioning, users are automatically created and updated based on the information provided by the OpenID provider when a user logs in. Before you enable provisioning, you can configure a template.
To enable provisioning:
menu Authorization > OpenID providers > tab Form
- Select Provisioning enabled.
For extensive information about provisioning, see Provisioning.
Login screen
Login screen for OpenID identity providers
An environment can support both local (IAM, database or Windows authentication) and external accounts (via one or more OpenID Identity providers). In that case, Indicium will show a login screen like the one below:
- If only one option is available, this login screen will not be shown at all. Instead, the only option will be handled as the default option. This allows for a seamless single sign-on experience where the user is always directly guided to the OpenID Provider during the authentication process.
- Remember my choice - a user can select this checkbox to set a cookie for skipping the login page the next time. This way, each user can make their own choice.
You can customize login pages for different customers or scenarios by using Web domains. For more information, see Set up login pages with web domains.
 Multiple login options allowed
Prompt for OpenID login
Indicium main administratorTo select what happens when a user logs in with an OpenID identity provider:
menu Authorization > OpenID providers > tab Form
-
Select a Prompt:
- Consent - Opens a consent dialog after signing in, asking the user to grant permissions.
- Login - Forces the user to enter their credentials, undoing single sign-on.
- Select account - Sends the user to an account picker where all accounts remembered in the session will appear.
- If left empty, the server decides. This offers a seamless login if a user is logged in already.
Buttons for signing in or out
Indicium main administratormenu Authorization > OpenID providers > tab Form
The following button options are available:
| Option | Description |
|---|---|
| Sign in button icon | Select an icon for the sign-in button. |
| Sign in button text | Select a text for the sign-in button. |
| Sign out button icon | Select an icon for the sign-out button. |
| Sign out button text | Select a text for the sign-out button. |
If you clear both the Sign out button icon and the Sign out button text, the sign out button will not be displayed. This is useful if your OpenID provider does not support signing out.
Sessions
Session expiration
Indicium main administratorYou can specify how long users can remain idle before the session expires and re-authentication is required. The default is 30 minutes.
To change the session expiration period:
menu Authorization > OpenID providers > tab Form
- Enter a value in the field Session expiration.
The OpenID provider may also have its own authentication session expiration settings. These settings only affect the user's session with the OpenID provider, such as the ability to quickly re-authenticate with it.
Log for OpenID
Indicium main administratorA log for login attempts is available, showing all attempts and providing extra information about any provisioning.
menu Authorization > OpenID providers > tab Login attempts
Here, you can also find errors that occurred during the creation or update of a user.
If an error occurs, a user will not be able to log in, but for one exception - when provisioning only fails to update the user's first- or last name, the login will continue as these values are not paramount for authentication or security.
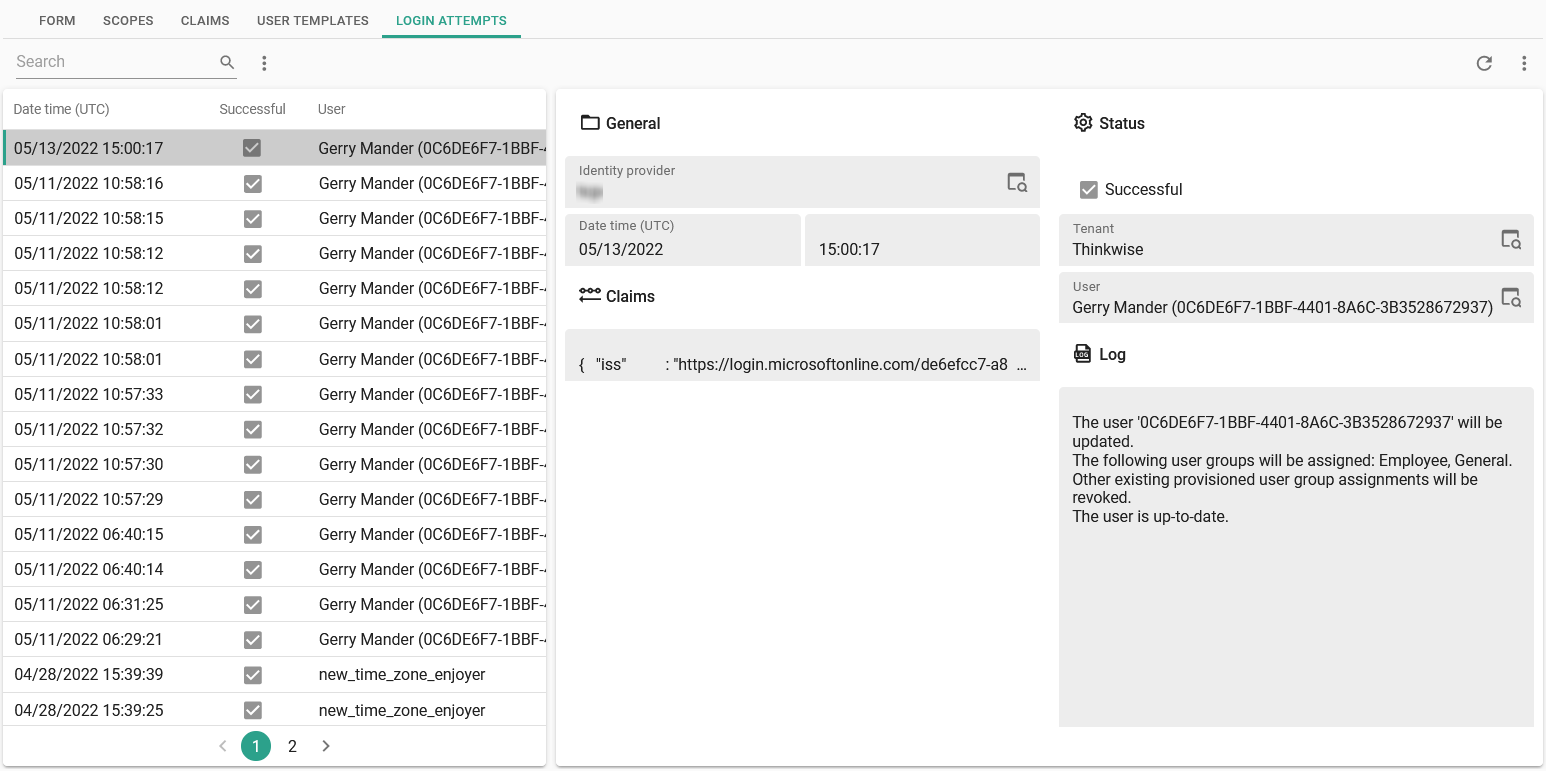 Login attempts