Certificate storage for client applications
Introduction to certificate storage for client applications
Indicium automatically creates certificates for client applications that have been configured in IAM. The Thinkwise Platform has several options for centralizing the storage of these certificates.
Due to license restrictions for the external IdentityServer component, a maximum of five client applications are allowed. Please contact Thinkwise if you need more than five client applications.
Token certificates in Azure
When Indicium is used as an OpenID server, it must add a signature to the access token to prove that it was created by an authorized Indicium instance. Indicium automatically creates a certificate that is used to sign the access token if OpenID clients are configured in IAM.
By default, Indicium stores this certificate locally, on the web server. In the case of a single Indicium instance (i.e. not load-balanced) this will work fine. However, when there are multiple instances of Indicium, the certificate must be stored elsewhere, since all servers must use the same certificate. If not, the access tokens created by instance A will not be authorized by instance B (or vice versa). Should the certificate be lost or replaced, all access keys will become unusable, but they can be easily requested again by the third party.
This manual describes how to centralize the storage of this certificate in Azure.
When using Indicium on Azure, the Server certificate must be stored in a Key Vault.
Create a Key Vault for certificates
-
Create a Key Vault on the Azure Portal.
-
Add an "Access Policy" to it to allow the Indicium instance Web App access.
-
Select the Identity menu in the Indicium Web App.
-
Check whether the Identity setting System Assigned is enabled.
-
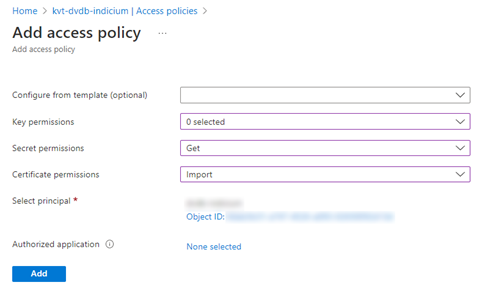
In the Key Vault, select +Add Access Policy from the Access Policy menu on the left-hand side.
-
In the Secret permissions field, select the "Get" permission.
-
In the Certificate permissions field, select the “Import” permission.
-
In the Select principal field, select your Indicium Web App.
-
Click Add. You are automatically returned to the Access Policy screen.
-
Click Save to save the new access policy.
 Add access policy
Add certificate settings to Indicium
To use the newly created Key Vault, you must set the KeyVaultCertificateUrl setting in the Indicium Web App.
In the appsettings.json configuration file, this KeyVaultCertificateUrl setting can be configured directly:
  "OpenIDServerSigningSettings": {
    "AzureKeyVault": {
      "KeyVaultCertificateUrl": "<key vault certificate url>"
    }
  }
Alternatively, you can store this setting in the App Service:
-
In the App Service, select Settings > Configuration from the menu.
-
Add the following Application settings:
Name: OpenIDServerSigningSettings:AzureKeyVault:KeyVaultCertificateUrl
Value: https://<name-of-the-key-vault>.vault.azure.net/certificates/<openid-server-certificate-name>
You can add a name to the certificate. This is how it will appear in the Azure Key Vault after it has been created by Indicium. It will be created only if OpenID clients are configured in IAM.
-
To allow Indicium to generate the certificate, add setting: website_load_certificates with value “*”.
-
Restart Indicium. This is required to automatically create the signing certificate.
Token certificates in AWS
When Indicium is used as an OpenID server, it must add a signature to the access token to prove that it was created by an authorized Indicium instance. Indicium automatically creates a certificate that is used to sign the access token if OpenID clients are configured in IAM.
By default, Indicium stores this certificate locally, on the web server. In the case of a single Indicium instance (i.e. not load-balanced) this will work fine. However, when there are multiple instances of Indicium, the certificate must be stored elsewhere, since all servers must use the same certificate. If not, the access tokens created by instance A will not be authorized by instance B (or vice versa). Should the certificate be lost or replaced, all access keys will become unusable, but they can be easily requested again by the third party.
This manual describes how to centralize the storage of this certificate in AWS.
Sign certificates on AWS
When using Indicium as an OpenID Server on AWS, Indicium can store the Server certificate in the AWS Secrets Manager.
To give the Elastic BeanStalk EC2 instance access to the Indicium OpenID Server certificate:
-
In your Elastic Beanstalk EC2 instance, select the Security tab.
-
Click the Identity and Access Management (IAM) link.
-
Click Add permissions.
-
Click Create inline policy.
-
In the JSON tab, paste the JSON code fragment below.
-
Click Save to save the new policy. Indicium can now access the AWS Secrets manager.
{
    "Version": "2012-10-17",
    "Statement": [
        {
            "Sid": "VisualEditor0",
            "Effect": "Allow",
            "Action": [
                "secretsmanager:GetSecretValue",
                "secretsmanager:CreateSecret"
            ],
            "Resource": "arn:aws:secretsmanager:<region>:<account-id>:secret:<secret-prefix>-*"
        }
    ]
}
In the above JSON code fragment:
- Replace
regionwith, for example, “eu-west-1”. - Replace
account-idwith your account number. - Replace
secret-prefixwith the prefix you want your OpenID Server certifcate in the Secrets Manager to be named.
For example, if your prefix is “indicium/openid-server-test”, you should give access to “indicium/openid-server-test-*” with the wildcard character.
- In the
appsettings.jsonconfiguration file, add the following code:
  "OpenIDServerSigningSettings": {
    "AwsSecretManager": {
      "SecretName": "indicium/openid-server-test"
    }
  }
Token certificates on-premise
When Indicium is used as an OpenID server, it must add a signature to the access token to prove that it was created by an authorized Indicium instance. Indicium automatically creates a certificate that is used to sign the access token if OpenID clients are configured in IAM.
By default, Indicium stores this certificate locally, on the web server. In the case of a single Indicium instance (i.e. not load-balanced) this will work fine. However, when there are multiple instances of Indicium, the certificate must be stored elsewhere, since all servers must use the same certificate. If not, the access tokens created by instance A will not be authorized by instance B (or vice versa). Should the certificate be lost or replaced, all access keys will become unusable, but they can be easily requested again by the third party.
This manual describes how to centralize the storage of this certificate on-premise.
Sign certificates on-premise
When using Indicium as an OpenID Server in a VM, the certificate is automatically created in the Certificate Store. If you have multiple servers behind a load balancer, you must synchronize this IndiciumOpenID certificate manually, as follows:
- Export the IndiciumOpenID certificate from one web server.
- On each other web server, overwrite the IndiciumOpenID certificate with the exported one.
You must also set Load User Profile to true:
-
In IIS, right click on your Application Pool.
-
Open the Advanced Settings.
-
Set Load User Profile to True.
Sign certificates on-premise with Azure Key Vault
You can also use on-premise with Azure Key Vault. This consists of:
- Create a new "App registration" in the Azure portal.
- Create an Azure Key Vault.
- Configure some settings in the
appsettings.jsonconfiguration file.
- In Azure Active Directory, select App registrations to create the registration.
After creating the registration, you can find the Application (client) ID and the Tenant id in the Overview menu. These IDs will be used later.
-
From the Certificates & secrets menu, add a new "Client secret".
-
Copy or make a note of the secret value (not the secret id), this value is used in the last step.
-
Create a Key Vault from the Azure Portal.
-
Add an "Access Policy" to it to allow the Indicium instance Web App access.
-
In the Key Vault, select +Add Access Policy from the Access Policy menu on the left-hand side.
-
In the Secret permissions field, select the "Get" permission.
-
In the Certificate permissions field, select the “Import” permission.
-
In the Select principal field, select the "App registration" you created in the first step.
-
Click Add. You are automatically returned to the Access Policy screen.
-
Click Save to save the new access policy.
-
To use the newly created Key Vault, add the following section to the
appsettings.jsonconfiguration file, and specify the values for TenantId, ClientId, and ClientSecret.
  "OpenIDServerSigningSettings": {
    "AzureKeyVault": {
      "TenantId": "<tenant id>",
      "ClientId": "<client id>",
      "ClientSecret": "<tenant id value>",
      "KeyVaultCertificateUrl": "<key vault certificate url>"
    }
  }
OAuth 2.0 Bearer Tokens
IndiciumA client application configured in IAM can be used to request JSON Web Tokens (JWT). Users can use these tokens for the OAuth Bearer authentication scheme. The tokens usually contain a set of claims for resources. A user needs to grant an application access to these resources through a scope.
For example, for a client application with OpenID Connect authentication:
To get access to the claims that will be sent with OpenID, an application requests the access token endpoint for the openid scope.
If the consent page is enabled for the client application in IAM,
the user sees a page with the scopes to which the requesting application requires access.
If the user grants access to the listed scopes,
the application will receive an access token that it can use to make further requests on the user's behalf.
OAuth 2.0 can request additional scopes for a user. Currently, the following scopes are available:
- Support API access (
full_api_access) - Grants access to all the APIs available to the user. Access tokens are valid for one hour. - Support refresh tokens - Requests a new access token for OAuth if the old one is expired.
For more information about client application settings and scopes, see the Client applications guide.
If bearer tokens are used, you must add the external URL of Indicium as the authority for which the bearer tokens are valid. This is explained in the example below.
OAuth Bearer token example
To enable authentication through OAuth 2.0 Bearer Tokens, first configure the client application with OpenID Connect in IAM:
menu Client apps > Client applications
-
Select a client application that uses the Authorization code grant type.
-
Select the Support API access checkbox. This enables the
full_api_accessscope. -
Save this setting and navigate to tab Secrets.
-
Add a client secret.
-
On the tabs Allowed login redirects and Allowed logout redirects, add redirect URIs. This configuration acts as a whitelist of URLs that a third-party client can redirect back to after the access token request.
-
Save this configuration.
Then, configure the Authority URL:
-
Open Indicium's
appsettings.json. -
Add the location of the Authority, which is the external URL to Indicium, using the
BearerTokenAuthoritykey. This Authority URL uses 'HTTPS', e.g.:
{
  "BearerTokenAuthority" : "https://localhost:5001"
}
- Then, request an access token. In this example, the API tool 'Insomnia' has been used:
Example request for an access token (used API tool: Insomnia)
-
Grant type: Indicium uses the OAuth 2.0 Authorization Code flow which exchanges an authorization code for a token. For more information, see https://auth0.com/docs/flows/authorization-code-flow. You can use PKCE if the client is deemed insecure.
-
Authorization URL: to retrieve an authorization code via the browser. It involves authentication via the login prompt and (when required) consent. You can retrieve the Authorization URL by calling the following endpoint on the
Authority URL:<Authority URL>/.well-known/openid-configurationTypically, the authorization URL looks like this:
/connect/authorize -
Access token URL: to retrieve the access token. Just like the Authorization URL, you can retrieve the Access Token URL by calling the following endpoint on the
Authority URL:/.well-known/openid-configurationTypically, the Access token URL looks like this:
/connect/token -
Client ID, Client secret, and Redirect URL: client information stored in IAM.
-
Scope: This should include
full_api_accessto obtain an Access Token that gives API access. Other scopes, such as OpenId, profile, email, etc., can be requested simultaneously if necessary.
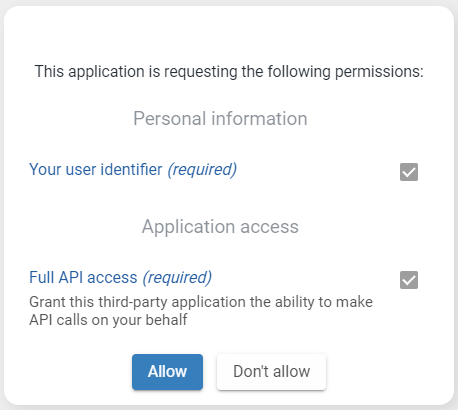
If the client application in IAM has been configured to require consent, the following consent page will appear. Only after the user's consent, Indicium will hand out the access token.
 Consent page