Universal GUI setup
Quick reference guide to the Universal GUI setup
Instead of using the Deployment Center, this document describes how to deploy your application with the Universal GUI manually (on premise).
To deploy Universal GUI in the cloud:
| Follow these steps to deploy your application with the Universal GUI on premise: |
|---|
| Check - Before you start, check if your systems meet the prerequisites. |
| Download - Download Universal GUI and save the files. |
| Configure IIS - Create an application pool for Indicium. |
| Deploy Indicium - Create the web application for Indicium. |
| Deploy - Deploy Universal GUI on the same server as Indicium. |
For a video (in Dutch) on how to manually deploy Indicium with the Universal GUI on premise, see: Masterclass Indicium. It is an extensive video that first covers Indicium and then the Universal GUI deployment (1:14).
Prerequisites
There are a few prerequisites to be able to run the Universal GUI.
| Required | More information |
|---|---|
| Indicium | The Universal GUI uses a dedicated version of Indicium. Make sure to download and install the latest version of Indicium Universal in TCP (menu Software > Thinkwise products). |
| Thinkwise platform | Check the Lifecycle policy for an overview of the supported platform versions. Ensure you also have the latest hotfixes applied and the latest version of Indicium installed. Applying further hotfixes or installing a subsequent version of Indicium might require an updated version of the Universal GUI as well. The latest version of the Universal GUI, along with the latest version of Indicium Universal and the most recently published hotfixes can be found in the Thinkwise Community Portal. |
| Browser | A modern browser is required to access the Universal GUI. A recent version of Chrome, Firefox, Edge or Safari mobile is required. Using the Universal GUI with IE is not supported. |
| Note: When using Google Chrome with an iOS device, the Add to home screen option is not available. With Safari, it is possible to add your application to the home screen. |
Download and save Universal GUI
When all prerequisites mentioned above are met:
-
Download the Universal GUI in TCP - Thinkwise products (menu Software > Thinkwise products) and save it without extracting it.
-
The download contains a
config.sample.jsonfile:- For a new deployment, rename
config.sample.jsontoconfig.jsonand use it to add your preferred settings. You can find all settings and their options at Configuration settings for the Universal GUI. - For existing deployments, you can keep your previously renamed
config.jsonfile.
- For a new deployment, rename
Setting up the Universal GUI
The easiest way to run the Universal GUI is to deploy it on the same server as Indicium. This is described in this manual.
However, it could also be an allowed origin in the appsettings.json file.
Browser security prohibits the Universal GUI from interacting with an Indicium on a different server by default. If required, Indicium settings can be configured to support this scenario.
The Universal GUI is accessed by a web browser, but can also be deployed as a Progressive Web App.
Web browser setup
Indicium is mandatory to use the Universal GUI and most Indicium installations are currently deployed on IIS. Deployment of the Universal GUI on IIS is shown as an example. Any webserver capable of serving static files can be used to deploy the Universal GUI.
If this is not configured correctly, the application will not contain the correct fonts, not load the correct configuration, and both the barcode scanner and the cortex barcode scanner will not work.
-
Place the unzipped Universal GUI folder next to Indicium. A common location for the Universal GUI would be in the
inetpub\wwwrootfolder.Do not convert the Universal GUI folder to an application, as it is a static website. So, no application pool is required.
 Location of the Universal GUI on an IIS server, next to Indicium
Be careful when deploying two Universal GUI instances on the same server. When two Universal GUI instances are accessible on the same (sub)domain, browsers will share the cache containing the Indicium URL, platform and application between the two Universal GUI instances.
- IIS is not configured by default to serve certain types of static content. Configure the MIME Types of the server to serve the following types:
| Extension | MIME Type |
|---|---|
| .json | application/json |
| .wasm | application/wasm |
| .woff2 | application/font-woff2 |
| .mjs | application/javascript |
| .ftl | application/octet-stream |
 The .json extension configured to be served by IIS
Settings for the Universal GUI login screen
The Universal GUI can be accessed by using a browser to access the location of the web application.
In the example above, this would be https://server/universal.
A login screen will be shown where the URL to access Indicium can be configured.
The Universal GUI shows the name of the logged-in user on the screen. That name is retrieved from the Software Factory, menu Maintenance > Users > field Name.
To configure the login options in the config.json:
- To disable the Options in the Login screen, set
"loginOptionsDisabled": true. - To hide the Options in the Login screen, set
"loginOptionsHidden": true. - To hide the Remember me option in the Login screen, set
"loginRememberMeHidden": true. - To specify the Application option in the Login screen, set
"defaultApplication": <ApplicationID>, whereApplicationIDis the id of the GUI application to load. This can be overwritten by the user. The default is an empty string, which loads all available applications. - To specify the Platform option in the Login screen, set
"defaultPlatform": <PlatformID>, wherePlatformIDis either Universal (3, default), Windows (0), or Web (1). - To specify the authentication provider that can be used, set
"loginProviderHint": <Provider>, where<Provider>is a comma-separated list of one or more authentication providers, for example,Google, Facebook, AzureAD.loginProviderHintis an optional setting. If you do not set it, all configured options are shown. - To allow local sign-in, add
localLoginto the list of authentication providers inloginProviderHint. If only local login is available, the login screen will be shown directly without redirecting to Indicium.
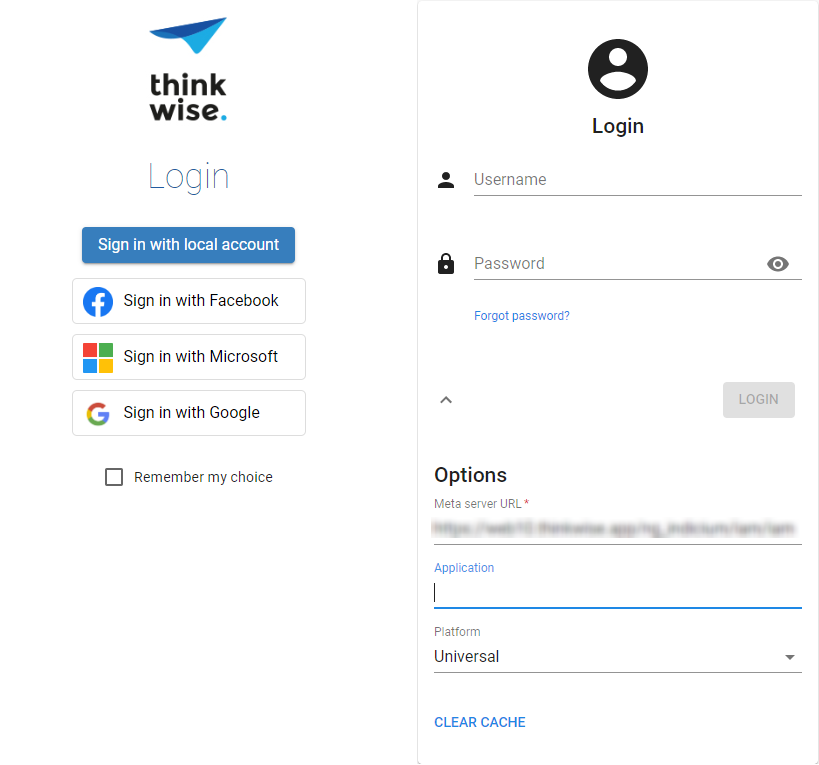 Login screens of the Universal GUI. Left: authentication providers. Right: local login.
Running the Universal GUI on IAM
When Indicium is configured on an IAM containing one or more applications for the user, the following Meta server URL can be used to run products present in the Software Factory:
https://server/indicium/iam/iam
- Make sure you use https, not http.
- The last part is the application you wish to load the model from, so it's either
/iam/sfor/iam/iam.
Use the Application or alias to load only a specific application from IAM. If left empty, the default application will be shown, and the other applications will be available through the menu.
The Platform can be chosen by the user to load the menu for either Universal, Windows, or Web.
The file config.json can be edited on the webserver to have the Universal GUI point to the correct URL,
application and platform default and to optionally disable editing the options from the login screen.
The platforms are defined as such:
| Platform | Config entry |
|---|---|
| Windows | 0 |
| Web | 1 |
| Mobile | 2 (deprecated) |
| Universal | 3 |
Running the Universal GUI directly on the Software Factory
To run products in a development environment directly on the Software Factory, Indicium must be configured on the IAM containing the Software Factory, often referred to as an IAM_DEV.
The following URL can be used to run products present in this Software Factory: https://server/indicium/iam/sf.
The application ID or alias provided in the login configuration screen should match an application ID or alias present as a Runtime configuration in the Software Factory. When no application ID or alias is provided, all active runtime configurations for the current user will be shown in the menu as applications. The desired runtime configuration(s) can be activated in the Software Factory for the user logging in to the application.
The user can log in using the credentials as configured in IAM. The same user has to be present in the Software Factory. The RDBMS user name in the Software Factory has to be the same as the user name in IAM.
Installation as a web app
The application can be installed as a Progressive Web App (PWA), which means it can be installed to run stand-alone on the user's device by supported platforms and browsers, acting just like a native desktop or mobile app. It is a web application using static files. Besides the HTTP server, no further application process is running.
- For more, general information on this subject: Progressive Web App (PWA).
- Check the instructions for installing PWAs for your browser, e.g. Chrome, or device.
By default, users can install an application with a Universal GUI as an app on their home screen. On platforms that support direct installation, this is a menu option in the user settings after the user has logged in via the browser. On platforms that do not support this, the user will get installation instructions.
Direct installation is not supported by Google Chrome in iOS.
Settings for a web app
All the necessary settings for deploying a PWA are available in the manifest.json file, which is deployed alongside Universal GUI.
So, when a user decides to install the Universal GUI on their home screen, it will show the correct title and images.
When you replace the Universal GUI with a newer build, exclude the manifest.json file and your icons, or they will be overwritten.
For more information about the manifest.json file, see:
- https://web.dev/add-manifest/
- https://developer.mozilla.org/en-US/docs/Mozilla/Add-ons/WebExtensions/manifest.json
For more information about settings for the Universal GUI in the manifest.json file, see:
Disable installation notification for users
To inform your users that it is possible to install your application on their home screen, a notification is shown by default. To disable this notification:
-
Inside the Universal folder, open the
config.jsonfile. -
At option
installNotificationDisabled:- Set to
trueto ignore the install notification. - Set to
falseto show the install notification (default).
- Set to
The install notification is not always shown to the user: after they either installed or canceled, the notification will be suspended for 30 days. After the 30 days have passed, the user will one again receive an install notification.
To change this timeframe:
- Inside the Universal folder, open the
config.jsonfile. - Add option
installNotificationExpirationInDaysand set the number of days.
Configuration settings for the Universal GUI
The following configuration settings are available for the Universal GUI. You can add these settings to the config.json file.
| Parameter | Description |
|---|---|
allowedHTMLURIPrefixes | Sets the list of allowed HTML protocols. |
barcodeScannerSymbologies | Sets the supported symbologies for the barcode scanner. |
chartDefaults | Add any Fusion Chart configuration property to a chart. See Configure chart properties. |
cortexEnabledSymbologies | Sets the enabled symbologies for the Cortex barcode scanner. |
cortexLicense | Sets the license key for the Cortex barcode scanner. |
debugMode | Enable the debug mode to help add breakpoints or to use Model insight. |
defaultApplication | Sets the id of the GUI application to load, and the corresponding option in the Login screen. |
defaultPlatform | Sets the default platform to load (default Universal), and the corresponding option in the Login screen. |
enableApplicationSearch | Adds a search bar to the Application switcher. See Switch to another application. |
enableDragDrop | Set this option to true to enable drag and drop in the grid. |
enableSkeletonScreens | Set this option to false to use a spinner instead of a skeleton screen (default) when loading. A skeleton screen means that the application or screen is loaded first with empty/grey fields. |
gridDisableRowSwitchDebounce | Process the first row switch in a sequence immediately instead of waiting. See Improve grid performance for mobile devices. |
gridRowBuffer | Sets the number of rows the grid displays outside the visible area. See Improve grid performance for mobile devices. |
installNotificationDisabled | Disable the notification about the possibility to install the application on the home screen. See Installation as a web app. |
installNotificationExpirationInDays | Sets the number of days to suspend the install notification after installation or canceling. See Installation as a web app. |
loginAuthProviderHint | Provide Indicium with a hint about which authentication provider(s) should be used in the Login screen. |
loginOptionsDisabled | Disable the Options in the Login screen. |
loginOptionsHidden | Hide the Options in the Login screen. |
loginRememberMeHidden | Hide the Remember me option in the Login screen. |
searchDebounceTime | Sets the search debounce time (in milliseconds) for non-mobile devices. |
searchDebounceTimeMobile | Sets the search debounce time (in milliseconds) for mobile devices. |
serviceUrl | Sets the service URL used by Indicium. For details, see, for example, here (deploying on Azure) or here (deploying with Amazon AWS). |
spacingMode | Sets the default spacing mode (compact or comfortable). |
useFormFieldBackgroundColor | Use the default background color for form fields. |
Allowed HTML protocols
The Universal GUI filters HTML to prevent some types of attacks by malicious input or scripts. Protocols for links in the HTML control, for example, are also filtered.
By default, the list of allowed protocols contains: HTTP, HTTPS, mailto, tel, sms, cid.
You can add more protocols to the filter to include more applications, such as Viber or VSCode.
To allow the Viber and VSCode protocols, add the following option to the config.json file:
allowedHTMLURIPrefixes: "vscode, viber"
The allowedHTMLURIPrefixes option is optional.
There is no need to include the default protocols in the config.json file. They are added automatically.
Delayed search
When you type into the search field, the search starts a moment after each keystroke if no new keystroke occurs. This is called the debounce time.
Since typing on a mobile device or touch keyboard can be slower, search results may update too quickly after each keystroke.
To prevent this, you can delay searching by configuring this debounce time in the config.json file.
Settings for config.json are:
searchDebounceTime- in ms, with a default value of 300 ms and a minimum value of 300 ms.searchDebounceTimeMobile- in ms, with a default value of 600 ms and a minimum value of 300 ms.
Improve grid performance for mobile devices
Universal GUIFor applications running on mobile devices with low hardware specifications, record changes and scrolling in a grid can be slow.
To improve the performance, you can use these parameters in the configuration file config.json:
| Parameter | Description | Options |
|---|---|---|
gridDisableRowSwitchDebounce | When set to true (on any device), or "mobile" (while working on a mobile device), the first row switch in a sequence of row switches will be processed immediately instead of waiting for the 300 ms debounce timeout. | true false "mobile" |
gridRowBuffer | Sets the number of rows the grid displays outside the visible area. The default is 10. For example, if a grid shows 30 rows (the number of rows that fits on your screen without scrolling), the grid will render 50 rows in total (10 extra rows before and 10 after). When scrolling, 10 rows can be displayed immediately, so the user will not see any redraw. Setting a low row buffer makes the initial loading of the grid faster (for example, when data is first loaded, or after filtering or grouping), but may slow down scrolling. Setting a high row buffer makes scrolling smooth because more rows have been drawn before the scrolling occurs. | any number. default 10 |