MCP in the Thinkwise Platform
MCP (Model Context Protocol) is an open standard that lets AI agents connect to your applications. AI agents are AI systems that autonomously take actions, use tools, and complete multi-step tasks to achieve a goal. An AI agent uses an LLM (Large Language Model) as its underlying model, but it can do more than generate text based on a prompt. The Thinkwise Platform also offers LLM connectors, which you can use in system flows to add generative AI to your application. For more information on LLMs, see Generative AI.
AI agents connected to the Thinkwise Platform are constrained by access delegation roles in IAM. This means they can only access the data and perform actions that you give them permission for. When the AI agent connects to your application for the first time, Indicium provides it with a token that is scoped to the roles you authorized for it. Every request after that is checked by Indicium against your IAM roles before the AI agent can perform any action.
Once authorized, AI agents can perform various actions in your application, such as:
- Interactive search and analysis of application data. For example, analyze sales data and create quarterly reports, or discover trends in customer behavior.
- Perform actions in your application. For example, book hours or process a meeting summary.
- Automation of repetitive tasks. For example, create tickets, process invoices, or create draft orders from a customer's email.
- Accelerated application development. For example, create a data model in the Software Factory based on descriptions of your business processes or create a screen type and add it to the application menu. See also Use generative AI to develop an application.
- Community post - Getting started with MCP
- Community post - Thinkwise Platform as MCP Server
- Community post - MCP on the Software Factory
Set up MCP in the Thinkwise Platform
To set up MCP in the Thinkwise Platform, complete the following steps:
- Set up Indicium connectivity for MCP.
- Set up authorization for MCP in IAM.
- Add an MCP connector to your AI tool.
Prerequisites for using MCP in the Thinkwise Platform
AI has limitations and can pose risks if used without discretion. See also, Limitations of generative AI for more information.
- Using MCP in a production environment requires an amended license agreement with Thinkwise. MCP is freely available in development and test environments. Contact your account manager for more information.
- If you have multiple instances of Indicium, ensure certificate storage for Client Applications is configured correctly. For more information, see Certificate storage for client applications.
- We recommend setting up single sign-on (SSO) in your environment. This adds a layer of security and simplifies the login process for your users.
- Store the client secret of your client application in a password manager or secrets vault. Never store it in a chat log, command history, or shared file.
Limitations of MCP
The following operations are supported:
- Reading data, including filtering, sorting, grouping, and aggregating.
- Inserting and updating data, including resolving lookups by their display value, applying default and layout logic, and returning translated error messages so the client can correct mistakes.
- Deleting data.
- Executing tasks, both unbound tasks and tasks bound to a specific record, with the same lookup resolution, layout logic, and error message support as data operations.
- Process flows that start with a task, add row, update row, or delete row action and then continue with only system actions.
The following is not yet supported:
- Uploading and downloading files.
- Reports.
- Process flows that include non-system actions.
- Import and other bulk operations.
- Prefilters.
1. Choose how your AI tool connects to Indicium
Whichever option you choose, Indicium must be able to send requests to its own web address. Make sure that your network allows the following:
- Outbound traffic from Indicium to its own web address.
Add this address to your outbound allowlist, just like
licensing.thinkwisesoftware.com. - Inbound traffic that comes from the IP address of the Indicium server itself.
- DNS resolution of the hostname by the Indicium server itself. This is mostly an issue on-premise. To solve it, add an internal DNS record or a hosts file entry that resolves the hostname to the server itself.
Connect through the internet (recommended)
IndiciumYou can set up MCP in your environment by making Indicium reachable from the internet, including development environments. Exposing Indicium does not grant access to your data, because Indicium authenticates and authorizes every request before any data can be accessed. Development environments have the same protection as production environments.
Connect through a local Indicium instance
IndiciumIf you want to set up MCP locally, you need to set up a local Indicium instance on your own machine or network. Setting up MCP locally limits the reach of your AI tools, as most browser-based AI tools cannot connect to a local server. This rules out most browser-based AI tools, as well as automation platforms. For this setup, we recommend using Claude Code with the Claude CLI, which can connect to a local Indicium instance without issues.
2. Set up authorization for MCP in IAM
Intelligent Application ManagerIn IAM, you determine the level of access an AI agent has in your application. This is similar to how PATs (Personal Access Tokens) work, but with more granularity and control.
Set up authorization carefully. If set up incorrectly, the AI agent may not be able to access your application, or it may have more access than intended.
To set up authorization for MCP, you need to create a client application for the MCP connector with OpenID Connect authentication. The user and application must be allowed to delegate access, and access delegation roles must be made available and assigned to the client application.
See User-delegated API access (OpenID) for a full guide on how to set up user-delegated API access in IAM. Use the recommended settings for an MCP client application below when creating the client application for the MCP connector.
If you are using the MCP client to develop in the Software Factory, access to branches needs to be set separately for each branch. See Set up branch access.
Recommended settings for an MCP client application
The following settings are recommended when you are creating a client application for the MCP connector.
- Set Client to
mcp_connector(or any other memorable name without spaces or special characters). - Set the application to Enabled.
- Enable Support OpenID Connect.
- Enable Require PKCE.
- Enable Offline access.
- Set API access to Limited access.
- Enable Required consent.
- Add the redirect URLs used by the AI tool, for example
http://localhost:8080/callback, as an allowed login redirect (menu Client apps > Client applications > tab Allowed login redirects).
See OpenID Connect authentication for further information on configuration and available settings.
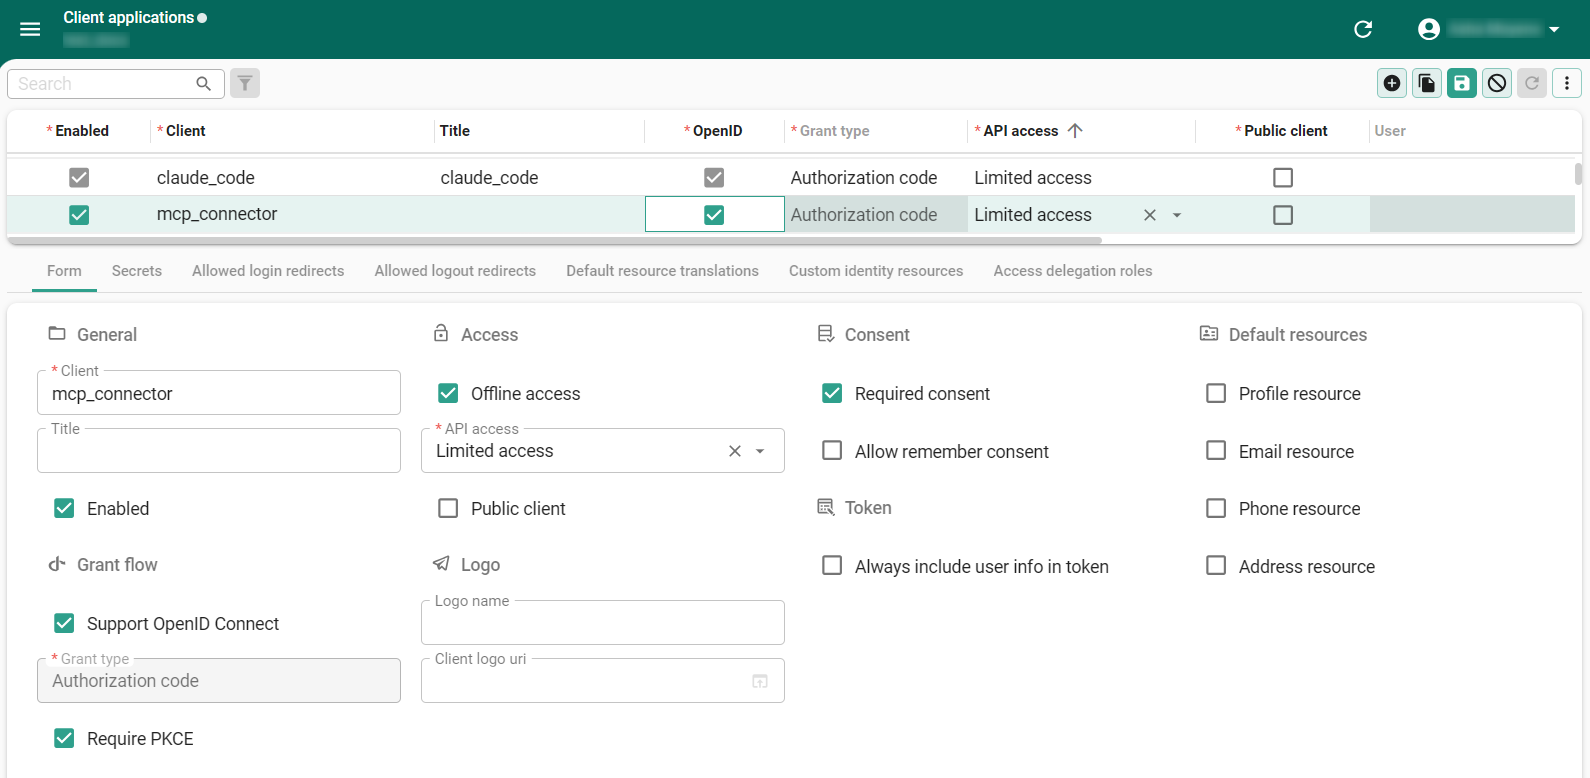 Recommended settings for an MCP client application
3. Add an MCP connector to your AI tool
You can connect the Thinkwise Platform to the following AI tools:
- Claude web and desktop (OAuth)
- Claude Code (OAuth)
- ChatGPT with OAuth (OAuth)
- ChatGPT with a PAT (PAT)
- Microsoft Copilot Studio (PAT)
- Mistral (PAT)
We recommend using OAuth wherever the AI tool supports it. Use a PAT only if the AI tool does not support OAuth. See Use a PAT to connect an MCP client for more information.
Claude web and desktop
To connect Claude web or desktop to the Thinkwise Platform, the following applies:
-
Indicium must be reachable from the internet. See Connect through the internet.
-
Claude looks for the authentication endpoints at the root of your host. Configure the following redirects on your web server:
From To /.well-known/.../indicium/.well-known/.../authorize/indicium/connect/authorize/token/indicium/connect/token -
Add the following callback URLs as allowed login redirects to your client application in IAM (menu Client apps > Client applications > tab Allowed login redirects):
https://claude.ai/api/mcp/auth_callbackhttps://claude.com/api/mcp/auth_callback
If you do not add the callback URLs to the allowed login redirects, IAM rejects the login.
To add a custom connector in Claude:
-
Open the Customize screen from the menu.
-
Go to the tab Connectors.
-
Select Add and Add custom connector.
 Select 'Add custom connector'
 -
Enter a Name (for example, 'Thinkwise MCP') and the URL of the
/mcpendpoint of your Indicium (for example,https://mcp.thinkwise.app/indicium/mcp). -
Select Use your own OAuth client. Enter the Client application ID and Client secret of the client application you created in IAM.
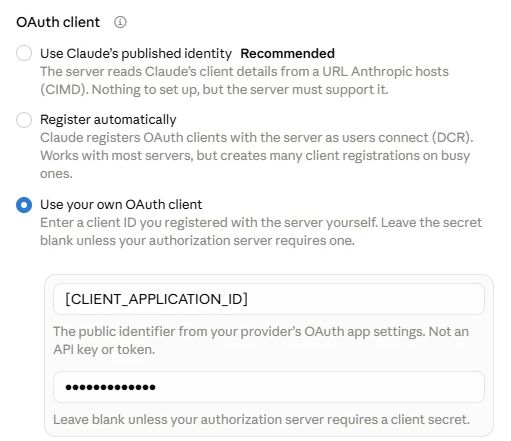 Set the client application ID and client secret for your custom OAuth client
 -
Select Connect. Indicium opens automatically. Authenticate in Indicium and confirm the roles available to MCP.
After authenticating, Indicium returns you to Claude. The connector is now ready to use.
Claude Code
Ensure you have the following tools installed on your machine:
- The Claude Code CLI (required)
- Visual Studio Code (optional)
- The Claude Code extension for Visual Studio Code (optional)
Add the redirect URLs used by the AI tool, for example http://localhost:8080/callback,
as an allowed login redirect (menu Client apps > Client applications > tab Allowed login redirects).
The port can vary depending on how Claude Code is set up.
If you use a different callback port, add the matching URL instead.
You can add more than one allowed login redirect, for example one for every AI tool or environment you connect.
If you do not add the callback URL to the allowed login redirects, IAM rejects the login.
For more information on how to install and set up Claude Code, see Getting started with Claude Code.
Choose a Claude Code client
You can run Claude Code in several places, for example:
- The Claude Code extension in Visual Studio Code. This suits developers, especially if you also use RDBMS plugins in Visual Studio Code.
- The tab Code in the Claude desktop app. This is the easier starting point for other users.
Both clients run on the same engine, so your MCP connector works the same in either one.
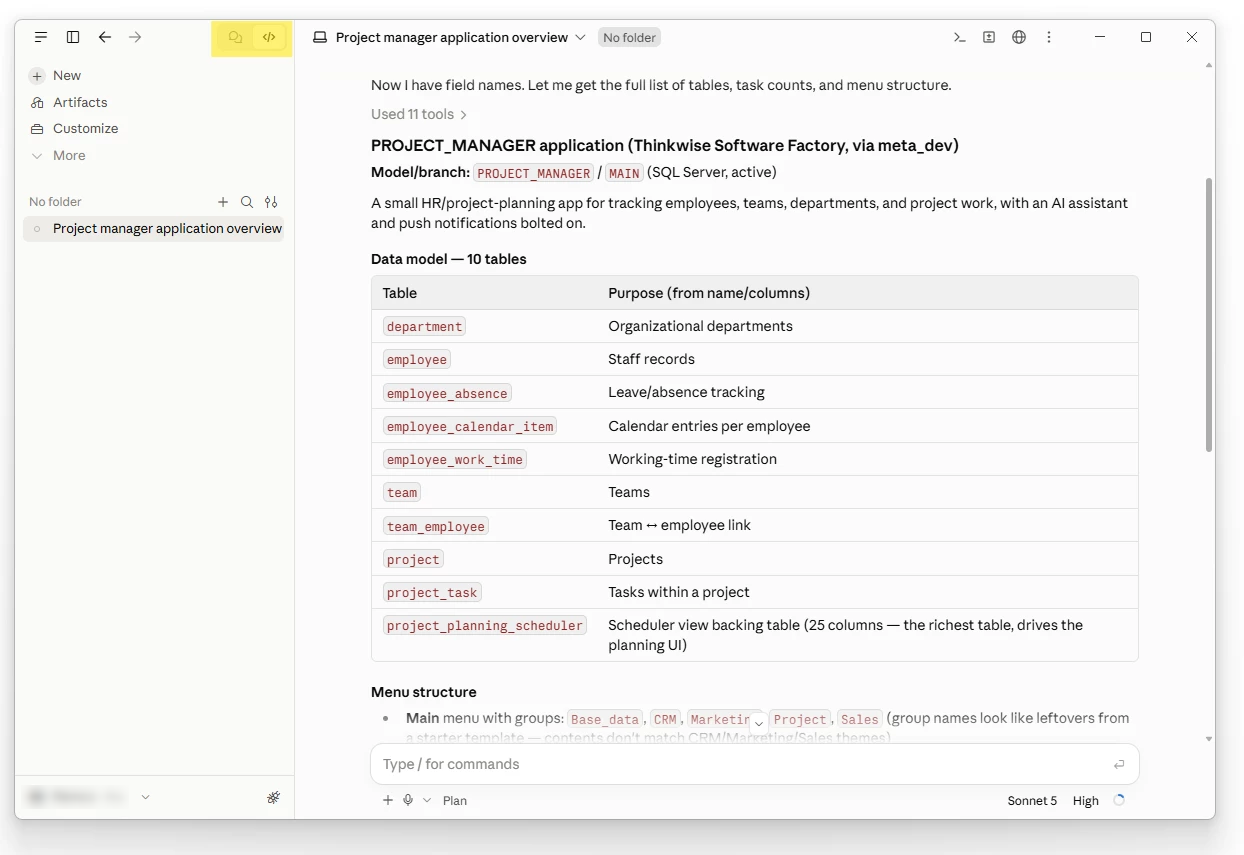 Claude desktop app in Code mode
Permissions in Claude Code
The first time an MCP tool runs, Claude Code asks for your permission. Claude Code can also ask to save a file to disk, for example to filter a large dataset.
You can set the permission mode in the permission selector at the bottom right of the chat bar:
- The default mode asks before every tool call.
- Auto approves routine actions automatically.
- Bypass permissions skips confirmation altogether.
Select the mode that matches how closely you want to supervise Claude Code. For more information, see Permission modes.
Install the connector from the chat
You can add the connector straight from the chat in Claude Code, using the prompt below. Using this prompt, Claude Code will ask step by step for the information it needs to create the connector: your Indicium URL, the client ID (the client name you chose), and the client secret.
Claude Code installs the connector by running PowerShell scripts through the Claude Code CLI. It asks for permission to run each script.
Prompt to install an MCP connector from the chat
  Install an MCP connector using the following instructions:

  # Install an MCP connector in Claude Code

  Set up and authenticate a custom MCP connector in Claude Code. Ask the
  questions in Step 0 one at a time before doing anything — do not assume
  defaults for values the user hasn't given you, except where marked "default."

  ## Step 0 — Gather configuration

  Ask, in order, waiting for each answer before asking the next:

  1. **Server name** — the alias to register this connector under in Claude
    Code (e.g. `sf_mcp`). This name must be used consistently in every step
    below (add, get, config lookup, `/mcp` selection) — do not let the add
    command use a different name than later steps reference.
  2. **MCP endpoint URL** — the full transport URL (e.g.
    `https://<host>/<path>/mcp`).
  3. **OAuth client ID.**
  4. **OAuth client secret** — tell the user it will only be exported into the
    current shell session as an env var, never echoed, logged, or written to
    a file.
  5. **Callback port** (default: `8080`) — only needs to change if the
    server's OAuth client has a different redirect URI pre-registered.
  6. **OAuth discovery document URL** (default:
    `<mcp base URL without /mcp>/.well-known/openid-configuration`) — ask
    only if the user says the default path doesn't apply.
  7. **Config scope** (default: `user`) — `user` registers the connector once
    for every project on this machine; `local` restricts it to the current
    project only. Ask only if the user wants something other than `user`.

  Call the collected values `{{SERVER_NAME}}`, `{{MCP_URL}}`, `{{CLIENT_ID}}`,
  `{{CLIENT_SECRET}}`, `{{CALLBACK_PORT}}`, `{{DISCOVERY_URL}}`, `{{SCOPE}}`
  below. Derive `{{RESOURCE_BASE}}` by stripping the trailing `/mcp` path
  segment from `{{MCP_URL}}`.

  ## Step 1 — Export the client secret for this shell session

  The variable name is `MCP_CLIENT_SECRET` — fixed, not derived from the
  server name. `claude mcp add --client-secret` reads only this name; anything
  else fails with *"No TTY available to prompt for client secret. Set
  MCP_CLIENT_SECRET env var instead."*

    (bash)
    ```bash
    export MCP_CLIENT_SECRET="{{CLIENT_SECRET}}"
    ```
    (PowerShell)
    ```powershell
    $env:MCP_CLIENT_SECRET = "{{CLIENT_SECRET}}"
    ```

  Agent shells generally do not persist environment variables between tool
  calls. Run this export and the Step 2 `add` in a **single** invocation
  (`;`-joined in PowerShell, `&&`-joined in bash) rather than as two steps.

  ## Step 2 — Add the MCP server

    ```bash
    claude mcp add -s {{SCOPE}} --transport http {{SERVER_NAME}} {{MCP_URL}} \
      --client-id {{CLIENT_ID}} \
      --client-secret \
      --callback-port {{CALLBACK_PORT}}
    ```
  `-s {{SCOPE}}` is not optional — with no `-s`, `claude mcp add` defaults to
  `local`, which registers the server for the current project only.
  `--client-secret` with no value reads from the env var set in Step 1.
  `--callback-port` pins the OAuth redirect URI to
  `http://localhost:{{CALLBACK_PORT}}/callback` — required whenever the
  server's OAuth client has that exact redirect URI pre-registered.

  ## Step 3 — Add discovery metadata

  The entry's location in `~/.claude.json` depends on the scope used in
  Step 2:

  | Scope | Path in `~/.claude.json` |
  |---|---|
  | `user`  | top-level `"mcpServers"` → `"{{SERVER_NAME}}"` → `"oauth"` |
  | `local` | `"projects"` → `"<project path>"` → `"mcpServers"` → `"{{SERVER_NAME}}"` → `"oauth"` |

  Locate the entry by searching the file for `"{{SERVER_NAME}}"` rather than
  assuming either path. Under its `"oauth"` object, add:
    ```json
    "authServerMetadataUrl": "{{DISCOVERY_URL}}"
    ```

  ## Step 4 — Discover and pin scopes dynamically (do not hardcode)

  Do not type out a fixed scope list. Query the server itself for what it
  currently advertises, then write that into the config:

  1. **Query the server for its current scopes.** GET the OAuth
    protected-resource metadata document (RFC 9728), which is unauthenticated:
      ```bash
      curl -sS "{{RESOURCE_BASE}}/.well-known/oauth-protected-resource"
      ```
      This returns JSON with a `scopes_supported` array. If it 404s, retry
      against the MCP path itself:
      ```bash
      curl -sS "{{RESOURCE_BASE}}/.well-known/oauth-protected-resource/mcp"
      ```
    If both fail, ask the user to paste the scope list manually and skip to
    step 5 below.

  2. **Check for an existing scopes value.** Read `oauth.scopes` at the same
    scope-determined location as Step 3 — top-level
    `mcpServers.{{SERVER_NAME}}.oauth.scopes` for `user` scope,
    `projects["<project path>"].mcpServers.{{SERVER_NAME}}.oauth.scopes` for
    `local` — or a `.mcp.json` in the repo for project scope. It's likely
    empty/absent on a fresh add — that's expected, just treat the server's
    list as entirely new.

  3. **Diff before writing.** Compare the server's `scopes_supported` array
    against any existing `oauth.scopes` string.
    - If they already match, say so and skip to Step 5 — nothing to change.
    - If this is a fresh add, or the server list only adds scopes, note what's
      being granted.
    - If scopes are being removed/narrowed from a prior value, note that too.

  4. **Confirm before granting.** Since this is a first-time authorization
    (or a widening one), use AskUserQuestion to show the discovered scope
    list and confirm before writing it — especially anything that reads like
    a write/approve/send/manage/create/delete capability. Don't silently
    apply an OAuth grant the user hasn't seen.

  5. **Write the config precisely.** Set `oauth.scopes` for
    `{{SERVER_NAME}}` to the confirmed list, joined with single spaces, in
    the server's own ordering:
      ```json
      "scopes": "<scope1> <scope2> <scope3> ..."
      ```
    Do this with a targeted string replacement (Read the exact surrounding
    lines first, then Edit) — do not round-trip the whole `~/.claude.json`
    through a JSON parser/serializer, since it's a large shared file and
    reserializing risks reformatting unrelated content.

  6. **Validate.** After editing, parse the file (e.g.
    `Get-Content -Raw ~/.claude.json | ConvertFrom-Json` or
    `python -c "import json; json.load(open(...))"`) to confirm it's still
    valid JSON and that `oauth.scopes` reads back as expected.

  ## Step 5 — Verify registration

    ```bash
    claude mcp get {{SERVER_NAME}}
    ```
  Expect `Status: Needs authentication`, the configured `client_id`,
  `callback_port {{CALLBACK_PORT}}`, and a `Scope:` line matching
  `{{SCOPE}}` (`User config (available in all your projects)` vs
  `Local config (private to you in this project)`).

  If `{{SERVER_NAME}}` is missing entirely, first confirm which scope it was
  actually added under — re-run `claude mcp get {{SERVER_NAME}}` and read the
  `Scope:` line, or `claude mcp list` from the directory in question. Do
  **not** resolve a lookup miss by duplicating the entry under several
  project-path key variants: `JSON.parse` keeps only the *last* duplicate
  key, so the added entries are inert, and strict parsers (PowerShell's
  `ConvertFrom-Json`) reject the file outright. If a project-scoped entry is
  genuinely unreachable, re-add it with `-s user`.

  ## Step 6 — Authenticate

  Claude Code enumerates MCP servers at session start, so a server added
  mid-session will not appear in the current one regardless of what the config
  says. Tell the user to **restart or reload the session first**, then run
  `/mcp`, select `{{SERVER_NAME}}`, and complete the OAuth login in the
  browser window that opens. Claude Code should then report the server as
  connected.

  Remind the user: this only registers the scopes in config — the actual
  OAuth token is issued during this authentication step, so it must run
  *after* Step 4's scopes are written, not before.

  ## Troubleshooting

  If authentication fails with "Client secret validation failed", **remove
  and re-add** rather than editing in place:
    ```bash
    claude mcp remove {{SERVER_NAME}} -s {{SCOPE}}
    ```
  then repeat Step 2. Claude Code links the stored client secret to a hash of
  the server's config — editing the URL or secret directly in
  `~/.claude.json` without going through `claude mcp` can silently orphan
  that link.

  **Changing scope after the fact** requires a remove and re-add:
  `claude mcp remove {{SERVER_NAME}} -s <old-scope>`, then repeat Step 2 with
  the new `-s`. Steps 3 and 4 must then be **redone**, because `claude mcp
  add` writes only `type`, `url`, `clientId`, and `callbackPort` — the
  `authServerMetadataUrl` and `scopes` added by hand do not migrate to the
  new config location and are silently lost.

  **If the MCP URL 404s**, check the transport scheme before anything else. A
  correctly configured OAuth-protected MCP endpoint answers an unauthenticated
  POST with `401` and a `WWW-Authenticate` header; a plain `404` (especially
  an IIS error page) usually means the path is not served over that scheme at
  all. Retry the same URL over `https://` before assuming the path is wrong.
Manage connectors with MCP Manager
MCP Manager is a desktop application to manage the MCP connectors in Claude Code without using the command line. It lists every MCP connector installed in Claude on your computer. You can add, remove, or refresh connectors, and add new connectors with a configuration wizard. You can download MCP Manager from GitHub.
MCP Manager is not an official Thinkwise application, and no support is available for it.
The first time you open MCP Manager, Windows SmartScreen can block the application. If so, open the properties of the executable and select Unblock.
ChatGPT with OAuth
ChatGPT can connect to the Thinkwise Platform with OAuth or with a PAT. We recommend OAuth, because each user authenticates with their own identity. Use a PAT only if you have no alternative. See also, ChatGPT with a PAT.
ChatGPT runs in the cloud, so Indicium must be reachable from the internet. See Connect through the internet.
You need to access the Workspace settings of your organization in ChatGPT to add an MCP connector with OAuth.
-
In the Workspace settings, go to Apps and select Create.
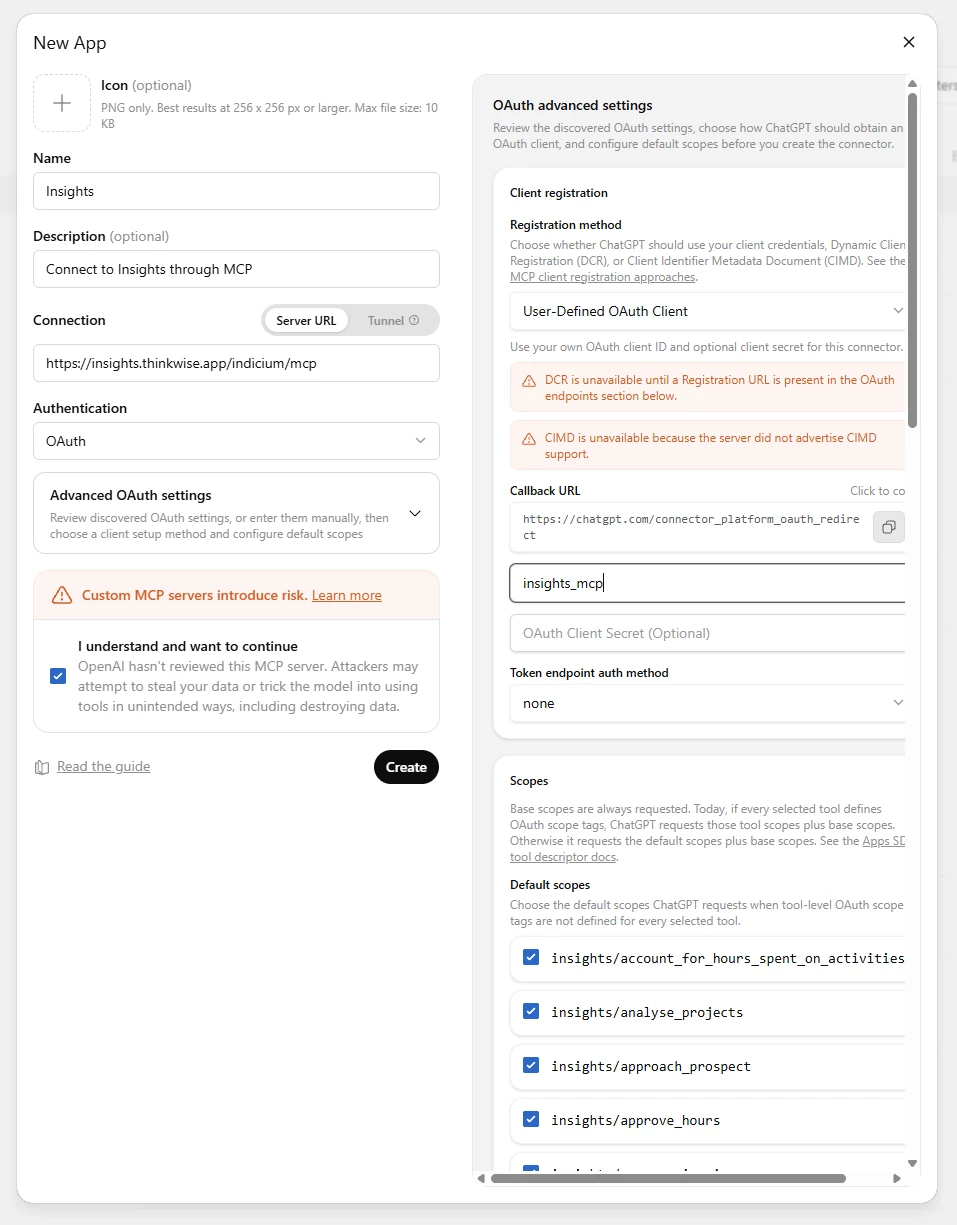 Add an app in the ChatGPT workspace settings
 -
Enter a recognizable name and description for the app.
-
Enter the URL of the
/mcpendpoint of your Indicium (for example,https://mcp.thinkwise.app/indicium/mcp). -
Set Authentication to OAuth and select the confirmation checkbox.
-
In the section Advanced OAuth settings, select User-defined OAuth Client.
-
Enter the Client ID and client secret of the client application you created in IAM.
-
ChatGPT shows a callback URL, for example
https://chatgpt.com/connector_platform_oauth_redirect. Add this exact URL as an Allowed login redirect to your client application in IAM (menu Client apps > Client applications > tab Allowed login redirects).warningIf you do not add the callback URL to the allowed login redirects, IAM rejects the login.
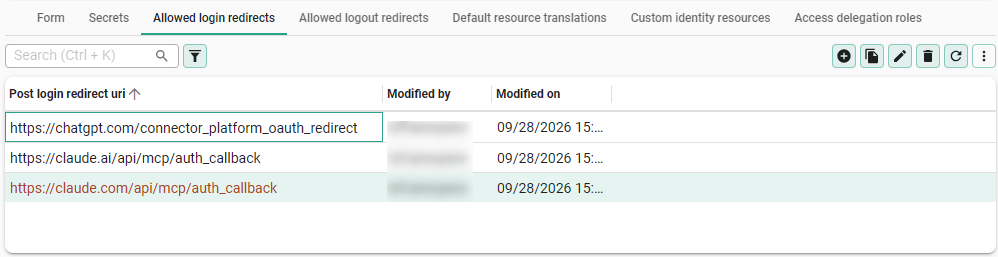 Allow the login redirect for ChatGPT
 -
Select Create. The app appears in Drafts.
-
Open the app and select Publish to make it available to your organization.
Each user connects to the connector individually:
- Open Plugins and select the connector.
- Select Connect. Indicium opens automatically.
- Authenticate in Indicium and authorize ChatGPT to access your roles.
ChatGPT with a PAT
If you cannot use OAuth, ChatGPT can also connect to the Thinkwise Platform with a PAT. We recommend using ChatGPT with OAuth instead. See Use a PAT to connect an MCP client.
Do not use a PAT in a production application environment. All users of a connector with the same PAT share one identity, so actions cannot be traced back to the person who triggered them.
To add an MCP connector in ChatGPT, you need access to the Workspace settings of your organization.
-
In the Workspace settings, go to Apps and select Create.
-
When prompted, enable Developer mode.
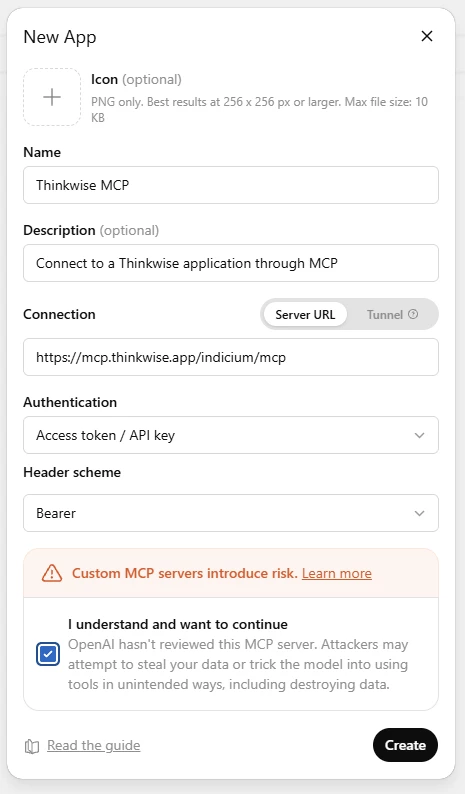 Create an app in the ChatGPT workspace settings
The connector now appears in the plugin overview of each user. The first time users open the connector, they enter their own PAT.
To use the connector in a chat, select + in the chat box and select the MCP connector as a source.
Microsoft Copilot Studio
Microsoft Copilot Studio connects to the Thinkwise Platform with a PAT. See Use a PAT to connect an MCP client.
Do not use a PAT in a production application environment. All users of a connector with the same PAT share one identity, so actions cannot be traced back to the person who triggered them.
To add an MCP connector in Microsoft Copilot Studio:
-
Go to Microsoft Copilot Studio and create a new agent.
-
Select Tools in the top right corner.
-
Select Add and select Model Context Protocol (MCP).
-
Configure the MCP server:
- Enter a Server name and Server description. These are only used for display.
- Enter the Server URL of the
/mcpendpoint of your Indicium (for example,https://mcp.thinkwise.app/indicium/mcp). - Set Authentication to API key.
- Set the header name to 'Authorization'.
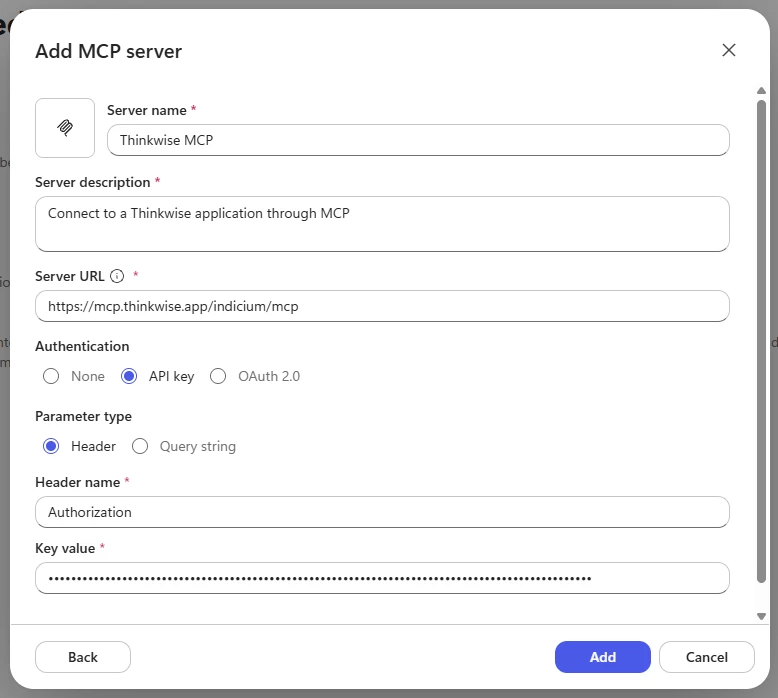 Configure the MCP server in Microsoft Copilot Studio
 -
Select Add, then select Create new connection.
-
Enter the authorization header value in the following format:
Bearer <your PAT>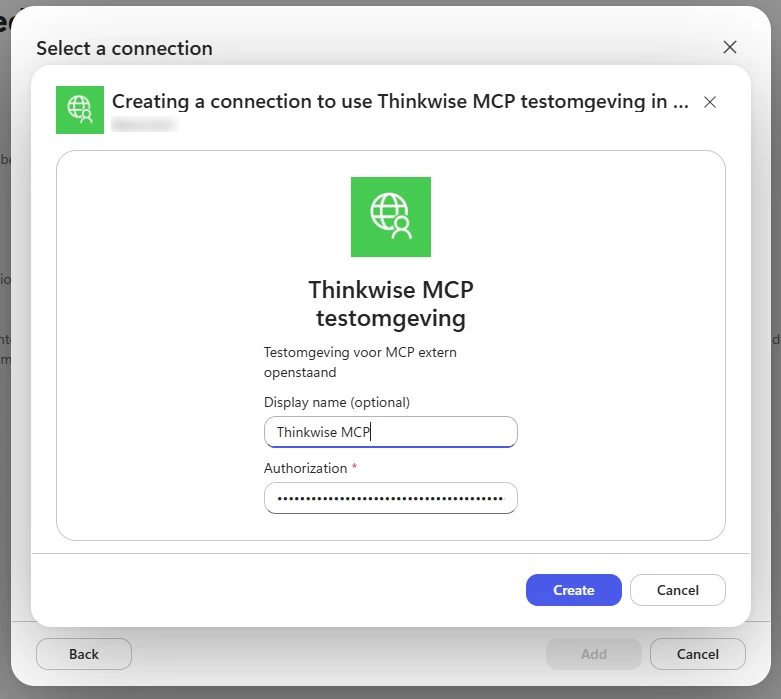 Enter the authorization header value in Microsoft Copilot Studio
 -
After the connection is created successfully, select Add to add the MCP connector as a tool.
-
Enter a name and description for the agent, and add context and skills if needed.
-
Test the agent in the preview tab.
-
Publish the agent.
Mistral
Mistral connects to the Thinkwise Platform with a PAT. See Use a PAT to connect an MCP client.
Do not use a PAT in a production application environment. All users of a connector with the same PAT share one identity, so actions cannot be traced back to the person who triggered them.
To add an MCP connector in Mistral:
-
Select Connectors in the menu on the left.
-
Select Add connector, then select Add custom connector.
-
Enter a Name (for example, 'Thinkwise MCP') and the Server of the
/mcpendpoint of your Indicium (for example,https://mcp.thinkwise.app/indicium/mcp). -
Set Authentication type to API Token Authentication.
-
Paste your PAT in the field Authorization header value. The Bearer type is selected by default.
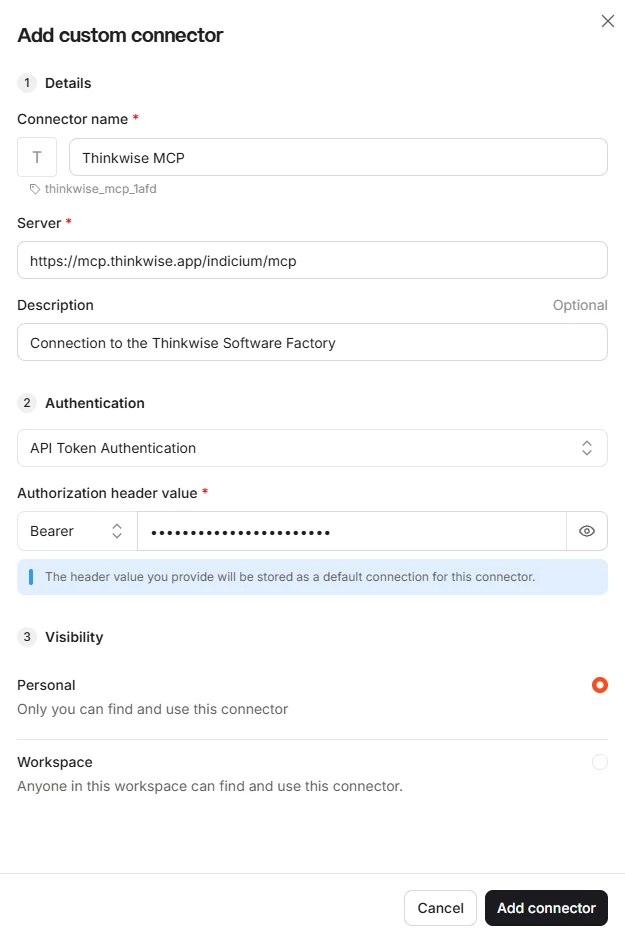 Configure the MCP connector in Mistral
 -
Select Add connector. The connector is now ready to use.
4. Test the MCP connector
To test the MCP connector in Claude Code:
- Open a new chat session.
- In the chat window, enter
/mcpand select MCP servers. Your connection appears with the label "Needs authorization." - Select the connection and select Authorize. This opens a browser window to Indicium. Here you authorize your user with the rights you have set up in IAM for the MCP connector.
- Select Allow.
Enter a test prompt in the chat to verify that the MCP connector is working correctly. You can do this for other AI tools as well.
- If you are using generative AI to develop with the Software Factory, changes made through delegated access are tracked within the Trace info group of the object. See also Track changes.
- To help Claude Code develop in the Software Factory, see Use AI skills to support the development process.
Refresh scopes
A scope is a set of access delegation roles that your client application is allowed to use. When an AI agent first authorizes against your MCP connector, it requests those scopes and your user consents to them in the browser.
Scopes need to be refreshed any time you change the roles available to the client application.
In Claude Code, you can refresh scopes in the following ways:
- Chat: ask Claude directly. Tell it to retrieve the scopes from the MCP server and update the local scopes, then reauthorize when it prompts you.
- Skill: use the skill included in this blog post.
- MCP Manager: select Refresh scopes. See Manage connectors with MCP Manager.