Thinkwise Deployment Center
Introduction to the Thinkwise Deployment Center
The Thinkwise Deployment Center ('Deployer') is created to make the deployment of Thinkwise products easier. You can use it to install:
- The Software Factory development environment.
- An application environment that consists of an Intelligent Application Manager, Indicium Application Tier, and user interfaces.
Products that are currently supported for deployment by the Thinkwise Deployment Center include:
- Intelligent Application Manager
- Software Factory
- Upcycler
- Windows GUI
- Universal GUI
- Indicium Application Tier
- Your own applications created with the Thinkwise Platform (as of Software Factory/IAM v2019.1 and Deployer v1.8.0).
Quick reference guide
| When | Description |
|---|---|
| Always | Check the prerequisites. |
| Always | Check the information about Licences. |
| Always | Install an Intelligent Application manager. |
| Need-to-have | Install what you need: the Software Factory, Indicium, GUI(s), and the Upcycler. |
| If applicable | More information on the manifest. |
Prerequisites
- .NET Framework 4.6.1 or higher, installed on the computer that runs the deployer tool.
- Good IIS knowledge.
- Remote Universal GUI and Indicium deployment is only available through the Microsoft IIS Administration API.
- Also check each product's own prerequisites (for example, Indicium, Universal GUI).
Getting started
The Thinkwise Deployment Center is available as a:
- GUI application (
twdeployerGUI.exe) for deployment by following steps in a user interface. - Commandline tool (
twdeployer.exe) for automated deployments.
It is not possible to download these tools separately. Both are included in the installation package.
-
Open the download page in the Thinkwise Community Portal (menu Software > Thinkwise products).
-
Select the Deployment Center.
-
Execute the task Download installation package.
-
Select the GUIs and Applications you want to include into the installation package.
warningIf you select Hotfix only, you can only install hotfixes for the selected applications, if available. So, for a full or first-time installation, make sure that Hotfix only is deselected.
-
Select Execute.
-
If necessary, select another folder in the explorer.
-
Select Save.
-
If the download is complete, extract the files.
-
Navigate to the folder with the extracted files:
- To start the deployment with a user interface (GUI), run
twdeployerGUI.exe. Continue with Install an Intelligent Application Manager. - To start the deployment with a Command Line Interface (CLI), run
twdeployer.exe.
- To start the deployment with a user interface (GUI), run
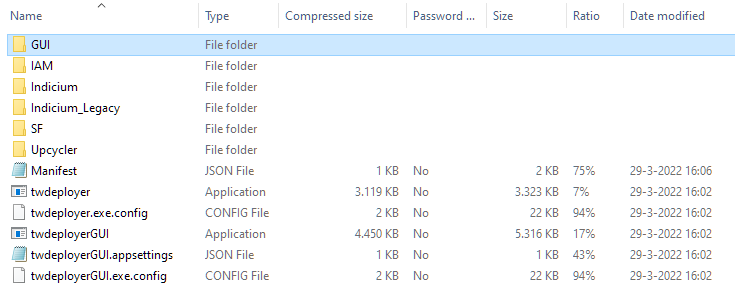 The extracted folders and files for the Deployment Center
Install an Intelligent Application Manager
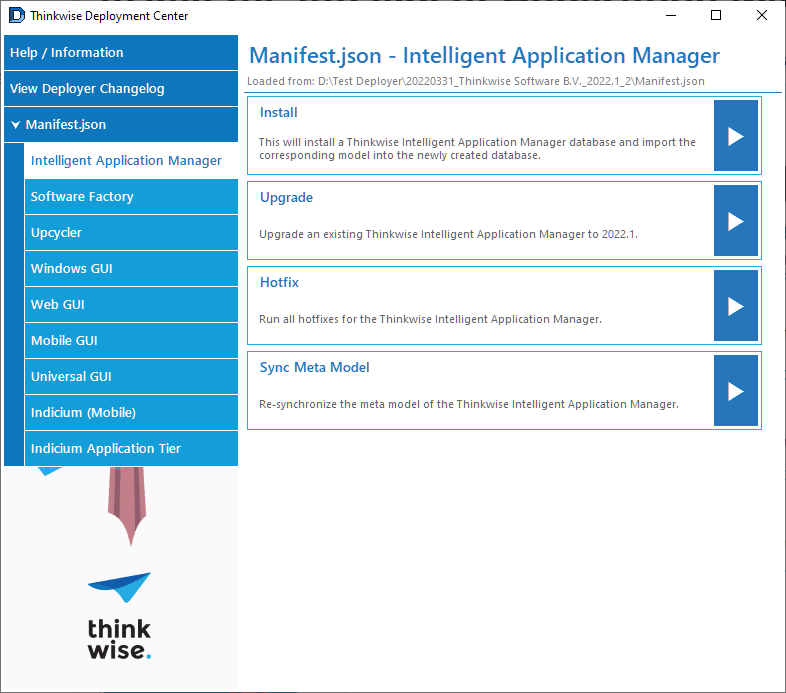
Always start by installing the Intelligent Application Manager for the Thinkwise application or the Software Factory development environment. Four deployment options are available:
- Install - Install an IAM database and import the corresponding model into the newly created database.
- Upgrade - Upgrade an existing IAM.
- Hotfix - Run all hotfixes for the IAM.
- Sync Meta Model (only for installation manifests using schema version 2 because manifests using schema version 3 contain
syncMOdel) - Re-synchronize an application's meta model into IAM without installing or upgrading the database. This option is available for deployment packages generated by the Software Factory if the Deployment Center detects aMetaModelfolder at the same directory level as anInstallorUpgradepackage.- The synchronization deployment for the Software Factory and Upcycler requires the name of a matching database due to their post-synchronization scripts.
- These products use the database name, for example, to create an application record inside the target IAM. For applications other than the Software Factory and Upcycler providing a database name is optional since the Deployment Center cannot detect if the post-synchronization scripts use it.
An Indicium runtime needs to be installed and running for every Intelligent Application Manager.
If you have installed an IAM and want to install a development environment, the next step is to continue with the Software Factory installation.
Authentication methods
When you connect to SQL Server databases, the following authentication methods are available in the GUI:
- SQL Server Authentication - Authenticate using a regular SQL Server account username and password.
- Windows Authentication - Authenticate using the current Windows user account.
- Microsoft Entra Password - Authenticate using a username (always the email address) and password against the Microsoft Entra tenant configured for the SQL Server instance.
- Microsoft Entra Integrated - Authenticate using the current Windows user against the Microsoft Entra tenant configured for the SQL Server instance. This option requires the computer to be domain-joined/federated with the Microsoft Entra tenant.
- Microsoft Entra MFA - Authenticate interactively using a browser window like most Microsoft/Azure service websites. Because this is handled by OAuth/OpenID Connect, this option also supports Multi-Factor Authentication (MFA) methods.
- Microsoft Entra Service Principal - Authenticate using an Application Service Principal in a Microsoft Entra tenant. This option requires the App ID and a client secret value from the target application registration.
For the command-line interface, the same authentication options are available
when you connect to SQL Server databases through the iam/sf/upcycler/app commands.
These can be set through the --auth-method and --iam-auth-method options depending on the subcommand.
The --auth-method currently falls back to previous implicit authentication methods for backwards compatibility.
The following commands are available:
UserPassword- Authenticate using a regular SQL Server account username and password.WindowsAuthentication- Authenticate using the current Windows user account.MSEntraUserPassword- Authenticate using username/email and password against the Microsoft Entra tenant configured for the SQL Server instance.MSEntraIntegrated- Authenticate using the current Windows user against the Microsoft Entra tenant configured for the SQL Server instance. Requires the computer to be domain-joined/federated with the Microsoft Entra tenant.MSEntraMFA- Authenticate interactively using a browser window like most Microsoft/Azure service websites. Because this is handled by OAuth/OpenID Connect, this option also supports Multi-Factor Authentication (MFA) methods. However, due to the interactive nature of this flow, this value is not suitable for use in scripts running inside a CI environment.MSEntraServicePrincipal- Authenticate using an Application Service Principal in a Microsoft Entra tenant. This option requires the App ID (--username) and a client secret (--password) value from the target application registration.
Advanced connection options
The following advanced connection options are available in the GUI:
- Encryption - Sets the level required for SSL/TLS when connecting to the server and can be set to:
- Optional - Uses SSL/TLS if it is available but it is not required.
- Mandatory - Requires the server to provide SSL/TLS.
- Strict - Same as Mandatory but requires the connection to support at least TDS 8.0.
- Trust server certificate - Production servers should always use a valid SSL/TLS certificate. However, development servers might not be properly configured with one. This option can be used to always trust the certificate given by the server even if it, for example, is self-signed.
- Certificate host name - Enter the host name that is expected to be provided in the SSL/TLS certificate in case it does not match with the host being connected to.
For backward compatibility, the advanced options in the GUI are interpreted as follows in the command-line interface:
- Encryption - Is always set to Optional, which will use SSL/TLS if available but it is not required.
- Trust server certificate - Is always set to True which allows incorrectly configured/invalid certificates from the server.
- Certificate host name - Is always empty. Because Trust server certificate is always true, this option does nothing.
Install a Software Factory
Stop Indicium before you upgrade the Software Factory.
If Indicium keeps running, it will log its presence in IAM and start executing system flows for the Software Factory. In that case, data gets mutated, which leads to errors during the upgrade.
Four deployment options are available:
- Install - Install a Software Factory database.
- Upgrade - Upgrade an existing Software Factory.
- Hotfix - Run all hotfixes for the Software Factory.
- Sync Meta Model - Synchronize the Software Factory's meta model into an IAM instance.
It is necessary to add the model of the Software Factory development environment to an IAM. Therefore, the first step is to connect with a database server and select the IAM database. Usually, this is the IAM database created in the previous step.
To skip the synchronization step, clear the Import application model checkbox on the Synchronization options screen. This can be useful when a single IAM has been configured with multiple instances of the same application on different servers.
After installing the Software Factory, you can use the previously created IAM shortcut to start the development environment.
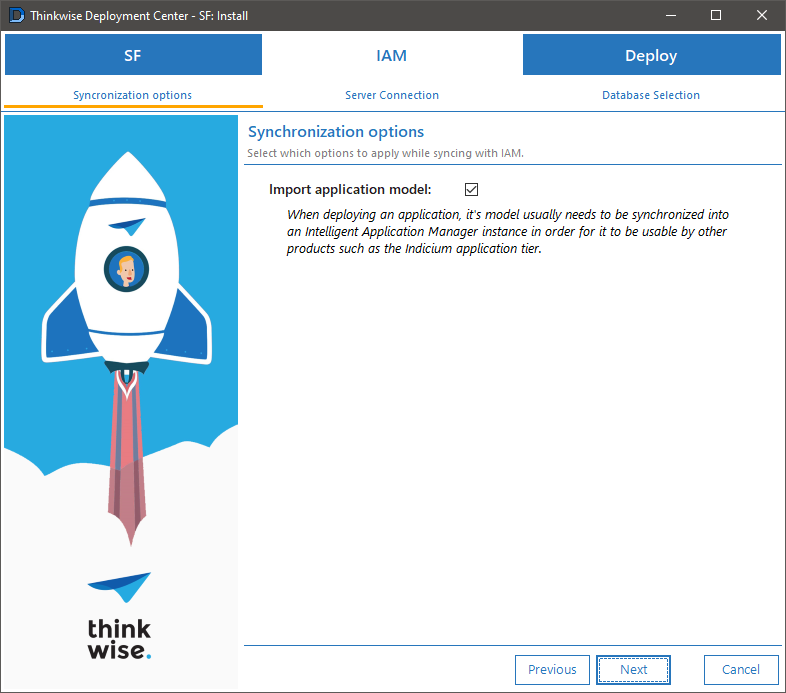 Synchronization options for the Software Factory
Authentication methods
When you connect to SQL Server databases, the following authentication methods are available in the GUI:
- SQL Server Authentication - Authenticate using a regular SQL Server account username and password.
- Windows Authentication - Authenticate using the current Windows user account.
- Microsoft Entra Password - Authenticate using a username (always the email address) and password against the Microsoft Entra tenant configured for the SQL Server instance.
- Microsoft Entra Integrated - Authenticate using the current Windows user against the Microsoft Entra tenant configured for the SQL Server instance. This option requires the computer to be domain-joined/federated with the Microsoft Entra tenant.
- Microsoft Entra MFA - Authenticate interactively using a browser window like most Microsoft/Azure service websites. Because this is handled by OAuth/OpenID Connect, this option also supports Multi-Factor Authentication (MFA) methods.
- Microsoft Entra Service Principal - Authenticate using an Application Service Principal in a Microsoft Entra tenant. This option requires the App ID and a client secret value from the target application registration.
For the command-line interface, the same authentication options are available
when you connect to SQL Server databases through the iam/sf/upcycler/app commands.
These can be set through the --auth-method and --iam-auth-method options depending on the subcommand.
The --auth-method currently falls back to previous implicit authentication methods for backwards compatibility.
The following commands are available:
UserPassword- Authenticate using a regular SQL Server account username and password.WindowsAuthentication- Authenticate using the current Windows user account.MSEntraUserPassword- Authenticate using username/email and password against the Microsoft Entra tenant configured for the SQL Server instance.MSEntraIntegrated- Authenticate using the current Windows user against the Microsoft Entra tenant configured for the SQL Server instance. Requires the computer to be domain-joined/federated with the Microsoft Entra tenant.MSEntraMFA- Authenticate interactively using a browser window like most Microsoft/Azure service websites. Because this is handled by OAuth/OpenID Connect, this option also supports Multi-Factor Authentication (MFA) methods. However, due to the interactive nature of this flow, this value is not suitable for use in scripts running inside a CI environment.MSEntraServicePrincipal- Authenticate using an Application Service Principal in a Microsoft Entra tenant. This option requires the App ID (--username) and a client secret (--password) value from the target application registration.
Advanced connection options
The following advanced connection options are available in the GUI:
- Encryption - Sets the level required for SSL/TLS when connecting to the server and can be set to:
- Optional - Uses SSL/TLS if it is available but it is not required.
- Mandatory - Requires the server to provide SSL/TLS.
- Strict - Same as Mandatory but requires the connection to support at least TDS 8.0.
- Trust server certificate - Production servers should always use a valid SSL/TLS certificate. However, development servers might not be properly configured with one. This option can be used to always trust the certificate given by the server even if it, for example, is self-signed.
- Certificate host name - Enter the host name that is expected to be provided in the SSL/TLS certificate in case it does not match with the host being connected to.
For backward compatibility, the advanced options in the GUI are interpreted as follows in the command-line interface:
- Encryption - Is always set to Optional, which will use SSL/TLS if available but it is not required.
- Trust server certificate - Is always set to True which allows incorrectly configured/invalid certificates from the server.
- Certificate host name - Is always empty. Because Trust server certificate is always true, this option does nothing.
Install a Windows GUI
Three deployment options are available:
- Install - Install a Windows GUI to a directory.
- Upgrade - Upgrade a Windows GUI inside a directory.
- Create startup config - Create a new startup configuration file and optionally a shortcut to a Windows GUI installation. Note that when you (re)load a configuration template, you must also reselect the IAM.
To skip the synchronization step, clear the Import application model checkbox on the Synchronization options screen. This can be useful when a single IAM has been configured with multiple instances of the same application on different servers.
Install a Universal GUI
- If you use the Deployment Center to install the Universal GUI remotely, the IIS Administration API needs to be installed on the web server.
- For a new deployment, rename
config.sample.jsontoconfig.jsonand use it to add your preferred settings. You can find all settings and their options at Configuration settings for the Universal GUI. - For existing deployments, you can keep your previously renamed
config.jsonfile.
Four deployment options are available:
- Install (Local) - Install a Universal GUI to the IIS instance on the current server.
- Upgrade (Local) - Upgrade a Universal GUI to the IIS instance on the current server.
- Install (IIS API) - Install a Universal GUI on a (remote) IIS server using the IIS API.
- Upgrade (IIS API) - Upgrade a Universal GUI on a (remote) IIS server using the IIS API.
Install an Indicium Application Tier
If you use the Deployment Center to install an Indicium Application Tier remotely, the IIS Administration API needs to be installed on the web server.
Four deployment options are available:
- Install (Local) - Install an Indicium Application Tier with support for the Universal GUI to the IIS instance on the current server.
- Upgrade (Local) - Upgrade an Indicium Application Tier with support for the Universal GUI to the IIS instance on the current server.
- Install (IIS API) - Install an Indicium Application Tier with support for the Universal GUI on a (remote) IIS server using the IIS API.
- Upgrade (IIS API) - Upgrade an Indicium Application Tier with support for the Universal GUI on a (remote) IIS server using the IIS API.
Install the Upcycler
- Before you install and use the Upcycler, consult the manual and contact your Thinkwise representative.
- Make sure to download the Upcycler as part of the installation package in TCP. See Getting started.
Two deployment options are available:
- Install - Install an Upcycler database.
- Sync Meta Model - Synchronize the Upcycler's meta model into an IAM instance.
To skip the synchronization step, clear the Import application model checkbox on the Synchronization options screen. This can be useful when a single IAM has been configured with multiple instances of the same application on different servers.
Default settings Deployment Center GUI
The Deployment Center comes with a settings file for the GUI. It is called twdeployerGUI.appsettings.json.
You can use it to store some default values for various screens during startup.
Default template
The default template is:
{
  "DbConnection": {
    "Host": "",
    "Username": ""
  },
  "IISApi": {
    "ServerUrl": "https://localhost:55539",
    "ApiKey": "",
    "Username": "",
    "TrustInvalidSSLCert": false
  },
  "Manifest": {
    "SelectionDirectory": "",
    "LoadOnStartup": [
    ],
    "HideLoadAfterLoadOnStartup": true
  },
  "Flow": {
    "ModelSync": {
      "Application": {
        "HideScriptVariablesStep": true,
        "UseDefaultDatabaseName": true
      }
    },
    "ApplicationUpgrade": {
      "SkipManualChecks": false
    }
  }
}
Default host and username
-
DbConnection- use this section to specify a defaultHostandUsernamewhen making a connection to a database server, for example, when starting an install or upgrade flow.- If
Usernameis empty or otherwise unspecified, the GUI assumes you want to use Integrated Security instead. - After a successful connection to a database server, the GUI will continue to load the information of the last successful connection for subsequent screens.
Example:
{
"DbConnection": {
"Host": ".\\sql2019",
"Username": "sa"
}
}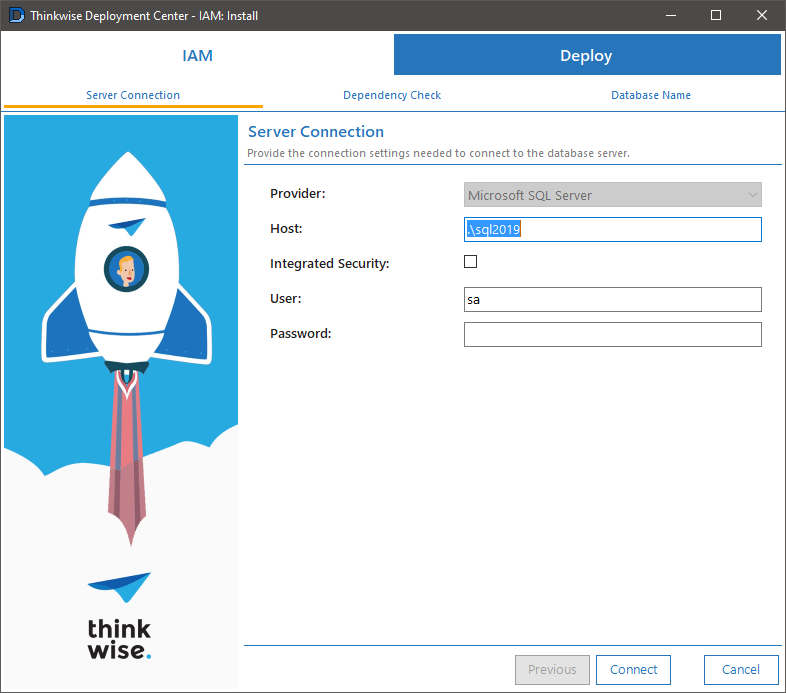 DbConnection settings result in the GUI
 - If
Default connection to IIS API
-
IISApi- Use this section to specify default connection settings to a Microsoft IIS Administration API instance.Example:
{
"IISApi": {
"ServerUrl": "https://localhost:55539",
"ApiKey": "not a real key just an example",
"Username": "tsf\\thisisausername",
"TrustInvalidSSLCert": true
}
}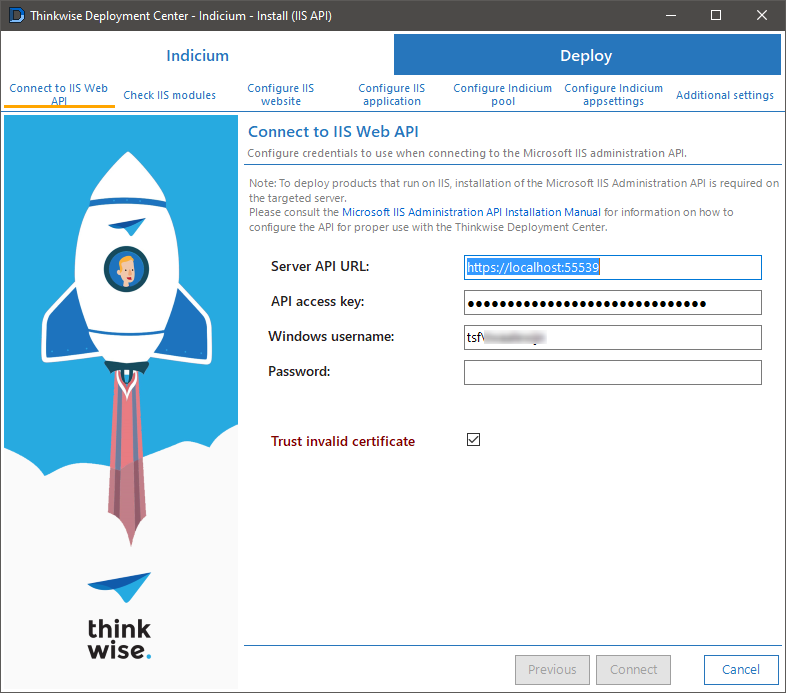 IISApi settings result in the GUI
Defaults for manifest at startup
-
Manifest- Use this section to indicate how manifests are loaded by the GUI at startup.-
SelectionDirectory- Use this setting to change the file picker on the Load Manifest screen, to always try and open in the specified directory.- If the directory does not exist or cannot be found, the file picker control will fall back on the default Windows behavior. In that case, it tries to open the last directory from which a user has selected a file.
- The directory path must be specified using Windows style path separators (backslash).
Since the settings file uses JSON, this means you always need to escape it. So, use
C:\\Manifestsinstead ofC:/ManifestsorC:\Manifests. And use\\\\unc_share\\directoryinstead of\\unc_share\directory.
Example:
{
"Manifest": {
"SelectionDirectory": "C:\\Manifests"
}
}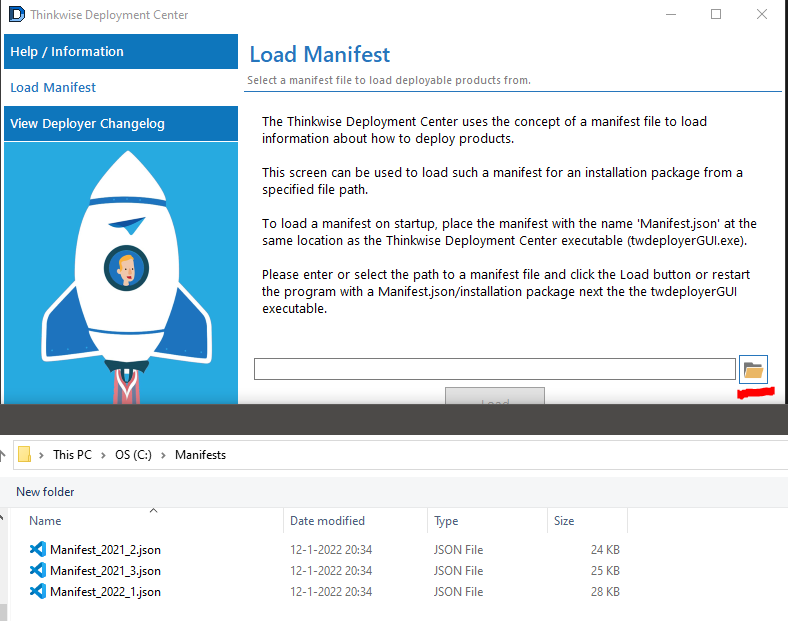 SelectionDirectory setting result in the GUI
LoadOnStartup- Use this section to specify multiple manifest files to load during startup. When you leave it unspecified or empty, the GUI will look for aManifest.json/yaml/ymlfile in the executable's directory.
{
"Manifest": {
"LoadOnStartup": [
"C:\\Manifests\\Manifest_2021_2.json",
"C:\\Manifests\\Manifest_2021_3.json",
"C:\\Manifests\\Manifest_2022_1.json"
]
}
}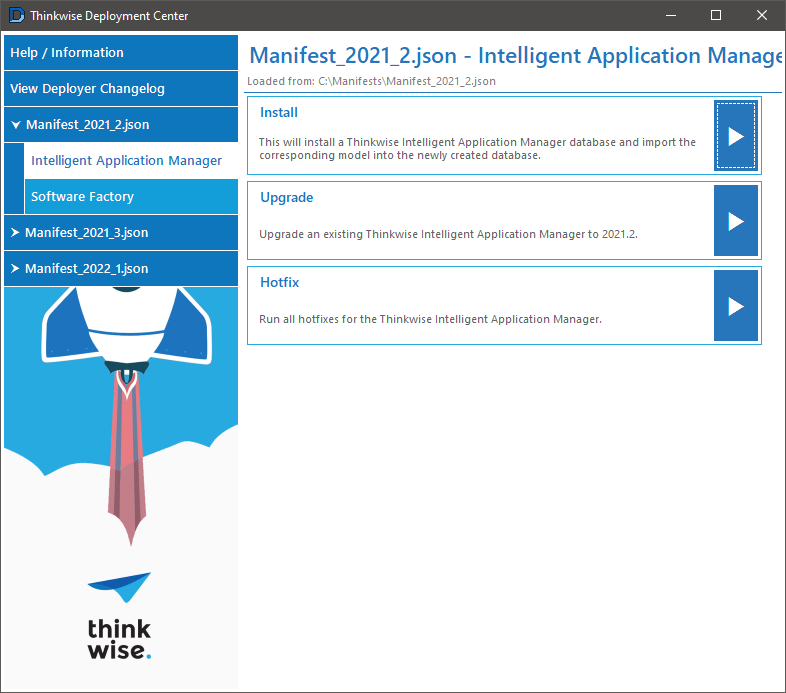 Manifest setting result in the GUI
Paths are relative to the location of the executable. So, if you also want to load the default manifest locations, you must add them.
Example:
{
   "Manifest": {
       "LoadOnStartup": [
         "Manifest.json",
         "C:\\Manifests\\Manifest_2021_2.json",
         "C:\\Manifests\\Manifest_2021_3.json",
         "C:\\Manifests\\Manifest_2022_1.json"
       ]
   }
}HideLoadAfterLoadOnStartup- By default, the GUI hides the separate manifest loading and selection screens if a manifest is loaded during startup. You can change this behavior by setting it tofalse.
Example:
{
"Manifest": {
"LoadOnStartup": [
"C:\\Manifests\\Manifest_2022_1.json"
],
"HideLoadAfterLoadOnStartup": false
}
}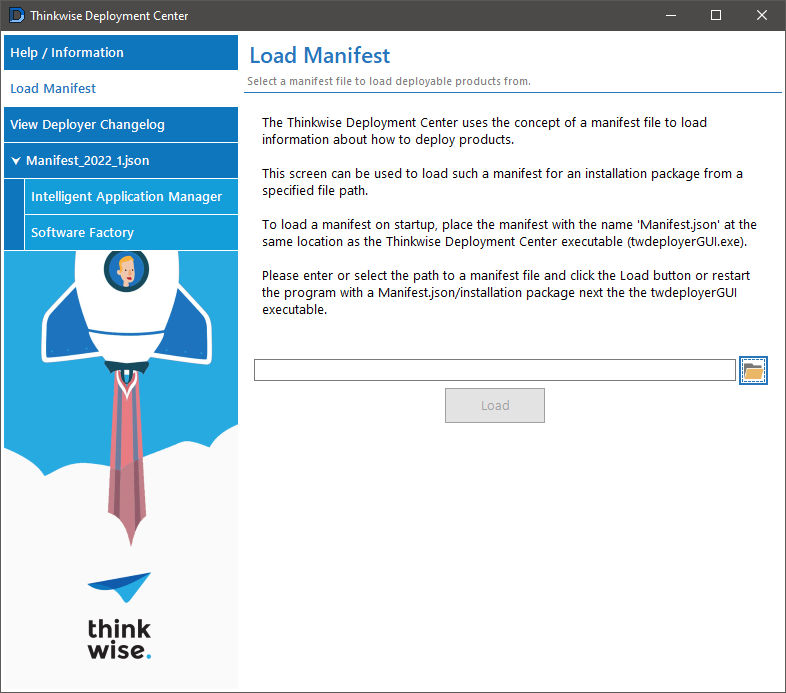 The separate manifest loading and selection screens are no longer hidden
 -
Hide the script variables step
When going through the model synchronization flow for an application, you will be prompted for a database name to be used in the script's post-synchronization section. This value is optional and can be disabled.
-
Flow:ModelSync- Section for the model synchronization flow.HideScriptVariablesStep- Hide the database prompt in the post-synchronization section of the Deployment Center GUI.
{
  "Flow": {
    "ModelSync": {
      "Application": {
        "HideScriptVariablesStep": true
      }
    }
  }
}
Skip manual checks screen
Before upgrading a database, a screen is displayed that warns you to back up your database and stop Indicium before proceeding. This screen might be redundant if you have defined a different upgrade process.
-
Flow:ApplicationUpgrade- Section for the application upgrade flow.SkipManualChecks- When set totrue, the Deployment Center GUI will skip the manual checks screen.
{
  "Flow": {
    "ApplicationUpgrade": {
      "SkipManualChecks": true
    }
  }
}
Default database name for model synchronization
It is possible to use the default database name as default value for the model synchronization script variable.
-
Flow:ModelSync- Section for the model synchronization flow.UseDefaultDatabaseName- When set totrue, the Deployment Center GUI will use the value of the product'sdefaultDatabaseNameproperty in the manifest.
Example:
{
  "Flow": {
    "ModelSync": {
      "UseDefaultDatabaseName": true
    }
  }
}
In the following manifest, the GUI will use MY_APP as the default value for <@db_name,,> in the script variables step.
This also works in combination with the HideScriptVariablesStep setting.
{
  //...
  "products": [
    {
      "type": "Application",
      //...
      "packages": [
        {
          "type": "Install",
          "path": ".../MY_APP/Install",
          "defaultDatabaseName": "MY_APP"
        }
      ]
    }
  ]
}
Troubleshooting Platform installation
The Help/Information menu in the Deployment Center menu also contains useful advice and references.
The following messages/problems can occur during the platform installation:
This compatibility level is for SQL Server [version] or higher
This problem can have one of two possible causes:
- The SQL Server is outdated and needs an update. In that case: update the SQL Server to a supported version.
or:
- The SQL Server has the required version, but in the database it's configured at a lower version. In that case:
- Open SQL Server Management Studio and go to the IAM database properties.
- Open the Options menu.
- Check if the Compatibility level is set at the right level.
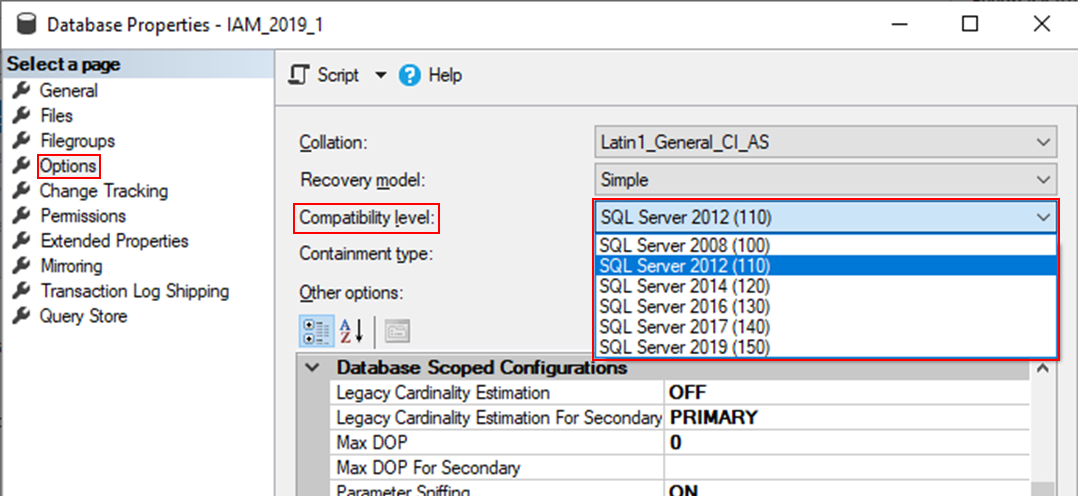 IAM properties in SQL Server Management Studio (Compatibilty level)
Licenses
See: