Google Cloud setup
Introduction to Google Cloud setup
This manual provides instructions for deploying Indicium dockerized in the Google Cloud Platform (GCP).
Prerequisites
For general information about setting up security, see Security
Running Indicium in the GCP requires:
- Applications:
- Docker - for the commands in Google CLI.
- Google CLI - to deploy Indicium to Google Cloud.
- Thinkwise products:
- IAM & Software Factory databases
- Indicium
- Universal GUI and Windows GUI (EoL)
- Google Cloud APIs:
- Artifact Registry API
- Cloud Build API
- Cloud DNS API
- Cloud Domains API
- Cloud Run Admin API
- Cloud SQL Admin API
- Cloud Storage API
- Compute Engine API
- Container Registry API
- Identity and Access Management (IAM) API
- Network Management API
- Network Security API
- Serverless VPC Access API
- Service Networking API
- Other:
Create a SQL Cloud Instance
A SQL Cloud instance is a managed database service that allows you to run SQL databases in Google Cloud.
To create a SQL Cloud instance:
- Open the Google Cloud Console and log in.
- In the left navigation menu
 , go to SQL > Instances.
 - Click Create Instance.
![]() Create instance button
Create instance button
-
In the section Choose your database engine, select the database type: SQL Server.
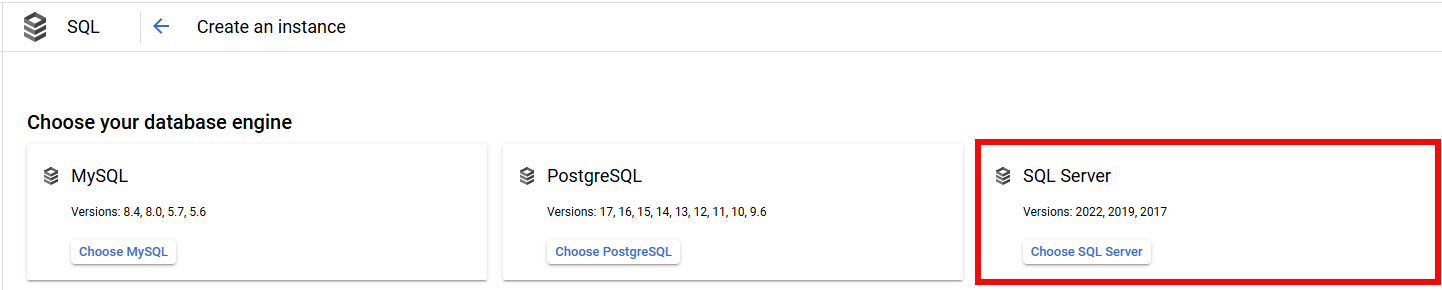 Choose SQL Server
 -
In the section Choose a Cloud SQL edition:
- Select an edition: Enterprise Plus or Enterprise.
- In the field Edition preset, select Development or Production.
-
In the section Instance info:
- In the field Database version, Select Standard edition (minimum 2019).
- Enter an Instance ID.
- Enter or generate a Password for user sqlserver.
-
In the section Choose region and zonal availability:
- Select your Region.
- Select the Zonal availability.
-
Expand the section Customize your instance.
-
Expand the section Machine configuration.
-
Select a Machine:
- minimum for development: 2 vCPU, 8 GB
- minimum for production: 4 vCPU, 16 GB
-
Expand the section Storage.
-
Select the Storage capacity:
- Minimum 250 GB.
-
Expand the section Connections.
-
Select the Instance IP assignment:
- Private IP - see also Install a Virtual Machine.
- Public IP - add your IP address to Authorized networks.
-
Check the Summary and Pricing estimate at the right side of the screen.
-
Click Create instance.
Install a Virtual Machine (optional)
When to use a Virtual Machine
If you configured your SQL Server with only a private IP, you need a Virtual Machine to connect to it in the following situations:
- Deployment with the Windows GUI (EoL)
- Database deployment of IAM (and the Software Factory) to SQL Cloud. (Note: the Software Factory database is only for development.)
Create a Virtual Machine
To create a Virtual Machine:
- In the left navigation menu , go to Compute Engine > VM instances.
- Click Create instance.
![]() Create instance button for a VM
Create instance button for a VM
- Create a Windows VM with the following minimum specifications:
- 4 vCPU
- 16 GB memory
- 200 GB storage
- Check the Monthly estimate on the right side of the screen.
- Click Create.
- Connect the VM to your network to connect to the SQL server.
Configure Serverless VPC access
Serverless VPC access allows you to connect your Google Cloud services safely to your VPC network. A VPC network (Virtual Private Cloud network) in Google Cloud is a virtual version of a physical network, implemented within Google's infrastructure. It provides a logically isolated and configurable network environment for your Google Cloud resources.
To create a private and secure connection between Google services, you must configure the Serverless VPC connector and the VPC network.
Create a Serverless VPC connector
If you do not yet have a VPC network, you must create one first.
To create a Serverless VPC connector:
- In the left navigation menu , go to VPC network > Serverless VPC Access.
- Click Create connector.
![]() Create connector button
Create connector button
- Create the connector:
- Enter a Name.
- Select a Region.
- In the field Network, select your VPC network. This network is used for the entire Google Cloud environment, including firewalls, routes, etc.
- In the field Subnet, select Custom IP Range.
- In the field IP range, enter 10.8.0.0.
- Expand the section Show scaling settings:
- In the field Instance type, select f1-micro.
- Check the Details on the right side of the screen.
- Click Create.
Edit the VPC network
- In the left navigation menu , go to VPC network > VPC networks.
- Select your network.
- Go to the tab Private Services Access.
- Click Allocate IP range:
- In the field Name, enter google-managed-services-default.
- In the section IP range, select the radio button Custom.
- In the field IP range, enter 10.1.0.0/16.
- Click Allocate.
- Go to the tab Private Connection to Services.
- Select your connection (click on the connection name).
- In the field Assigned allocation, select the allocated IP range.
- Click Create.
Download and install the Thinkwise products
Download the Thinkwise software
If you created a virtual machine, use this machine for the following steps.
To download the Thinkwise software:
- Open TCP, log in, and go to the menu Software > Thinkwise products.
- Select Download installation package
 .
. - In the field Version, select your current version.
- Select the following products:
- Applications: SF
- Applications: IAM
- GUIs: Universal
- Service Tiers: Indicium
- Select Execute.
Install the IAM database
- Open the Thinkwise Deployment Center (
twdeployerGUI.exe). - Under Manifest.json, select Intelligent Application Manager > Install
- In the tab Server connection, configure the connection:
- Host - the private IP address of your SQL Server.
- Username - sqlserver.
- Password - the password you created for the SQL Server instance.
- Click Connect.
- Go to the tab Database name and enter a name for the database (for example, IAM).
- Click Next.
- In the tab Deploy, deploy the database. This may take a few minutes.
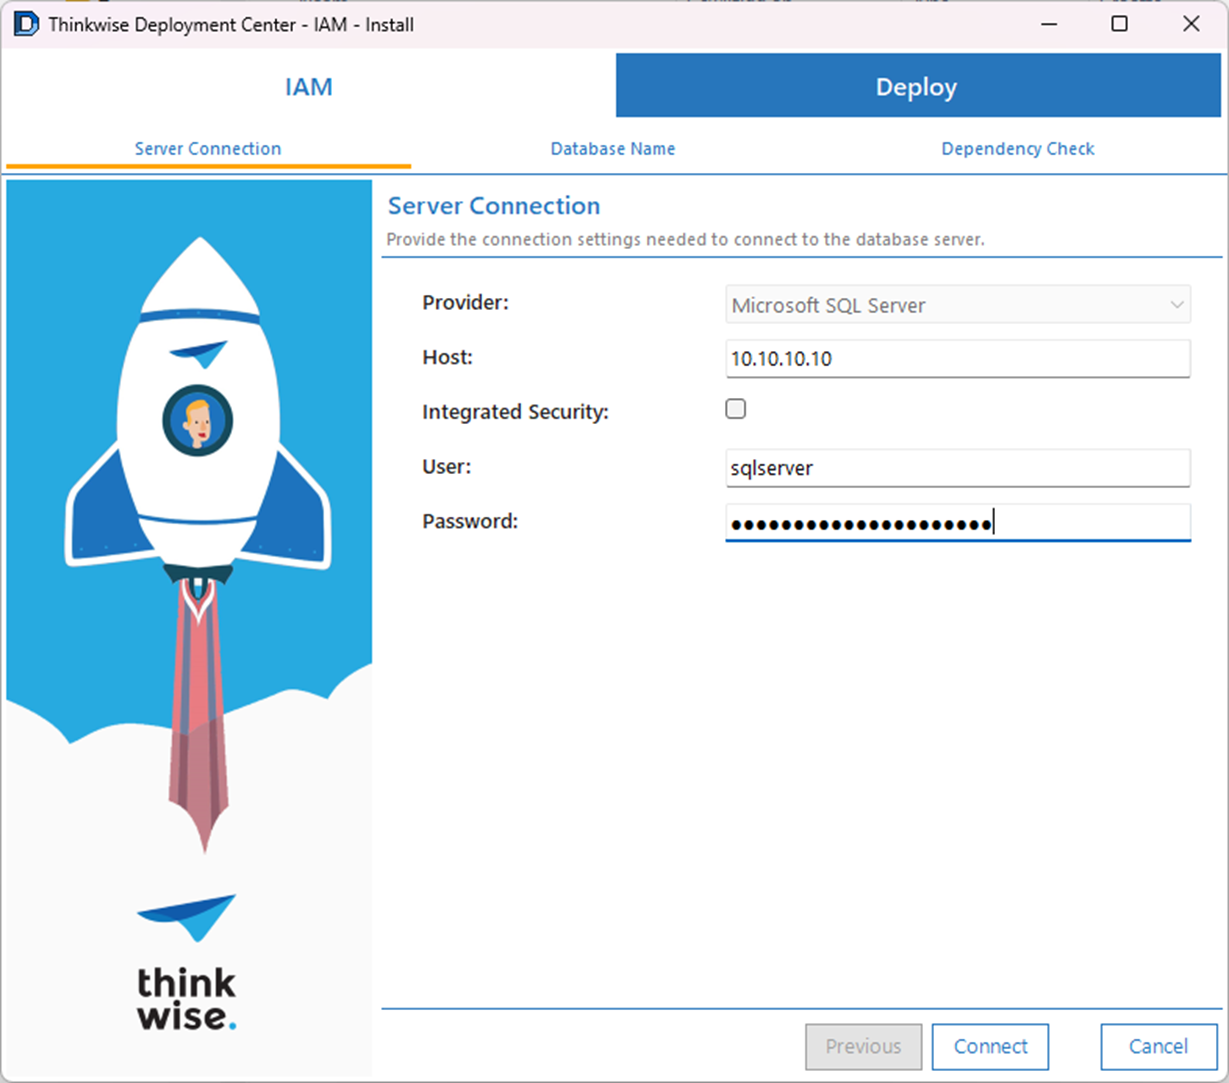 Server connection for IAM database
Install the Software Factory database (optional)
The Software Factory database is only for development.
To install the Software Factory database:
- Open the Thinkwise Deployment Center (
twdeployerGUI.exe). - Under Manifest.json, select Software Factory > Install.
- In the tab Server connection, configure the connection:
- Host - the private IP address of your SQL Server.
- Username - sqlserver.
- Password - the password you created for the SQL Server instance.
- Click Next and Next.
- Select the IAM database you created in the previous step.
- Click Deploy. This may take a few minutes.
Deploy Indicium to Google Cloud Run
Google Cloud Run is a fully managed computing platform that automatically scales your stateless containers. Because of its scalability, Indicium should be deployed to Google Cloud Run.
Create a Docker file and app folder
-
On your local machine, create a folder that contains:
- Another folder named
app - A file named
Dockerfile(no extension).
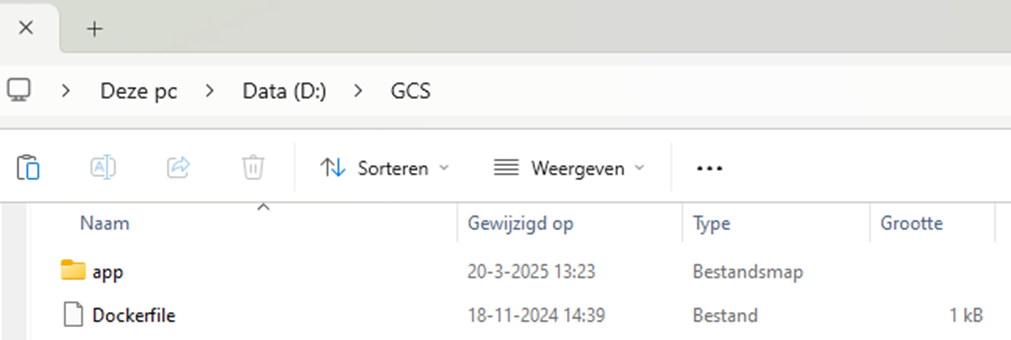 Create folder and file
 - Another folder named
-
Add the following information to your
Dockerfileand save it:FROM mcr.microsoft.com/dotnet/aspnet:8.0
ENV ASPNETCORE_URLS http://+:8080
EXPOSE 8080
WORKDIR /app
COPY ./app /app/
ENTRYPOINT ["dotnet", "Indicium.dll"]noteCheck the
aspnetversion with your platform version in the System requirements: Example Docker file
 -
Copy the files from the downloaded Indicium folder to the
appfolder. -
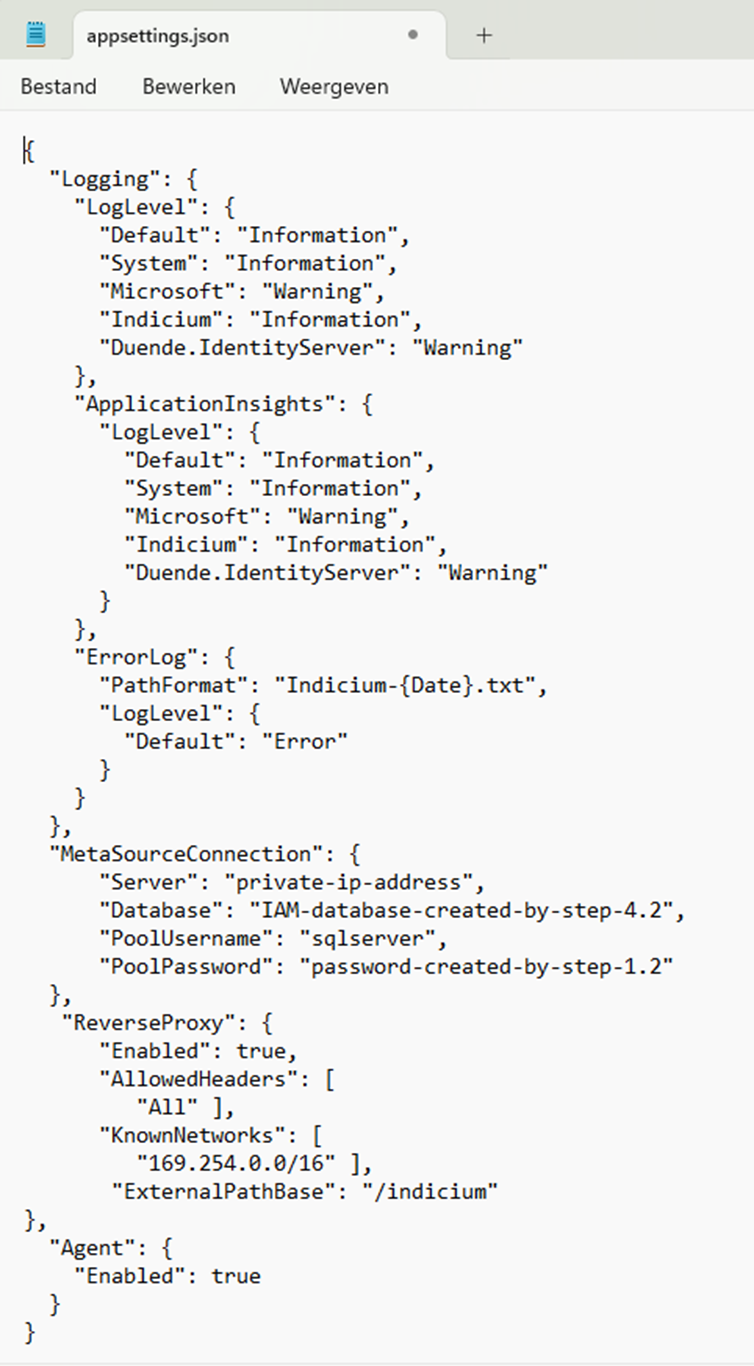
Configure Indicium's
appsettings.jsonfile: change or add the information about theMetaSourceConnectionand add theReverseProxysettings for the load balancer.noteMake sure that all brackets and sections are at the right level.
"MetaSourceConnection": {
      "Server": "private-ip-address",
      "Database": "the-IAM-database-that-you-created",
      "PoolUsername": "sqlserver",
      "PoolPassword": "the-password-that-you-created"
},
   "ReverseProxy": {
      "Enabled": true,
      "AllowedHeaders": [
         "All" ],
      "KnownNetworks": [
         "169.254.0.0/16" ],
      "ExternalPathBase": "/indicium"
},
Example appsettings.json file
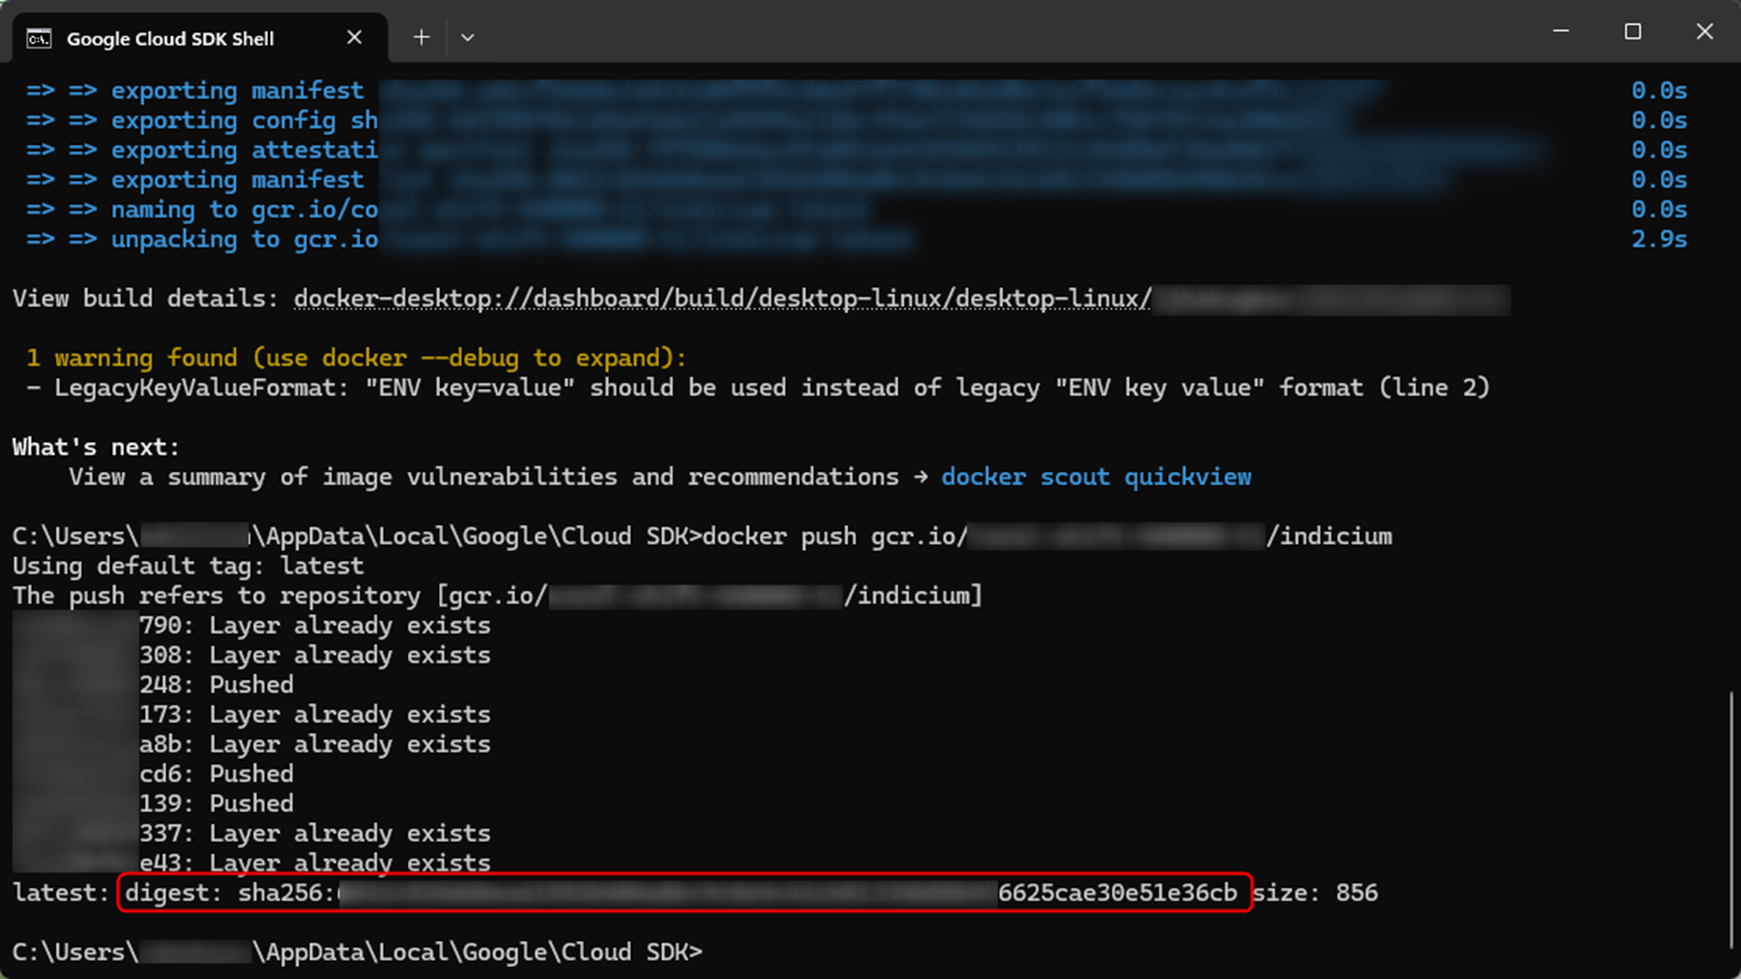
Push Indicium to Google Cloud
-
Open Google CLI.
-
Make sure your Docker Desktop is running.
-
Go to the folder that contains the
appfolder andDockerfile. -
Use the following commands:
gcloud auth configure-docker
docker build -t gcr.io/google-project-id/indicium
docker push gcr.io/google-project-id/indicium
When Indicium is pushed, you get the result: digest.
Example digest
 Push Indicium to Google Cloud
Create a Google Cloud Run service
- Go to the Google Cloud Console.
- In the left navigation menu , go to Cloud Run.
- Select Deploy container > Service.
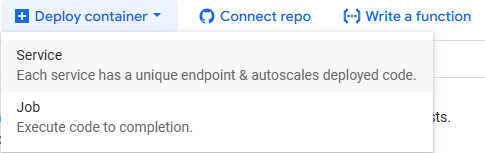 Deploy container button
-
In the field Container image URL, click Select.
-
In the pop-up window Select container image from Artifact Registry, select your pushed Indicium image (check the
digest). -
Click Select.
The field Service name now contains the name of the Indicium image.
-
Select your Region.
-
In the section Authentication, select Allow unauthenticated invocations.
Example configuration screen
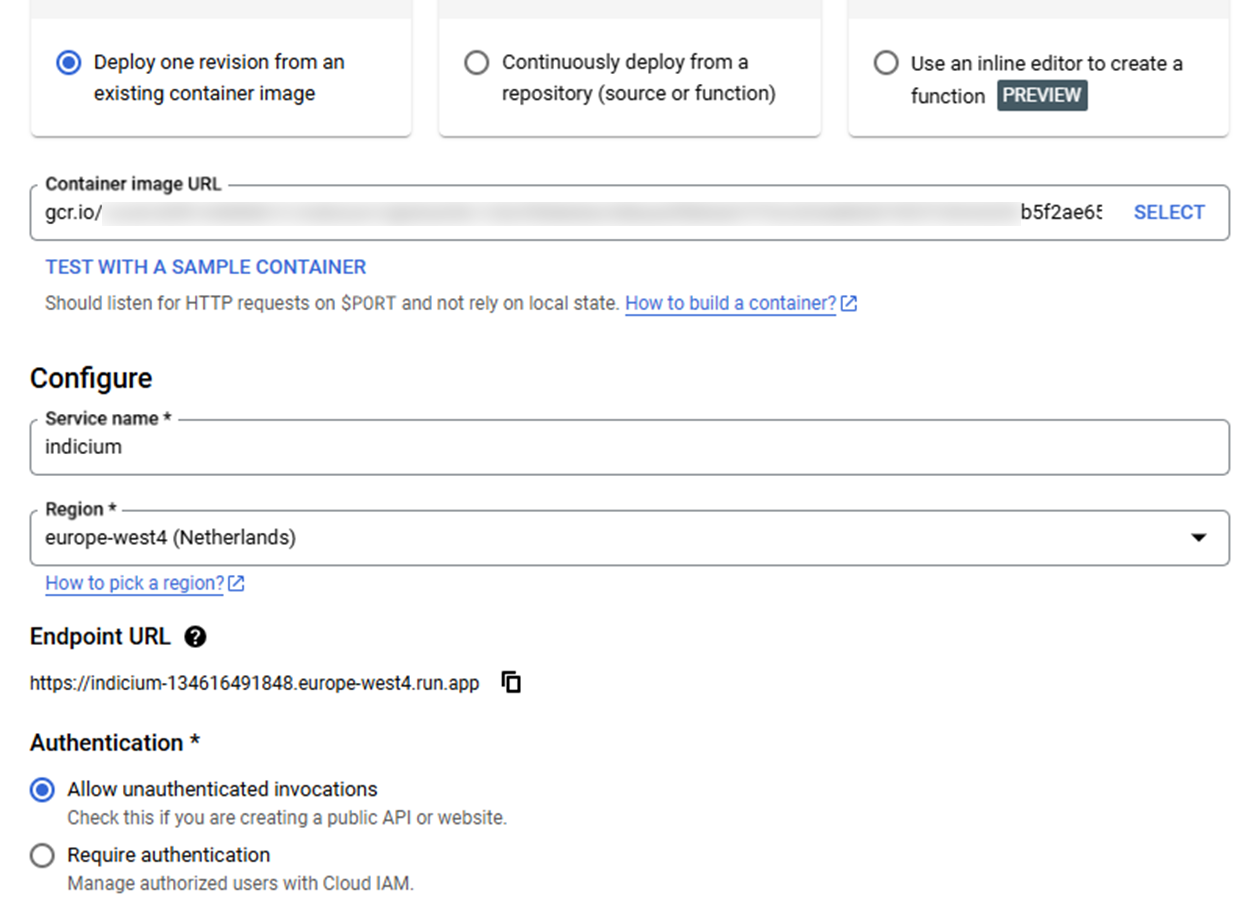 Cloud Run configuration
 -
Expand section Container(s), Volumes, Networking, Security.
-
In tab Container(s):
- In the section Resources, field Memory, select 1 GiB.
- In the section Cloud SQL connections, click Add connection and select your SQL Cloud instance.
-
Go to the tab Networking:
- Select the checkbox Connect to a VPC for outbound traffic (for private connections).
- Select the checkbox Use Serverless VPC Access connectors.
- In the field Network, select the VPC connector you created.
- Select the checkbox Route only requests to private IPs to the VPC.
-
Go to the tab Security:
- In the dropdown list for field Service account, click Create new service account.
- In the pop-up window, in the field Service account name, enter Indicium.
- Click Create.
- In the section Grant this service account access to project, select the following roles:
- Cloud SQL Admin
- Cloud SQL Client
- Click Done.
-
Click Create.
Deploy the Universal GUI to a bucket
Create a bucket
The Universal GUI is a static page that can be deployed to a Google Cloud Storage bucket.
To create a bucket:
- In the left navigation menu , go to Cloud Storage > Buckets.
- Click Create.
![]() Create bucket button
Create bucket button
- In the section Get started, enter a URL for the bucket name, for example,
example.domain.com. - Click Continue.
- In the section Choose where to store your data:
- Select your region.
- In the section Choose a storage class for your data:
- Select Set a default class.
- Select Standard.
- In the section Choose how to control access to objects:
- Select how you want to control access to your objects.
- Click Create.
- In the overview, select the bucket you created.
- Upload the Universal GUI files to the bucket.
Configure access to the bucket
- In the left navigation menu , go to Cloud Storage > Buckets.
- Open your bucket.
- Go to the tab Permissions.
- Click Prevent public access and Confirm.
- Click Grant access.
- In the field New principals, enter
allUsers. - In the field Select a role, select Cloud Storage > Storage Object Viewer from the dropdown list.
- Select Save and Allow public access.
- Go back to the bucket overview.
- In the right-hand menu, select the three dots
 and Edit website configuration.
 - In the pop-up window, enter the Index (main) page suffix and the Error (404 not found) page.
- Click Save.
Example website configuration
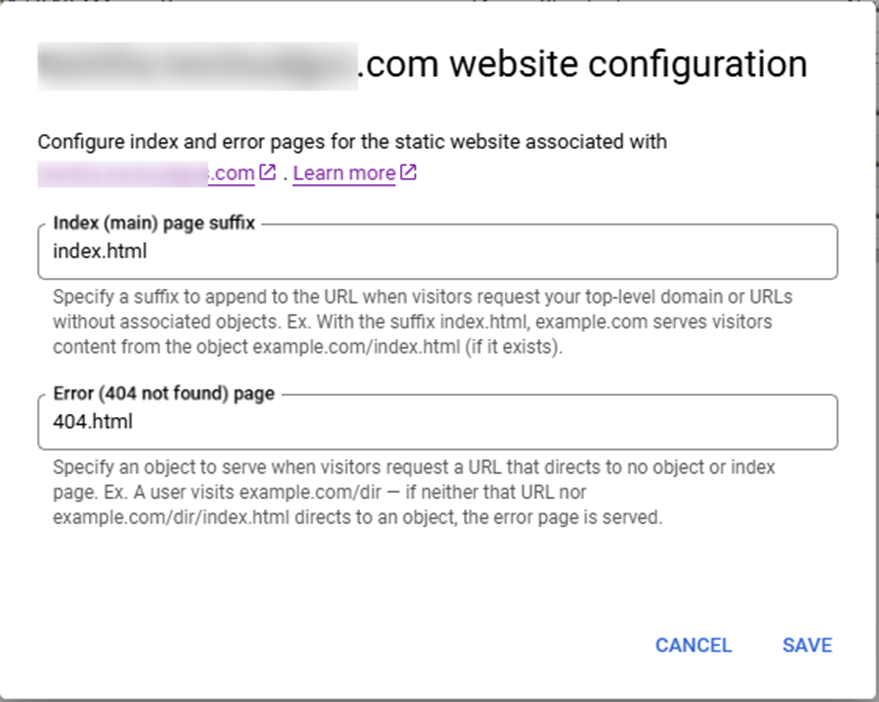 Website configuration for the bucket
Load balancer
Load balancing is the process of distributing a set of tasks over a set of resources to make their overall processing more efficient. In this case, the Universal GUI bucket is the frontend and the Indicium service is the backend.
- The frontend is the part of the load balancer that receives incoming requests from users and forwards them to the appropriate backend service.
- The backend is the part of the load balancer that processes the requests and returns the responses to the frontend.
Create a load balancer
- In the left navigation menu , go to Network services > Load balancing.
- Select Create load balancer.
![]() Create load balancer button
Create load balancer button
- In the section Type of load balancer, select Application Load Balancer (HTTP/HTTPS).
- Click Next.
- In the section Public facing or internal, select Public facing (external).
- In the section Global or single region deployment, select Best for global workloads.
- In the section Load balancer generation, select Global external Application Load Balancer.
- In the section Create load balancer, check your configuration.
- Click Configure.
- Continue with the configuration of the frontend.
Configure the frontend
After creating the load balancer, you must configure the frontend:
-
In the left pane, enter a Load balancer name.
-
In the section Frontend configuration, enter a name: HTTPS (optional).
-
In the field Protocol, select HTTPS.
-
In the field IP version, select IPv4.
-
In the field IP address, select the button Create IP address:
- Enter a name for the IP address.
- Click Reserve.
-
In the field Port, enter 443.
In this example, we create a certificate. You can also use an existing certificate.
-
In the field Certificate, click Create a certificate:
- Enter a name for the certificate.
- Select Create Google-managed certificate.
- Enter your domain (for example,
domain.com).
-
The field SSL policy, the default policy is TLS1.0:
- For more secure settings, create a policy.
- It is best practice to use the latest TLS.
-
Select the checkbox Enable HTTP to HTTPS redirect.
-
Click Done.
-
Continue with the configuration of the backend.
Configure the backend
After creating the load balancer and configuring the frontend, you must configure the backend. It consists of two parts: the backend bucket and the backend service.
- The backend bucket is used in HTTPS load balancing to deliver static files (such as images, CSS, HTML, and JavaScript) directly from Cloud Storage. This reduces the need to host these assets on VMs or other resources, which can be more expensive and less efficient.
- The backend service defines how the load balancer should distribute traffic to the backends, including health checks, session affinity, and timeout settings.
To configure the backend bucket:
- In the field Backend services & backend buckets, select Create a backend bucket from the dropdown list.
- Enter a Name for the backend bucket.
- Select the bucket you created.
- Select the checkbox Cloud CDN.
- Click Create.
To configure the backend service:
-
In the field Backend services & backend buckets, select Create a backend service from the dropdown list.
-
Enter a Name for the backend service.
-
In the field Backend type, select Serverless network endpoint group.
-
In section New backend, in the field Serverless network endpoint groups, select Create serverless network endpoint group.
- Enter a Name.
- Select a Region.
- Select the radio button Cloud Run.
- In the field Select service, select the Indicium you created.
- Click Create.
-
Select the checkbox Enable Cloud CDN.
-
Expand the section Advanced configurations.
-
Expand the section Custom request headers.
-
Select Add header.
- In field Header name 1, enter X-Forwarded-Host.
- In field Header value 1, enter nameloadbalancer.domain.com.
-
Click Create.
Example advanced configuration
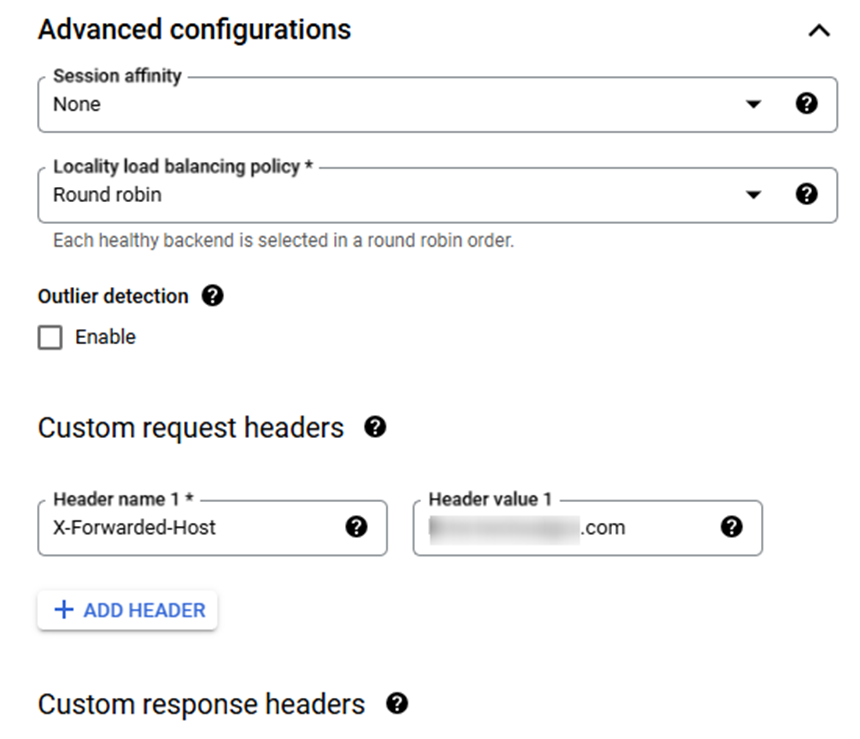 Advanced configuration for the backend service
Configure routing rules
After configuring the backend service, you can configure the routing rules. Routing rules determine how incoming requests are routed to the backend services based on the request's host and path.
To configure the routing rules:
-
In the section Mode, select the radio button Advanced host and path rule.
-
In the section Action, select the radio button Route traffic to a backend service.
-
In the field Backend, select the Universal bucket backend you created.
Example routing rules
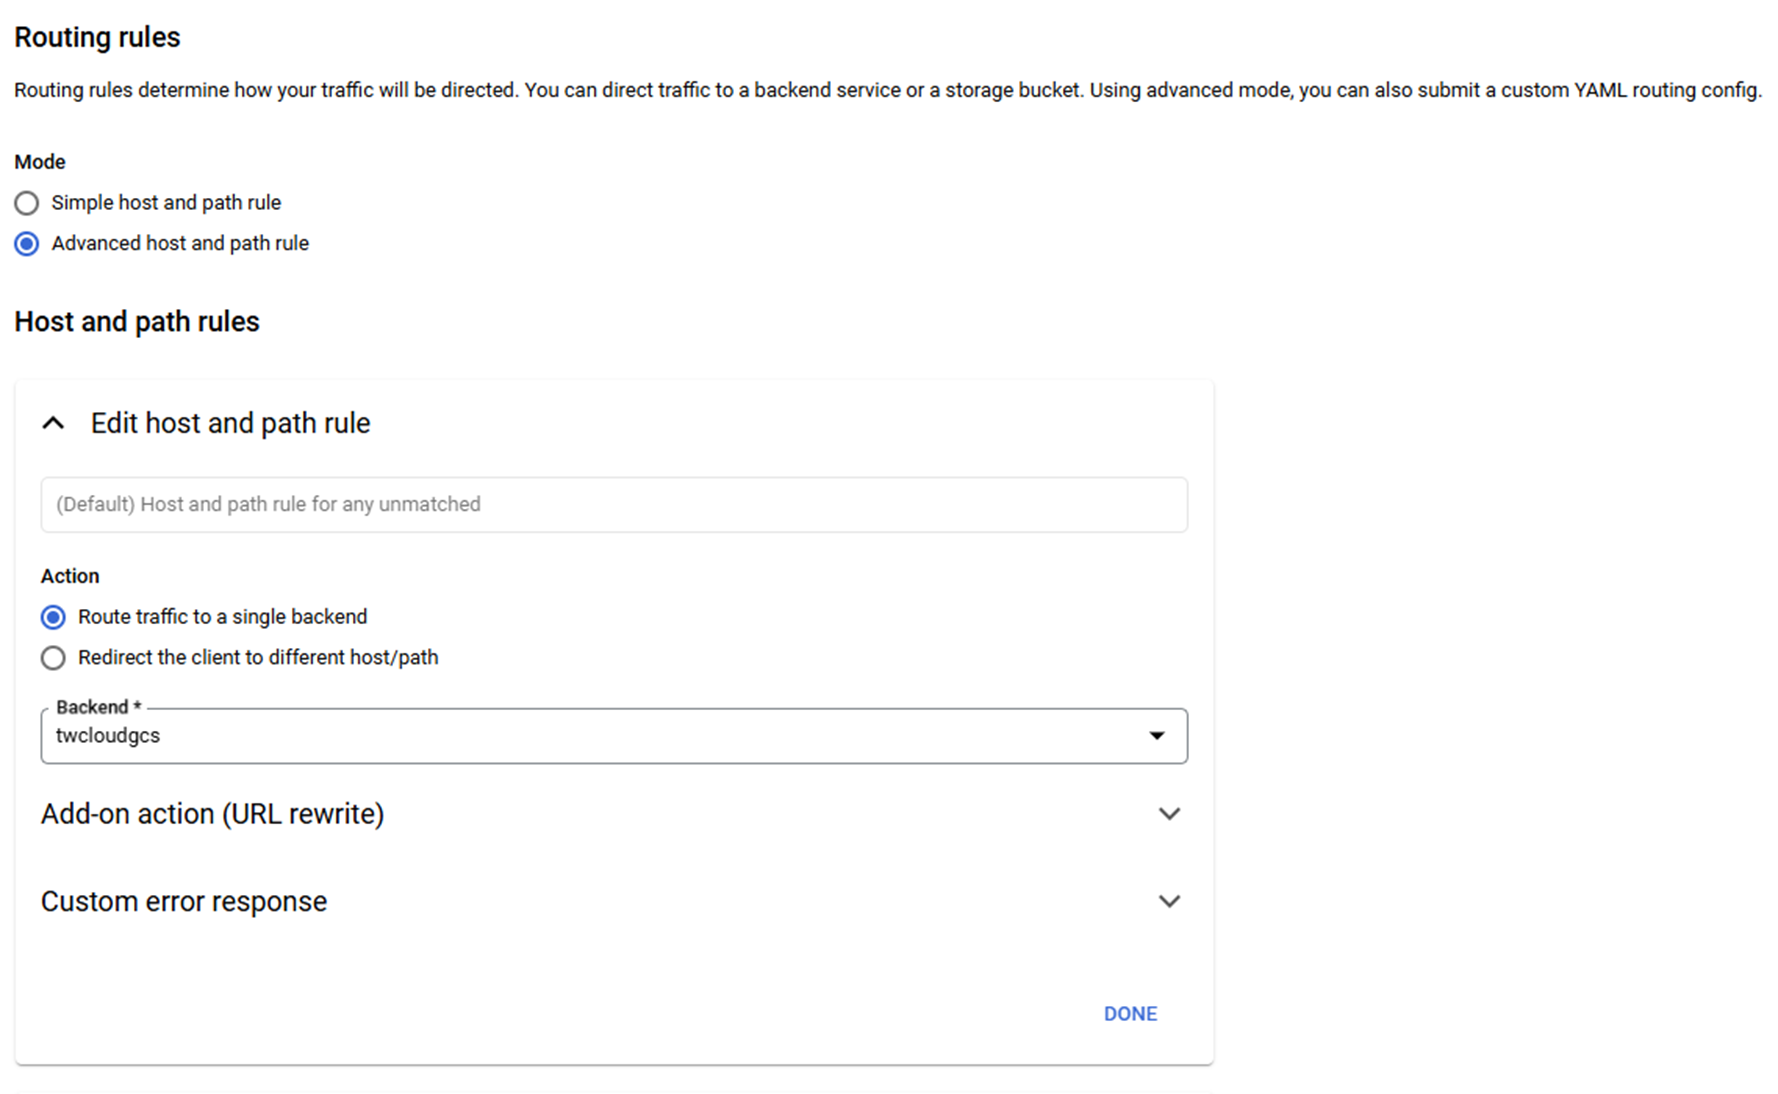 Routing rules for the load balancer
 -
Select the button Add host and path rule.
-
In the field Hosts, enter the domain name (for example,
domain.com). -
In the field Path matcher, enter:
defaultService: projects/project-id/global/backendBuckets/namebackendbucket
name: matcher-1
routeRules:
- description: service-indicium-rewrite
matchRules:
- prefixMatch: /indicium
priority: 1
service: projects/project-id/global/backendServices/namebacketservice
routeAction:
   urlRewrite:
pathPrefixRewrite: /project-id- your projectnamebackendbucket- the name of the backend bucket you created.namebacketservice- the name of the backend service you created.
Example host and path rules
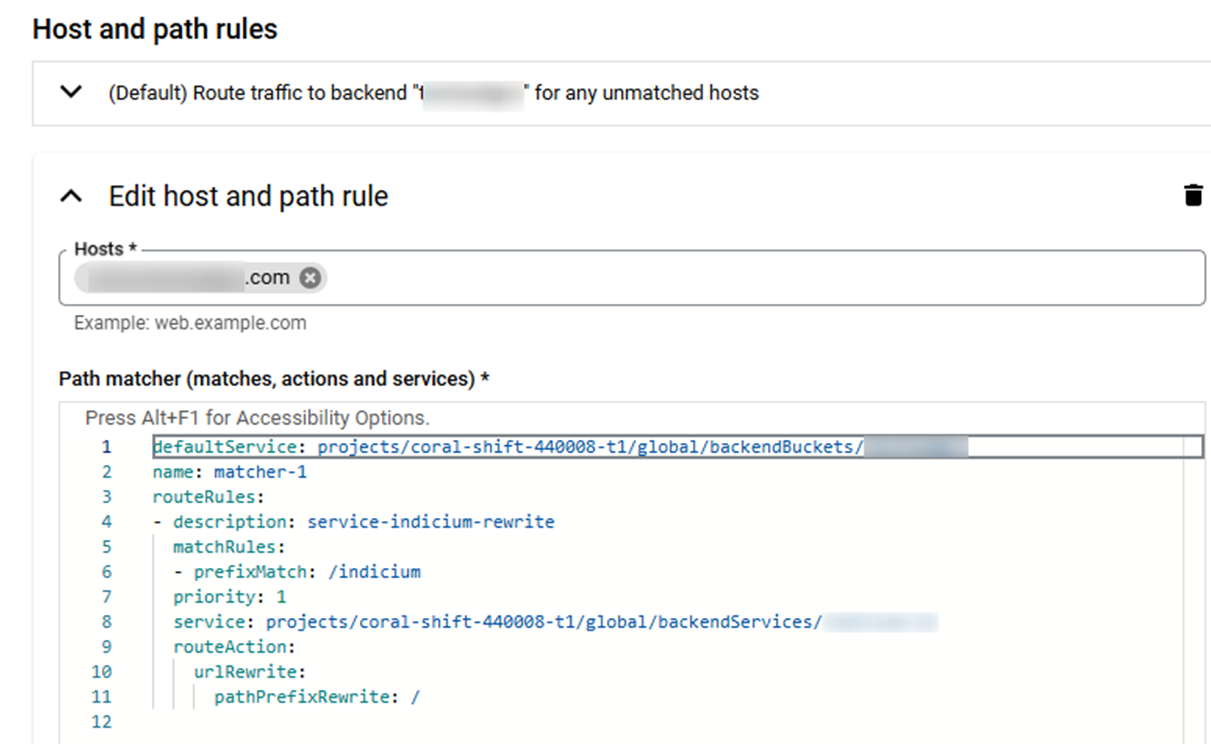 Host and path rules for the load balancer
 -
-
Click Done.
Review and finalize
After configuring the routing rules, you can review and finalize the load balancer:
- Review the settings for the Frontend, Routing rules, and Backend. If your load balancer has already been created, you can find its IP address in the Frontend section.
- Click Create.
Cloud Domain & Cloud DNS (optional)
Register a cloud domain
A Cloud Domain is a domain name that is registered with Google Cloud. Its purpose is to provide a unique and human-readable address for your resources in Google Cloud.
- In the left navigation menu , go to Network services > Cloud Domains.
- Select Register domain.
![]() Register domain button
Register domain button
- In the section Search domain, enter your domain name (for example,
domain.com). A list of available domains is displayed.- Click Select
 .
.
- Click Select
- Click Continue.
- Create a DNS configuration.
- Configure the Privacy protection.
- Enter your Contact details.
- Click Register.
It can take up to 48 hours before the domain is registered.
Update the Cloud DNS
After registering the domain, you must update the Cloud DNS to route traffic correctly.
To update the Cloud DNS, you need to create a DNS zone and add a record set:
- In the left navigation menu , go to Network services > Cloud DNS.
- Click the link of your zone in the column Zone name.
- Click Add standard.
![]() Add standard button
Add standard button
- In the section Create record set:
- In the field DNS name, enter the URL (for example,
domain.com). - In the field Resource record type, select A.
- In the field IPv4 address, enter the IP address of the load balancer you created.
- In the field DNS name, enter the URL (for example,
- Click Create.
For more information, see the official Google Cloud documentation: Cloud DNS overview.