2023.3
Support for this release has ended. The release notes are still available for reference, however, no additional updates will be provided. Update to the latest version. See our Lifecycle policy for more information.
The highlight of this release is the introduction of generative AI in the Software Factory. We have added four Large Language Model connectors that you can use in your system flows. This opens a world of new possibilities.
Of course, we have also implemented AI in the Software Factory. The first use is for reviewing control procedures. You can decide whether you want to use it or not, to support a human review.
An important change in this release is that we have improved the merging process and its screens.
Below, you can read about all the improvements and additions, including 8 Community ideas representing 111 votes.
Questions or suggestions about the release notes? Let us know in the Thinkwise Community!
Contents
- Contents
- Upgrade notes
- Breaking changes
- Generative AI with process flow connectors
- Some definitions
- Generative AI provider
- New process flow connector - LLM Chat completion
- New process flow connector - LLM Completion
- New process flow connector - LLM Instruction
- New process flow connector - LLM Embedding
- Automated AI review for control procedures
- New menu items for AI-related overviews
- New and changed in the Software Factory
- Merging - Merge session screens redesigned
- Merging - Improved merge of duplicate actions
- Merging - Improved change comparison
- Access control - Public API roles
- Access control - Removed task 'Import roles from IAM'
- Models - Encryption process for key values improved
- Models - Encrypt key values for runtime configurations
- Models - Restructured tabs in 'Model content'
- Models - Export and import Software Factory base data
- Models - Switch branch after deleting or archiving
- Models - New branch diagram settings
- Process flows - Show code for a process action
- Process flows - Copying a process action improved
- Processes - Fallback display type for table tasks and reports
- Processes - Drag-drop tasks now have configurable visibility
- Data - Code example in calculated field query of columns
- Data - Optimized data migration for changed column order
- Quality - New menu item 'Manual tests' and Manual test role
- Quality - Go from 'Code review' to 'Control procedure'
- Quality - Triggers in unit tests now called statements
- Quality - Additional menu item 'Sub names'
- Generic - Generated objects included when copying objects
- Generic - Unlink a generated object from its control procedure
- Generic - More space for descriptions
- Specification - Only with role 'Specification developer'
- Specification - Added prefilter 'Current iteration' to Work overview
- Fixed in the Software Factory
- New and changed in the Intelligent Application Manager
- Data model changes
Upgrade notes
SQL Server and .NET Framework support
See the table below for the .NET Framework and SQL Server requirements.
| Component | Minimum .NET version | Minimum SQL Server version |
|---|---|---|
| Windows GUI | 4.7 | 2019 |
| Web GUI | 4.7.2 | 2019 |
| Indicium | 6.0 | |
| Indicium Basic | 4.7.2 |
Re-generate model definition
After every platform upgrade, always re-generate the definition of your work model before you start developing it (menu Deployment > Creation > tab Generate definition). This applies changes in the base models to your work model.
Note: if you are using nested base models, re-generate all base models below the highest level before you re-generate the work models.
Breaking changes
Change in email templates
In IAM, you can no longer use different From addresses and names in different system email templates (menu Settings > Global settings > tab Email templates).
Now, IAM always uses the From address and name you configured for an email provider.
The reason for this is the introduction of email notifications to users from IAM. See Send email notifications from IAM.
During the upgrade, the From address and name are taken from the topmost template of your default system email templates and added to the email provider configuration. Check if this is the address and name you want to use (menu Settings > Global settings > tab Email providers).
Generative AI with process flow connectors
IndiciumGenerative AI is now available in the Software Factory. To support you in using generative AI in your applications, we have added four Large Language Model (LLM) connectors that you can use in your system flows. They connect to an external API configured through your Generative AI Provider in the Software Factory. The prompts are sent to the Generative AI provider and the LLM's response is sent back to your application.
The LLM connectors open a world of new possibilities. You can use them, for example, to:
- Generate text based on a few keywords
- Summarize text
- Classify text (extract the subject or tags from a text)
- Analyze the sentiment of a text
- Answer questions
- Translate text to another language
Share your use cases and inspire others in the Thinkwise Community!
The new connectors are:
- LLM Chat completion - use this connector to build a chat conversation between a user and a Large Language Model (LLM).
- LLM Completion - this connector can suggest how to complete a provided text. You can use it, for example, to complete product descriptions, draft emails, or generate code.
- LLM Instruction - this connector can transform text following your instruction. It can, for example, summarize, translate, change the formality of, or remove sentiment from a text.
- LLM Embedding - this connector can find semantically related texts.
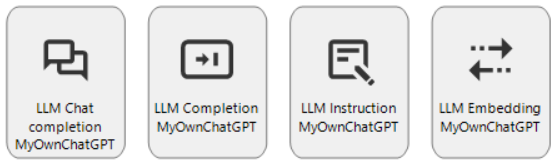 Four new process flow connectors for AI
To use these connectors, you need to configure a generative AI provider.
Some definitions
Generative AI refers to a specific class of artificial intelligence techniques and models. These are designed to create or generate new content that is similar to, but not an exact copy of, existing data. The models can generate new content, such as text, images, music, and more, by learning patterns and structures from large datasets.
A Large Language Model (LLM) is an example of Generative AI. LLMs are large neural networks that are trained to predict the next token (word, punctuation, etc.) given some text. They are trained on very large amounts of data. You can instruct an LLM what to do with your text.
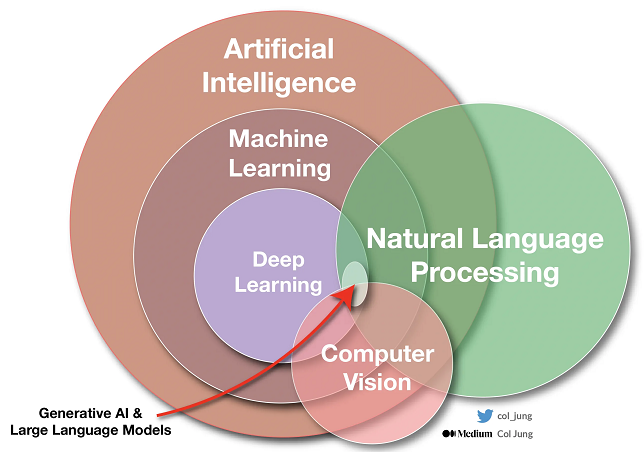 A visual explanation
Generative AI provider
Before you can use an LLM connector in a system flow, you have to configure a generative AI provider for a branch (menu Models > Model overview > tab Branches > tab Generative AI providers). You can create multiple providers to separate LLM workloads across API keys or deployments.
In the Generative AI providers screen, you can add information about the provider and the LLM models:
- We currently support two providers: OpenAI (known for ChatGPT) and Azure OpenAI. Depending on the type, authentication options can be different.
- The AI model settings in this screen are used for the different LLM connectors. You can find a full overview of the currently available models at https://platform.openai.com.
You can change the provider, authentication, and selected AI models per runtime configuration in the Software Factory (menu Maintenance > Runtime configurations > tab Generative AI provider). They can also be overridden for each application in IAM (menu Authorization > Applications > tab Generative AI providers).
If you are using a 3-tier setup, where the Software Factory and IAM are used in the Universal GUI, you can encrypt the generative AI provider's key values.
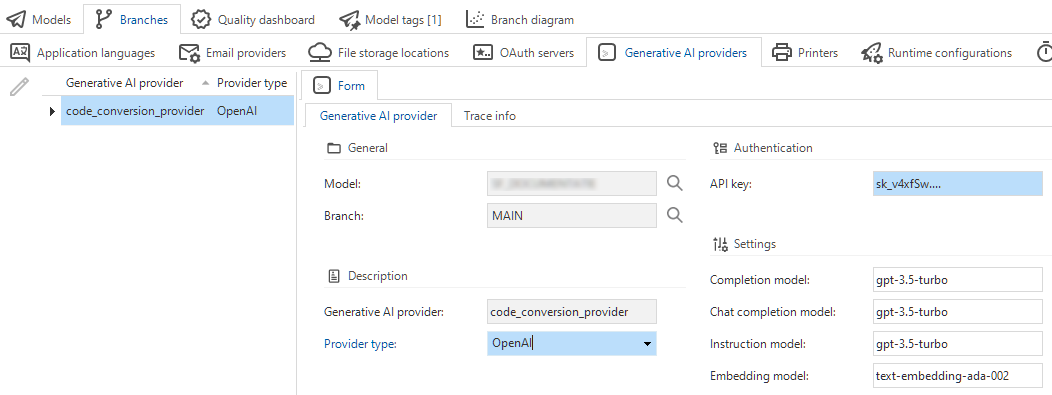 Configuring Generative AI providers
New process flow connector - LLM Chat completion
You can use the LLM Chat completion connector to build a chat conversation between a user and a Large Language Model (LLM).
Depending on your configuration, the history can remain available during the entire conversation and be reused in subsequent connector use. You could also use a user's previous history to set up the goal of the chat and to set the initial context for the chat using data from the application. This can be done invisibly to the user.
Input parameters:
- Chat history (optional) - A JSON array as formatted in the request, usually one system message followed by several user and assistant messages. You can modify this via logic to include any additional messages.
- Prompt - The new message, usually a user message. It will be added to the chat history.
- Max tokens (optional) - The maximum number of tokens. The default depends on the provider and model.
Output parameters:
- Received chat message content
- Chat history - The chat messages in JSON format with the received chat message appended for easy continuation of the chat.
- Status code
- Error text
Example: Customer support with LLM Chat Completion
Context: a customer has sent two emails.
- The role (system) contains the instruction for the LLM.
- A customer support person (user) wants to help the customer fast without reading (long) emails or history.
- The connector (assistant) replies with a summary.
The application provides the LLM Chat Completion connector with an initial history: the system message, the emails making up the support ticket, and a prompt to give a summary. The user will see the most actionable information first: the summary and order number if provided. They can subsequently ask additional questions.
  [
    {
        "role": "system",
        "content": "You are a concise assistant that provides context to and answers questions about customer service tickets. These tickets consist of a number of emails. When asked for a summary, ALWAYS respond with \"order no:\" followed by the order number or \"not provided\" if not provided, and then respond with \"summary:\" followed by a one to two-sentence summary of the support ticket."
    },
    {
        "role": "user",
        "content": "email: Dear Customer Support,\n\nI am writing regarding an order that I recently placed on your website. I received the package yesterday, but unfortunately, it was missing an item that I had ordered.\n\nThe order number is #123456 and the missing item is a blue hoodie in size medium. However, when I opened the package, I noticed that the hoodie was not included. I have checked the entire package thoroughly, and it is clear that the item was not included or accidentally removed during the packaging process.\n\nI kindly request your assistance in resolving this issue as soon as possible. I would appreciate if the missing hoodie could be sent to me promptly or if alternative arrangements could be made. I have been a loyal customer for several years and have always been satisfied with the products and services provided by your company.\n\nPlease let me know what steps should be taken to rectify this situation. I have attached a copy of the order confirmation for your reference. If there is any additional information or documentation required, please do not hesitate to ask.\n\nThank you for your attention to this matter. I hope to receive a prompt response and a resolution to this issue.\n\nKind regards,\n\nBob."
    },
    {
        "role": "user",
        "content": "email: Hi Customer Support,\n\nQuick follow-up! I forgot to mention but it wasn't blue but more of a green-ish.\n\nBob."
    },
    {
        "role": "user",
        "content": "Briefly summarize the customer's problem or question."
    }
  ]
The response (Received chat message content) is: order no.: #123456
summary: The customer received their order but it was missing a green-ish hoodie in size medium. They are requesting assistance in resolving the issue and getting the missing item sent to them promptly.
If the customer support person needs more information, they can ask a question (prompt): When did the customer receive the package?
The connector (assistant) replies (Received chat message content): The customer received the package yesterday.
Both the new question and the generated response are added to the chat history:
[
    {
        "role": "system",
        "content": "You are a concise assistant that provides context to and answers questions about customer service tickets. These tickets consist of a number of emails. When asked for a summary, ALWAYS respond with \"order no:\" followed by the order number or \"not provided\" if not provided, and then respond with \"summary:\" followed by a one to two-sentence summary of the support ticket."
    },
    {
        "role": "user",
        "content": "email: Dear Customer Support,\n\nI am writing regarding an order that I recently placed on your website.
        ... (see the first code snippet for the rest of the content)
        \n\nKind regards,\n\nBob"
    },
    {
        "role": "user",
        "content": "email: Hi Customer Support,\n\nQuick follow-up! I forgot to mention but it wasn't blue but more of a green-ish.\n\nBob."
    },
    {
        "role": "user",
        "content": "Briefly summarize the customer's problem or question."
    },
    {
        "role": "assistant",
        "content": "order no: #123456\nsummary: The customer received their order but the blue hoodie in size medium was missing. They now mention that the hoodie is actually green-ish. They are requesting assistance in resolving the issue and getting the missing item sent to them promptly."
    },
    {
        "role": "user",
        "content": "When did the customer receive the order?"
    },
    {
        "role": "assistant",
        "content": "The customer received the order yesterday."
    }
]
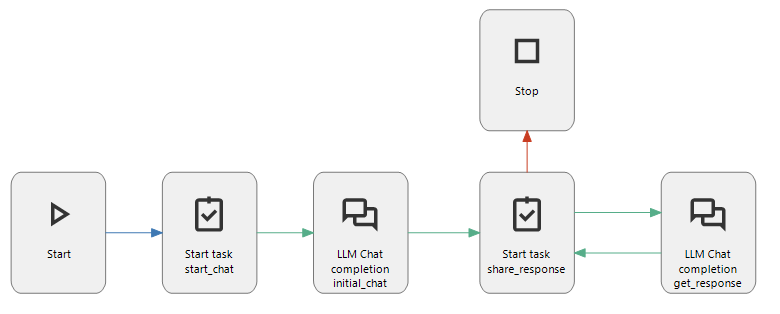 Example of LLM Chat Completion in a system flow
New process flow connector - LLM Completion
The LLM Completion connector suggests how to complete a provided text (prompt). You can use it, for example, to complete product descriptions, draft emails, or generate code.
Input parameters:
- Prompt - The text segment to be completed by the connector.
- Max tokens (optional) - The maximum number of tokens. The default depends on the provider and model (often 16).
Output parameters:
- Output text - The received suggestion for completing the text.
- Status code
- Error text
Example: Text completion with LLM Completion
The prompt from a user is: These P-N Junction Diodes are manufactured in Asia and can be used for
The output text from the connector could be: various electronic applications such as rectification, switching, and signal modulation. P-N junction diodes are designed to allow current flow in one direction while blocking it in the opposite direction, making them ideal for applications where controlling the flow of electricity is essential. They are widely used in power supplies, voltage regulators, LED displays, and many other electronic devices.
 Example of LLM Completion in a system flow
New process flow connector - LLM Instruction
The LLM Instruction connector can transform text following your instruction. It can, for example, summarize, translate, change the formality of, or remove sentiment from a text.
Input parameters:
- Text - The text that needs to be transformed.
- Instruction - The instruction for the model: what should it do with the text?
Output parameters:
- Output text - The transformed text.
- Status code
- Error text
Example: Summarize a text with LLM Instruction
The input text is: I'm very happy to announce today that we have completed the deal. This has been in the works for over 15 months and has been quite challenging. But we did it!
The input instruction is: Reduce to only factual information, removing emotion and sentiment.
The resulting output text from the connector could be: We have completed the deal after a 15-month process.
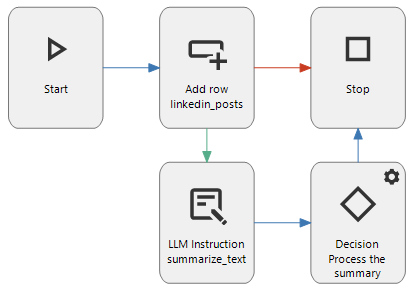 Example of LLM Instruction in a system flow
New process flow connector - LLM Embedding
The LLM Embedding connector transforms the input text into an embedding that can be used to find semantically similar text. A solution in the Thinkstore is available to compare embeddings (see the example below).
'To embed' means to put something inside something else.
The goal of the LLM Embedding connector is to convert a hard-to-grasp object (text) into a representation that is easier to work with. Embedding refers to that conversion; it puts complex pieces of text inside a space of simpler representations.
Think of a simple graph: a two-dimensional plane with axes and an origin. You can put points on that plane and define them by two numbers: the x and y coordinates. With this representation, you can inspect:
- the distance between points (a metric for similarity)
- the angle between two points and the origin (a measure of similarity)
- arithmetic in the vector space, for example:

(this is not usually seen with LLMs)
Points on the two-dimensional plane (2D vectors) can contain only a limited amount of information. The LLM needs to store more information for the vector to represent the text well. So, it uses more numbers to represent a point in a higher dimensional space (typically hundreds to thousands of dimensions).
If a text has been transformed into a vector representation, the LLM can calculate similarities between texts with the cosine similarity function (available in the Thinkstore). This allows you to improve text search and find the extent to which information is related. It is used, for example, by search engines to find results that are similar to the requested topic. Or you can use it to detect anomalies by setting an expected minimum threshold on the similarity between a new text and the texts in the database.
You could even use the LLM Embedding connector to embed older messages in the chat history to provide context to the LLM Chat Completion connector. This can be useful, for example, when the full context has become too large for the LLM Chat Completion connector. However, letting the LLM summarize the chat history is arguably easier.
Input parameters:
- Text - The text that has to be embedded for comparison to other texts.
Output parameters:
- Embedding (JSON) - The resulting embedding (a list of numbers).
- Status code
- Error text
Example: Find related information with LLM Embedding
The input text for a ticket is: I can't save .csv files, it gives an error and I don't know how to solve this
The resulting embedding (JSON) is:
[
    -0.032498688,
    -0.013597722,
    0.0013119321,
    -0.020781917,
    ... (over a thousand numbers)
    -0.01832623
]
This is compared to previously calculated embeddings for other tickets. If there are tickets with the same subject (problems with saving .csv files), they most likely have a high similarity with the request and will be linked.
An implementation of the cosine similarity function is available in the Thinkstore.
select *
from meeting m
cross apply (
    -- A function available in the Thinkstore for comparing embeddings
    select dbo.compare_embedding(m.tickets_embedding, @question_embedding)
) n (cosine_similarity)
where n.cosine_similarity > 0
order by n.cosine_similarity desc
-- Select how much context is necessary. It should still fit the LLM prompt.
offset 0 rows fetch first 4 rows only
 Example of LLM Embedding in a system flow
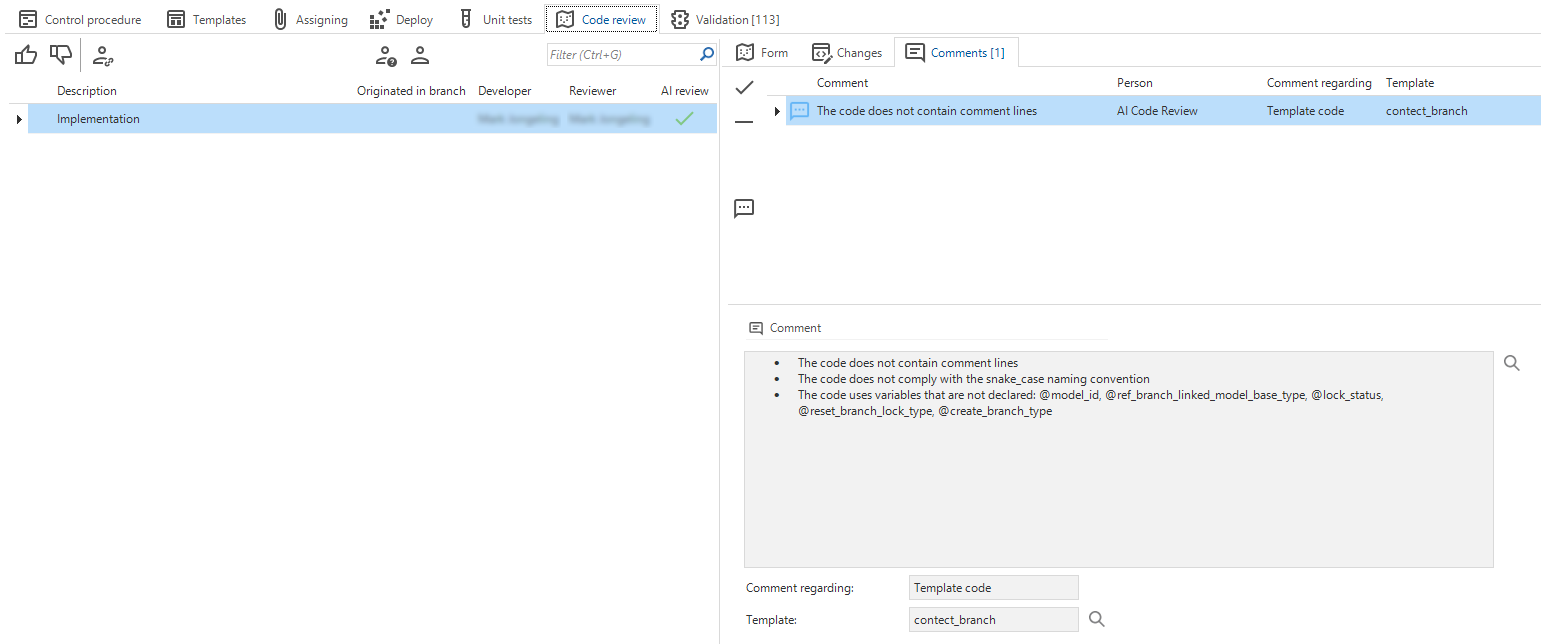
Automated AI review for control procedures
With the new LLM connectors, the Software Factory can now use AI to automatically perform a code review on any control procedure. The new option Use AI review is available in the menu Maintenance > Configuration, and is enabled by default for all Software Factory instances that require code review.
To use automated AI code review, change the status of a control procedure to review using the task
Ready for review ![]() and select the option Review by AI.
The control procedure templates are sent to OpenAI for review, along with a master prompt and code guidelines.
It may take some time for the AI to complete its review.
and select the option Review by AI.
The control procedure templates are sent to OpenAI for review, along with a master prompt and code guidelines.
It may take some time for the AI to complete its review.
After the review, the response is shown as comments on the tab Code review > Comments.
How to start using AI in the Software Factory
To use the AI capabilities of the Software Factory:
- Visit the website of OpenAI to obtain an API key.
- Modify the generative AI provider settings in IAM for the Software Factory application:
- In IAM, navigate to the menu Authorization > Applications > SQLSERVER_SF > tab Generative AI providers.
- Edit
generative_aiand set the API key. - Optional: Change the chat completion model from the default
gpt-3.5-turboto another model that your key allows. - In the Software Factory, navigate to menu Maintenance > Configuration.
- Make sure that Use AI review is selected. Note that this only applies if the option Code review required is also selected.
This feature is intended to support human reviewers and can be used as a tool to assist in the review process. Users can still disable the AI review if they prefer only a manual review. We value your feedback in the Community to help improve the use of AI in the Thinkwise Platform.
 Results of the AI review
New menu items for AI-related overviews
newWe have added two new menu items for AI-related overviews to the menu Advanced > Master data > Software > Code guidelines:
- Master prompts - An overview of the master prompts used for the Software Factory's AI capabilities.
- Code guidelines - An overview of the code guidelines used for AI code review.
New and changed in the Software Factory
Merging - Merge session screens redesigned
changeWe changed the detail screens of the merge process to improve the process and the conflicts overview (menu Models > Merging). In addition, we have added an overview showing the merge's impact.
| Old name | New name | Description |
|---|---|---|
| Conflicts | Active conflicts | A list of all conflicts that were detected after you started the merge session. You have to resolve all conflicts to execute the merge session.
|
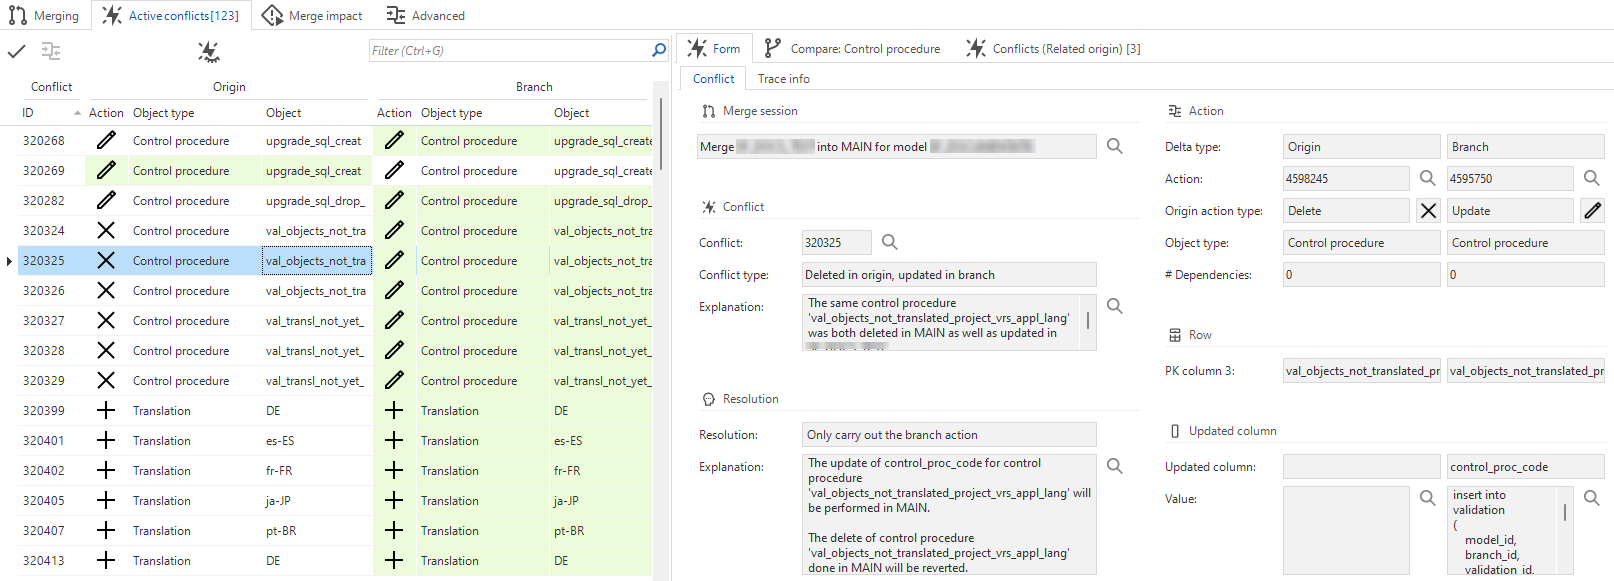 | ||
| - | Merge impact | An overview of all the actions that will be done during the execution of the merge session. You can use this for a full review.
|
 | ||
| Actions | Advanced | A complete overview of all generated delta actions. For more complex merge sessions, you can select here if and how actions should be applied or ignored (tab Form > group Apply). However, we recommend using separate branches to limit which changes are merged. |
 |
Merging - Improved merge of duplicate actions
changeDuplicate actions can occur if you first merge a branch to the origin and then the origin back to the branch.
Previously, only for duplicate insert actions in a branch and origin, a merge conflict was created and resolved automatically by skipping the identical insert of the source branch. Identical delete and update actions were still executed because they had no real effect. However, they cluttered the overview of actions with an impact on the target branch.
Now, merge sessions also create and automatically resolve conflicts for duplicate update and delete actions in the source and target branches. Identical update and delete actions for the source branch will be skipped since they have already been done in the target branch.
As a result, fewer actions will be marked as Actions with branch impact ![]() .
It also leads to a minor performance improvement, as the duplicate update and delete actions in the source branch are no longer executed.
You will see the change best when you review the impact of a merge session on a branch
with the filter Actions with impact on the branch
.
It also leads to a minor performance improvement, as the duplicate update and delete actions in the source branch are no longer executed.
You will see the change best when you review the impact of a merge session on a branch
with the filter Actions with impact on the branch ![]() activated (menu Models > Merge > tab Advanced).
activated (menu Models > Merge > tab Advanced).
If you disable both prefilters in the tab Advanced, you will see the automatically resolved conflicts.
The new conflict types are:
- Deleted in origin and branch
- Updated in origin and branch with the same value
- Inserted in origin and branch with the same values (in addition to the existing Inserted in origin and branch).
The new conflict types are mostly informational - they are automatically resolved and cannot be changed.
Merging - Improved change comparison
changePreviously, the tab Active conflicts would contain a tab Comparison that displayed two forms side by side. Now, the new tab Compare: [object type] is available for each object type involved in a selected conflict.
On these comparison tabs, you can quickly identify and focus on specific conflicts. It also provides historical context so you can resolve conflicts more efficiently by having easy access to relevant information.
The tab Compare: [object type] contains three rows:
- current origin
- current branch
- origin from when the branch was created
Having access to both the original version and the changes can help you resolve conflicts more easily. You can compare the column changes for each version to help you decide on the correct conflict resolution. This is particularly useful if the origin was changed after the branch was created.
In the branch, you have added a description to column A, but in the origin you have also edited the description of column A in the same table. This causes a conflict. If you select this conflict on the tab Active conflicts, a tab will appear: Comparison: Col. On this tab you will see three rows: one with the current origin record, one with the current branch record, and one with the record from when the branch was first created. By comparing the two different updated versions to the original description, you can more easily determine how to resolve the conflict.
Access control - Public API roles
newTo integrate your application with other systems, you can use Indicium calls with authentication, for example, as a client application or with an OpenID provider.
However, systems like webhooks or subscriptions do not always allow authentication.
In these cases, you can now make the API call public for access without authentication. You can use this for actions like processing appointments and emails with Microsoft Graph.
You can only use this for individual API calls. Authentication is always required for your application if you use it with the Universal GUI.
To set up a public API call, you must assign a role to the object, for example, to a subroutine, and make it public with the new checkbox Allow as public API (menu Access control > Roles). This option does not affect how the role is used in a GUI.
You need to synchronize the role to IAM as usual. In IAM, an application administrator or application owner can complete the configuration. See Public API roles configuration.
After configuring the Public API role, you can make the public API call.
The URL is the same as a regular API call aside from an extra /public/ segment as the first segment in the URL.
-
A regular API call URL would look like:
https://my_server/indicium/iam/my_appl/my_procedure -
A public API call URL would look like:
https://my_server/indicium/public/iam/my_appl/my_procedure
If the /public/ and /open/ segments are used simultaneously, the /public/ segment must precede the /open/ segment.
Validations for 'Allow as public API'
The validations for Allow as public API are mainly warnings that your setup of a role is perhaps not the most logical solution. They are part of the validation group Access control. We have added the following validations:
- Error - A public API role is an all-rights role - All-rights roles can pose a security risk because a user with this role can access everything, especially when it is also a public API role.
- Warning - Adding, updating, or deleting is allowed for a public API role - Anyone with knowledge of the URL is allowed to manipulate data in the application.
- Warning - A public API role allows access to a column with potentially sensitive data - A column that potentially contains sensitive data has been authorized as a public API role. This means anyone who knows the URL can access this potentially sensitive data.
- Warning - A public API role includes a process flow with UI actions other than the start action - While starting process flows on an API call can be very useful, API clients are unlikely to follow up on any UI continuation of a process flow.
- Warning - A public API role has access to sensitive data- A column that contains sensitive data has been authorized for a public API role. This means that anyone who knows the URL can access this sensitive data.
- Warning - Subroutine execution is allowed for a public API role - Anyone who knows the URL is allowed to execute this subroutine and possibly manipulate data in the application.
- Warning - Task execution is allowed for a public API role - Anyone who knows the URL is allowed to execute this task and possibly manipulate data in the application.
- Information - A public API role has access to a list bar item - There is no point in including list bar items rights in a public API role.
- Information - A public API role has access to a menu - There is no point in including menu rights in a public API role.
- Information - A public API role has access to a tree view item - There is no point in including tree view item rights in a public API role.
- Information - A public API role has access to a tile - There is no point in including tile rights in a public API role.
- Information - A public API role has access to a custom screen - There is no point in including custom screen rights in a public API role.
Access control - Removed task 'Import roles from IAM'
changeIn the Software Factory 2019.1, we moved role configuration from IAM to the Software Factory. At that time, we introduced a task in the Software Factory Roles screen that allowed you to import roles from IAM.
We did this to facilitate upgrading from an older platform version. See this blog post.
Given the number of platform versions since the 2019.1 release, the task Import roles from IAM ![]() is deprecated.
We have removed it from the Roles screen (menu Access control > Roles).
is deprecated.
We have removed it from the Roles screen (menu Access control > Roles).
Models - Encryption process for key values improved
change 3-tier Software Factory and IAM in the Universal GUIEncryption is only available in a 3-tier setup, where the Software Factory and IAM are used in the Universal GUI. It is not available for the Software Factory and IAM for the 2-tier Windows or Web GUIs because it requires Indicium support and configuration.
In the Software Factory and IAM, it is possible to encrypt key values when you switch ![]() to another type of email provider or file storage location.
If you changed the type, a pop-up forced you to use encryption.
The only way to avoid encryption was to cancel the pop-up and manually edit the settings.
to another type of email provider or file storage location.
If you changed the type, a pop-up forced you to use encryption.
The only way to avoid encryption was to cancel the pop-up and manually edit the settings.
To improve this, we have added a checkbox Use encryption to the task Switch type ![]() .
It gives you more control over the use of encryption.
It is selected by default for types that support encryption, but you can clear it.
.
It gives you more control over the use of encryption.
It is selected by default for types that support encryption, but you can clear it.
- If you clear it, the unencrypted key value fields will be available again.
- Only if Use encryption is selected, the pop-up appears so you can enter the key values that need to be encrypted.
You can find the task Switch type ![]() that contains the Use encryption checkbox in:
that contains the Use encryption checkbox in:
- Software Factory - menu Maintenance > Runtime configurations > tab Email providers/File storage locations.
- IAM - menu Authorization > Applications > tab Email providers/File storage location. The configuration in IAM for an application overrides the one in the Software Factory.
Models - Encrypt key values for runtime configurations
3-tier Software Factory in the Universal GUI newYou can already set up a different File storage location, Email provider, and OAuth server per runtime configuration (menu Maintenance > Runtime configuration > tab Email providers/File storage locations/OAuth servers). Now, you can also encrypt the key values for each of these items in the runtime configuration.
We also added the task Reset encrypted data ![]() to these screens.
When you execute this task, the encrypted key values will be deleted.
If you use this, do not forget to add unencrypted key values, to ensure the email provider, file storage location or Auth server keeps working.
to these screens.
When you execute this task, the encrypted key values will be deleted.
If you use this, do not forget to add unencrypted key values, to ensure the email provider, file storage location or Auth server keeps working.
Models - Restructured tabs in 'Model content'
changeWe have restructured the tabs in the screen Model content (menu Models > tab Model content).
The large number of tabs on this screen has grown a lot over the years, which made it feel cluttered. We have removed redundant tabs to improve the clarity of this screen. This improves the user experience, and it makes maintenance easier for our development team.
To restructure the screen, we have set up criteria that tabs should meet to be retained or added on the Model content screen. The tabs that did not meet those criteria have been removed.
The two main criteria for including tabs on the screen Model content are:
- Tabs out of their parent context - These contain objects that are not shown in their parent context, such as Columns, Task/Report/Subroutine parameters, Indexes, and Prefilters. You can use these for global actions, such as filtering, searching, analyzing, comparing, and (mass) updating data.
- Tabs that serve a unique purpose - These are not available as a screen elsewhere, such as Code files and Extenders.
The criteria have led to the following results:
- We kept 21 tabs that meet the criteria.
- We added 5 tabs that meet the criteria but were not yet present:
- Elements
- Table variant - columns
- Task variant - parameters
- Report variant - parameters
- Check constraints
- We removed 31 tabs that did not meet the criteria (except for Model settings and Tables).
- Some of the removed tabs included a Tags tab. To preserve this functionality, we added Tags tabs to the process-optimized screens for subjects where they were missing. The Tags tab for all topics is still available.
Models - Export and import Software Factory base data
newWhen importing a model, its base data is not always available in the target Software Factory instance (for example, color, or sample data sets). For these cases, you can now export the user-created base data from your source Software Factory instance and import it into the target Software Factory instance.
- Export your base data with the task Export base data in the menu Advanced > Master data > Software Factory.
Then, select the folder where you want to save the exported
base_data.datfile. - Import your base data into other Software Factory instances with the task Import base data in the menu Advanced > Master data > Software Factory.
Note that if you customize base data that came with the Thinkwise Platform, it may be overwritten when upgrading to a new platform version.
Models - Switch branch after deleting or archiving
changePreviously, if you archived your currently active branch, the Software Factory determined the origin of that branch and switched your active session to that origin. The same happened if you archived a branch after executing a merge session.
However, if you deleted your active branch, the Software Factory could not change your active session to the origin. This meant your current active session was no longer valid, and if you tried to change an open document, you would get an error.
Both processes have been changed. Now, if you delete or archive your active branch, the Switch branch dialog opens. Here, you can decide in which branch you want to continue.
Models - New branch diagram settings
newWe have introduced new settings to modify how the branch diagram is displayed.
These settings include:
- Display versions from - Set a start date and time to the range of versions that should be displayed.
- Display versions to - Set an end date and time to the range of versions that should be displayed.
- Width between versions - Specify the number of pixels between each version circle in the branch diagram.
If you select a date range, the branch diagram will show the following:
- First versions are always shown, regardless of whether they fall within the specified range. Without a first version, the creation logic of branches would be lost within the branch diagram.
- Named or merged versions of branches are only shown if they fall within the specified range.
You can specify the branch diagram settings in the following places:
- Model-wide: menu Models > Model overview > Models > tab Model overview. The settings specified here apply to the entire model, with no distinction between which developer is logged into the Software Factory, unless they have customized their settings.
- User-specific: menu Models > Model overview > tab Branch diagram > tab Settings. On this tab, you can specify your personal preferences. The settings chosen here are not shown to other developers. The same tab is available in the menu Maintenance > Users > tab Branch diagram settings.
Process flows - Show code for a process action
Community ideaIt is possible to use logic in a process flow. Previously, you could only view the code in the screens Code overview or Functionality.
To make code inspection faster and easier, we have added a new task: Show process action code. It is available on the tabs Design and Process actions (menu Processes > Process flows) for process actions that use logic.
You can recognize those process actions in the tab Design by the ![]() icon.
In the tab Process actions, you can use the prefilter Contains logic
icon.
In the tab Process actions, you can use the prefilter Contains logic ![]() .
.
You can execute the task Show process action code from the overflow menu or with the shortcut Alt + S. It is possible to include the last preceding program object item, or include all preceding program object items. In the same way, you can include the first subsequent program object item, or include all subsequent program object items.
 Inspect the code for a process action
Process flows - Copying a process action improved
Community idea changeWhen you copy a process action in the tab Design of a process flow (menu Processes > Process flows), its X and Y axis coordinates are also copied. This could cause the process action to be drawn behind the copied process action, hiding it from view.
Now, both axis values of the copied process action are updated to be slightly different from those of the original. This ensures that the copied process action is visible.
 Both the original and the copied action are visible
Processes - Fallback display type for table tasks and reports
Universal GUI changeTo customize how a table task or table report is shown in the Universal GUI, you could already change its Display type. If there was enough space, the presentation would be according to the selected type. If there was not enough space, the Universal GUI decided what the fallback display type would be.
For example, you could set the display type for a task to Icon + text. On a smaller screen, the GUI would fall back to Text. Then, it would fall back to Icon as icons are smaller than text. Finally, it would move the task to the overflow menu.
You can now customize the fallback behavior. We have added additional combinations of fallback display types to cover most cases. For example, you can now configure the GUI to immediately fall back to Icon if it is not possible to show Icon + text.
If there is sufficient space, the first option of your selected display type is chosen. Without enough space for that option, the (first) display type between parentheses is chosen, and so on. For all options except Overflow and Hidden, the final fallback display type is the overflow menu, which is not explicitly mentioned in the options.
These settings are available in:
- menu Processes > Tasks > tab Defaults/Variants > tab Table tasks
- menu User interface > Subjects > tab Defaults/Variants > tab Links > tab Tasks
- menu Processes > Reports > tab Defaults/Variants > tab Table reports
- menu User interface > Subjects > tab Defaults/Variants > tab Links > tab Reports
 New display type options
Processes - Drag-drop tasks now have configurable visibility
Universal GUI changeYou can now configure the Display type for drag-and-drop tasks:
- menu Processes > Tasks > tab Defaults/Variants > tab Table tasks
- menu User interface > Subjects > tab Defaults/Variants > tab Links > tab Tasks
Previously, these tasks were always hidden.
You can choose to show a task as any of the Display type options (see Fallback display type for table tasks and reports). It is still possible to hide a drag-and-drop task, with the option Hidden.
During the update, existing tasks get Display type - Hidden, so your existing product will not change.
Data - Code example in calculated field query of columns
Community idea newA code example is now added to the query field when you use a calculation type for a column. It serves as an illustration to explain the subtle differences in query structure for calculation types (menu Data > Data model > tab Tables > tab Columns > tab Form > tab Column > Calculated field). Switching between calculation types will overwrite the current example if possible.
 A code example for the calculation type Expression
Data - Optimized data migration for changed column order
When you add a column between other columns, it increases the absolute order number of the subsequent columns by 1. Previously, these subsequent columns would be marked as 'Changed' in menu Data > Data migration > tab Tables > tab List > tab Columns > tab Column changes, even though only their absolute position had changed. This could distract attention from the newly added column whose attribute had actually changed.
To prevent this, columns with a changed absolute order number are no longer displayed on the tab Column changes.
It is also possible that no columns have been added or removed, and the only change is the order of already existing columns. In this case, a new checkbox Column order changed is shown on the tab Table changes, as an indication why the data migration will result in an upgrade.
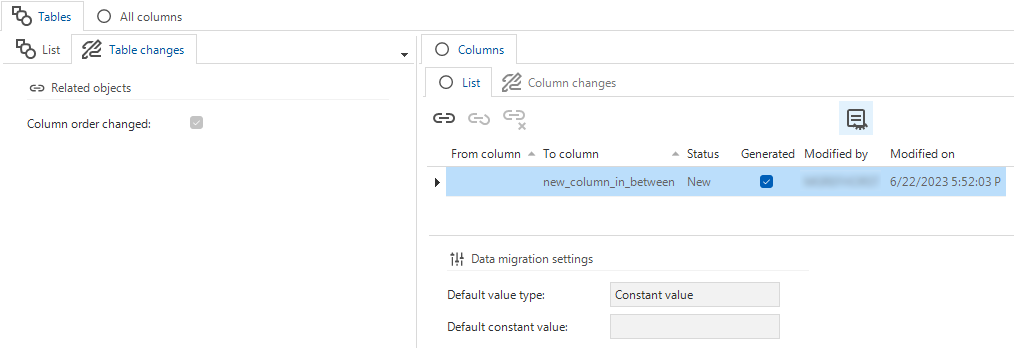 The new 'Column order changed' checkbox
This checkbox is not affected by changing the order of expression columns, as they should never result in an upgrade.
Quality - New menu item 'Manual tests' and Manual test role
changeThe menu Quality contains a new menu item Manual tests. You need the Manual test role to work with manual test scenarios. This role can be granted in IAM, see Grant a user group access to the application.
Some of the tabs in Manual tests are new, others have been (partially) moved from the menu Specification (see Specification - Only with the role specification developer).
- Test scenarios - Moved from Specification to Quality. It has no model and branch context.
- Test runs - Was already available in Quality. It has a model and branch context.
- Test findings - New. A simplified variant of the Specification's Work tab. The default prefilter only shows test findings. It has no model and branch context.
To support the new manual tests, we have added a dedicated Manual test role.
Quality - Go from 'Code review' to 'Control procedure'
newWhen reviewing code, you may want to view its context. For example, the unaffected templates, previous code reviews, or even the entire program object code.
To support this, we have added a new task to the Code review screen (menu Quality > Code review):
![]() Go to control procedure in Functionality (ALT + C).
It opens the object in the tab Control procedure of the Functionality screen.
Go to control procedure in Functionality (ALT + C).
It opens the object in the tab Control procedure of the Functionality screen.
Similar tasks are already available in other places, such as the tab Deploy and the screen Code overview.
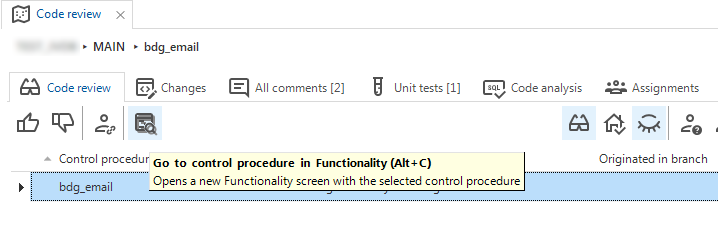 Go from Code review to Control procedure
Quality - Triggers in unit tests now called statements
changeThe insert, delete, and update triggers you can choose when creating or editing a unit test are now called insert, delete, and update statements. 'Statement' more accurately covers the purpose of such a unit test because you test the specific statement, which may or may not contain a trigger.
Quality - Additional menu item 'Sub names'
change CommunityTo support clear and consistent naming in your software, it is important that you only use approved sub names for model objects.
These sub names were already available in the Software Factory, in the menu Advanced > Model management > Sub name groups.
To improve your use of naming conventions, we have made access to this menu item easier by adding it to the menu Quality. In this new menu item, you can manually add sub names (approved or disapproved) before they are used in the model.
It gives you access to all the relevant sub names of the branch you are working in and is based on the branch's Sub name group. The sub name group for a branch is set in the menu Models > Model overview > tab Branches > tab Model settings.
Generic - Generated objects included when copying objects
changePreviously, when you copied an object, both the object and its underlying objects were always added as 'not generated'.
Now, if the original has been generated by a control procedure, the object and its underlying objects will also remain generated.
This applies to all generic copy ![]() tasks.
tasks.
For example, if you used the Dynamic Model to add a table and copied that table, the copy became 'not-generated'. Now it remains generated and can still be managed by the Dynamic Model.
In most situations, this changed behavior is desired, but in some cases, some objects may be deleted after generating the definition for your branch.
Verify that the meta control procedure that needs to generate the object does actually generate it.
Generic - Unlink a generated object from its control procedure
changeSince it is now possible to include generated objects in copy object tasks (see Generated objects included when copying objects), you can also unlink a generated object from its control procedure. When an object is no longer linked, it is no longer read-only and can be changed.
For example, if you have a meta control procedure that adds a column active to every table and you copy a table, the active column remains generated. But when you change the table to a view, you can choose to unlink the active column and make it read-only.
The task for unlinking a generated object is available for every object that can be generated.
Some objects may be hidden by the prefilter Hide generated ![]() .
If necessary, first deactivate the prefilter.
Then, select the generated object, and execute the task Unlink generated object from the context menu, the ribbon, or with Ctrl+U.
.
If necessary, first deactivate the prefilter.
Then, select the generated object, and execute the task Unlink generated object from the context menu, the ribbon, or with Ctrl+U.
The task is not available in the taskbar because it is an expert feature that you should only use if you fully understand the Dynamic Model.
Generic - More space for descriptions
changeWe have improved the layout of all screens that contain a form with the field Description. This field now has its own form group, allowing us to remove the label in front of it. This change gives the description more space, which improves its readability.
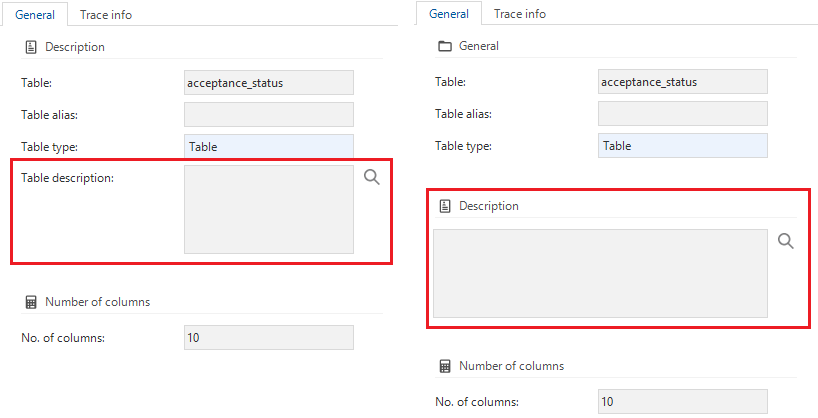 Left, the old description field, right, the new one
Specification - Only with role 'Specification developer'
changeDevelopers do not always interact with the specifications, but the menu items for Specification take up a lot of space at the top of the menu. Because of this, the menu group Specification will now only be visible to developers with the new role Specification developer. If the developer's user group is linked to this role in IAM, they will have full access to the specifications.
Specification - Added prefilter 'Current iteration' to Work overview
Community idea newTo help you easily organize your planned work for the current iteration,
we have added the prefilter Current iteration ![]() to the Work overview screen (menu Specification > Work overview).
to the Work overview screen (menu Specification > Work overview).
 Current iteration prefilter
Fixed in the Software Factory
Branch update after revert
During its lifecycle, a branch can be updated via merges from its origin. Future merges will only take into account changes made since that update.
If a branch is reverted to a point in time before the last update, its merge session administration is now updated as well. After reverting, future merges from the branch's origin will be taken into account since the last branch update before the reversal.
The branch FEATURE has been created based on version 1.11 in DEVELOP. It was subsequently updated with the DEVELOP branch at version 1.12.
Future merges will be based on the differences between 1.12 and the current DEVELOP branch and 1.12 and the current FEATURE branch.
If you revert FEATURE to F0.2, future merges will be based on the differences between 1.11 and the current DEVELOP branch and 1.11 and the current FEATURE branch.
 Branch update after revert
No more error when changing base model screen types
If you changed a screen type in the base model, generating the work model where this screen type was used could cause a constraint error. This has been solved.
Copying rights when renaming a table or report
If you tried to rename or delete a task or report with underlying table task or report rights, you would encounter an error message. This has been fixed.
Disabled output parameters for functions
If you select the checkbox Output parameter (menu Business Logic > Subroutines > tab Default > tab Subroutine parameters > tab Form) for subroutines with the type 'Function', you encounter an error during the upgrade because output parameters for functions are not supported. For this reason, you can no longer select the Output parameter checkbox.
A validation to detect this situation was already present. It is still useful if the Output parameter checkbox is selected using the dynamic model.
Upgrade no longer fails when changing a calculated column (function) to a standard column
If a calculated column (function) is changed to a standard column and an upgrade is executed afterward, the parameters of the proxy function for that column will now be passed on correctly to the renamed proxy function in the upgrade script.
New and changed in the Intelligent Application Manager
Authorization - Public API roles configuration
new Application administrator Application ownerIf a role in the Software Factory has been marked as Allow as public API (see Access control - Public API roles), you can continue its configuration in IAM.
A new tab is available in IAM: menu Authorization > Applications > tab Public API roles. It contains an overview of the roles that have been marked in the Software Factory as Allow as public API.
You can activate or deactivate a role as public API with the tasks Set as public role ![]() and Revoke as public role
and Revoke as public role ![]() .
If a role is activated as a public role in IAM but no longer allowed as a public API in the Software Factory, it gets a red and bold font.
.
If a role is activated as a public role in IAM but no longer allowed as a public API in the Software Factory, it gets a red and bold font.
On the tab List you can also see if a role is available for a public API. You cannot change it here. When you copy an application in IAM, you can select whether or not to copy this setting.
 Public API configuration in IAM
User notifications - Send email notifications from IAM
Community idea newYou can now send email notifications from IAM to users. Use this, for example, to inform users of an application about planned system downtime. You can only email users with a registered email address in IAM.
To send notification emails, you must first set up an email provider for IAM (menu Settings > Global settings > tab Email providers).
 An email provider for notification emails
Then, configure a template for your notification email. Templates are available in the menu Settings > Global settings > tab Email templates > tab Notification email templates. If a template is available in the user's preferred language, they will receive it in that language. If not, IAM uses the default template.
You can personalize the email with parameters in the template's email body.
The current options are {first_name} and {sur_name}.
They will be replaced with the users' first name and surname.
If the information is not available, the parameter will be left empty.
You can use this, for example, as Dear {first_name} {sur_name}.
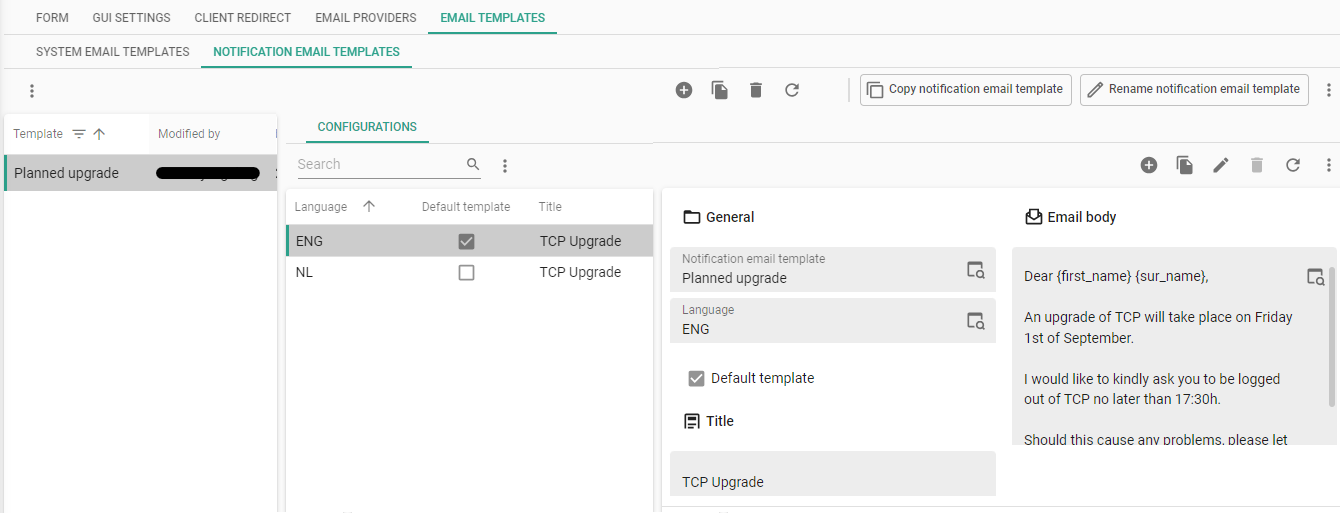 A template for a notification email
Now you can create the notification emails.
This process is part of the existing user notification system in IAM.
Select the task Add notifications ![]() (menu Authorization > Tenants/Applications/User groups/Users).
Select a Notification type (Email notification) and an Email template.
A preview is available but cannot be edited here.
IAM checks the notification queue every 10 seconds.
If an email notification has been added, it will be sent.
(menu Authorization > Tenants/Applications/User groups/Users).
Select a Notification type (Email notification) and an Email template.
A preview is available but cannot be edited here.
IAM checks the notification queue every 10 seconds.
If an email notification has been added, it will be sent.
We implemented only the part of the Community idea that has been described here. The rest of the idea needs further research and consideration.
 Add an email notification
Translations - New global translations for licenses
newWe have added some standard translations related to licenses to the global translations. You can customize them in IAM as described in the IAM documentation.
The following translation objects are available ({ "translation_object", "Translation" }):
{ "license_page_header", "License" },
{ "license_refresh_page_button", "Refresh page" },
{ "license_register_environment_button", "Register environment" },
{ "license_reload_from_iam_button", "Reload current license from IAM" },
{ "license_check_for_update_button", "Check for an updated license" },
{ "license_is_updating_message", "The check to update the license is running but taking longer than expected. Refresh the page periodically to check the status once more." },
{ "license_state_label", "State:" },
{ "license_refresh_on_label", "Refreshable from:" },
{ "license_valid_until_label", "Valid until:" }
Generic - Changed access to Advanced menu
change 3-tier IAM in the Universal GUIIf you use IAM in the Universal GUI, you can now find the Advanced menu underneath the application name above the menu. With this application switcher, you can change from the Default menu to the Advanced menu. This change means that the menu structure is now the same as for IAM in the Windows GUI.
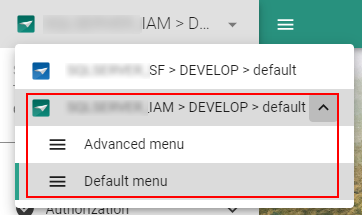 Switch from default to advanced menu
Documentation - Easy access to IAM documentation
newTo facilitate the use of the Intelligent Application Manager, we have added the menu Documentation > IAM Documentation. It opens the Intelligent Application Manager guide in your browser.
Data model changes
Data model changes for the Software Factory and IAM meta-models are listed here. This overview can be used as a reference to fix dynamic control procedures, dynamic model code or custom validations after an upgrade.
Changes Software Factory
Table changes
Changes
| SF - From table | SF - To table |
|---|---|
| - | code_guideline |
| - | gai_provider |
| - | gai_provider_configuration |
| - | master_prompt |
| - | usr_branch_diagram_settings |
| generation_email | - |
Column changes
Changes
| SF - From table | SF - From column | SF - To table | SF - To column |
|---|---|---|---|
| email_provider_configuration | - | email_provider_configuration | encryption_used |
| file_storage_configuration | - | file_storage_configuration | encryption_used |
| merge_conflict_type | - | merge_conflict_type | merge_conflict_explanation |
| merge_conflict_type_resolvement_type | - | merge_conflict_type_resolvement_type | origin_conflict_resolvement_explanation |
| merge_conflict_type_resolvement_type | - | merge_conflict_type_resolvement_type | branch_conflict_resolvement_explanation |
| model | - | model | branch_diagram_display_from |
| model | - | model | branch_diagram_display_to |
| model | - | model | branch_diagram_width_between_versions |
| oauth_server_configuration | - | oauth_server_configuration | encryption_used |
| pending_change_log | - | pending_change_log | gai_review_status |
| process_action | - | process_action | gai_provider_id |
| role | - | role | allow_public_api |
| sf_configuration | smtp_server_address | sf_configuration | - |
| sf_configuration | smtp_server_password | sf_configuration | - |
| sf_configuration | smtp_server_usr_name | sf_configuration | - |
| sf_configuration | smtp_server_from_email_address | sf_configuration | - |
| sf_configuration | smtp_server_port | sf_configuration | - |
| sf_configuration | - | sf_configuration | use_gai_review |
| unit_test_result_parmtr | - | unit_test_result_parmtr | expected_output_value_until |
| unit_test_result_parmtr_type | - | unit_test_result_parmtr_type | expected_output_value_until |
Changes Intelligent Application Manager
Table changes
Changes
| IAM - From table | IAM - To table |
|---|---|
| - | gui_appl_authorization_public |
| - | iam_gai_provider |
| - | notification_email_template |
| - | notification_email_template_configuration |
| - | sf_gai_provider |
| - | tab_prefilter_dependency |
Column changes
Changes
| IAM - From table | IAM - From column | IAM - To table | IAM - To column |
|---|---|---|---|
| notification | - | notification | notification_type |
| notification | - | notification | notification_email_template_id |
| process_action | - | process_action | gai_provider_id |
| role | - | role | allow_public_api |
| system_email_template | from_name | system_email_template | - |
| system_email_template | from_email_address | system_email_template | - |
| tab_variant_map_base_layer | show_map_base_layer | tab_variant_map_base_layer | - |
| tab_variant_map_data_mapping | show_map_data_mapping | tab_variant_map_data_mapping | - |
| tab_variant_map_overlay | show_map_overlay | tab_variant_map_overlay | - |