2023.2
Support for this release has ended. The release notes are still available for reference, however, no additional updates will be provided. Update to the latest version. See our Lifecycle policy for more information.
The 2023.2 release of the Thinkwise Platform includes many improvements and additions. One of the most visible changes is that we have revised the Result tab in the Functionality screen. An example of a new feature is, that you can now mark a column or domain for optimistic locking, which prevents users from editing the same record at the same time.
Because we value your input, this release also includes 29 community ideas representing 390 votes. One idea that received many votes was a Branch diagram for your models in the Software Factory. It provides a graphical overview of all the branches inside the model and how they interact. Another popular Community idea was to add the Match any (OR) option to the prefilters. This allows you to set up combinations of prefilters that were not possible before.
Table of contents
- Table of contents
- Upgrade notes
- Breaking changes
- Major change - Functionality and Code overview screens revised
- New and changed in the Software Factory
- Models - Email providers
- Models - Encrypted key data for file storage, email provider, and OAuth server
- Models - Send client credentials in body or header for OAuth Services
- Models - Changed RDBMS type support
- Models - Expansion of 'Use upgrade logic'-functionality
- Models - Change file storage location type
- Models - Import a model into an existing model or branch
- Models - Branch diagram
- Models - Archiving branches
- Models - Remember selected branch
- Models - Include data migration mappings during merge
- Models - Prefilter on branches in 'Create merge session' task
- Models - Prefilters for delta actions in merge
- Models - Subfolder support for writing code files and program objects
- Models - Retired model folder specification
- Models - 'Floating labels strategy' setting
- Process flows - Input parameter information
- Process flows - Process step description
- Process flows - Check for variables in deep links
- Process flows - New process action: Timeseries forecasting
- Process flows - New process action: Copy to clipboard
- Process flows - New process action: Email connector
- Process flows - New input parameters for 'Print file (PDF)' process action
- Tasks - Show or hide double-click tasks
- Data - Optimistic locking
- Data - Improved navigation
- Data - New domain control: 'Copy to clipboard'
- Data - Domain description
- Data - Alphanumeric value length
- Data - Read-only field for domain in edit-mode
- Prefilters - 'Match all' and 'Match any' in prefilter groups
- Prefilters - Changes to state and authorization
- User interface - Tab page group as fallback
- User interface - Optional default statements for handlers
- User interface - Copy from form/grid to filter/search
- User interface - Progress bar status colors
- User interface - Moved 'Auto-save' checkbox
- User interface - Universal GUI theme background fit options
- User interface - Translation management for Universal GUI
- Business logic - Improved navigation from Code search
- Business Logic - Control procedure changes
- Business logic - Improved default for trace columns
- Quality - Approving or hiding validation messages
- Quality - Improved performance Quality dashboard
- Quality - Smoke test improvements
- Quality - Unit tests for insert triggers improved
- Quality - Unit test mock data improvements
- Quality - Set up mock data for a view
- Quality - Validation for branch with an interval
- Quality - Validations for mock data
- Access control - Improved adding new objects to Model rights
- Access control - Performance improvement for variants
- Enrichment - Staged strategy for dynamic model
- Deployment - Deleting generated objects improved
- Deployment - Only dropping objects in dbo schema
- Deployment - Improved creation of deployment package
- Deployment - Improved automation of the Creation process
- Deployment - Smart upgrade performance optimization
- Deployment - Refresh disabled when waiting for input
- Maintenance - Refresh disabled when waiting for input
- Fixed in the Software Factory
- Rollback detection in unit tests
- Deleting data set table also removes rows
- Expanded support of unit test filter conditions
- Commas in numeric columns in mock data sets
- Prevent granting public rights to user-defined data types and views
- Delete branch that has related merge session
- Delta actions determined correctly when branch is merged multiple times
- Behavior of 'Default enabled' when executing validations
- Mapping during data migration after renaming a table and a column
- New and changed in the Intelligent Application Manager
- Client applications - Extended support
- Encryption for OpenId providers and Client applications
- Authorization - Send client credentials for OpenID providers
- Authorization - Deviate from the default email provider
- Authorization - Improved provision default authorization task
- Authorization - Extended rights for application administrators
- Models - Original branch name visible in IAM
- User groups - Moved 'Copy user group to tenant' task
- Users/User groups - Inspect variant effective rights
- Users - Allow an unlimited number of sessions
- Users - Copy and import user preference
- Tags in IAM
- Fixed in the Intelligent Application Manager
- Data model changes
Upgrade notes
Upgrade from 2020.1 or older
If your current version of the Thinkwise Platform is 2020.1 or older, you must first upgrade to version 2022.1 before upgrading to a newer version. Version 2022.1 is the last release in which you can upload your icons.
Always read the release notes for any upgrade you do or skip.
SQL Server and .NET Framework support
The Software Factory and the Intelligent Application Manager now require SQL Server 2019 or higher.
See the table below for the .NET Framework requirements.
| Component | Minimum .NET version |
|---|---|
| Windows GUI | 4.7 |
| Web GUI | 4.7.2 |
| Indicium | 6.0 |
| Indicium Basic | 4.7.2 |
Reactivate large inactive branches
In the 2023.2 release, the Inactive state for branches has been replaced by the Archived state. For more information, see Models - Archiving branches.
When you upgrade to platform version 2023.2, all inactive branches are automatically archived, and the Archived column value will be updated accordingly.
Archiving branches with a large amount of data can take a long time to complete. To save time, you can set all large inactive branches to Active before starting the upgrade and archive them later manually.
After an upgrade: re-generate model definition
After every platform upgrade, always re-generate the definition of your work model before you start developing it (menu Deployment > Creation > tab Generate definition). This applies changes in the base models to your work model.
Note: if you are using nested base models, re-generate all base models below the highest level before you re-generate the work models.
Breaking changes
Mobile GUI no longer supported
In accordance with our Lifecycle Policy, Thinkwise Platform version 2023.2 will no longer support the Mobile GUI. Read more about this in the blog post.
- If you are still using the Mobile GUI, switch to the Universal GUI before updating your platform to version 2023.2.
- Manually remove all Mobile GUI data from your model in the Software Factory.
Access control - Direct references for role tables
changedRole tables (menu Access control > Roles) now have direct references for integrity checking with their respective object tables. These references ensure that deleting an object will also delete all granted rights.
To prevent errors during the generation process, check if all related granted rights have been removed.
Deployment - Deletion of generated objects improved
changedDuring the definition generation, model objects are no longer deleted if they are still referenced by other model objects.
This change ensures that all the generated model objects can be referenced as menu items, diagrams, look-up references, variants, and so on. It restores integrity between roles and model objects, and prevents problems. This was previously disabled to preserve role rights for generated objects that were deleted and recreated during generation.
This change may cause errors during definition generation. Control procedures with the Delete strategy may assume that the object and its related objects are always deleted. Model objects that were previously deleted at the start of the generation process and not recreated by the control procedure may now be unintentionally 'left behind' after the generation process. This happens if they are not deleted due to references from other model objects, such as role rights.
This change does not have the same effect on control procedures with the Delete strategy that create tag values, domain elements, and translations. Previously, these were not deleted, and the control procedure code checked to see if they already existed. Consider updating these control procedures to the Fully controlled strategy.
For more information, see Deployment - Deleting generated objects improved.
Email settings and templates for password reset and two-factor authentication
Indicium changedWhen users reset their password or log in with two-factor authentication, Indicium sends an email with a new token.
Settings regarding this email used to be configured in Indicium's app settings. Now, you have to configure these settings in IAM.
To be able to use password reset and two-factor authentication in Thinkwise Platform version 2023.2, configure the emails and templates in IAM, in the menu Settings > Global settings > tab Email providers.
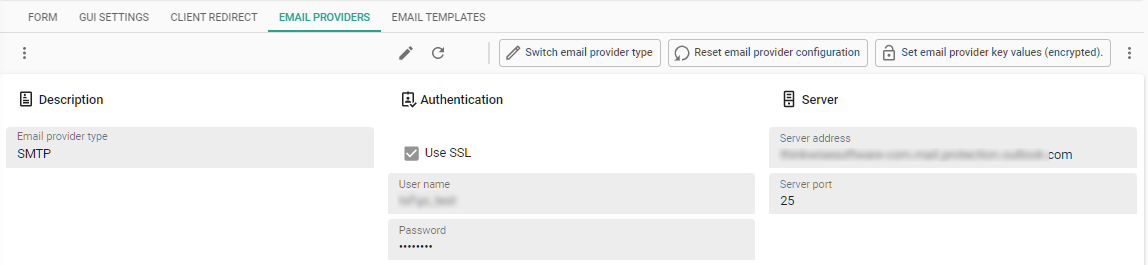 Email settings for two-factor authentication and password reset
We have added templates for 'Two factor token' and 'Password reset' (tab Email template) for seven languages with default settings that can be changed.
If a user's language does not exist, Indicium will send an email in the default language for that template type. If you do not want to specify or maintain this email for each language, you can delete all languages except the default language.
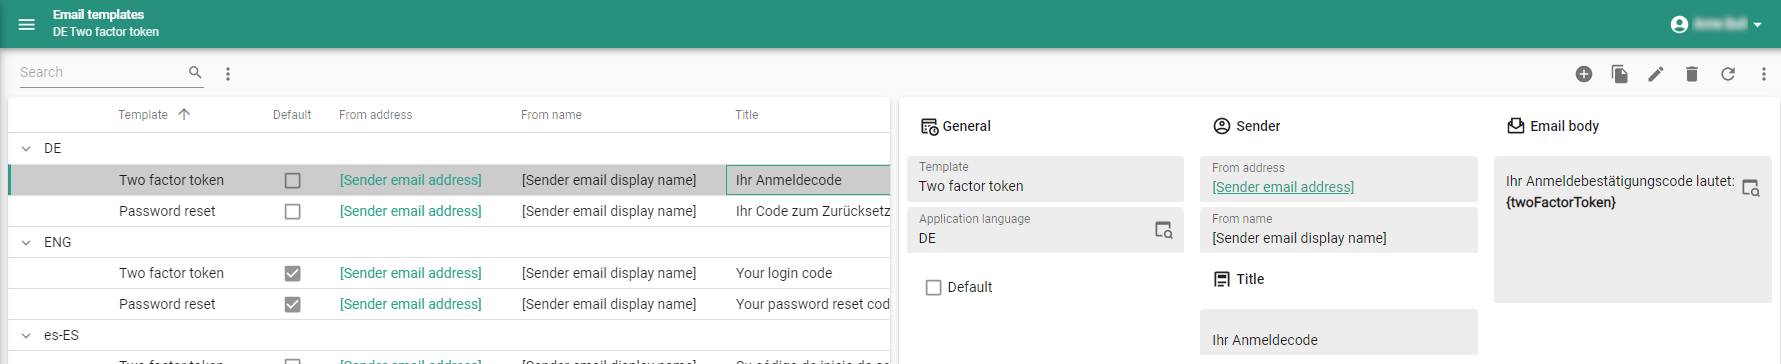 Email templates for two-factor authentication and password reset
Access Control - Variant effective rights
newIt is now possible for an object to be unauthorized in its base object, but hidden and thus available in its variant. This reduces the amount of redundant model information that the GUI receives.
You can inspect the effective rights of table variant columns, task variant parameters, and report variant parameters
in menu Access control > Roles > tab Tables/Tasks/Reports > tab Columns/Task parameters/Report parameters.
Execute the Show variant effective rights ![]() task
to get more information about why the column or parameter has certain rights.
task
to get more information about why the column or parameter has certain rights.
You can also inspect the effective rights for objects for specific users or user groups in the Intelligent Application Manager, see Inspect variant effective rights.
Synchronization may take a bit longer than before, because more data is being transferred. In return, this results in a performance improvement when starting your application against IAM.
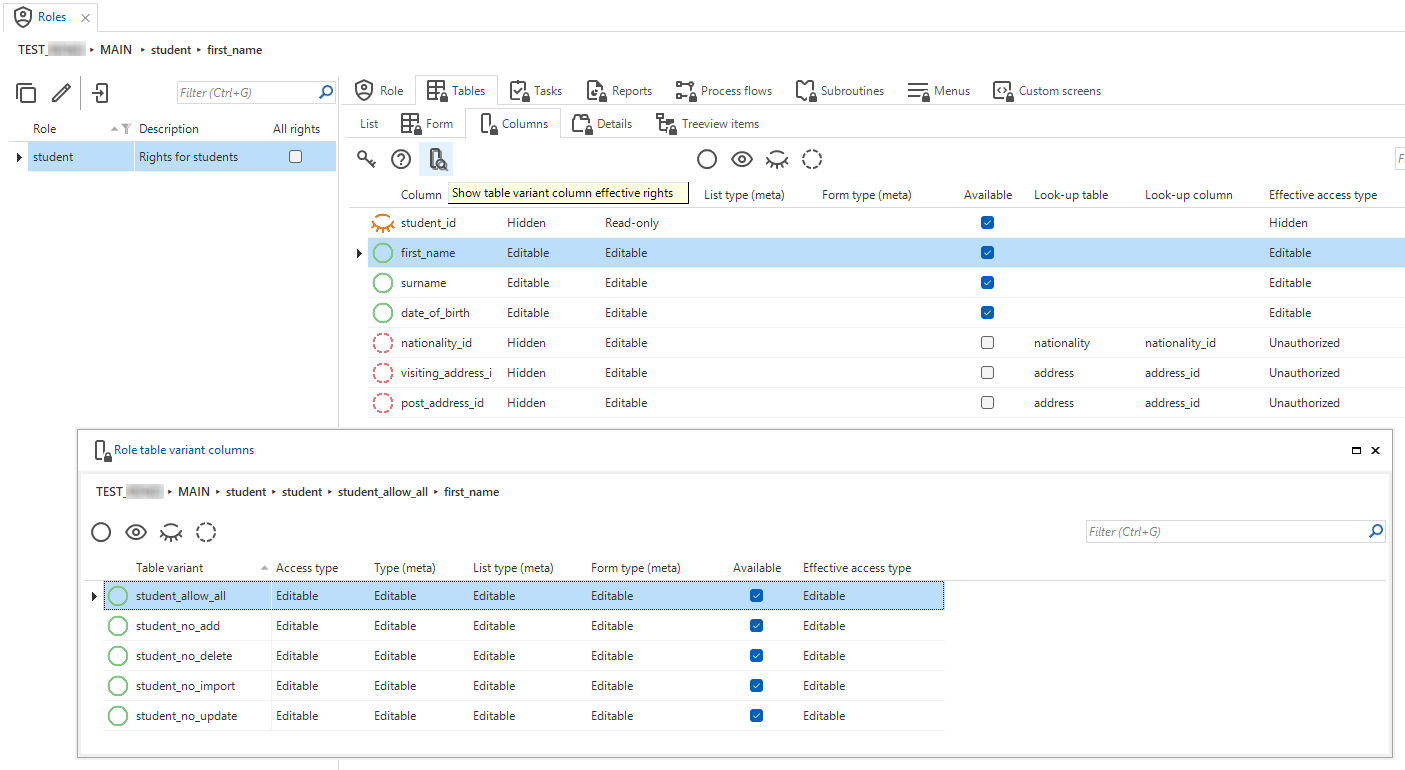 Variant effective rights for roles in the Software Factory
Check for illegal characters in printer name
When adding a printer, the printer name is now checked. The printer name can be used in a process action, and process actions only support alphanumeric characters and underscores. Other characters are not accepted for the printer name and will be replaced by underscores (_) when you save the printer.
During the upgrade to 2023.2, printer names that contain illegal characters are updated by replacing the illegal characters with underscores (_).
Major change - Functionality and Code overview screens revised
changed new Community ideaWe have improved and revised the Result tab in the Functionality screen. The main change is that the custom components have been replaced with tasks that call jobs executed by Indicium. The Code overview screen has been changed in a similar way.
An overview of the changes
The screenshot belows shows the revised Result tab in the Functionality screen:
- The Result tab is now named Deploy and contains tasks instead of GUI functionality (see 'Result' is now 'Deploy'):
 Generate control procedure
 Execute all program objects
 Execute selected program objects
- A progress bar (see Error handling)
- Edit code
 (see Edit code)
 - Show generated item code
 (see Show the program object item code)
 - Tasks to jump to a program object's control procedure or template (see Easy access to code) :
 Go to control procedure in Functionality
 Go to Template in Functionality
The Code overview screen has been revised in a similar way. See Code overview screen revised.
 An example of the revised Deploy tab in the Functionality screen
'Result' is now 'Deploy'
To better reflect the use of the Result tab in the Functionality screen, it is now called Deploy (menu Business logic > Functionality > tab Deploy).
This tab still contained GUI functionality for generating control procedures and executing program objects. We have replaced this functionality with tasks that call jobs that are executed by Indicium. Jobs offer the advantages of being executed by the web server (more processing power) and that their history is available to every user in the Jobs screen.
You can now use the following tasks to generate code and execute program objects:
- Generate control procedure (ALT + G) -
Generates the program object code for the control procedure.
- Execute all program objects (ALT + E) -
Executes all program objects from the control procedure to the database, regardless of any (pre)filters that are applied.
- Execute selected program objects (ALT + S) -
Executes the selected program objects from the control procedure to the database.
It is possible to Cancel ![]() a generation or execution.
The step to generate or execute the active program object will be completed. Then the job is terminated.
a generation or execution.
The step to generate or execute the active program object will be completed. Then the job is terminated.
Headers and footers generated
The headers and footers of any program object already present in the Deploy tab are now automatically refreshed when the control procedure is generated. Therefore, it is no longer necessary to re-generate the code group for a model change when deploying code in this way. This is a significant performance improvement.
For example, if a program object already exists for a task, a newly added task parameter is automatically added to the header when you generate the control procedure.
Note that if no program object exists, the code group must still be generated.
Error handling
The progress bar shows whether the generation or execution was successful. If it fails, the progress bar turns red.
-
If the generation of a control procedure fails, it is almost always due to an error in the code of an SQL-typed control procedure. If no program objects have been created yet, the Program object tab is replaced by the tab Generation error, which contains the corresponding error.
 A generation error explained
 -
When the execution of a program object fails, it is almost always due to an error in the template code. The program object code field is shortened to make room for another one with the corresponding error.
With the prefilter Failed ![]() (ALT+F),
you can filter program objects that have failed or are still running.
(ALT+F),
you can filter program objects that have failed or are still running.
Edit code
You now edit ![]() the code directly in the Functionality screen,
either inline or through an IDE (an Integrated development environment, such as SQL Data Studio).
Changes are automatically reflected in the code template.
the code directly in the Functionality screen,
either inline or through an IDE (an Integrated development environment, such as SQL Data Studio).
Changes are automatically reflected in the code template.
It is no longer possible to 'rename' a control procedure or template via code editing. Instead, a new control procedure or template is inserted.
Show the program object item code
The option to highlight code has been removed because it did not work well in all scenarios, for example, when the program object code exceeded the control size.
Now, the task Show generated item code ![]() is available.
It is possible to select the preceding and following code.
is available.
It is possible to select the preceding and following code.
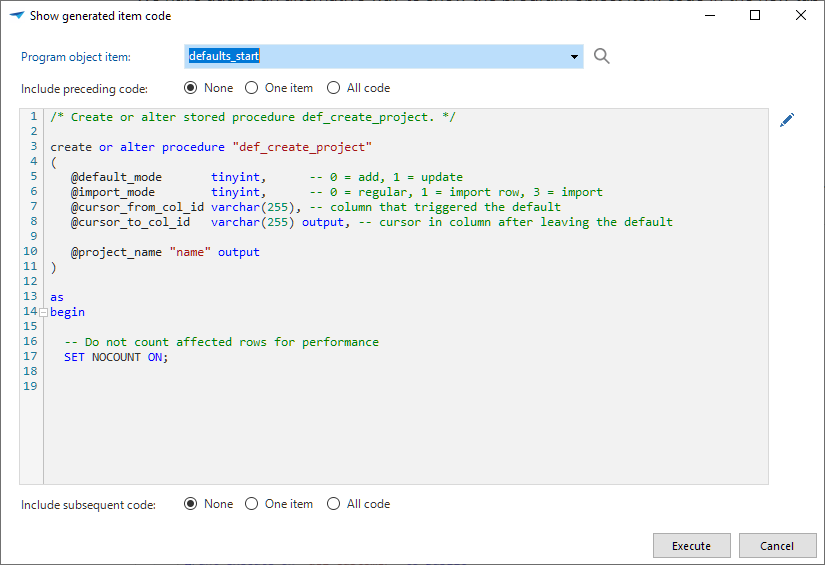 Show the program object item code
Code overview screen revised
The Code overview screen (menu Business logic > Code overview) has been redesigned in a similar manner to the Deploy tab of the Functionality screen.
Unlike the Functionality screen, the Code overview screen does not contain information about control procedures, only about program objects.
If an error occurs during the control procedure generation process, you can use the new task
Go to control procedure in Functionality ![]() (ALT+C) to jump to the control procedure.
(ALT+C) to jump to the control procedure.
We also replaced the task Generate program objects ![]() in the Code overview screen.
The new task is
in the Code overview screen.
The new task is ![]() Generate selected program objects.
Its icon reflects that the task is now only executed for a selection.
To generate all program objects, you must remove the prefilter, and select all objects before executing the task.
Generate selected program objects.
Its icon reflects that the task is now only executed for a selection.
To generate all program objects, you must remove the prefilter, and select all objects before executing the task.
For more information, see the following topics in these release notes:
Easy navigation to code
Replacing the custom screens in Functionality and Code overview has enabled further process improvements.
Previously, object screens contained a Functionality tab where you could only view the program objects and program object items. This tab has been removed. Instead, you can now jump directly from an object, such as a table or task, to the code overview:
 Go to object in Code overview (ALT + O) -
Opens the object in the Code overview screen to see all the logic assigned to it.
Available on many screens.
Go to object in Code overview (ALT + O) -
Opens the object in the Code overview screen to see all the logic assigned to it.
Available on many screens.
On the Code overview screen, you can view the program object code as well as generate the control procedure and execute the program object.
To maintain the program object, you can easily jump to its control procedure or template. Both tasks are also available on the Deploy tab of the Functionality screen:
- Go to control procedure in Functionality (ALT + C) -
Opens the object in the Control procedure tab of the Functionality screen.
- Go to Template in Functionality (ALT + T) -
Opens the object in the Template tab of the Functionality screen.
New and changed in the Software Factory
Models - Email providers
newSimilar to, for example, File storage locations or OAuth Servers, we have added Email providers to the list of settings you can configure for a branch. In this tab, you can set up your preferred email protocol in combination with settings such as the server address and port, username, and password.
You can select a provider type from the following list:
- Microsoft (Graph)
- Mailchimp
- Sendgrid
- SMTP
Depending on the selected provider, different authentication options are available.
You can set your default email providers in the menu Model overview > tab Branches > tab Email providers.
- In the Software Factory, you can change
 or reset
  the standard setup for each runtime configuration (menu Maintenance > Runtime configurations > tab Email providers).
Use this, for example, if you want to use SMTP in your development environment and Microsoft Graph in your test environment.
the standard setup for each runtime configuration (menu Maintenance > Runtime configurations > tab Email providers).
Use this, for example, if you want to use SMTP in your development environment and Microsoft Graph in your test environment. - In IAM, you can deviate per application (menu Authorization > Applications > tab Email providers). See Deviate from the default email provider.
 Set a default email provider
Models - Encrypted key data for file storage, email provider, and OAuth server
new Universal GUI IndiciumYou can now securely store the key data for a file storage, email provider, and OAuth server in the database. Previously, the key data were stored in the database in plain text, so anyone who could access the database could get them. Now, you can choose to store them in an encrypted form that only Indicium can decrypt.
Encryption is only available in a 3-tier setup, where the Software Factory and IAM are used in the Universal GUI. It is not available for the Software Factory and IAM for the 2-tier Windows or Web GUIs because it requires Indicium support and configuration.
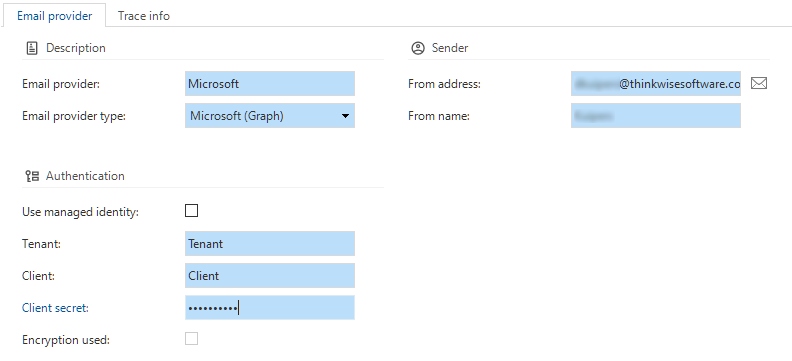
First, you must configure encryption in Indicium for the platform you are using. Then, when you add, for example, an email provider, a popup will automatically appear where you can enter the email provider's key values (menu Models > Model overview > tab Branches > tab Email providers). The values in this popup are encrypted.
In the Model overview, you can see where encryption is used (Model overview > tab Branches > tabs Email providers, File storage locations, and OAuth servers):
- If the checkbox Encyrption used is selected, the values are encrypted.
- If the checkbox Encryption used is not selected, either the values are not encrypted, or there are no values stored in the database.
- If the values are visible in the form, they are not encrypted.
- If the values are not visible in the form, there are no values stored.
A task is available to modify existing key values: Set key values (encrypted) ![]() .
When editing an old record, you will see a message recommending that you use the encryption task instead of saving the data unencrypted.
.
When editing an old record, you will see a message recommending that you use the encryption task instead of saving the data unencrypted.
For security purposes, we recommend changing your key values before storing them encrypted, as the model history will still contain the unencrypted keys.
 Example: Encryption for an email provider in the Software Factory in Universal GUI
Models - Send client credentials in body or header for OAuth Services
newIf you use an OAuth server, the client credentials are sent in the request body by default. This is supported by most OAuth servers.
However, Basic OAuth is supported by all OAuth servers. Therefore, you can now also send client credentials As Basic Auth header.
You can configure this setting in menu Models > Model overview > Branches > OAuth servers.
See also Send client credentials in body or header for OpenID providers
 Additional option to send client credentials
Models - Changed RDBMS type support
changedFrom now on, the RDBMS type of a model (menu Models > Model overview) will be used for all database connections. This means that you can no longer set up multiple runtime configurations for base models to use different RDBMS types. If your system is currently set up this way, you must configure and use the corresponding work model to connect to the database.
The RDBMS types 'Mock' and 'Webservice' are no longer supported (menu Maintenance > Configuration). These types are no longer necessary. They were used before Indicium existed to start an application without a database and to use web services.
We have also removed the RDBMS field in the runtime configuration screen (menu Maintenance > Runtime configurations). Technically, it was possible to run code on a different RDBMS than the one specified for the model. For example, it was possible to run SQL server code on a DB2 database. This situation was undesirable.
Models - Expansion of 'Use upgrade logic'-functionality
changedThe program objects ug_after_upgrade_from_[version], ug_before_upgrade_from_[version] and ug_during_upgrade_from_[version] were only executed
when the checkbox Use upgrade logic was selected for that branch (menu Models > Model overview > tab Branches > tab Model versions).
If a model version was created in the origin branch, the upgrade template could not be generated, or the model version had to be added for the new branch as well.
Now, the Model versions of the direct and indirect origin branches (menu Models > Model overview > tab Branches > tab Form > group Merging) are included as well. This makes it easier to work in branches and add upgrade scripts that can be used (and re-used) in FEATURE and DEVELOP branches.
Models - Change file storage location type
It was already possible to set your default file storage location in the menu Model overview > tab Branches > File storage location.
Now, you can change ![]() or reset
or reset ![]() the default setup for each runtime configuration (menu Maintenance > Runtime configurations > tab File storage locations).
the default setup for each runtime configuration (menu Maintenance > Runtime configurations > tab File storage locations).
These tasks are already available in IAM, to deviate from the default for an application.
Models - Import a model into an existing model or branch
Importing a model used to be limited to a new model without a branch. You can now merge imported model data with an existing model or branch. This means that you can export a model at a specific point in time, and use that exported model to update an existing branch. The target branch content will be fully overwritten to exactly match the exported model via a series of delete-, update- and insert actions.
Models - Branch diagram
new Community ideaWe have added a Branch diagram to the Software Factory to provide a graphical overview of the branches inside the model and the interaction between them. Go to menu Models > Model overview > tab Branch diagram to view it.
Archived branches are included by default in this diagram, and are shown in grey.
You can exclude them by executing the task Show/Hide archived branches ![]() .
.
To support the Branch diagram, we have made the following changes to the Model versions tab (menu Models > Model overview > tab Branches):
- The Model version type column now shows if model versions have been generated by a process such as merging or archiving. Model version descriptions that have been generated by a process cannot be altered, except for descriptions of model versions generated by the Creation process.
- Generated model versions will now be named slightly differently. The names will no longer include branch name(s), only the indication 'branch' or 'origin'. The only exception is the Create branch process. This process will now create a model version with the same name as the branch name.
During the upgrade to 2023.2, a best effort will be made to rename model version descriptions based on their respective model version type, which indicates the way the model version was created.
For more information on managing branches, see this blog in the Thinkwise Community.
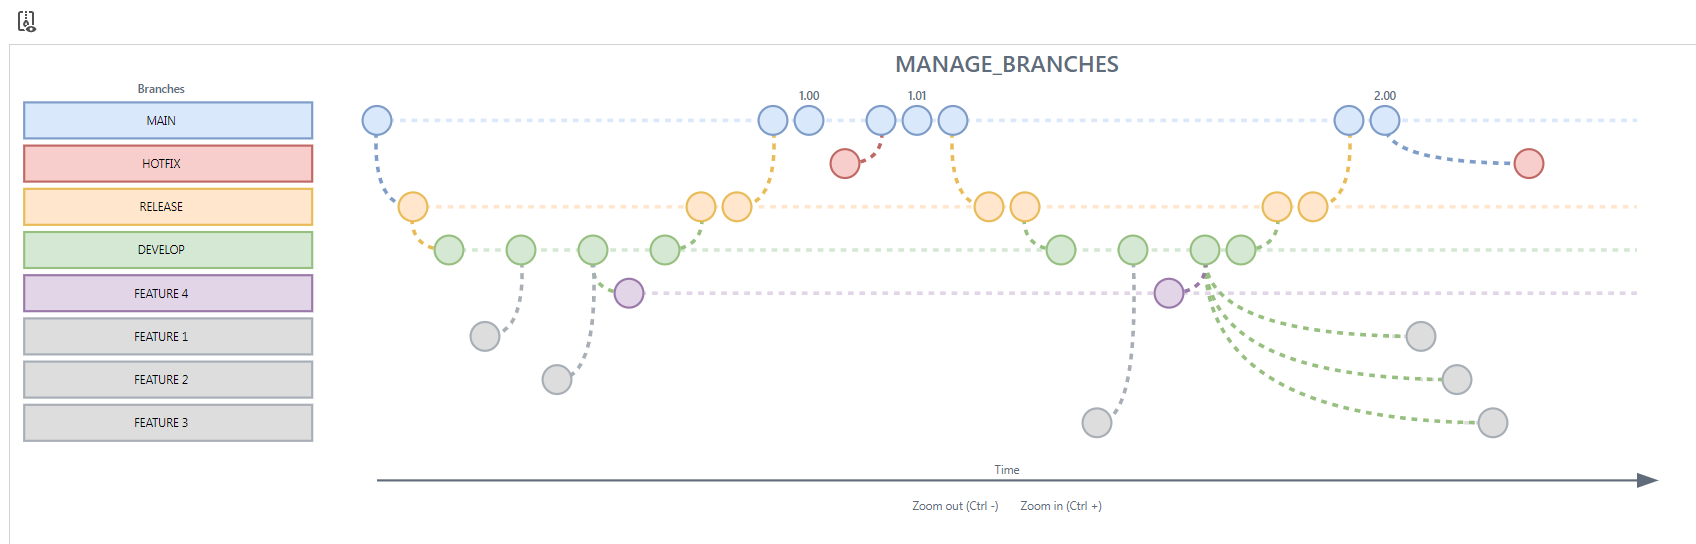 An example of a branch diagram
Models - Archiving branches
newFor branches, the Inactive state has been replaced by the Archived state.
Archiving ![]() a branch will delete all its operational data.
This reduces the database size of the Software Factory and increases performance. The branch record and model version information is retained,
which makes it different from deleting a branch entirely.
a branch will delete all its operational data.
This reduces the database size of the Software Factory and increases performance. The branch record and model version information is retained,
which makes it different from deleting a branch entirely.
This provides two additional possibilities compared to deleting a branch:
-
The branch remains visible in the Branch diagram.
-
The branch can be unarchived
 so that you can work in it again.
This will restore all data as stored in the history tables based on the state of the branch just before it was archived.
It is not possible to switch to an archived branch to work in it.
so that you can work in it again.
This will restore all data as stored in the history tables based on the state of the branch just before it was archived.
It is not possible to switch to an archived branch to work in it.If your database contains too much historical data, you can decide to delete the history from a specific point in time, for example, anything older than five years. It will then no longer be possible to unarchive a branch because its historical data cannot be re-inserted.
If neither of these possibilities are desired, you can choose delete the branch entirely.
You can archive a branch in the menu Models > Model overview > tab Branches. It is not allowed to archive the MAIN branch or branches that are the origin of other branches that have not been archived.
During the upgrade to platform version 2023.2, all inactive branches will be archived automatically, and the Archived column value will be updated accordingly.
The archiving process for branches with a large amount of data can take a long time to complete. To save time, you can set all large inactive branches to Active before starting the upgrade and archive them later manually.
Models - Remember selected branch
Community idea newWhen opening the Software Factory, you are presented with the Switch branch dialog in which you need to select a model and branch. We have added a new option to this dialog, called Remember selected branch. Select this checkbox to specify that the next time you start the Software Factory, the model and branch will automatically be selected to match the previous session. This way you can continue to work in the Software Factory without the need to select the model and branch each time.
If a specified model or branch is no longer active, the Switch branch dialog will reappear, ensuring that you select a different model or branch. If you have selected Remember selected branch and want to switch to a different branch, you can do this in the menu Models > Switch branch.
Models - Include data migration mappings during merge
Previously, when merging a source branch into a target branch, the data migration mappings of the various upgrades of the source branch would not affect the target branch.
Now, the mappings from the source branch, along with all the intermediate mappings up to the current state of the source branch, will be combined and applied to the new model version created in the target branch after the merge.
Here is how it will work:
- When merging an origin branch (like DEVELOP) into a target branch (like FEATURE), any mappings made in the origin branch since creating the target will also apply to the target branch.
- When merging a branch (like FEATURE) back into its origin (like DEVELOP), any mappings made in the branch since it branched from the origin will also apply to the origin branch.
This ensures that the mappings done in the branch will be re-applied when configuring an upgrade in the origin and vice versa.
You may need to use the Re-apply intermediate mappings ![]() task
to see the effect when configuring the database upgrade of the target branch after the merge.
More information about this task is in our documentation: Table mapping and Column mapping.
task
to see the effect when configuring the database upgrade of the target branch after the merge.
More information about this task is in our documentation: Table mapping and Column mapping.
Suppose there are mappings from upgrades of model versions done outside of the source branch (for example, upgrading from MAIN to your FEATURE branch, even though FEATURE was branched from DEVELOP). In that case, those mappings will also be copied to be applied to the target branch of the merge session (in this case, from MAIN to DEVELOP).
Models - Prefilter on branches in 'Create merge session' task
changed Community ideaIf you create ![]() a merge session (menu Models > Merging),
you will initially only see active branches in the Merge from and Merge into fields that have been marked as 'My branches', and their origin branch.
This can make it easier to quickly choose the correct branch to merge from and into.
If you want to merge from or into another branch, you can disable the prefilter My branches in the look-up popup.
a merge session (menu Models > Merging),
you will initially only see active branches in the Merge from and Merge into fields that have been marked as 'My branches', and their origin branch.
This can make it easier to quickly choose the correct branch to merge from and into.
If you want to merge from or into another branch, you can disable the prefilter My branches in the look-up popup.
Models - Prefilters for delta actions in merge
newWe have added two prefilters for delta actions in the Models > Merge > Actions tab.
 Actions with branch impact -
Shows the delta actions that will affect the target branch when the merge session is executed.
This provides insight into delta actions that may require additional checking to know if it is legitimate to apply them.
Actions with branch impact -
Shows the delta actions that will affect the target branch when the merge session is executed.
This provides insight into delta actions that may require additional checking to know if it is legitimate to apply them. Actions that will be ignored - Shows the delta actions that will not be applied when the merge session is executed,
for example, because they are the same in the origin and branch because of a manual choice.
This provides insight into delta actions that may require an additional check to know if it is legitimate if they are not applied.
Actions that will be ignored - Shows the delta actions that will not be applied when the merge session is executed,
for example, because they are the same in the origin and branch because of a manual choice.
This provides insight into delta actions that may require an additional check to know if it is legitimate if they are not applied.
Models - Subfolder support for writing code files and program objects
changedBoth the code file paths and the program object paths are now relative. As a result, you can write to folders other than the default.
This includes the use of subfolders. The default subfolder for code files is Source_code\Groups, and for program objects, it is Source_code\Program_objects.
Previously, code files and program objects were always written to the same folder within the model folder.
However, the model folder specification has not been used for this since platform version 2022.2.
Instead, the File storage location as specified in the Intelligent Application Manager for the SQLSERVER_SF application is used.
For example, the standard code file Functions will be written to the File storage location + Source_code\Groups\060_Functions.sql
(the relative path of the code file).
You can configure the file storage location in IAM, in the menu Authorization > Applications. If you want to use subfolders other than the default, you can specify them for code files in the Software Factory: menu Models > Model content > tab Code files > field File specification.
Models - Retired model folder specification
changedThe model folder specification (menu Maintenance > Configuration) is no longer used and has been removed. Upgrade validation messages will be created if a situation occurs in the models where the model folder specification was used. Due to the removal of the model folder specification, these paths are no longer updated automatically and must be updated manually if required.
Models - 'Floating labels strategy' setting
new Universal GUIFor the Form component, the Software Factory allows separate specifications for Label width (px) and Field width (px) in the Model settings.
However, these specifications do not work well for input controls in the Universal GUI that use floating labels. Instead of placing a label in front of the input control, floating labels are placed inside the input control. When a value is entered, the label floats to the top of the input control.
 A floating label in the Universal GUI
By default, the label width and the field width are now added together to determine the size of the form input controls in the Universal GUI.
Applications designed for earlier generations of GUIs, where the labels are always in front of the input fields on the form component may experience unexpected results.
To provide a smooth transition, you can configure on a per-model basis whether to include the label width if the input control uses a floating label. You can configure the Floating labels strategy in the menu Models > Model overview > tab Branches > tab Model settings > group Form.
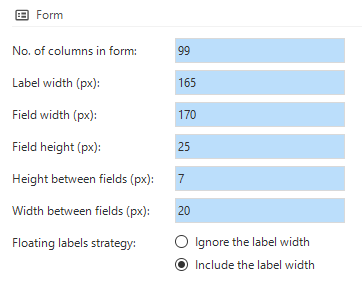 Settings for the label width
Only forms and parameter pop-ups are affected by this setting. The CHECKBOX and LABEL control types are never affected by this setting because they do not use floating labels.
If you set Floating labels strategy to Ignore the label width, the model-, table- and column-, or parameter-specific settings for label width are not included in the floating label width calculation.
- For new models, Floating labels strategy is set to Ignore the label width by default.
- For existing models in the Software Factory and the Intelligent Application Manager that include Universal as a target platform, Floating labels strategy is set to Include the label width by default for compatibility. This results in an unmodified Universal GUI form layout after the upgrade.
- For existing models in the Software Factory and the Intelligent Application Manager that do not include Universal as target platform, Floating labels strategy is set to Ignore the label width by default to allow for a smooth transition to the Universal GUI.
- Existing models in the Software Factory and IAM that use the IgnoreFloatingLabelWidth extended property in their default configuration will have the setting adjusted accordingly during the upgrade. The extended property will then be removed. This results in an unmodified Universal GUI form layout after the upgrade.
Process flows - Input parameter information
new Community ideaWhen adding input parameters to process actions, it was not always clear what to enter. For example, when to use a relative or an absolute path. We have added an explanatory line to the input parameters to provide relevant contextual information.
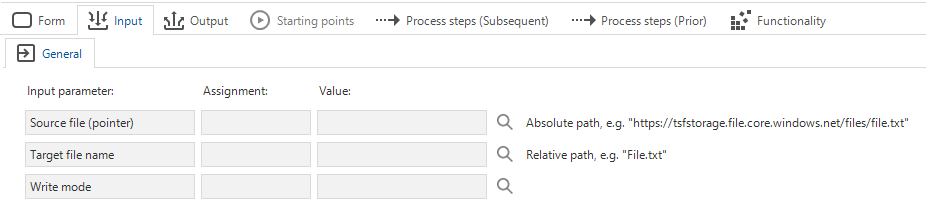 More information about input parameters
Process flows - Process step description
new Community ideaYou can now add and view a process step description when designing a process flow. A new field called Process step description is available in the menu Processes > Process flows > tab Process steps. In the Design tab, you can toggle its visibility in the Settings tab.
You can also edit the description in the Design tab, by double-clicking the process step.
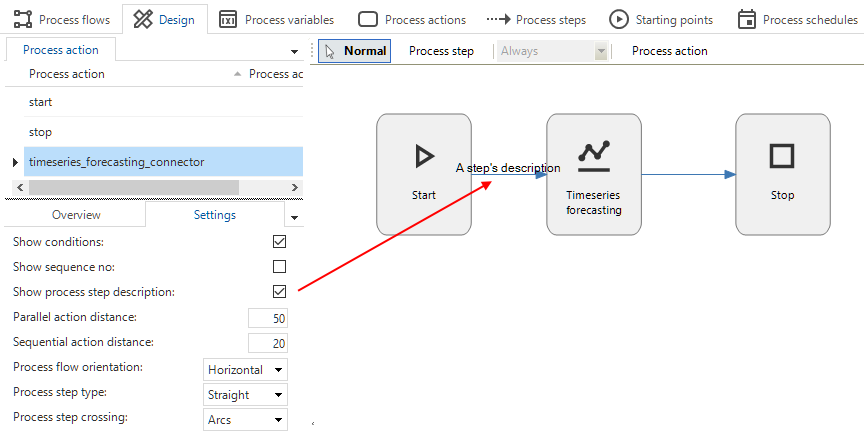 A process step with a description
Process flows - Check for variables in deep links
newProcess variables that are used in deep links are now checked by Indicium to see if they match the minimum and maximum values of the domain.
These values were the only part of the domain input constraints that were not yet implemented.
Process flows - New process action: Timeseries forecasting
newWe have expanded our machine learning functionality with a new process flow action: Time-series forecasting. This is a connector that you can use in a system flow to perform a time-series forecast. For example, you can use it to forecast stocks.
In applications built with the Thinkwise Platform, you can use machine learning techniques to perform calculations that are difficult to do manually. This is possible because historical data are usually available to train a model. Examples include predicting price, project cost-, effort, and profit, assessing risks, automating ticket assignment, or assigning quality labels.
For more information, see the Machine learning guide or contact your Thinkwise representative.
Process flows - New process action: Copy to clipboard
new Community idea Universal GUIThe new process action Copy to clipboard allows you to copy a value to the clipboard. The value can be a regular field, an expression field, or a calculated field.
Process flows - New process action: Email connector
newThe new process action Email connector allows you to select an email provider from a list of previously configured email providers.
The advantage is that you do not have to set up all the generic parameters again for each process flow. Instead, you can select a predefined email provider with all its settings instead. See Email providers.
The parameters for this connector are similar to the ones for the SMTP connector: To recipients, CC recipients, BCC recipients, Subject, Message, Allow HTML, Priority, and Storage attachments path.
Process flows - New input parameters for 'Print file (PDF)' process action
new Community ideaWe have added eleven new input parameters to the Print file (PDF) connector: Override printer name, Duplexing, Input bin (Tray), Output color, Output quality, Borderless, Page order, Page orientation, Page per sheet, Page per sheet direction, and Stapling. Input parameter values are given where possible. Most of the parameters are optional because printers usually have their own defaults.
In a process flow that requires user interaction, these parameters are available only for the Universal GUI. In a system flow, they are available to both the Universal GUI and the Windows GUI.
Tasks - Show or hide double-click tasks
new Universal GUI Community ideaYou can now choose to hide or show tasks that are used as double-click tasks in the Universal GUI. For Windows GUI users, these tasks are always visible.
To change the visibility of a task, go to the menu Processes > Tasks > tab Default/Variants > tab Table task and change the Display type. This setting is set to Hidden during the upgrade to make sure that the behavior of end applications is not changed.
Data - Optimistic locking
newYou can now mark a column or domain with the setting Use for optimistic locking. This prevents multiple users from editing the same record at the same time.
For columns, the Use for optimistic locking checkbox is available in the menu Data > Data model > tab Tables > tab Columns > group Model settings.
If you select it for a column, Indicium includes the column in a comparison that determines if the record has been modified during editing. You will be notified if the comparison determines that the row has been edited.
For domains, the Use for optimistic locking checkbox is available in the menu Data > Domains > tab Form.
If you select it for a domain and use the domain for a column, the column will be marked automatically. Most domains can be marked manually, according to your preferences. Only if the datatype is ROWVERSION, Use for optimistic locking is selected by default. If the ROWVERSION domain is used for a column, the column is also hidden by default and set as the last column.
The following set of validations has been added to encourage the use of optimistic locking:
- Optimistic locking is available for all table types but is not used for any table.
- Optimistic locking is not used by this table.
- Optimistic locking is set up for other columns while a rowversion column is present.
The other columns have no effect on the optimistic locking because rowversion already does this automatically.
Data - Improved navigation
new Community ideaWe have added a new task to make navigation between the Data model and Subjects screens faster and easier.
- Execute the task
 Go to Subject (ALT + S) in the menu Data > Data model > tab Tables
to jump to the selected table on the Subjects screen.
Go to Subject (ALT + S) in the menu Data > Data model > tab Tables
to jump to the selected table on the Subjects screen. - Conversely, the task Go to Data model (ALT + D) in the menu User interface > Subjects > tab Default
will jump to the selected table in the Tables tab of the Data model screen.
In both screens, you can use the keyboard shortcut Alt + S to execute the task.
Data - New domain control: 'Copy to clipboard'
new Universal GUI Windows GUI Community ideaWe have added a new domain control: Copy to clipboard (menu Data > Domains > tab Form > field Control). Form fields that use this control will display a 'copy' icon. When a user clicks on it, the value of the field is copied to the user's clipboard.
![]() A field with 'Copy to clipboard' (Windows GUI)
A field with 'Copy to clipboard' (Windows GUI)
Data - Domain description
new Community ideaYou can now add a description to a domain. You can enter any details that are related to the domain and relevant to note (menu Data > Domains > tab Form > tab Domain).
Data - Alphanumeric value length
newYou can now add a length to domains with a VARCHAR_MAX or NVARCHAR_MAX data type (menu Data > Domains > tab Form). This allows you to set an input limit in an interface with a limited length where (N)VARCHAR is too short and MAX is too long.
This was already available for the VARCHAR and NVARCHAR datatypes.
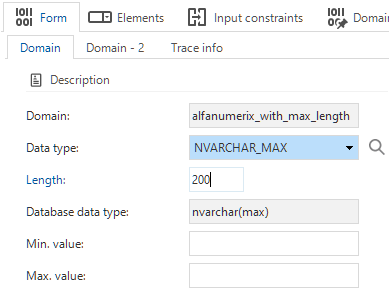 Maximum length for VARCHAR_MAX and NVARCHAR_MAX
Data - Read-only field for domain in edit-mode
new Universal GUIDomains now have a setting to determine how their read-only fields are displayed in edit mode. If the Read only input control checkbox is cleared, the read-only fields will be displayed as a label instead of the (default) disabled input control.
The checkbox is available in the menu Data > Domains > tab Form.
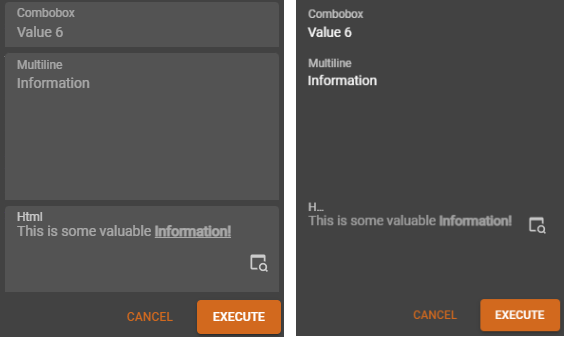 A field in the Universal GUI as a read-only input control and as a label
Prefilters - 'Match all' and 'Match any' in prefilter groups
new Universal GUI Community ideaThe prefilter groups have been extended with additional options. Previously, it was only possible to either make a group exclusive or select the Mandatory setting. Exclusive meant that prefilters could not be used simultaneously, and if Mandatory was selected, at least one prefilter had to be active at any given time.
You can now allow multiple active prefilters in one group. This is what the Exclude option already offered but in reverse. The Exclude checkbox has been renamed to Multiple active prefilters.
In addition, a new option, Filter mode, has been added with two choices:
- Match all (AND) means that if multiple prefilters are enabled, the resulting data set must match the conditions of all selected prefilters.
- Match any (OR) means that if multiple prefilters are enabled, the resulting data set must match at least one of the conditions of the selected prefilters.
These settings allow you to set up combinations of prefilters that were not possible before. They are available in the Prefilter group lookup, in the menu User interface > Subjects > tab Data > tab Prefilters > tab Form.
Windows GUI The Windows GUI does not support Match any (OR). If you select this option, only one prefilter can be active at a time.
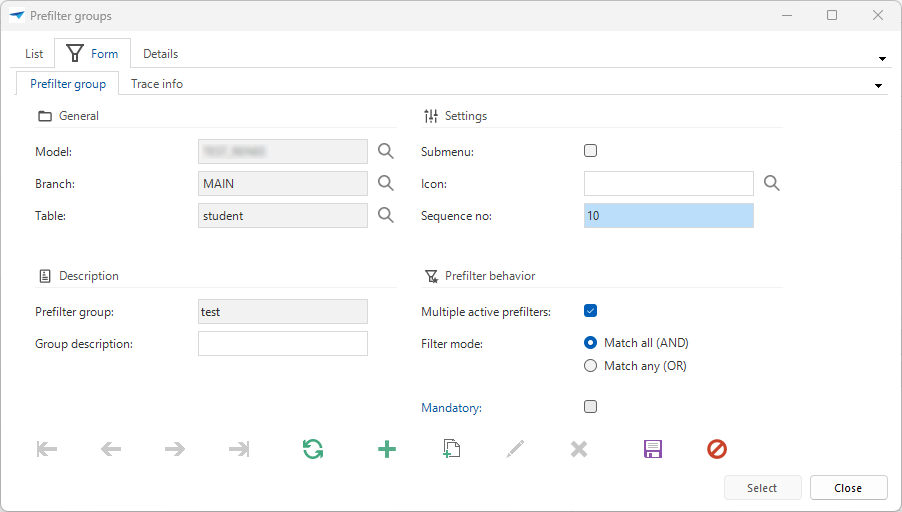 New options for prefilter behavior
Prefilters - Changes to state and authorization
changed Community ideaWe have made some changes to the prefilters with prefilter state Off hidden (menu User interface > Subjects > tab Subjects > tab Data > tab Prefilters > group Prefilter state):
- To avoid an unwanted situation, this state can no longer be used via the API.
If you specify such a prefilter via the
$prefiltersegment, Indicium will ignore it. - A prefilter with this state now better ensures that data is within the boundaries of mandatory prefilter groups.
For example, in a reference to a record
flower(id=15)if no prefilters of the mandatory prefilter groupRed or Green or Blue or Purplecan be specified. Now, ifpurpleis Off hidden, the query will be
select *
from flower
where id = 15
  and (Red or Green or Blue)
instead of and (Red or Green or Blue or Purple).
The following changes have been made to prefilter authorization:
-
The existing option Data authorization prefilter has been renamed to Always on to make it clearer what it does (menu Access control > Model rights > tab Tables > tab Prefilters).
 Prefilters screen for tables
 -
The option Group - Filter mode has been added to the screens for Prefilters to ensure that administrators can see how the prefilters work when setting up rights.
- menu Access control > Model rights > tab Tables > tab Prefilters > tab Roles
- menu Access control > Roles > tab Tables > tab Prefilters
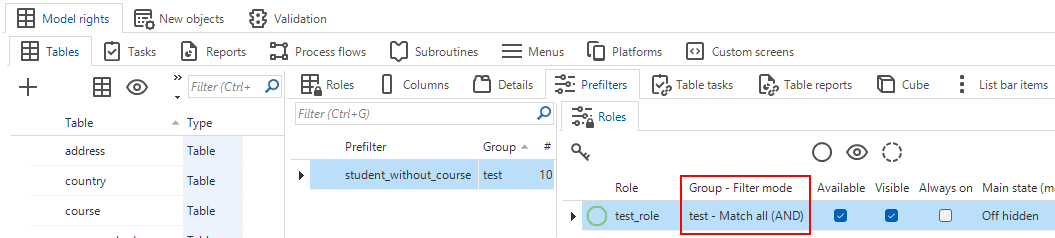 Prefilters screen for model rights
As a result, setting a prefilter in a mandatory group to Off hidden implicitly results in some form of data authorization. However, mandatory prefilter groups are not intended to be used for data authorization.
The entity discount has a mandatory prefilter group.
It consists of three non-overlapping prefilters, representing discounts with statuses draft, active, and expired.
If the prefilter draft is set to Off hidden for a given end user, this user will no longer be able to access discounts with the status draft.
Indicium will only be able to return discounts with either status active or expired for this user.
Avoid the following methods of limiting data access:
- Setting any type of prefilter group to mandatory. This limits the user to only the data covered by the prefilters in that group.
- Setting a prefilter in a mandatory group to Off hidden. This further limits the user to only the data covered by the other prefilters available in that group.
- Setting a prefilter in a non-mandatory group that uses Filter Mode = Match any (OR) to On locked, On hidden, or Always on. This effectively makes that prefilter group mandatory, limiting the user to the data covered by the other prefilters available in that group.
Instead, set individual prefilters that are not part of a specific prefilter group. We recommend that you apply data authorization as follows:
- Set a prefilter without a group to On locked, On hidden, or Always on.
- Set a prefilter in a group that uses Filter Mode = Match all (AND) to On locked, On hidden, or Always on.
Any of these options will prevent the user from accessing any data that does not match the specific prefilter.
User interface - Tab page group as fallback
new Community ideaYou can assign detail references to a specific Detail group in the model. Sometimes, this Detail group may not be available in the assigned screen type.
For these cases, we have added new functionality: Fallback group. This allows for easier reuse of screen types.
- If there is no fallback group in the screen type, the detail references are not displayed.
- If multiple fallback groups are provided, the GUI decides where to display the details.
You can set up fallback groups in the menu User interface > Screen types > tab Design. Select True from the Fallback allowed drop-down list to indicate that the currently selected tab page can be used as a fallback group.
You can use fallbacks to, for example:
- Manage where details that do not belong to any detail group in the screen type are displayed when there are multiple detail tabs or detail tiles on the screen.
- Show only a very specific set of details when they are shown in a detail group, but show more details when you zoom in.
- Allow the user to choose (using user preferences) whether to display a screen type with a limited set of details or a screen type with an extensive set of details.
- Display a more limited set of details at specific break points.
For example, you have set up the standard screen type master_detail.
This screen type uses detail group 'A' for its detail tabs.
Fallback allowed is on for the details.
When you use this screen type, the details of group 'A' will be visible. In addition, items assigned to other detail groups and items without a group will also be visible (if they exist).
If you want to limit the visible details to group 'A' only, clone master_detail.
Give the new screen type a name, for example, master_details_essentials.
Make sure that Fallback allowed is off for this screen type.
Only details that are explicitly part of group 'A' will be displayed on master_details_essentials.
User interface - Optional default statements for handlers
new SQL Server Community ideaWith handlers, you can replace the GUI's default CRUD actions.
When you activate a handler, an additional checkbox appears: Auto generate insert, Auto generate update, or Auto generate delete (menu User interface > Subjects > tab Settings > tab Performance > group Handlers).
If you select one of these checkboxes, the Software Factory will add the corresponding default statement when you re-generate the handler. Previously, you had to add the default statements manually.
Initially, the behavior of a handler is the same as that of the CRUD button (for example, 'delete' means delete a record in both cases). By deviating from the default in a handler, you can change its behavior (for example, 'delete' causes a record to be archived instead of deleted). You can also add your own logic to them (for example, 'delete' ensures that the record is deleted and leads to the activation of a Deleted checkbox).
- If you activate a handler for a table, the Auto generate checkbox is selected by default.
- If you activate a handler for a view, the Auto generate checkbox is cleared by default. The automatically generated statement is often not applicable because a view usually consists of multiple tables.
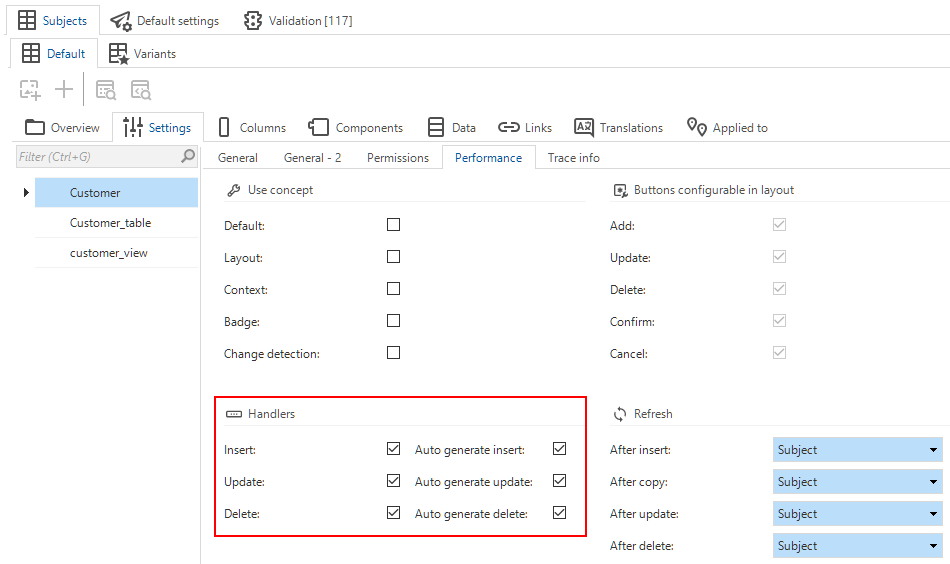 Checkboxes for automatic generation of default statements
This is supported only for SQL Server RDBMS type models. During the upgrade, the new checkboxes are not selected to ensure that existing handler functionality is not changed.
User interface - Copy from form/grid to filter/search
new changed Community ideaThe Software Factory already has tasks in the menu User interface > Subjects to copy the order and visibility settings from one place to another. This is an easy way to, for example, apply your grid setup to a form and vice versa.
In addition, it is now also possible to copy the order and visibility settings from a grid or form to the filter or search settings. You can use these tasks in the same way as the existing tasks, for example, to apply the setup of a form to the search settings. Of course, you can also use these tasks for a first setup and then deviate from it.
The following new tasks are available:
- tab Data > Filter > task
 Copy from grid
 - tab Data > Filter > task
 Copy from form
 - tab Data > Search > task Copy from grid
- tab Data > Search > task Copy from form
The order will be copied by default. You have to choose manually if the visibility will be updated as well. The reason for this is that the visibility is transformed depending on how the grid or form is set up, and needs some extra caution before executing.
The order is copied one-to-one. As mentioned above, the visibility is transformed:
- If the form/grid type is 'editable' or 'read-only', the visibility is transformed to 'always'.
- If the form/grid type is 'hidden', the visibility is transformed to 'never'.
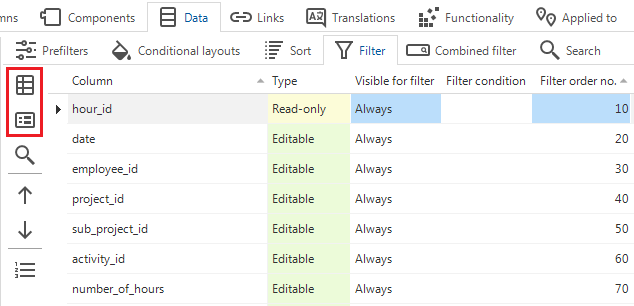 Copying the order and visibility of a grid or form to a filter
User interface - Progress bar status colors
newNow, conditional layouts are also applied to progress bars that are used as a field in a form, grid or task. This requires the extended property FormProgressBar to be present and set to 'True'.
You can use this, for example, to change the color of the progress bar to indicate the progress status of a job.
You will also see this change in the Software Factory progress bars. They now also change color depending on the progress of a job.
User interface - Moved 'Auto-save' checkbox
changed Universal GUIThe abilities of the Auto-save checkbox are no longer tied to a specific component but affect all components of the subject.
To reflect this change, it has been moved. You can now find it in the menu User interface > Subjects > tab Default/Variants > tab Settings > tab General > group Settings.
Previously, it was available in group Form.
 Auto-save as a setting for all components
User interface - Universal GUI theme background fit options
new Universal GUIYou can now change the background fit for the Universal GUI. In the menu User interface > Themes, select a Universal GUI theme and change the Background fit field. The available options are Center, Fit, Stretch (default), Fill, and Tiled.
User interface - Translation management for Universal GUI
new Universal GUIIn the Thinkwise Platform version 2023.1, we introduced the Translation management role for the Windows GUI. Now, in the 2023.2 release, we have extended this role. It now also grants access to the Translations and Help screens with the Universal GUI (menu User interface > Translations or Help).
Business logic - Improved navigation from Code search
new Community ideaWe have added the following new tasks to the Code search screen (menu Business Logic > Code search) to make navigating between Code search and either Functionality or Code overview faster and easier:
 Go to control procedure in Functionality (ALT + C) -
Jump to the selected control procedure in the Functionality screen.
Only available for a search result in either the Control procedure code group or the Template code group.
Go to control procedure in Functionality (ALT + C) -
Jump to the selected control procedure in the Functionality screen.
Only available for a search result in either the Control procedure code group or the Template code group. Go to template in Functionality (ALT + T) -
Jump to the selected template in the Functionality screen.
Only available for a search result in either the Control procedure code group or the Template code group.
Go to template in Functionality (ALT + T) -
Jump to the selected template in the Functionality screen.
Only available for a search result in either the Control procedure code group or the Template code group. Go to object in Code overview (ALT + O) -
Jump to the selected object in the Code overview screen.
Only available for a search result in the Program object generated code group
and if it is a program object that is actually linked to a model object.
This means that it is not possible to navigate to the Code overview for program objects such as
Go to object in Code overview (ALT + O) -
Jump to the selected object in the Code overview screen.
Only available for a search result in the Program object generated code group
and if it is a program object that is actually linked to a model object.
This means that it is not possible to navigate to the Code overview for program objects such as createorupgradescripts.
Business Logic - Control procedure changes
changedThe following changes have been made to control procedures (menu Business Logic > Functionality > tab Control procedure):
- When a control procedure is abandoned, all changes made since it was last approved and completed are reverted. In addition, all related trace information is now rolled back as well, so it really looks like the changes never happened.
- The fields Source code created on and Development completed on have been removed from the control procedure screen. These fields were not used often, and the development information can also be found in the history overview of the control procedure (Ctrl + H).
- When you use the task Ready for review
 to set a control procedure to review status,
you can now immediately assign a reviewer.
to set a control procedure to review status,
you can now immediately assign a reviewer.
Business logic - Improved default for trace columns
changedWe have made the following improvements to the default procedure that is responsible for filling the trace columns:
- When a new record is added, the insert and update fields are filled. The insert date/time and update date/time are the same and contain the date/time of the last field edit.
- It does not use separate set statements for the insert date/time and the update date/time. As a result, there is no longer a millisecond difference between the two fields.
If the table contains an insert trigger that updates itself, the behavior of the default is slightly different. For example, the Abs. order no. will be updated by a trigger after a new column has been inserted. After the trigger is executed, the insert and update fields are no longer the same, because a change was made after the record was inserted.
Quality - Approving or hiding validation messages
changedPreviously, it was possible to temporarily approve validations. However, you do not want to approve something that is wrong, you just want to hide it to fix it later.
This viewpoint has led to the following changes in the menu Quality > Validations > tab Validation and tab Validation messages:
| Type | Old | New |
|---|---|---|
| task | ||
| task | ||
| task | ||
| prefilter | ||
| task | - | |
| task | - |
- Only hide messages when you have a good reason to do so and when you are sure that the problem will be resolved.
- Always resolve all validation messages to avoid future problems and inconsistencies.
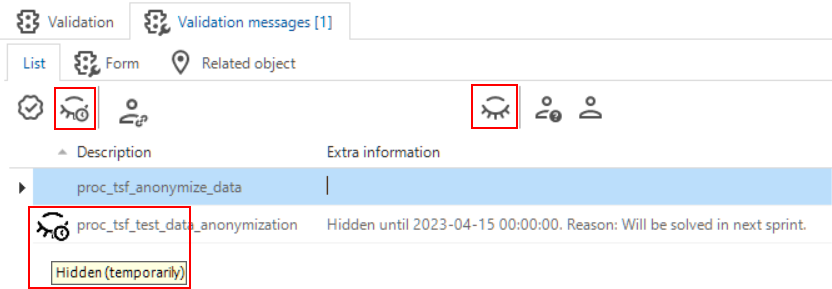 Some of the changes in the Validation messages tab
Changes in the menu Quality > Validations > tab Maintenance:
| Type | Old | New |
|---|---|---|
| column | Allow approve | Allow approval indefinitely. This setting is now only applied to permanent message approval. Hiding messages no longer depends on this setting. |
| tab | Approved messages | Approved messages (indefinitely) |
| tab | Approved messages (temporary) | Hidden messages (temporarily) |
 Changes in the validation's Maintenance tab
Quality - Improved performance Quality dashboard
changedWe have improved the performance of the Quality dashboard in the Model overview (Models > Model overview > tab Quality dashboard). Larger models are now better supported, especially models with many branches.
We have removed the Hide inactive branches prefilter from the list of branches in the Quality dashboard. Inactive branches no longer exist, but have been replaced by archived branches. Since archived branches contain no data, they cannot be displayed on the Quality dashboard. See Archiving branches.
Quality - Smoke test improvements
newIn the previous release, we introduced the smoke test (menu Quality > Smoke tests). In this release, we have extended and improved this functionality.
Smoke tests now also include deviating default expressions, which have been introduced for columns or parameters on a variant level.
The smoke test has also become a part of the Creation flow (menu Deployment > Creation). You can execute it:
- As a separate step after the unit tests (tab Run smoke test).
- As part of the task Execute all creation steps
 (tab Generate definition).
 - In an automated deployment process for the complete creation. Use
"execute_smoke_test" : trueto calladd_job_to_do_complete_creation. - In an automated deployment process for a separate smoke test step. Use
add_job_to_run_smoke_tests(parameters:model_id,branch_id, runtime_configuration_id, andjob_id`).
On all the screens where smoke tests are available, you can now re-run ![]() a single test step.
Note that this is only possible for existing steps and may even cause a step to disappear.
A full smoke test is required on a regular basis to create new steps for newly introduced testable scenarios.
a single test step.
Note that this is only possible for existing steps and may even cause a step to disappear.
A full smoke test is required on a regular basis to create new steps for newly introduced testable scenarios.
We have also improved the visual information about the duration and failures:
- The full duration of each smoke test step is stored and displayed. Note that a prefilter or expression test can be affected by the performance of an underlying view or function.
- If one of the steps in a smoke test has failed, it is displayed in the Error message column. A warning due to a timed-out step is not considered a failure.
An additional validation has been added regarding the execution and status of smoke tests:
- Smoke test failed.
This should encourage regular smoke testing and resolve any warnings and errors.
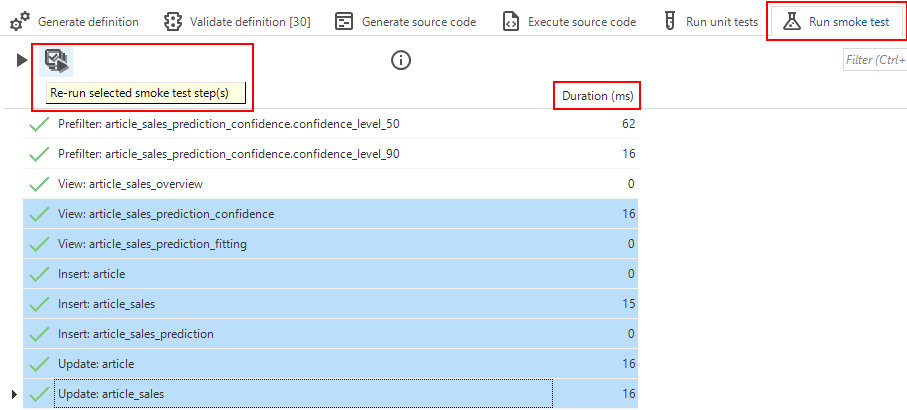 Smoke tests in the Creation screen
Quality - Unit tests for insert triggers improved
changedCreating a unit test for insert triggers has been possible for quite some time. However, when creating one, you always had to look at the data model to determine which input parameters were minimally required to ensure that the insert statement that triggers the trigger would go off without problems. The Software Factory did not provide this information.
This has been changed. When creating a unit test for an insert trigger, the Software Factory now automatically adds input parameters for mandatory columns without a specific default value. A value for the input parameter will not automatically be provided, you still need to set this up yourself.
Identity columns are not included. If they were included, the insert would fail because the default unit test statement does not turn on the identity insert. Identity columns always have a technical 'default' value, which means they do not need to be included in the insert statement.
We have added a validation to indicate that one or more of the mandatory columns have not been set up as an input parameter.
Quality - Unit test mock data improvements
new changedIn a unit test, you can now add a preparation query to a mock data set. With a preparation query, you can programmatically enhance mock data or other database objects such as views or functions via alter statements. This was already available for unit tests.
When a unit test is executed, the preparation query for a mock data set is executed after all the mock tables have been prepared, but before the unit test preparation query is executed.
The following has changed for mock data sets and tables:
- Adding mock data sets via the grid has been disabled. You can now use the form to add
 a new one.
This makes it easier to specify mock data for tables with many columns.
a new one.
This makes it easier to specify mock data for tables with many columns. - Mock data tables are now added
 and deleted
  via tasks instead of the grid.
This reduces the number of ways to add and delete tables and simplifies these processes.
via tasks instead of the grid.
This reduces the number of ways to add and delete tables and simplifies these processes.
After adding a table to a mock data set, you can select ![]() columns for input values.
Deselected
columns for input values.
Deselected ![]() columns will not be available as row and column values.
columns will not be available as row and column values.
This behavior change requires the procedure tsf_mock_tab to be reapplied to the test database.
Only then will the fallback values be applied.
The following tasks are now available to add rows to your mock data set. Some were already available but have been changed:
- Adding a mocked data row no longer has a parameter pop-up but creates the row immediately.
Therefore, you can no longer use this task to add an entirely new table to the mock data set.
- Copying
 a mocked data row no longer has a parameter pop-up.
 - Also deleting a mocked data row is now done with a task.
You can only specify values for columns that are selected for use in the mock data set.
The mandatory columns at the data model level are marked.
Expression values and constant values now share the same input field.
A button ![]() is still available to open and modify the expression using an IDE.
is still available to open and modify the expression using an IDE.
The four options for specifying a column value have been made more explicit. You can now choose one of the following options: Constant value, Expression, Null-value, or Fallback value. Changing column values no longer refreshes the entire document after each update. A manual refresh is now required to see changes in the key values reflected in the row description.
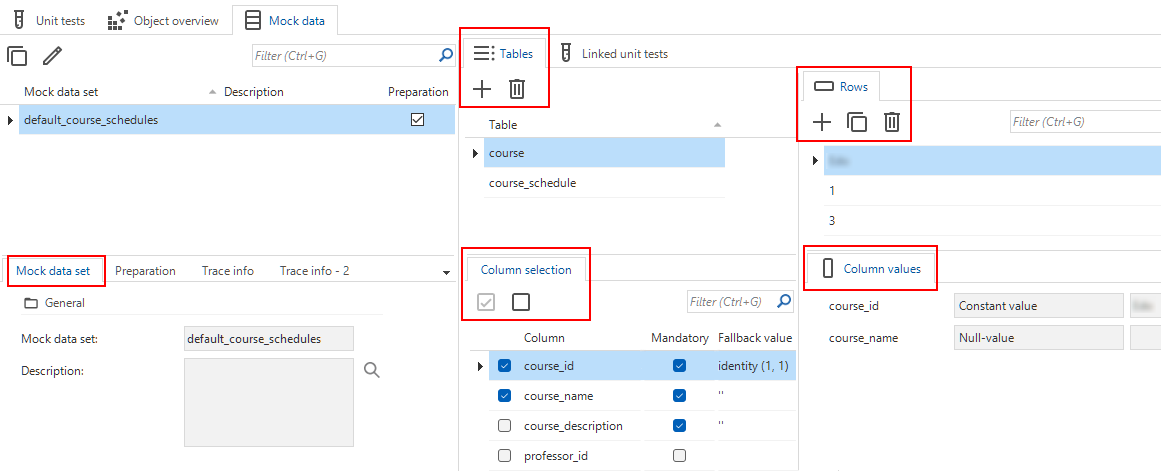 Improved mock data for unit tests
Quality - Set up mock data for a view
new Community ideaIn unit tests, it was already possible to set up mock data for tables. Now, you can also add a view to the list of selected tables for a mock data set.
To see the effect of adding a view, execute the task Show unit test code ![]() .
.
Quality - Validation for branch with an interval
newWe have added a new validation for branches that contain an interval value for auto-refresh or badges.
Constantly refreshing of screens or badges results in sessions remaining open, which can be a security risk.
If you receive a validation message about auto-refresh or badges, contact your Security Officer to determine how to proceed. If you choose to keep the auto-refresh or badges settings, the validation message may be approved.
Quality - Validations for mock data
newWe have added the following validations for mock data sets:
- An expression column is included in the columns of a mock data set - Checks if a mock data set contains a column that is defined as an expression in the data model. Expression fields are not present in the database.
- A mandatory column has been marked to use a null value in a mock data set - Checks if a mock data set contains a column that is mandatory in the data model but has been defined as a null value in the mock data. Inserting a null value into a mandatory column is not allowed.
- A primary key column is not included in the columns of a mock data set - Checks if a mock data set is missing a column that is a primary key in the data model. Primary key values are mandatory.
- A primary key column has been marked to use a fallback value in a mock data set - Checks if a mock data set contains a column that is part of the primary key but has been defined as a fallback value in the mock data. Primary keys do not have a fallback value because they must be unique.
- A primary key column has been marked to use a null value in a mock data set - Checks if a mock data set contains a column that is part of the primary key but has been defined as a null value in the mock data. Inserting a null value in a primary key column is not allowed.
Access control - Improved adding new objects to Model rights
changedIn the Software Factory version 2023.1, we have refactored the New objects tab to comply with temporal versioning (menu Access Control > Model rights > New objects). In this release, we have improved the performance of the tab to handle larger models and branches that would result in a larger history.
Another major change is that the tab used to display data in real time; when you added a new object and refreshed the tab, it was displayed immediately. Now, you have to generate new objects. There are two ways to do this:
- Task Set source for data migration and upgrade is available on both the New objects tab
and the Data migration screen.
It first updates the source version for the branch, then generates the new objects. Previously, this task only updated the source version.
- Task Generate new objects is only available in the New objects tab.
If the source version for the branch is correct, you can use it to generate only the new objects.
 New tasks for generating new objects
Access control - Performance improvement for variants
changedEffective rights for variants are now calculated in the Software Factory and synchronized to IAM. This improves performance.
Previously, variant rights were calculated based on IAM data at application startup.
Enrichment - Staged strategy for dynamic model
newIn addition to the Delete strategy for Dynamic Model control procedures, it is now possible to use the Staged strategy (menu Enrichment > Dynamic model > tab Dynamic model).
Compared to the Delete strategy, the Staged strategy will improve the generation performance. It only applies changes between the desired and the actual set of model objects instead of deleting and recreating the entire set.
Like the existing Staged strategy for program objects and program object-item control procedures, this strategy provides temporary tables for the SQL code to describe the desired set of model objects. Then, generated objects in the model associated with that control procedure are compared to the data in the temporary tables and automatically deleted, inserted, or updated.
Any model object table can be used by simply referring to the corresponding temporary table name in the SQL code. Note that the following items are not available in the temporary tables:
- Model and branch columns
- Identities
- Trace columns
- Columns referring to the control procedure that manages the generated object
- Calculated fields (such as
abs_order_no) - Derived fields (such as
is_detail)
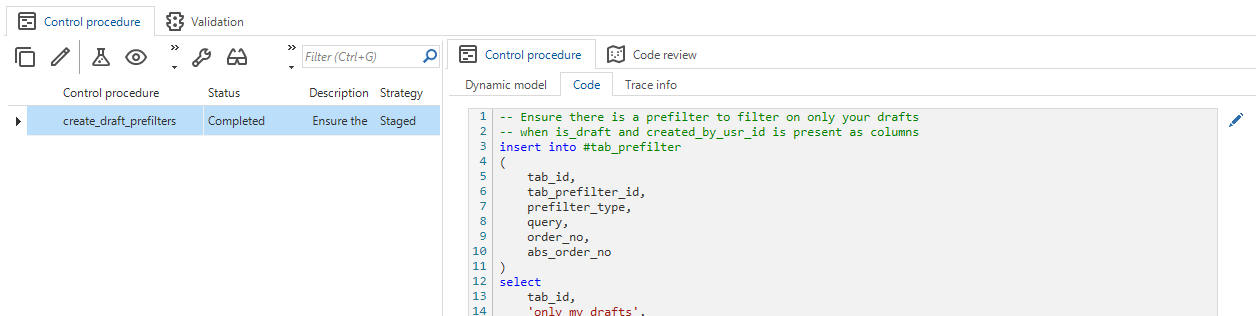 A control procedure with a 'Staged' strategy in Dynamic model
A task is available to Show the full staged control procedure code ![]() .
It will show the full execution code, including provisioning, deletion, update, and insertion.
So, it shows how this would be implemented if a Fully managed strategy had been used to achieve the same result.
.
It will show the full execution code, including provisioning, deletion, update, and insertion.
So, it shows how this would be implemented if a Fully managed strategy had been used to achieve the same result.
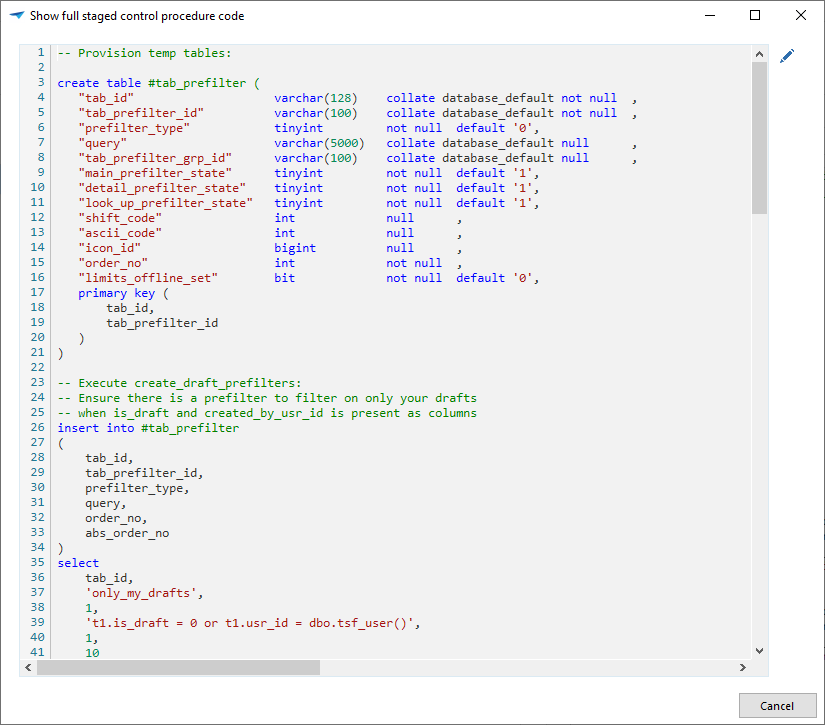 The full code for a staged meta control procedure
Deployment - Deleting generated objects improved
changedDuring the definition generation, model objects are no longer deleted if they are still referenced by other model objects, if
- They were copied from a base model and are no longer present in the base model (this behavior remains unchanged).
- They were generated by control procedures with generation strategy Delete (menu Business logic > Functionality > tab Control procedure > field Strategy).
- The Generated checkbox is selected (available in a form's Trace info for a limited set of objects, such as tables, columns, domains, tasks, reports, screen types).
Previously, the following items would cascade delete some types of referencing model objects when generating the definition, prevent other types of referencing model objects from deleting the generated objects, and cause errors for other types of referencing objects:
- Control procedures with generation strategy Delete.
They may still use this checkbox,
although we recommend using By control procedure (
generated_by_control_proc_id), available for all model objects. - Translation objects created for model objects. These are no longer marked as Generated since they do not participate in the new system.
This change ensures that all generated model objects can now be referenced as menu items, diagrams, look-up references, variants, and so on. It restores integrity between roles and model objects, and prevents problems. This was previously disabled to preserve role rights for generated objects that were deleted and recreated during generation.
In addition, a small set of model objects marked as Generated or generated by control procedures with the Delete generation strategy were previously not deleted. They are now correctly deleted at the start of the generation if they satisfy the above rules.
This is a breaking change. For more information about potential issues, see Breaking - Deleting generated objects improved.
Deployment - Only dropping objects in dbo schema
changed SQL serverPreviously, if you wanted to drop an object of a certain name and type, all objects of that name and type in the database would be dropped, regardless of their schema. If an object with the same name and the same type existed in two different schemas, both would be dropped.
The Software Factory only creates objects in the dbo schema. The uniqueness of a table's name and type is guaranteed only within its schema. You may have intentionally created an object with the same name and type in another schema. For example, if you use Microsoft Azure's "App service", additional tables are added to the database with their own schema.
In such a case, dropping both objects would be undesirable.
The Software Factory scripts will now only drop objects in the dbo schema to avoid dropping objects that should not be removed.
Deployment - Improved creation of deployment package
changedBefore creating a deployment package (menu Deployment > Deployment package), the Software Factory now checks if the branch has roles and the source version has a name. If not, you will be directed to the right screen to resolve the situation. The name is important because the Deployment Center uses it to upgrade from one version to the next.
We have also added fields to display the source branch and model version in the Create deployment package task dialog. This makes it clear which source version the deployment package is based on.
Deployment - Improved automation of the Creation process
changedIn the automation of the Creation process, we have revised the following add_job_to tasks, resulting in some parameter changes:
| Task | Change | Remarks |
|---|---|---|
add_job_to_generate_definition, add_job_to_do_complete_creation | Parameter debug is now editable. | debug is relevant to the Generate definition process. It logs when the branch is 'locked' and 'unlocked', and any action taken by the user after a process step has failed. |
add_job_to_do_complete_creation, add_job_to_run_smoke_tests | host and db_name are no longer input parameters. | This does not affect the API call as these were read-only parameters. However, it does affect execution of this task using a SQL query. Remove the host and db_name parameters from the execution query. |
add_job_to_do_complete_creation | New parameter: execute_smoke_test. | - |
add_job_to_validate_all | Parameter validation_type has been made editable. | validation_type is relevant to the Validate definition process, it allows execution of specific validation types. By default, leaving validation_type empty will cause all validations to be executed.The following validation types are possible:
|
Deployment - Smart upgrade performance optimization
changedWe have significantly improved the performance of the Smart method in the source code generation by using the temporal tables that have been introduced in the 2023.1 version of the Software Factory.
Deployment - Refresh disabled when waiting for input
changedWhen generating the definition or executing source code (menu Deployment > Creation), the screen kept refreshing while the job was active. Even if an error occurred and the task was waiting for input, the screen kept refreshing, making it difficult to read the tooltips to determine which task to select.
Now, when a job is waiting for user input, the screen stops refreshing. When you provide the requested input, it begins refreshing again so you can see the progress of the job.
Maintenance - Refresh disabled when waiting for input
changedThe Jobs screen (menu Maintenance > Jobs) will now only be refreshed when necessary, that is, only when something has changed.
Fixed in the Software Factory
Rollback detection in unit tests
To address a rollback problem, we have improved the detection of a premature transaction rollback during unit test execution.
As a result, the Should rollback setting (menu Quality > Unit tests > tab List or Form) now accurately indicates that a rollback has occurred.
This setting is applied, for example, during a unit test on a handler procedure. If an error occurs, the transaction is rolled back by the handler procedure, terminating it prematurely. This rollback is now detected by the Software Factory.
Due to the improved rollback detection, a unit test that ran successfully on platform version 2023.1 may now fail.
Deleting data set table also removes rows
Deleting data set tables (menu Quality > Unit tests > tab Mock data) will now also remove any configured Table data. This prevents the same data from being reused if the table is added again later.
Expanded support of unit test filter conditions
In the previous 2023.1 release, the filter conditions for the trigger row filters in unit tests were extended to include all the conditions that are standard in the standard Thinkwise GUI filter (CTRL+R). This functionality has now been extended to the other unit test types where the Expected output tab page is applicable.
We have added the column Expected output until. This allows you to use the filter conditions Between and Not between as intended. You can configure these unit test filter conditions in menu Quality > Unit tests > tab Form > tab General > tab Expected output.
Commas in numeric columns in mock data sets
If you provided column values in mock data sets with a numeric datatype and used a comma as the decimal separator, this would be misinterpreted by the unit test execution mechanism. Instead of interpreting it as one number, it would see it as two separate values. To resolve this issue, commas in numeric values are now automatically replaced with dots after leaving the field.
Prevent granting public rights to user-defined data types and views
You can already use the model tag NO_GRANT_TO_PUBLIC to prevent granting public rights to various database objects such as tables and procedures.
Now, granting public rights to user-defined data types (based on your domains) and views will no longer occur when using this model tag.
You can configure public rights in the menu Models > Model overview > tab Model tags.
Delete branch that has related merge session
Previously, you could not delete a branch if a related merge session existed because of the references between the branch and the merge session. We have made an exception for these references. You can now delete a branch with an existing merge session. When you delete such a branch, its associated merge session is longer executable.
You can delete branches in the menu Models > Model overview > tab Branches.
Delta actions determined correctly when branch is merged multiple times
When a branch was merged multiple times without archiving in between, some delta actions could be missing. This happened because the merge action compared the branch to the wrong origin model version. This has been fixed.
Now if you merge a branch into the origin without archiving, you subsequently must also merge the origin into the branch. This ensures that both the origin and the branch are up to date and that the delta actions are generated correctly. You will be notified if this situation occurs after executing a merge session, and if you start a new merge session from the branch into the origin.
Behavior of 'Default enabled' when executing validations
When executing individual validations, they should always be executed, regardless of whether they are enabled by default. Otherwise, you would never be able to execute these types of validations. This situation did not work as desired and has been corrected. The setting Default enabled is available in the menu Quality > Validations > tab Maintenance.
The behavior has not changed for executing all validations or a complete validation group. In these cases, only the validations enabled by default will be executed. You can execute validations in the menu Quality > Validations.
Mapping during data migration after renaming a table and a column
The first time you renamed a table and one or more columns within that table, the data migration did not map those columns to each other. Instead, it would mark one column as Removed and one as New.
Now, renamed columns in a renamed table are mapped correctly (within the time frame between the source model version and the current model version).
New and changed in the Intelligent Application Manager
Client applications - Extended support
new Community ideaIt was already possible to set up a client application for OpenID authentication and API access via the OAuth2 Authorization code grant flow. Now, you can also set up a client application exclusively for delegated API access via this grant flow, without enabling OpenID in the process. See User delegated API access.
In addition, you can set up a client application for machine-to-machine API access via the OAuth2 Client credentials grant flow. See Machine-to-machine API access.
Because of these additions, the following UI elements have been renamed:
| Old name | New name |
|---|---|
| menu OpenID apps | menu Client apps |
| menu OpenID apps > OpenID clients | menu Client apps > Client applications |
| menu OpenID apps > OpenID resources | menu Client apps > Custom resources |
| tab OpenID client | tab Client application |
You can configure your client application in the menu Client apps > Client applications > form Client application.
User-delegated API access
To set up a client application exclusively for delegated API access, without OpenID, via the OAuth2 Authorization code grant flow, we have made some changes.
All the configuration for the Authorization code grant flow that does not affect the Client credentials grant flow has been made exclusive to the Authorization code grant flow. For example, settings for consent, redirects, and PKCE.
-
If you select the Authorization code grant flow and clear Support OpenID Connect, these additional options will become visible.
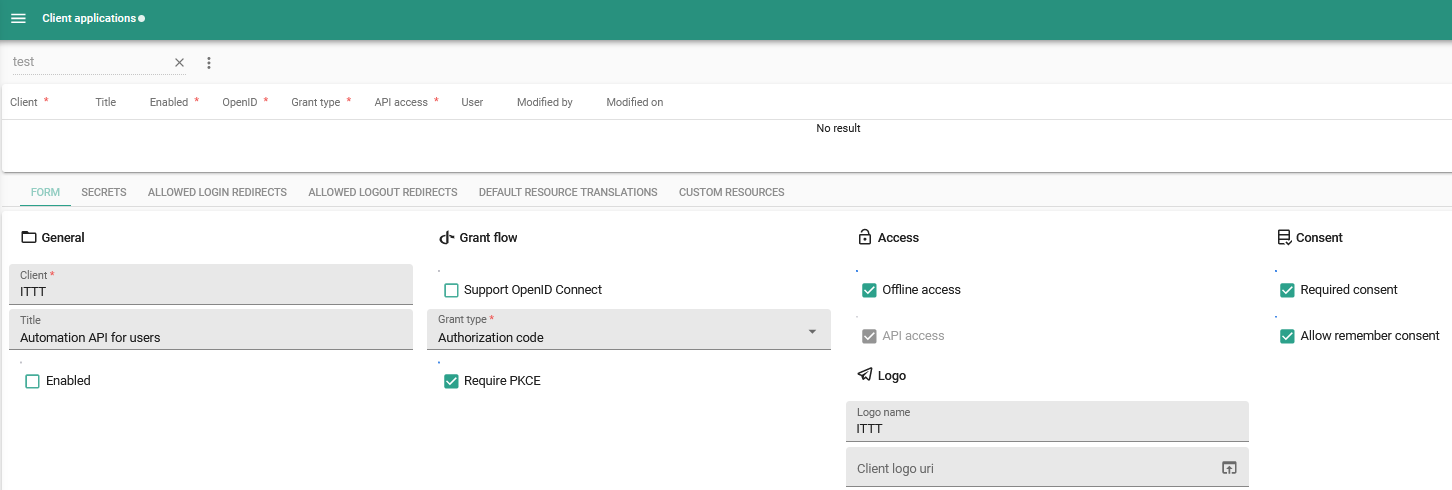 Configuration setting for the Authorization code grant flow without enabling OpenID
 -
If you re-enable Support OpenID Connect, the available settings will automatically revert to the Authorization code grant flow without API access. In this case, Support API access becomes optional. You can then configure additional fields related to the identity resources that can be requested by the client application.
 Configuration settings for the Authorization code grant flow with OpenID
Machine-to-machine API access
To set up your client application for machine-to-machine API access via the OAuth2 Client credentials grant flow, you need to clear the Support OpenID Connect checkbox. Support API access becomes mandatory.
The client application will use the selected Identity for authentication. Usually, it is best to use a service account.
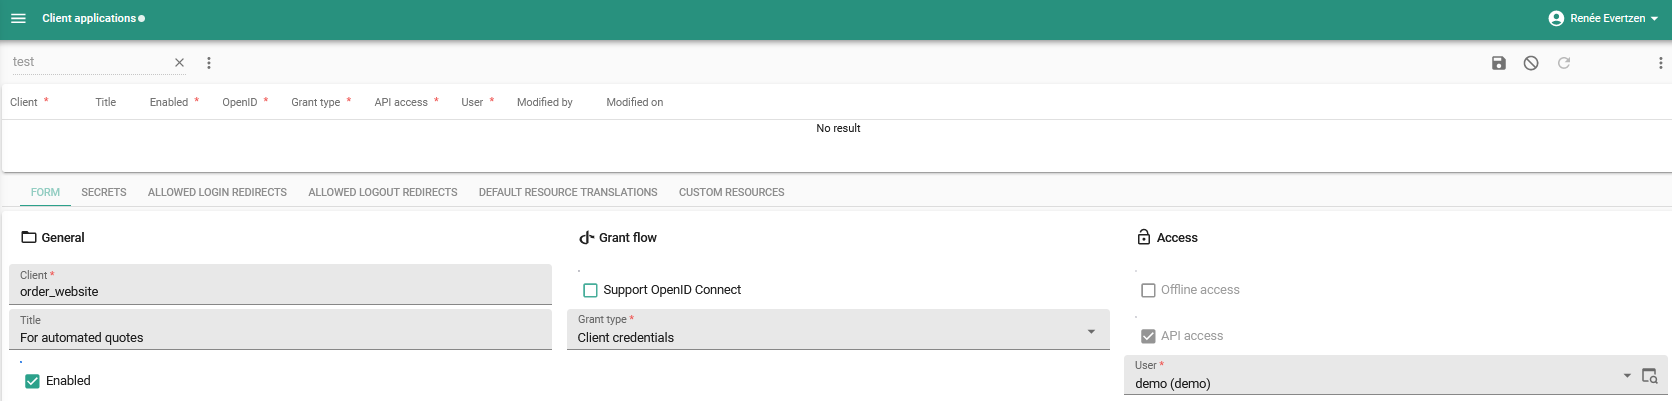 Configuration settings for the Client credentials grant flow
Encryption for OpenId providers and Client applications
new Universal GUI IndiciumYou can now store the client secret for OpenId Providers and the secret for Client applications encrypted in the database.
Encryption is only available in a 3-tier setup, where IAM is used in the Universal GUI. It is not available for IAM for the 2-tier Windows or Web GUIs because it requires Indicium support and configuration.
First, you need to configure encryption in Indicium (appsettings.json) for the platform you are using. Then, encrypt the secrets:
- For OpenId providers, execute the task Encrypt OpenID provider
 to add an encrypted client secret to a provider (menu Authorization > OpenID providers).
 - For Client applications, you can encrypt the secret in the menu Client apps > Client applications.
Select the client application and go to the tab Secret.
Execute the task Add secret (encrypted) .
Authorization - Send client credentials for OpenID providers
changedWhen using an OpenID provider, client credentials are sent in the request body by default. You can now also send client credentials As Basic Auth header. You can configure this setting in the menu Authorization > OpenID providers.
See also Send client credentials in body or header for OAuth services.
Additional option to send client credentials
Authorization - Deviate from the default email provider
newAfter setting a default email provider in the Software Factory (see Email providers), you can override it per application in IAM in the menu Authorization > Applications > tab Email providers.
To change the email provider type, execute the task Switch email provider type ![]() .
.
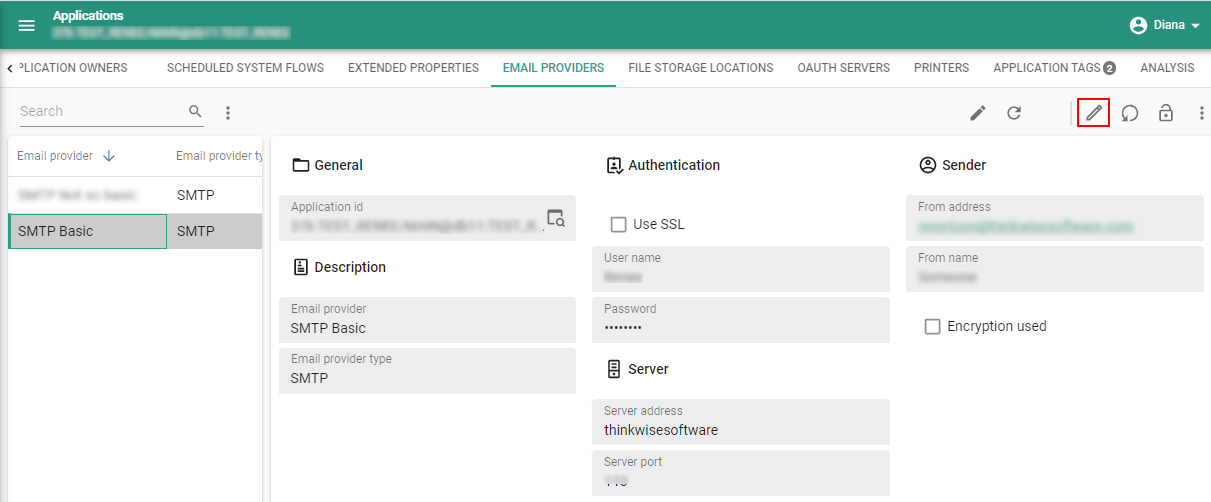 Email provider in IAM
Authorization - Improved provision default authorization task
changedThe output provided by the task provision_default_authorization in IAM could sometimes exceed the maximum allowed length when called through the OData API.
To prevent this, a new parameter has been added to the task: show_output.
If the task is executed through the GUI, the output will always be returned.
For API calls, this parameter is automatically set to 0 but can optionally be set to 1 to allow output.
The API call to execute the task has also changed.
Instead of calling the task from iam/iam/usr_grp_gui_appl_overview([primary key])/provision_default_authorization, you should call it from the root: https://[server]/indicium/iam/iam/provision_default_authorization.
The JSON request body for this task now includes tenant_id, model_id, branch_id, and gui_appl_id:
{
  "tenant_id": 12,
  "model_id": "My model",
  "branch_id": "MAIN",
  "gui_appl_id": 83
}
Authorization - Extended rights for application administrators
newUsers with the role Application administrator now also have rights to the following application information: system flows, printers, email providers, OAuth servers, file storage locations, translations, and module authorization.
Models - Original branch name visible in IAM
newIt was already possible to synchronize to IAM with a different branch name (menu Deployment > Synchronize to IAM).
However, only the new branch name was visible in IAM, so the original name was not always clear. To resolve this, the original branch name is now also available in IAM, in the menu Models > Model overview > tab Branches > tab Form. These fields are not visible if the branch has been synchronized with the same name.
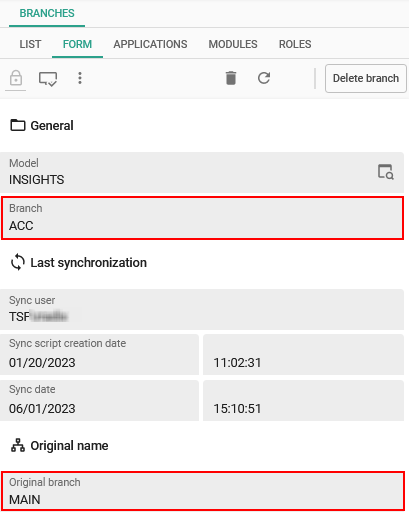 Original branch name visible in IAM
User groups - Moved 'Copy user group to tenant' task
changedPreviously, the User group screen in the Intelligent Application Manager contained two separate tasks, both of which involved copying a user group,
but were slightly different.
There is also a regular CRUD action to copy the user group at the record level.
To reduce complexity, we have removed the task Copy user group to tenant ![]() .
.
To preserve its functionality, we have extended the task Copy user group ![]() with an additional setting called Copy - Users (menu Authorization > User groups).
with an additional setting called Copy - Users (menu Authorization > User groups).
This setting is only available if your administrator role allows copying user group within the original tenant.
- If the administrator's default tenant is a different tenant, this option is disabled.
- If the option is enabled and selected, the users that exist in the user group being copied are also copied to the new user group.
The task layout has also been updated:
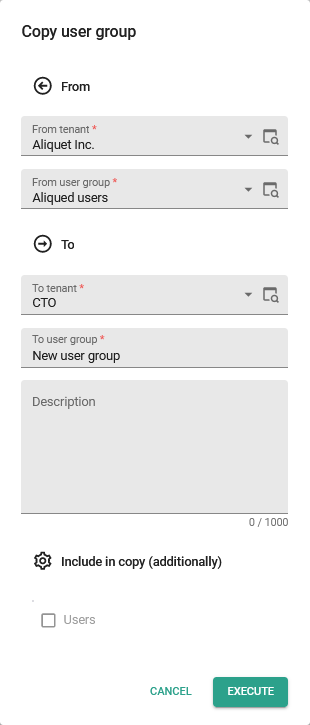 Copy user group changed
Users/User groups - Inspect variant effective rights
newAn object can now be unauthorized in its base object, but hidden and thus available in its variant. For more information, see Inspect variant effective rights.
In IAM, you can inspect the variant effective rights for users and user groups:
- For users: menu Authorization > Users > Effective user rights. The rights are available on the tabs Table rights, Task rights, and Report rights.
- For user groups: menu Authorization > User groups > tab Effective group rights. The rights are available on the tabs Table rights, Task rights, and Report rights.
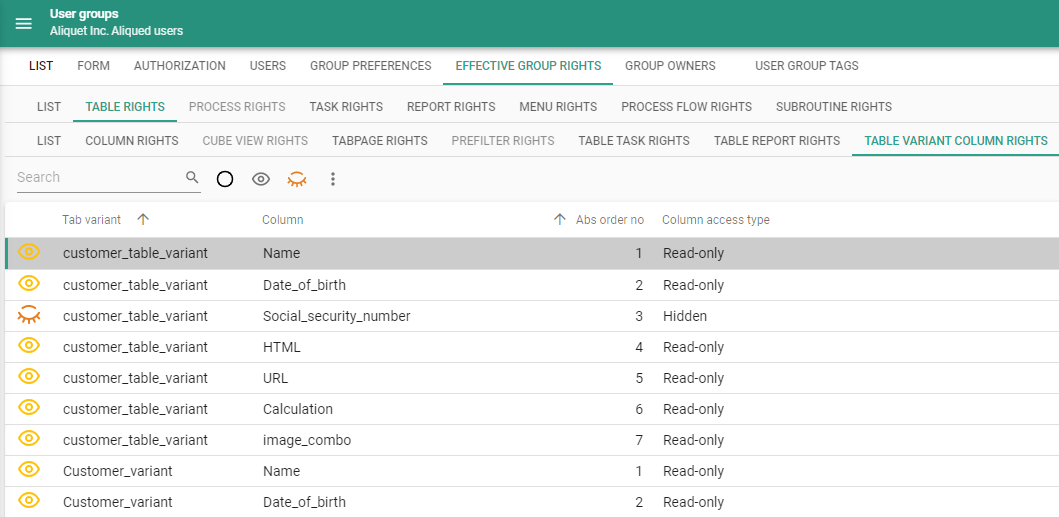 Inspect a variant's effective rights
A column is unauthorized if:
- No rights are granted.
- The GUI does not need the column definition because it is not used for functions like sorting and filtering.
However, in the variant of a table, you can set up a sorting that uses this unauthorized column. Since the column is now available but hidden in the variant, its information is available in the Universal GUI for sorting.
Users - Allow an unlimited number of sessions
new Community ideaAll users in IAM have a limited maximum number of sessions for a given application. Service accounts are also subject to this limit.
To allow service accounts to have an unlimited amount of sessions while still being able to limit the sessions of other users, we have introduced a new setting. With this setting, you can exclude a user from the specified maximum number of sessions. In this way, you can allow a service account to have unlimited sessions for each application for which it has rights.
- For an application, you can set the maximum number of sessions per account in the menu Authorization > Applications > tab Form.
- To exclude a user from this maximum, select the checkbox Exclude from max. # sessions in the menu Authorization > Users > tab Form.
Users - Copy and import user preference
changed Community ideaCurrently, IAM contains a task to copy ![]() the user preferences of another user within the same IAM environment
(menu Authorization > Users).
We have renamed this task to Re-apply user preference and added an additional Import option.
With this new option, you can import a JSON file to override one user's preferences with another user's preferences.
The other user can even be outside the IAM environment.
the user preferences of another user within the same IAM environment
(menu Authorization > Users).
We have renamed this task to Re-apply user preference and added an additional Import option.
With this new option, you can import a JSON file to override one user's preferences with another user's preferences.
The other user can even be outside the IAM environment.
You can create the JSON file with the task Export user preferences ![]() .
.
Tags in IAM
new Community ideaThe IAM already had a Tag tab for Users. This has been extended. You can now add tags to:
- User groups - menu Authorization > User groups > tab User group tags
- Tenants - menu Authorization > Tenants > tab Tenant tags
- Applications - menu Authorization > Applications > tab Application tags
You can also add tags in the menu Advanced > Master data > Tags. If one of the objects has related tags, it will be displayed in the tab with a badge.
With the Main administrator role, you can maintain tags for users, user groups, tenants, and applications. With the Application administrator role, you can only maintain them for applications.
You can use tags to maintain information that is not available in the Intelligent Application Manager. They can also be used in combination with the post synchronization code in the Software Factory.
When a user or user group is copied, the tags are copied with it. Tenants are not expected to be copied, so tags are not included. For applications, copying the tags is optional. They are included by default.
 Example of a User group tag
Fixed in the Intelligent Application Manager
Prefilter on variant no longer overrides variant settings
User preferences for enabling or disabling prefilters will no longer be applied if the prefilter for that variant is read-only or hidden to the user. See also Prefilters that are 'Off hidden'.
Cube allow dragging fields
User role rights were not taken into account to determine whether dragging a field within a cube was allowed. If the cube setting indicated that it was allowed, it was allowed. Now, both settings are taken into account.
Explain task for effective rights
We have fixed a problem with the Explain task ![]() ,
(menu Authorization > User groups > tab Effective group rights and menu Authorization > Users > tab Effective user rights)
when explaining the rights for objects that are deeper than one level.
In this case, only the top level would be explained.
The same problem would occur for objects such as list bar groups/items and module groups/items.
,
(menu Authorization > User groups > tab Effective group rights and menu Authorization > Users > tab Effective user rights)
when explaining the rights for objects that are deeper than one level.
In this case, only the top level would be explained.
The same problem would occur for objects such as list bar groups/items and module groups/items.
Now, the message provides the user with the correct information.
For example, the message about a list bar item will now look like this:
'The role role grants rights to table prefilter address / active_address'.
Data model changes
Data model changes for the Software Factory and IAM meta-models are listed here. This overview can be used as a reference to fix dynamic control procedures, dynamic model code or custom validations after an upgrade.
Changes Software Factory
Table changes
Changes
| SF - From table | SF - To table |
|---|---|
| - | data_migration_new_object |
| - | data_set_col |
| - | email_provider |
| - | email_provider_configuration |
| - | execute_object_code_step |
| - | generate_object_code_step |
| offline_code_file | - |
| reachable_report | - |
| reachable_tab | - |
| reachable_task | - |
Column changes
Changes
| SF - Table | SF - From column | SF - To column | New column mandatory | New column default value |
|---|---|---|---|---|
| branch | - | archived | 1 | 0 |
| branch | - | origin_merge_pending | 1 | 0 |
| branch | model_folder_spec | - | - | - |
| branch | default_file_storage_folder | - | - | - |
| col | - | use_for_optimistic_locking | 1 | 0 |
| control_proc | development_completed_on | - | - | - |
| control_proc | source_code_created_on | - | - | - |
| control_proc | source_code_deployed_on | - | - | - |
| data_set | - | use_preparation_query | 1 | 0 |
| data_set | - | preparation_query | 0 | NULL |
| deployment_run | sync_as_model_id | - | - | - |
| deployment_run | sync_as_branch_id | - | - | - |
| dom | - | read_only_input_control | 1 | 1 |
| dom | - | dom_description | 0 | NULL |
| dom | - | use_for_optimistic_locking | 1 | 0 |
| execute_object_code_log | - | execute_object_code_log_id | 1 | NULL |
| execute_object_code_log | status_code | status | - | - |
| file_storage | - | sas_token_encrypted | 0 | NULL |
| file_storage | - | aws_secret_access_key_encrypted | 0 | NULL |
| file_storage | - | azure_client_secret_encrypted | 0 | NULL |
| file_storage | - | encryption_used | 1 | 0 |
| file_storage | - | password_encrypted | 0 | NULL |
| file_storage_configuration | - | sas_token_encrypted | 0 | NULL |
| file_storage_configuration | - | aws_secret_access_key_encrypted | 0 | NULL |
| file_storage_configuration | - | azure_client_secret_encrypted | 0 | NULL |
| file_storage_configuration | - | password_encrypted | 0 | NULL |
| generate_object_code_log | - | model_id | 0 | NULL |
| generate_object_code_log | - | branch_id | 0 | NULL |
| generate_object_code_log | log_id | generate_object_code_log_id | - | - |
| merge_session | deactivate_branch | archive_branch | - | - |
| model | - | show_archived_branch_in_diagram | 1 | 0 |
| model_settings | - | floating_label_field_width | 1 | 0 |
| model_vrs | - | model_vrs_type | 1 | 0 |
| model_vrs | - | merge_session_id | 0 | NULL |
| model_vrs | - | merge_from_branch_id | 0 | NULL |
| model_vrs | - | merge_into_branch_id | 0 | NULL |
| oauth_server | - | client_authentication_mode | 1 | 0 |
| oauth_server | - | client_secret_encrypted | 0 | NULL |
| oauth_server | - | encryption_used | 1 | 0 |
| oauth_server_configuration | - | client_secret_encrypted | 0 | NULL |
| process_action | - | email_provider_id | 0 | NULL |
| process_step | - | process_step_description | 0 | NULL |
| role_tab_prefilter | data_authorization_prefilter | always_on | 1 | 0 |
| runtime_configuration | rdbms_type | - | - | - |
| runtime_configuration | mobile_proxy_address | - | - | - |
| screen_component | - | use_as_fallback_grp | 1 | 0 |
| sf_configuration | default_model_folder_spec | - | - | - |
| smoke_test_step | - | duration_ms | 0 | NULL |
| smoke_test_step | - | smoke_test_step_type | 1 | 0 |
| smoke_test_step | - | type_of_object | 1 | 0 |
| smoke_test_step | - | pk_col_1 | 1 | 0 |
| smoke_test_step | - | pk_col_2 | 0 | NULL |
| smoke_test_step | - | pk_col_3 | 0 | NULL |
| subroutine_option | subroutine_option_no | - | - | - |
| sync_run | sync_as_model_id | - | - | - |
| sync_target_iam | rdbms_type | - | - | - |
| tab | - | use_insert_handlers_template | 1 | 0 |
| tab | - | use_update_handlers_template | 1 | 0 |
| tab | - | use_delete_handlers_template | 1 | 0 |
| tab_data | tab_data_display | - | - | - |
| tab_prefilter_grp | - | allow_multiple_active_prefilters | 1 | 1 |
| tab_prefilter_grp | - | filter_mode | 0 | 0 |
| tab_prefilter_grp | exclude | - | - | - |
| unit_test_col_output | - | expected_output_value_until | 0 | NULL |
| unit_test_col_type | - | expected_output_value_until | 0 | NULL |
| unit_test_fixed_parmtr_output | - | expected_output_value_until | 0 | NULL |
| unit_test_process_step_output | - | expected_output_value_until | 0 | NULL |
| unit_test_process_variable_output | - | expected_output_value_until | 0 | NULL |
| unit_test_ref_output | - | expected_output_value_until | 0 | NULL |
| unit_test_report_parmtr_output | - | expected_output_value_until | 0 | NULL |
| unit_test_report_parmtr_type | - | expected_output_value_until | 0 | NULL |
| unit_test_subroutine_parmtr_output | - | expected_output_value_until | 0 | NULL |
| unit_test_tab_report_output | - | expected_output_value_until | 0 | NULL |
| unit_test_tab_task_output | - | expected_output_value_until | 0 | NULL |
| unit_test_task_parmtr_output | - | expected_output_value_until | 0 | NULL |
| unit_test_task_parmtr_type | - | expected_output_value_until | 0 | NULL |
| usr | - | use_last_usr_session | 1 | 0 |
| validation | executed | - | - | - |
Changes Intelligent Application Manager
Table changes
Changes
| IAM - From table | IAM - To table |
|---|---|
| - | elemnt_sort_order |
| - | gui_appl_tag |
| - | iam_email_provider |
| - | openid_client_secret |
| - | role_report_variant_parmtr |
| - | role_tab_variant |
| - | role_tab_variant_col |
| - | role_tab_variant_detail |
| - | role_tab_variant_prefilter |
| - | role_tab_variant_ref |
| - | role_tab_variant_report |
| - | role_tab_variant_task |
| - | role_task_variant_parmtr |
| - | sf_email_provider |
| - | system_email_template |
| - | tenant_tag |
| - | usr_grp_tag |
| offline_code_file | - |
| openid_client_secret | - |
| reachable_report | - |
| reachable_tab | - |
| reachable_task | - |
Column changes
Changes
| IAM - Table | IAM - From column | IAM - To column | New column mandatory | New column default value |
|---|---|---|---|---|
| branch | - | original_model_id | 0 | NULL |
| branch | - | original_branch_id | 0 | NULL |
| col | - | field_width_option | 1 | 1 |
| col | - | field_percentage | 0 | NULL |
| col | - | form_next_grp_col_id | 0 | NULL |
| col | - | next_tab_col_id | 0 | NULL |
| col | - | field_set | 1 | 0 |
| col | - | read_only_input_control | 1 | 1 |
| col | - | use_for_optimistic_locking | 1 | 0 |
| gui_appl | mobile_proxy_address | - | - | - |
| iam_file_storage | - | sas_token_encrypted | 0 | NULL |
| iam_file_storage | - | aws_secret_access_key_encrypted | 0 | NULL |
| iam_file_storage | - | azure_client_secret_encrypted | 0 | NULL |
| iam_file_storage | - | encryption_used | 1 | 0 |
| iam_file_storage | - | password_encrypted | 0 | NULL |
| iam_oauth_server | - | client_secret_encrypted | 0 | NULL |
| iam_oauth_server | - | encryption_used | 1 | 0 |
| openid_client | - | openid_enabled | 1 | 1 |
| openid_client | - | grant_type | 1 | authorization_code |
| openid_client | - | client_credentials_usr_id | 0 | NULL |
| openid_provider | - | client_authentication_mode | 1 | 0 |
| openid_provider | - | client_secret_encrypted | 0 | NULL |
| process_action | - | email_provider_id | 0 | NULL |
| process_step | - | process_step_description | 0 | NULL |
| report_parmtr | - | field_width_option | 1 | 1 |
| report_parmtr | - | field_percentage | 0 | NULL |
| report_parmtr | - | form_next_grp_report_parmtr_id | 0 | NULL |
| report_parmtr | - | next_tab_report_parmtr_id | 0 | NULL |
| report_parmtr | - | field_set | 1 | 0 |
| report_parmtr | - | read_only_input_control | 1 | 1 |
| report_variant_parmtr | - | field_width_option | 1 | 1 |
| report_variant_parmtr | - | field_percentage | 0 | NULL |
| report_variant_parmtr | - | form_next_grp_report_parmtr_id | 0 | NULL |
| report_variant_parmtr | - | next_tab_report_parmtr_id | 0 | NULL |
| report_variant_parmtr | - | field_set | 1 | 0 |
| report_variant_parmtr | - | read_only_input_control | 1 | 1 |
| role_tab_prefilter | data_authorization_prefilter | always_on | - | - |
| screen_component | - | use_as_fallback_grp | 0 | NULL |
| sf_oauth_server | - | client_authentication_mode | 1 | 0 |
| tab_prefilter | - | grp_prefilter_allow_multiple_active_prefilters | 0 | NULL |
| tab_prefilter | - | grp_prefilter_filter_mode | 0 | NULL |
| tab_prefilter | grp_prefilter_exclude | - | - | - |
| tab_variant_col | - | field_width_option | 1 | 1 |
| tab_variant_col | - | field_percentage | 0 | NULL |
| tab_variant_col | - | form_next_grp_col_id | 0 | NULL |
| tab_variant_col | - | next_tab_col_id | 0 | NULL |
| tab_variant_col | - | field_set | 1 | 0 |
| tab_variant_col | - | read_only_input_control | 1 | 1 |
| task_parmtr | - | field_width_option | 1 | 1 |
| task_parmtr | - | field_percentage | 0 | NULL |
| task_parmtr | - | form_next_grp_task_parmtr_id | 0 | NULL |
| task_parmtr | - | next_tab_task_parmtr_id | 0 | NULL |
| task_parmtr | - | field_set | 1 | 0 |
| task_parmtr | - | read_only_input_control | 1 | 1 |
| task_variant_parmtr | - | field_width_option | 1 | 1 |
| task_variant_parmtr | - | field_percentage | 0 | NULL |
| task_variant_parmtr | - | form_next_grp_task_parmtr_id | 0 | NULL |
| task_variant_parmtr | - | next_tab_task_parmtr_id | 0 | NULL |
| task_variant_parmtr | - | field_set | 1 | 0 |
| task_variant_parmtr | - | read_only_input_control | 1 | 1 |
| usr_general | - | exclude_from_max_concurrent_sessions | 1 | 0 |